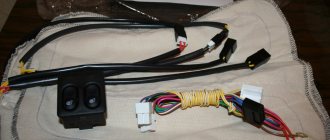
Hi all. Today I’ll tell you how to replace the fuel pump mesh on a Lada Priora
at home. A step-by-step photo report of replacing the fuel pump mesh will help you perform this procedure yourself if the need arises.
Replacing the Priora fuel pump mesh
not much different from replacing the mesh with the one I wrote about here. Symptoms indicating the need to change this grid are the same as for everyone: interruptions in engine operation, jerking while driving, problems with starting, etc.
To replace the fuel pump mesh on a Priora you need to have:
- Head “10”, flat screwdriver;
- Rags;
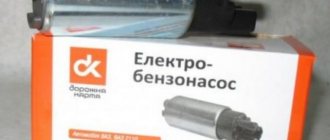
- New fuel pump mesh.
Replacing the fuel pump mesh - step-by-step instructions
Attention!
We will be working with a flammable substance, so first of all, remove any sources of fire. Do not smoke while doing this work! Some, by the way, light a cigarette out of habit while performing such work. As a result, they pay very dearly for their inattention and violation of basic safety precautions.
- Turn off the power or remove the one that controls the fuel pump.
- Start the engine and let it run until it stalls. This way you will remove excess and spill a minimum of gasoline when removing the fuel pump.
- Next you need to remove the rear sofa (seats).
- For “every fireman”, remove the “-” terminal of the battery, gasoline is highly flammable, you never know...
5. Using a vacuum cleaner and a rag, clean the “working area” so that nothing gets into the tank when removing the fuel pump.
6. Place a rag under the fuel hoses and disconnect them from the fuel pump. Be careful, gasoline will spill. The hoses are disconnected by pressing the metal clamp.
8. Remove the metal ring holder.
9. Carefully remove, do not rush and be careful not to accidentally damage the fuel pump float.
10. When the fuel pump is dismantled, it is necessary to disconnect the plastic pipe, after which you can disassemble the pump itself.
11. It is necessary to remove two small retaining rings located on both sides of the guides.
12. Carefully bend the plastic ears holding the glass, after which you will have access to the mesh itself.
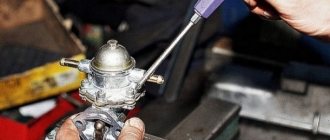
13. To remove the mesh, just carefully pry it off using a flat-head screwdriver.
14. Replace the mesh and reassemble everything in reverse order.
Most of the units and components in cars of the Lada Samara model line can be changed with your own hands. To do this, just stock up on the necessary tools and purchase a new part. This material describes in detail how to replace a VAZ 2110 fuel pump and its filter element - a mesh. The work is quite simple, since installing a new product does not require an inspection hole or a lift. After studying this material, the reader will learn how to change the fuel pump, when it needs to be done and how to determine that the unit has failed. To make sure that the device has failed, you need to measure its pressure - the article contains several ways to perform this action.
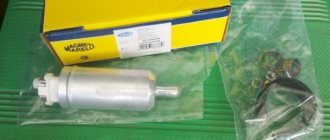
Advice! Many Samara owners install a VAZ 2110 Bosch fuel pump. Despite the higher cost, the imported unit has a long service life, and it is easier to maintain when compared with a standard unit.
Replacing the fuel pump mesh on a Priora, photos and videos, price
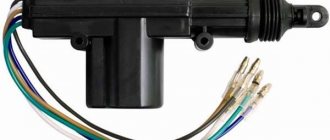
The fuel pump in a car is designed to supply gasoline from the fuel tank to the engine.
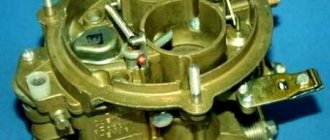
For carburetor cars, mechanical pumps are used. Due to the short distance between the carburetor and the fuel pump, fuel is supplied at low pressure. Cars with an injection-type fuel system are equipped with electric fuel pumps that supply gasoline under high pressure.
The operation of such a pump is controlled by an electronic system that takes into account the throttle position, as well as the air-fuel ratio.
Basic fuel pump malfunctions
The fuel pump in the Prior may operate intermittently due to low-quality fuel. This is due to the fact that a fine fuel filter is installed here after the fuel pump.
At the inlet there is only a filter mesh that performs rough cleaning. The gasoline at some of our gas stations is so dirty that the mesh gets clogged quite quickly. The engine does not start well or stalls during operation.
The car jerks along the way and slowly picks up speed. If the filter mesh is partially clogged with debris, the optimal supply of gasoline to the engine is disrupted in different operating modes. When the pump is unable to maintain the required pressure in the fuel system of 3.7-4.0 atmospheres. improper mixing of air and fuel occurs. As a result, the car loses speed.
In addition, even a well-warmed-up engine after a short stop can then start only after prolonged operation of the starter.
Unstable operation of the power unit is most often a consequence of a faulty fuel pump. First of all, you need to check the pressure level in it.
If after stopping the engine the pressure in the pump drops too quickly, then there is obviously damage to the diaphragm, as well as the sealing gasket. In this case, the gasket should be replaced, and the diaphragm should be reinforced with a special film.
There may also be foreign bodies in the fuel system, in which case the fuel pump must be disassembled and thoroughly washed. To do this, use the following tool:
- flat screwdriver;
- pliers;
- set of open-end wrenches;
- Phillips screwdriver;
- set of heads.
You can do this type of repair yourself in your own garage. Before starting it, you should once again make sure that the fuel pump is not working as it should.
To do this, you need to start the car and pay attention to the idle speed.
If it floats, then this is already one of the arguments in favor of carrying out repair work. In addition, you can go out onto the highway and sharply press the gas at about 3000 rpm. If the car starts to twitch while accelerating, then there is a second argument for making repairs.
Removing and disassembling the fuel pump
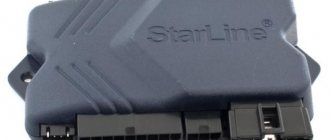
The fuel supply mechanism in the Priora is located in the gas tank, so to get it you need to:
- Remove the rear passenger seat. The latches holding it in place are on the sides.
- There is a hatch in the bottom of the car, secured with two self-tapping screws. Having removed it, we gain access to the fuel pump, which is fixed in the fuel tank with a flat metal ring.
- Remove the ring, which is held in place by nuts screwed onto eight threaded pins spaced evenly around the hole in the gas tank.
- We remove the two fuel hoses and remove the retaining ring.
- We disconnect the electrical connector through which power is supplied to the pump located in the plastic casing.
- We take out the housing; this must be done carefully so as not to damage the float, thanks to which the filling level of the gasoline tank is shown on the instrument panel.
- The next step is to pull out the pump itself, bend the four latches located on the body, and take out the fuel pump, at the bottom of which there is a coarse mesh.
As a rule, the entire mesh looks quite dirty, and its central part is literally clogged with various debris. To remove the old mesh, you just need to grab it on all sides with your fingers and pull it towards you, or pry it with a flat-head screwdriver.
It comes out of its seat relatively easily. After this we install a new mesh. A mesh for the Lada Priora fuel pump can be bought in a specialized store or on the market. It costs about 50 rubles.
There is usually also a lot of debris at the bottom of the plastic cup in which the pump was located. It needs to be rinsed well and wiped with a dry cloth.
Then everything is put together in reverse order. After replacing the mesh, the engine picks up speed smoothly and runs stably. While driving on the highway, the car no longer jerks and accelerates normally.
Pump operation and malfunctions
From the name you can understand that the fuel pump supplies fuel from the tank to the engine injectors. Accordingly, if the unit is faulty, then there will be no gasoline injection, and the power unit will not start working. There are options for injector and carburetor. The VAZ 2110 is equipped with an injector; therefore, the fuel pump must be suitable for this system. If the “ten” was modernized by installing a carburetor, then the unit will have to be taken out of stock. The unit is located in the fuel tank - under the left rear door, the electrics go under the rear row seats.
It is quite simple to understand that there are faults in the pump or its network:
- The car won't start. There are many reasons for this malfunction, but before performing a full diagnosis, you need to check whether the pump mesh is clogged or clogged.
- There are noticeable jerks in first gear. There are also many options here, but one of them is a non-working fuel pump.
Bosch fuel pump performance - from 3 to 3.8 bar
The manufacturer Bosch produces its own fuel pump for each type of fuel system. Why, after the original fuel pump fails, do people install a Bosch fuel pump from a VAZ 2110? How does the pressure and performance of the fuel pump compare with the original one? If you put it with high pressure, will the flow rate increase?
Consumption does not increase due to the performance of the fuel pump, since on cars the return line is activated and excess fuel is returned to the tank, there is also a fuel pressure regulator, from the name it is clear, I think what function it performs.
Consequently, there was a 2.8 bar pump, they installed a Bosch VAZ 2110 fuel pump with 3.8 bar and it will only get better. Fuel consumption may increase if the fuel pump does not create sufficient pressure in the rail and the injectors begin to pour gasoline, which does not burn, rather than spray.
Replacing the pump and its filter
Required Tools
Buying a new unit is only worth checking its pressure and condition of the parts. Replace with a Bosch fuel pump. If a standard unit is selected, then its product number is 2112-1139009. To work you will need the following tools:
- Screwdriver Set.
- Rags.
- Set of wrenches.
- Set of socket heads.
Replacement process
Replacing the filter or the entire unit will take no more than an hour. The work proceeds according to the following scheme:
- First you need to disconnect the negative terminal from the battery;
- Next, you need to dismantle the plastic cover, which is located under the rear row seats;
- Using the key “17”, you should loosen or completely unscrew the hoses, and also turn off the power to the unit;
- The next step is to unscrew the nut. The action must be performed in such a way as not to damage the float. Sometimes a plastic element remains in the tank, which is difficult to remove;
- After this, the filter (mesh) can be dismantled, cleaned and, if necessary, replaced;
- If replacing the “consumables” does not bring the expected results, then it is worth checking the operation of the unit itself and its pressure - a separate paragraph is devoted to this issue;
- The fuel pump is attached to the housing with eight bolts. After this, you can remove the O-ring;
- Now the unit can be removed along with the float and the rubber seal can be removed;
- When installing a new device, you need to make sure that the arrow is directed to the rear of the car;
- Having connected all the lines, the lid can be closed - the replacement is completed.
How to measure the pressure in the fuel system?
The easiest way to measure pressure is with a special device - a pressure gauge. The kit also includes an adapter and drain. Pressure can be determined using an air pressure gauge. This device is present in almost every motorist, as it is used to measure tire pressure. A normally functioning pump in a VAZ 2110 should have a reading of 2.8-3.2 atm. You need to connect the pressure gauge and check what the indicator is with the engine not running, but with the fuel pump on. It must be no lower than 2.8 atm.
As I already wrote, my car is not new, it consumes quite a lot of fuel. And so, on the advice of more experienced colleagues, I decided to replace the fuel pump grid, because according to them, if it is clogged, this has a bad effect on engine performance and consumption, because the fuel pump cannot supply the engine with the required amount of gasoline. After reading the Internet and seeing how people do it, I decided that there was nothing complicated about it and started replacing it.
I purchased two spare fuel pump screens from the online store, everything is as it should be for my EURO-3 car. I even bought a rubber gasket just in case, so that I could change it if the old one suddenly wore out. Those. I felt pretty confident that I had all the spare parts and could easily do the replacement.
In principle, there is a video on YouTube and there are publications on the Internet on a similar topic, but nowhere does it describe how to do everything step by step, so that the most novice can do the replacement of the fuel pump mesh. Also, nowhere is it said about possible problems and difficulties that inevitably occur. That's why I decided to write everything down in as much detail as possible.
The hatch through which we need to gain access to the fuel pump is located exactly under the front right passenger seat. Therefore, it is necessary to remove this seat first. We start by removing the decorative elements of the interior trim under the seat. To do this, you need to carefully remove the pistons that hold the trim elements at the front and rear. The front panel piece can be removed without any problems. But to remove the rear one, you must first remove the seat belt mounting bolt at the bottom. To do this, you need to remove the plastic cover from the head of the bolt and turn it out with a 17mm wrench. When you take out the rear upholstery element from under the chair, its top may rest against a cable wire, which is tied to the chair seat depth adjustment lever. If this happens, you need to remove the element from the front, keeping the adjustment lever pressed all the way (the wire will rise) and pushing the upholstery element back.
Having removed the decorative elements of the upholstery, you need to unscrew the bolts holding the chair itself: two bolts on the front:
and two bolts at the back:
then remove the seat from behind and so that it does not interfere with you, roll it on its side into the passage between the front and rear seats. Now you need to remove the seat frame, which is attached to the floor. To do this, you need to take out the soundproofing mat that lies inside the frame and unscrew the bolts holding it inside on both sides:
and two more bolts in the front, which are hidden behind the felt. And in order to bend the felt, you will have to unscrew the screws from the plastic lining at the threshold that holds the felt:
After this, you remove the frame and in front of you is the cover of a small hatch, which can be removed by unscrewing two screws along the edges. The cover has a rubber gasket at the edges, so you may need to pry it off with a flat screwdriver if the hatch cannot be removed after unscrewing the screws. And here you have a view of the external part of the submersible fuel pump module:
As you can see, three fuel lines enter the module, secured with latches. The arrows indicate the white squares on the sides of the latches that need to be pressed to remove the fuel line. I couldn't get my finger through to press the rightmost latch on the right side, so I did it with a flathead screwdriver. Before removing the fuel lines, it is recommended to relieve the pressure in the fuel supply system (or simply wait a couple of hours after turning off the engine). Disconnect the electrical connector and remove the fuel lines one by one. Some gasoline may spill out of them, so be prepared for this. Prepare some way to mark where each fuel line should be inserted so as not to get confused when you put everything back (for example, take colored markers and paint the white squares of the latches in different colors, and on the submersible module cover itself, circle the same color around the fuel line connector).
After you have disconnected the wires and fuel lines, unscrew all the nuts in a circle, after spraying them with WD to make it easier to turn.
In fact, it is not entirely correct to talk about the fuel pump grid. Correctly speaking - the mesh of the submersible module
fuel pump. The fact is that in the right tank of the UAZ Patriot there is a submersible module, inside of which there is a glass in which the mesh we need is placed, behind which there is an intake hole for the fuel pump, which in turn drives gasoline into the holes going outside, to which the fuel hoses are attached on latches (for some, on fittings). Also attached to the submersible module is a fuel level sensor in the gas tank and a float, which actually activates this sensor.
So, when you unscrew all the nuts and remove the ring holding the module, you need to carefully, without any effort, remove the entire submersible module by pulling it by the cover. You will see a rubber gasket between the outer part of the submersible module and the gas tank - do not remove it separately, take out the module together with it, otherwise you will be tortured to put it back on, but it does not interfere at all. The glass and the sensor float barely fit into the hole, but it’s enough to remove everything without problems.
Unfortunately, I only got a large photo of the outside of the module, where you can see the model numbers and brand:
So I’m providing a photo of the entire module taken from Yandex images
Below you can see the plastic cup I was talking about. You need to remove it and you will see the mesh itself. My mesh was very dirty, and there was a lot of debris in the glass. I removed the trash and washed the glass with gasoline. But the adventures began with the net. I had her planted to death. People wrote on the Internet that they also had difficulty removing it, but I tried my best, but could not remove it. Since I still wanted to change it, I solved the problem radically - I took side cutters and, gradually painting the plastic, tore out the mesh (or rather, what was left of it). Finally a victory, the grid is removed:
But I rejoiced early. Taking in my hands the mesh that I bought in the online store, I tried to install it, but it didn’t work out that way. The mesh didn't fit! Shock! I bought the net specifically for EURO-3, i.e. she must be native! But she still didn’t come. So much for EURO-3 and spare parts compatibility. Here are both grids:
On the right is the one who stood and you see how dirty she is. On the left is the one that should have come up. Now I’ll explain the meaning of the arrows in the previous photo and in this one. You can see how the mesh itself is attached. The mount has these teeth, and in the previous photo there is a certain pin with a circular groove where these teeth go when put on. That's all! It sits tightly, there is no way to tear it out!
So, back to the grids. They seem to have the same dimensions, but it is clearly visible that the attachment point of the left mesh is shifted relative to the attachment location of the right one. And when you try to put this net on, its edge rests against the glass support stand:
And that’s all - you can’t put on a glass! My more experienced colleague argued that in car markets, a fuel pump mesh is a very popular product that everyone has. I took both nets and visited two nearby car markets, but literally one person had the nets and despite the bag of different types of nets that he put in front of me, he didn’t have one that would suit me. So, you should EXACTLY
know what kind of mesh you need and don’t listen to those who say that any mesh will do, even from a Lada.
Won't do!
Tested by my own experience!
As a result, in one of the nearby stores of spare parts for GAZ and UAZ, I found the mesh. It was not the same as it was originally, but the seller assured me that it would definitely fit. I had nowhere to go and having paid 80 rubles (80 in total, not 300) I became the proud owner of this grid:
and despite my fears, it really fit perfectly:
Now that you have firmly inserted the mesh into the mount, put the glass back on and lower the submersible module into the gas tank. We begin reassembly. Make sure you have all the nuts you removed within reach.
The stands of the submersible module are spring-loaded. Therefore, when you straighten the rubber gasket and begin to press the upper part of the submersible module against it, you will feel the resistance of the springs. Be very careful! Make sure that the gasket lies flat, and that the upper part of the submersible module rests strictly vertically on it, without distortions! Then, pressing on the top of the submersible module and holding it tightly pressed against the gasket and gas tank, put the metal ring that you removed onto the studs. It’s not very convenient to do this alone, but I managed. Do not let go of the upper part of the submersible module even for a second - it must be pressed tightly at all times. It is in this position that you begin to tighten the nuts. They need to be twisted crosswise. Those. first the top one, then the bottom one opposite it, then the left one, then the right one opposite it, etc. until all the nuts are tightened with a slight tightness.
Now you can release the upper part of the submersible module, i.e. don't put any more pressure on her. And tighten all the nuts. Be careful not to overdo it. I explain why it was impossible to immediately release the lid and tighten the nuts, or why it was not necessary to tighten the nuts too tightly. There are two reasons for this:
- The submersible module may be skewed, and then no matter how you twist it, gasoline will leak out from under the gasket
- You can tear off the studs and that's even worse. The fastening of the studs, if you haven’t noticed, is spot welded and quite fragile. People got so worked up and tore off the fastening. Then I had to struggle for a long time with different glues, but it’s still not the same.
The fuel pump mesh on the Chevrolet Lacetti, also known as the coarse fuel filter, is an integral and vital part of the car’s fuel system. This device is capable of filtering all small particles of dust, dirt and rust, preventing the possibility of entering and reaching the fuel system line, ensuring smooth engine operation.
The following signs indicate the replacement of the Chevrolet Lacetti fuel pump mesh:
- The engine runs rough;
- Dips when pressing the gas pedal
- Decrease in dynamics;
- The car jerks when accelerating sharply;
The coarse filter must be replaced in a ventilated room or in the open air! The presence of open fire nearby is strictly prohibited. Do not smoke in any way. Required spare parts: FPT05 Coarse filter
Replacing the fuel pump mesh on a Chevrolet Lacetti.
Step 1: Before starting work, relieve the pressure in the fuel rail. . To do this, you need to pull out fuse Ef18 (fuel pump) in the engine compartment. After which you need to start the car and let it stall.
After the seat is removed, you will see the fuel pump plug. This plug sits on bitumen mastic - similar to the one presented in professional vibration isolation. The plug is removed by picking it up with a flat screwdriver - carefully, around the perimeter.
And, pressing the tab of the chip itself, we pull it off the connector.
And we move it to the side, avoiding contact with metal parts of the body.
Step 4: . Disconnect the fuel lines. To do this, you need to squeeze the clip-petal at the bottom of the plastic end of the fuel line with your fingers and pull it up.
Step 5: Remove the fuel pump retaining ring. To do this, you can use a pair of flat screwdrivers (longer and thicker) - rest against the windows of the lock and turn the locking ring counterclockwise. The ring fits very tightly and is difficult to turn.
Step 6: Pull up the fuel pump module, allowing the remaining gasoline to drain into the tank (remember the float when pulling out). At the same time, make sure that not a drop of gasoline gets on the chip with the wires: there is a sensitive rubber seal there, which, upon contact with gasoline, will swell greatly and become unusable!
Step 7: Now we begin to disassemble the fuel pump itself on the Chevrolet Lacetti.
Remove the connector by pulling the latch down.
Step 8: Bend the fasteners (4 of them) around the circumference of the body and carefully pull out the top cover with the terminal and the fuel pump itself from the glass.
Step 9: We pry off the nozzle with a screwdriver, after which it is pulled out well and remove the glass.
Access to the Chevrolet Lacetti fuel pump grid is provided.
Step 10: . After this, inspect the mesh and replace it. Most likely, it won’t even give any light because of the dirt. Even metal contamination is possible. Compare what the new and old meshes look like.
Step 11: Inspect the pump module bowl. Often, it is full of dirt.
Step 12: When installing the new screen on the fuel pump, make sure that it sits completely on the neck of the fuel pump.
Step 13: Assemble everything in reverse order.
When is it necessary to replace the mesh on the fuel pump?
The condition of the unit can be judged by its performance and the pressure developed.
To do this, you need to connect a pressure gauge to the fuel system through a special adapter. Such diagnostics are done at a service station. An easier way to diagnose a fuel pump at home is something like this:
- The ignition is turned on, but it does not work, there is no characteristic hum or it makes a lot of noise, which entails an overload of the unit and shortens its service life.
- The pump performance decreases, which is clearly visible when driving at third and fourth speeds on a flat road. The car does not respond when the driver presses the gas pedal.
- If a VAZ 2112 car “spontaneously” slows down while driving. This most likely indicates that there is a problem with the fuel supply to the gas tank.
- The reasons may be: clogged coarse or fine filters. The fine filter must be replaced, and the coarse filter (mesh) can be washed. But this will only give a temporary effect; after a short period of time, you will still need to replace the fuel pump grid on the VAZ 2112. Any car owner can purchase it at a car store without any problems. The price of the part is small, the DIY process will take a little time, but the reliability of the gas pump will increase for a long time.
Features of fuel filters for the Lada Priora car
VAZ 2170 fuel filters have their own characteristics.
- The coarse filter (FGO) is a fine mesh made of petrol-resistant plastic and capable of trapping solid impurities and dirt larger than 80 microns. It is made in the form of a flattened bag with a pipe in the middle, attached to the fuel pump using a clamp on the fitting.
Fine mesh filters gasoline before it enters the pump - A fine filter (FFO) consists of porous paper assembled into an “accordion” in a cylindrical body made of metal or polyamide. It traps impurity particles 50 microns in size and smaller. For connection to the fuel system, the filter housing has an inlet and outlet fitting with protrusions for clamps.
Fine filter traps small particles of impurities
It is noteworthy that these consumables are suitable for almost all injection VAZ models, from the “ten” to the “Kalina”. Only the latter use plastic clamps to secure the hoses (must be included in the kit), but for the Priora they are not needed.
It is quite difficult to make a mistake when purchasing a coarse filter - it is unified for the entire family of front-wheel drive VAZ models. The original product costs about 50 rubles.
You should not purchase mesh from dubious retail outlets. A fake can quickly fail, clogging the fine filter.
There are a number of things to consider when purchasing FTO.
- you need to make sure that the size of the filter matches the size of the housing and pipes - some foreign cars use very similar filters;
- the fittings must have protrusions for fixing the fuel hoses;
- preference should be given to familiar brands, avoiding Chinese manufacturers.
The size of the fine filter housing is unified for all injection VAZ vehicles
The cylindrical body of the part is held in place by a standard clamp designed for a diameter of 56 mm. The dimensions of the nozzles where the hoses with wire clamps are put on are 8 mm.
The FTO body can be made of metal or black plastic. The manufacturer installs both types of filters on VAZ cars - it doesn’t matter much.
The following fuel filter manufacturers have proven themselves well in the post-Soviet space:
- FILTRON (Poland);
- BOSCH (Germany);
- SCT Germany;
- "Salyut", Samara, Russia;
- UFI (Italy).
The filter housing can be made of metal or black plastic
Among the inexpensive products manufactured in the Russian Federation, we can highlight.
Table: price of fine filters for VAZ 2170
| Company name - |
manufacturer
FTO prices are current as of September 2020.