The driver can do many car-related operations on his own, without resorting to expensive car service services. This also applies to installing a deflector on the hood. So, if you thoroughly understand how to carry it out, the entire installation procedure will take, at most, half an hour. This material, focused on practical assistance to a wide range of motorists, is devoted to the features and subtleties of such an installation.
Installing a deflector on a car hood.
Why do you need a hood deflector?
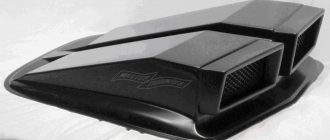
You should start with the main thing, namely, what is the functional purpose of car deflectors and why is a hood deflector needed. Despite its unsightly appearance, such a “fly swatter” on the hood, as it is correctly called, plays a significant role, performing in practice the function of a hood protector. This accessory prevents small stones and other foreign objects from getting into the hood from the outside, that is, it reliably protects the car from all kinds of scratches, chips, and other similar defects. In addition, he simultaneously plays the role of a kind of orderly, from early spring to late autumn clearly protecting the car from stains - the result of crashed midges. This is where its second, “lyrical” name “fly swatter” came from in driver’s usage. The combination of these two protective functions has earned it such wide popularity in the automotive world - many domestic and foreign cars are equipped with a variety of deflectors.
How to attach a fly swatter to the hood of a VAZ 2110
Video on how to attach a fly swatter to the hood of a VAZ 2110 - we care, we will find an answer to your request. Do-it-yourself car repair is a site that is designed to help car owners in this difficult task. How to repair a car yourself at home. We will help you with repairs and repair the car yourself. We know how to restore a car with minimal investment. I have attached video instructions.
Views: 306841
Category: Make a car yourself
Laughter in the topic: A woman with her lover in bed. Lover: - Your husband is constantly walking around with a rifle, if he catches us, he will definitely shoot me. - Don’t worry, I replaced all five cartridges in the clip with blanks. At this moment, the husband comes in, the lover rushes to the window, the husband shoots and kills him on the spot. A little surprised: “And I thought that I was no good as a shooter, I just couldn’t hit a huge elk five times while hunting from seven meters.”
Published by Admin: at the request of Nikitaa
Review from a car owner: I like everything, the ergonomics are on point. The suspension is energy-intensive. Predictable behavior on the road. Great crossover! Automatic transmission without any complaints, proven unit. Availability of SYNC system. I was pleased with the very fast defrosting of the glass. Driving on the highway is simply relaxing.
Video: how to attach a fly swatter to the hood of a VAZ 2110
How does it work
Drivers are wondering if a deflector is needed. This question has long become rhetorical. The benefits of it on any trip are undeniable. So, if you attach it to the hood, its body will be a constant barrier to the path of hard stones, objects, sand, other particles, as well as various insects flying into the “face” of the car. Such “bombing” is often fraught with hard contact with the varnish and its damage. The deflector will absorb their forceful blows, which can sometimes be quite impressive in strength and speed. As a kind of “wing”, it will also correct the trajectory of the oncoming air flow directed into the car, throwing away a trail of all kinds of midges from the hood and windshield. And this is a guaranteed basis that sensitive and very vulnerable to external interference parts of the car, especially the front of the hood, will not be subject to any unwanted contacts and will retain their attractive appearance.
Advantages and disadvantages of the “fly swatter”
It is necessary to be completely frank - deflectors have both pros and cons. Their advantages, due to which such accessories are now installed on so many cars both in our country and abroad, were mentioned earlier. Among the disadvantages of these accessories, experts and users of deflectors note, first of all, the indisputable fact that they significantly change the external, “native” appearance of the car, transform it aesthetically, giving it a new, sometimes unusual appearance to the eye.
But if this drawback is, so to speak, purely virtual, since you can always find something attractive in a new type of car, then the situation is much more serious if the deflector is installed incorrectly. For example, other inexperienced motorists, blinded by the desire to install the coveted “fly swatters,” purchase mounts that are mounted with through bolts or glued tightly. The first option is the most unsuitable, since its use leaves holes, and this is unacceptable for the hood. And the second one is very undesirable, because traces of super-strong glue on the hood will certainly remain. That is, the disadvantages of the deflector are mainly associated with the wrong choice and ill-considered installation of “fly swatters”, ultimately negatively affecting the “longevity” and appearance of the car.
Hood deflector. "Fly swatter." Installation — Lada Priora Sedan, 1.6 l., 2007 on DRIVE2
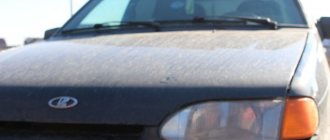
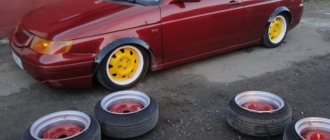
Priors have such a problem as chips on the front bumper and hood. The designers changed the appearance of the VAZ 2110, but they forgot about the air flows of the headwind, which changed their direction with restyling. If you notice, for example, on dozens, such chips accumulate quite slowly. But we’re not talking about that... When I bought the car, I naturally noticed small chips before the primer, since the paint is dark, these chips are clearly visible in the light. Just three days ago we decided to paint the bumper, there were too many chips. Even though I never ride behind anyone and drive quite carefully on gravel roads, chips have appeared, and there are many more than when I bought it. I took it to a specialist, painted it, and I’m very pleased with the result. Photo below. I read a lot of forums about hood deflectors, the pros and cons. The cost is small, it’s not torture to try, I decided to check it out. I bought a fly swatter, came home and had a question about installation. Naturally, I wasn’t going to drill anything because of this thing. The entire deflector at the points of contact with the hood is equipped with double technical tape and four metal fasteners. We did not use two fasteners; we only needed to drill there. They secured it to two side ones. The contact points between the fastener and the hood were sealed with duct tape, it holds tightly. I went out on the highway specifically, accelerated to 150 km/h against the wind, and took it for a test drive. The deflector did not fall off))) I will monitor the appearance of chipped points, I will write a review about the benefits or harm later, but now take a photo)
Be polite on the roads.
Issue price: 320 ₽
Choosing the right deflector
When choosing a deflector, the key should be a very important practical issue, not just their appearance and cost, but also the installation method. In the previous section it was already noted that it is undesirable for the crane to buy such fasteners that require bolted connections using through holes, as well as leaving “eternal” traces of powerful gluing. It is much more expedient and practical to choose such fastenings that use a harmless version of clip-on brackets. An equally suitable and safe option for the car is screwing it using standard technological holes, if the car has them.
Rules for installing a fly swatter
To figure out how to install the deflector on the hood, you should carefully study the installation instructions. Especially if you choose the optimal option for fastenings-clips, which are not particularly difficult to attach. Their advantage is that such assistants are put on the hood edge like clothespins, without damaging the surface of the hood itself. The installation algorithm is as follows:
- First, the hood is thoroughly washed and dried so that it is as clean as possible;
- They make a fitting of the deflector to the hood;
- The brackets are attached to the deflector and the fitting is repeated, lightly marking with a marker the places where it is desirable to install them;
- Remove the brackets and install them on the hood edge;
- And as a finale, the “fly swatter” itself is attached to them.
There are also options for mounting deflectors without brackets. Especially for new cars. Thus, in the modern automobile market, for a number of models, special deflectors are provided that allow them to be mounted through the holes of the “native” rubber seal, that is, without changing the design of the hood itself. In this case, installation is also very simple, namely, each of the fastening elements must be secured with its petals through the holes of the rubber hood seal. And with their help the deflector is mounted.
How to install a deflector on the hood with your own hands without damaging the varnish
The trend that has become fashionable to go to a car service center for every minor issue has no logical basis. With the question of how to install a deflector on the hood, there is absolutely no need to seek advice from specialists and spend money on it. This procedure is quite within the capabilities of any car enthusiast. To do this, you just need to choose the right “fly swatter”, study the instructions in detail, and spend literally 10-15 minutes on installation.
Buy deflectors - money well spent
Deflectors on a car, whether they are on the hood, doors or for the hatch, of course, immediately change its appearance. A tuning kit from a well-known manufacturer cannot fail to make changes to the exterior. The main task of glossy plates is to protect the car. The front part of the hood, the false radiator grille and the bumper are the most vulnerable places for sand, stones, and insects that mercilessly bomb the paintwork while driving. What does a fly swatter do:
- is a physical obstacle that repels flying solid particles;
- changes the air flow path, which removes flying debris from the hood and windshield.
The secret to success when choosing the right fly swatter
Correct and accurate installation of the hood deflector largely depends on how the selection was made. Deflectors are exclusively model accessories, that is, you need to buy products exclusively intended for a specific car model. Next, you should understand the installation methods. The following types of fastenings can be found on sale:
- fastening with bolts through through holes;
- gluing with elastic bands;
- installation via clip-on brackets;
- screwing into standard technological holes.
The first two options should be discarded immediately, as they completely kill the paintwork on the hood. If you ever have to remove the deflector, then in the most visible place there will be holes or glue residues with rubber bands, which are almost impossible to wash off. Two others deserve attention.
How to install a deflector on a hood with clip fastenings
One of the easiest ways to secure a “fly swatter” is to use so-called clip fastenings. Their peculiarity is that they are put on the edge of the hood like clothespins. Having soft cushioning material inside, they spare the paint. Installation is done as follows:
- the car hood is washed and dried;
- the deflector is removed from the packaging and fitted to the hood;
- Next, you should secure the brackets to the deflector and repeat the fitting, marking the location of their installation on the hood with a marker;
- Having removed the brackets, you should now install them on the edge of the hood;
- the deflector is installed and screwed to the brackets;
- the brackets are secured with screws to the hood frame from the inside (if provided for by the design).
How to install a hood deflector without brackets
Manufacturers of tuning elements began to produce deflectors that do not have brackets at all. This is especially true for new car models. The deflector has three curved petals in the lower front part, the holes on which exactly coincide with the holes for attaching the rubber seal on the front edge of the hood. Installation in this case becomes even easier:
- Having opened the hood, you need to unfasten and remove the plastic fasteners from the holes in the projection of the deflector petals;
- plastic fasteners should be inserted into the holes;
- the deflector is put on the protrusions of plastic fasteners and fixed with screws;
- thanks to the oval shape of the holes in the plates, you can move the entire structure relative to the hood line for precise alignment;
- the screws are tightened.
Tips to help a novice car enthusiast
The main element of the kit when purchasing a “fly swatter” is not the plastic wing, not the mounting kit, but the instructions for installing the hood deflector. Even before the money is transferred to the seller in the auto shop for the deflector you like, you should definitely make sure that the instructions are available and read them. The installation should also be carried out in strict accordance with the sequence and recommendations specified in it.
Another reliable assistant for the modern car enthusiast is the Internet. An incredible amount of video material has been filmed on how to install the deflector on the hood. As a rule, you can find videos that are dedicated to a specific car model and the available deflector.
source