Today the topic of our post is called a small homemade starting device for starting a car, namely a starting device, not a charger, since we have many articles on this site about car chargers and how to charge. Therefore, today we are exclusively talking about a homemade battery starter.
So, what is a starting device for a car in general, in our case for the Hyundai Santa Fe, but this is not particularly important for which car, the capacity of the battery through which this starting device will start the engine is more important.
DIY car starter diagram
In this article we will look at the simplest diagram of a starting device for a car with our own hands, because most people do not have the knowledge in circuit design and electronics to create complex starting devices, and it is not always profitable to purchase a lot of parts for homemade products, which can sometimes come out as budget ready-made starting device for a car from the store.
So, in our case, for the launcher, we do not intend to purchase an expensive high-capacity portable battery, otherwise the device will immediately turn from a budget device into a very expensive one.
We will be making a starting device for a car from a 220V network, for this we will need a powerful transformer, preferably with a power of at least 500 Watt, and preferably 800 Watt, ideally 1.2-1.4 kilowatts = 1400 Watts. Since when starting the engine, the first impulse given by the battery to crank the crankshaft = 200 Amperes and the consumption of the starter is approximately 100 Amperes, and when our 100A device is combined with the battery, they will just give out 200A at the start and then our starter will help maintain the current strength of 100 Amperes for normal starting and operation starter until the engine starts completely.
This is what a DIY car starter diagram looks like, photo below
Transformer for car starter
To create such a starting device from a transformer-type network, you need to rewind the transformer itself.
We will need:
- Transformer core
- Copper wire 1.5mm-2mm
- Copper wire 10mm
- Two powerful diodes like on welding machines
- Alligator clips for ease of use and connecting the starter wires to the car battery, very preferably copper, as they have high conductivity, and thick, at least 2 mm thick
We actually begin the process of making a portable starting device for a car with our own hands
To do this, you need to make the primary winding of the transformer with copper wire in insulation with a diameter of at least 1.5-2 mm, the number of turns will be approximately 260-300.
After you wind this wire onto the transformer core, you need to measure the current and voltage produced at the output of these windings, it should be in the range of 220-400 mA.
If you get less, then unwind a few turns of the winding, and if you get more, then on the contrary, wind it up.
Now you need to wind the secondary winding of the transformer of the starting charger. It is advisable to wind it with a multi-core cable with a thickness of at least 10mm, as a rule, the secondary winding contains 13-15 turns, at the output when measuring on the secondary winding you should get 13-14 volts, and as you understand, the voltage has become small, 13 volts in total, but the power the current flowing through it increased to approximately 100 Amperes, but was only 220-400 milliamps, that is, the current increased by approximately 300-400 times, and the voltage decreased by approximately 15 times.
For a battery, both are important, but in this case the key role is played by the current strength.
Calculation example
To properly manufacture a ROM, you need to calculate it. The transformer type of device is taken as the basis. The battery current in the starting mode is Ist = 3 * Sb (Sb is the battery capacity in A*h). The operating U on the “bank” is 1.74 - 1.77 V, therefore, for 6 banks: Ub = 6 * 1.76 = 10.56 V. To calculate the power consumed by the starter, for example, for 6ST-60 with a capacitor at 60 A: Рс = Ub * I = Ub * 3 * C = 10.56 * 3 * 60 = 1,900.8 W. If you assemble the device using these parameters, you get the following:
- The work is carried out together with a standard battery.
- To start, you need to recharge the battery for 12 - 25 seconds.
- The starter spins with this device for 4 - 6 seconds. If the launch fails, you will have to repeat the procedure again. This process has a negative impact on the starter (the windings heat up significantly) and the service life of the battery.
This is interesting: 6 sets of homemade ATVs: we assemble the quad with our own hands
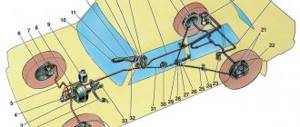
The device should be much more powerful (Figure 1), since the transformer current is in the range of 17 - 22 A. With such consumption, U drops by 13 - 25 V, therefore, the network U = 200 V, and not 220 V.
Figure 2 - Schematic representation of the ROM.
The electrical circuit consists of a powerful transformer and a rectifier.
Based on new calculations, the ROM requires a transformer with a power of about 4 kW. With this power, the crankshaft rotation speed is ensured:
- carburetor: 35 - 55 rpm;
- diesel: 75 - 135 rpm.
To make a step-down transformer, it is advisable to use a toroidal core from an old powerful high-power electric motor. The current density in transformer windings is approximately 4 - 6 A/sq. mm. The area of the core (iron ore) is calculated by the formula: Str = a * b = 20 * 135 = 2,700 sq. mm. If another magnetic circuit is used as a basis, then you need to find examples on the Internet of calculating a transformer with this form of iron ore. To calculate the number of turns:
- T = 30/Str.
- For winding I: n1 = 220 * T = 220 * 30/27 = 244. Winded with wire with a diameter of 2.21 mm.
- For II: W2 = W3 = 16 * T = 16 * 30/27 = 18 turns of aluminum bar with S = 36 sq. mm.
After winding the transformer, you need to turn it on and measure the no-load current. Its value should be less than 3.2 A. When winding, you need to evenly distribute the turns over the area of the coil frame. If the no-load current is higher than the required value, then remove or rewind the turns on winding I. Attention: Winding II must not be touched, as this will lead to a decrease in the efficiency of the transformer.
The switch should be selected with built-in thermal protection; use only diodes rated for a current of 25 - 50 A. All connections and wires should be laid carefully. Wires should be used of a minimum length and stranded copper with a cross-section of over 100 square meters. mm. The length of the wire matters, since it may have U losses of about 2 - 3 V when the starter starts. Make the connector with the starter quick-release. In addition, in order not to confuse the polarity, you need to mark the wires (“+” is red insulating tape, and “-” is blue).
The ROM should start for 5 - 10 seconds. If powerful starters (over 2 kW) are used, then single-phase power supply will not be suitable. In this case, you need to modify the ROM for the three-phase version. In addition, it is possible to use ready-made transformers, but they must be quite powerful. Detailed calculations of a three-phase transformer can be found in reference books or on the Internet.
Winding explanations
If you cannot achieve a voltage of 13-14 volts, then simply wind 10 turns on the secondary winding, measure the voltage, now divide this voltage by the number of turns in our case 10 and get the voltage of one turn, and then simply multiply how many turns are needed to achieve 13-14 volts at the output of the secondary winding of a transformer homemade starting device.
For clarity, let's look at an example:
WE wound the secondary winding with 10 turns, we measure the voltage with a multimeter, for example, we got 20 volts, but we need about 13.
This means that we take our voltage of 20 volts and divide by the number of wound turns 10 = 20/10 = 2, the number 2 is 2 volts and gives us the voltage of one turn, which means how can we achieve 13-14 volts knowing that one turn produced 2 volts.
We take the value of the voltage we need, let it be 14 volts, and divide it by the voltage of one turn 2 volts, = 14/2 = 7, the number 7 is the number of turns on the secondary winding of the car charger necessary to achieve 14 volts of output voltage.
Now let's all wind our 7 turns. And to the outputs of these turns, according to the diagram of the starting device for a car with your own hands, which is located above, we connect our diodes, some car enthusiasts also use a circuit with one diode and one 12V 60-100 watt lamp, as in the photo below
How to assemble a starter-charger with your own hands (step-by-step instructions)
Universal instructions for assembling a ROM with your own hands:
- The assembly can be carried out on different bases, but it is better to choose a textolite plate on which the transformer assembly is fixed. It is installed first because it is the largest component of the ROM.
- Fixing parts and passing electrical lines on the plate is done by drilling holes of appropriate sizes.
- Transformers, resistors, transistors and other components are installed on the board. Their presence is determined by the specific scheme. Fixation is carried out depending on the type of component - using self-tapping screws, glue or soldering. All parts are soldered together using a tin alloy.
- When the device circuit includes rectifying diode elements, a cooling system will be required. It is possible to use special metal jackets. If they are not enough for high-quality cooling, the circuit can be supplemented with fans from desktop computers.
It is necessary to consider heat-removing blinds on the body; this will be required for heat removal. The case may not be used, but its presence will protect the device from various external influences.
How to assemble a 6 V device yourself?
For assembly you will need a transformer device; the best option is to use a separating mechanism. The electric coil will be mounted on the top of the transformer. To prevent accelerated winding output when using ROM, the consumer must make the basis for the device in advance.
Metal or wooden plates or a box are used as the base material:
- If metal is preferred, then assembly will require a welding machine. Separate attention should be paid to the isolation of the ROM, otherwise its use may lead to injury to the consumer.
- When wood is preferred, you should choose a box of the right size. The top part will be removable; the consumer should be able to dismantle it. If it is necessary to supplement the ROM with a power control device, the mechanism is mounted in the upper part of the device.
How to make a 10V charger?
To assemble a 10-volt starting charger, you need to select the device body. It can be made of wood, but during installation it is important to take into account the dimensions of the transformer device. If you give preference to analog mechanisms, then the foundation must be made strong. 10-volt models are equipped with a more powerful transformer, so handles are installed on the device body, in its upper part, for easy transportation. The transformer assembly itself is mounted in the center of the housing, and then the damper is installed.
The operating parameter of the ROM will be at least 4 Ah. The device must be able to charge a battery with a capacity of no more than 100 Ah. To diagnose operation, the device is additionally equipped with an ammeter.
In order to minimize the likelihood of overloads, isolation transformer mechanisms can be used. Installation of regulatory devices in such models is optional.
Adding zener diodes is possible, but these elements will be analog, digital parts are not used. The use of multi-channel devices will ultimately lead to overload, which will cause a malfunction of the secondary winding of the transformer mechanism. When selecting transistor elements, preference is given to parts with a maximum load parameter of about 3 amperes.
Circuit for assembling a 10-volt ROM
When the consumer prefers a linear resonant ROM, the minimum output voltage parameter will be about 10 volts. And the vector frequency will be approximately 44 Hz. To assemble the mechanism you will need an expansion device.
Some experts recommend assembling capacitor-free devices, but then the load level on the transistor elements will be higher.
When installing clamps, it is better to give preference to aluminum elements, since they are minimally susceptible to the negative effects of corrosion.
Assembling 12 V models
Assembly of the 12-volt ROM is done using electrostatic capacitor devices; these parts are not difficult to find. A platform is used to create the device. When installing the transformer mechanism, a sealant is installed on the platform, only then can the inductor be mounted. It is better to purchase it complete with the primary winding. For installation, it is recommended to use open-type capacitor elements with the ability to withstand about 20 volts of output voltage.
The expansion elements are installed last; the consumer must first fix the damper. It is possible to add regulatory parts to the circuit, which are used to control the amount of power. When regulators are used, the circuit must be supplemented with a powerful power supply. Installation of a power supply is permitted only together with a zener diode.
For high-quality fastening of the clamps to the body, the use of welding equipment is allowed. When all assembly steps are completed, the damper is fixed. The installation of this unit is done next to the transformer device. Before using the ROM, it must be checked for grounding.
SadnessMan talked about the procedure for assembling a 12-volt ROM for the car's battery.
Single-phase modifications
To develop a single-phase ROM, you will need an integrated transformer device.
Assembly features of single-phase devices:
- Assembly of single-phase modifications involves the use of welding machines and soldering irons. You will also need plumbing tools, in particular a set of wrenches.
- The ROM body is made of metal sheets, the thickness of which is at least 1.4 mm. Fixing the body parts is done using bolts.
- A rubberized seal must be installed on the bottom of the housing.
- After installing the sealing component, the transformer device is mounted. Its fastening is carried out using special U-shaped inserts. Wooden boards are used as stops; each width is approximately 3.5 cm. To attach the stop, the body is measured.
- Assembly of a single-phase modification ROM involves the use of damper devices; the use of resonant parts is allowed. The dampers can withstand about 20 volts of voltage.
- When capacitor elements are added to the circuit, only open plan devices can be used. Such parts have the ability to support frequencies of about 45 Hz.
- When the assembly steps are completed, the power supply is fixed and the cables with clamps for connection to the battery are secured.