DIY reverse hammer
Any type of body work is expensive and requires special skills and tools. However, you can save on buying some by building them yourself. For example, you can make a reverse hammer with your own hands in an hour. This will allow you to independently carry out and control the process of leveling dents on the body in hard-to-reach places.
Using a Reverse Hammer
When studying information on how to use a reverse hammer, it is worth considering the type of tool and the degree of deformation of the body. In almost all cases, the recommendations for use are the same. Only small details differ. In some cases, the necessary work can be done without treating the surface, sometimes it needs to be degreased, and sometimes completely cleaned of the paint coating.
Working with a reverse hammer requires some skill. If you don’t have enough experience in using it, it’s better to practice on some sheet of metal of similar thickness and strength to a car body. If the damage to the housing is too complex, it is better to entrust its removal to an experienced specialist.
Reverse hammer device
There are several options for the reverse hammer structure:
- vacuum;
- with pneumatic pulling mechanism;
- devices with multiple weights;
- models with an adhesive base or replaceable nozzles.
The first of the presented types has a unique advantage over similar devices. The vacuum suction cup allows you to carry out repair work without damaging the paintwork. Depending on the power of the vacuum reverse hammer, it is possible to pull out small and medium-sized damage on various parts of the body. However, when working, it is necessary to follow a special technology: pulling should be done from the edge of the damage to its center. Otherwise, a dangerous stress for the metal arises, which can lead to fracture or unpredictable deformation.
Pneumatic reverse hammers are convenient because they require reduced effort when performing work. Another area where this tool is indispensable is work under the hood, including removing stuck parts.
A homemade reverse hammer can be built from the simplest components:
- a metal rod of suitable thickness and about half a meter long;
- steel washers of the appropriate diameter for installing stops;
- weights to increase impact force;
- rubber handle (can be replaced with any other convenient material);
- a hook or a metal plate with a holder - depending on the design of the intended hammer.
The condition of all components determines whether grinding and cleaning of metal parts will be necessary. To do this, you can use sandpaper or a metal grinding disc, and special compounds can also be useful. The design features will determine whether a welding machine is needed or only a thread cutting device is required. However, most often it is impossible to do without welding, since it is better to secure the lock washers to the rod of the reverse hammer using a reliable seam.
Vacuum return hammer
There is a separate type of device - a vacuum hammer. Vacuum straightening of a car body has its own peculiarity, thanks to which it is possible to put in order a fairly large damaged surface of the car.
Its advantage is that it has a vacuum suction cup, thanks to which there is no need to remove a thick layer of paintwork before starting body repairs. Also, compared to conventional tools, there will be no need to drill or weld staples in the area to be repaired. In this case, caps of different configurations and shapes are used. Using a vacuum suction cup, the material is well held when leveling the dent. Working with a vacuum tool will reduce work time and labor costs.
Vacuum straightening of the body is carried out as follows:
- First, the area to be leveled is cleared of fat and warmed up;
- The dent in the center and edges is glued with glue pins of the required size. The pistons are engaged with a vacuum hammer, and the impact on the surface is quite accurate;
- Repeat the previous two steps in turn until the surface of the body takes on its normal shape;
- At the end, after leveling, it is well worked out using a mini-lifter, which comes complete with pistons.
Despite the obvious advantages of vacuum extraction over conventional leveling, this method of body straightening also has its disadvantages. It will not be possible to completely remove the defect . Moreover, if there were cracks in the damaged area, then you risk damaging it even more. Accordingly, you need to be careful when choosing a straightening method, as well as choose the right tools for the job.
As you can see, a reverse hammer is an indispensable tool for body straightening work. It has many disadvantages, which we discussed above. But despite this, only with its help can you get rid of dents in hard-to-reach places. Therefore, it must be present in the arsenal of tools of every automobile mechanic.
Device design
You can find drawings of a reverse hammer for body repair on numerous websites. But before designing, it is important to decide on the purposes for which the tool will be used. It is possible to make a reverse hammer for straightening with your own hands in half an hour, but you need to choose a pattern in advance. It is easiest to assemble a model with an adhesive base or with replaceable threaded hooks.
The first step is to decide on the size of the hammer. Typically, a length of 50 cm is sufficient to ensure long-lasting performance and comfort, but this number can be reduced depending on individual needs or the availability of the necessary materials.
The second stage is a clear drawing, in which every detail is carefully drawn. Thanks to this, the number of component parts and the degree of their readiness for assembly becomes clear. Most often, it is at this moment that you can think over and make pulling hooks of various sizes in advance. Since a reverse hammer can be made with one or more weights, such a variety of attachments will allow you to work with dents of varying severity. For example, in case of specific damage, it is possible to weld several loops on one straight line and then thread a pin through them to pull them out with one plane.
This method will not work for every dent, but it can reduce the resulting deformation forces in the metal, which allows you to get the job done faster and with minimal damage.
Reverse hammer for body repair: step-by-step instructions
The process of manufacturing a reverse hammer begins with the preparation of the material. A metal rod 12 mm thick and 50 centimeters long will be used as a handle.
1. Making a movable “weight”
The weight for the reverse hammer is made of a rod with a diameter of 16 mm. The rod is cut into 5 even pieces, the length of which is 12-16 centimeters. The rods are secured to the main handle using electrical tape, and then they are welded together using a longitudinal welding seam. It is important to consider the absence of weld slag on the surface of the handle.
2. Tapping the top of the recoil hammer handle
The thread is cut for a long nut about 2-3 centimeters along the rod. This procedure should be carried out taking into account all angles, as this determines how strong the reverse straightening hammer will be.
3. Making bent hooks for a reverse hammer
These hooks are necessary for aligning parts in different planes. The production of elements is carried out individually depending on the needs of the user. The bending procedure is carried out using a sledgehammer and a stop.
4. Threading metal hooks
The threads are also cut on the finished hooks for the reverse hammer in order to use a long nut to connect the two elements necessary for the operation of this tool. The cutting must occur at an even angle so that the two connected parts are without distortions, otherwise the hook may break off the thread during the working process.
5. Installing lock washers on the handle
To obtain a high-quality universal return hammer, it is necessary to make reliable lock washers. These elements take most of the load during impacts, so their installation must be carried out taking into account all angles. A thread is cut at the end of the handle onto which a nut and washer are then screwed. Before installing the washer, a rubber handle made of electrical tape or rubber hose is mounted.
6. Checking the functionality of the reverse hammer assembly
The completed return hammer should work without jamming or any difficulties. All mechanisms move smoothly.
The threads on the hooks and lock nut must be lubricated to preserve the knot mechanism.
Video: how to make a reverse hammer with your own hands?
Manufacturing algorithm
When the model of the future product is selected, you need to consider the sequence of how to make a reverse hammer with your own hands. First you need to prepare all the components of the future mechanism. The first step is cleaning and polishing. This must be done for better sliding of the load along the base of the hammer. After this, the components are prepared. In a tool with a hook, a nozzle of the required size and diameter is made. If you choose a reverse hammer project with an adhesive base, it is assembled from available materials.
An interesting addition: if you don’t have a suitable weight at hand, you can build a reverse hammer weight with your own hands. To do this, you need to cut the scrap into parts of the same length and secure them with electrical tape around the rod, and use welding to connect the resulting result. It is important to remember that movement along the entire length should occur freely, so there is no need to make welds inside.
You need to select an iron rod that will be 3-4 cm thicker than the base of the reverse hammer and saw off a part 5-7 cm long. A hole is drilled inside to suit the thickness of the rod. The thread is cut inside at a right angle so that the plate welded further is strictly perpendicular to the working handle. This area must be well sanded and cleaned, and an artificial ribbed texture is created on the outside so that the sticky base interacts better with it.
Homemade Velcro backhammer sealant can be made from a variety of materials. The adhesive composition must meet several characteristics:
- it should not leave marks on the car’s paintwork;
- its degree of interaction with the surface must ensure reliable adhesion;
- the composition must be sufficiently elastic.
Self-production
Making a reverse hammer at home with your own hands is quite simple. It does not take much time and does not require special materials and tools. For a clearer understanding, you can watch a video on the Internet. A primitive drawing will also not be superfluous.
To make this tool with your own hands you will need the following:
- metal pin about 50 cm and 20 mm in diameter;
- a load that has an internal opening;
- thread cutting tool (optional);
- welding machine;
- Bulgarian.
If you decide to make a reverse hammer with a hook type of fastening, then a hook is made at the end of the pin. This can be done using a vice or pliers. Or use a welding machine to weld a ready-made hook from another device.
If the tool is made with a threaded grip, then the end of the pin is threaded with the appropriate tool. You should not cut a lot of threads, since the metal of the body is quite thin.
After making the tip, a weight is put on the pin, which is limited on the back side of the tool. This can be done by welding, or using a threaded stop. The second method is more advantageous, since it will allow you to use weights of different weights depending on the required force at the end of the reverse hammer.
How to turn an old shock absorber into a reverse hammer yourself?
First of all, the dismantled spare part must be properly disassembled. If the shock absorber is removed from the VAZ car, further work will not be too difficult. Of course, you will also need standard tools that are usually equipped in the garage of a car enthusiast who prefers independent maintenance and repair: a vice, an angle grinder, a manual welding machine, a gas torch or a crucible (for melting lead).
Instructions
To convert an old shock absorber into a useful tool, you will need a shock absorber top and rod.
Take care in advance of a container to drain any oil that spills from the cut.
- The stand must be clamped in a bench vice and carefully cut with a hand grinder to the plate with the spring installed, without catching the rod. All fasteners and parts of the strut must be disassembled and removed, and the oil seal and bushing must be removed from the upper shock absorber cover.
- To assemble a full-fledged and functional reverse hammer, all that remains is to mount a handle, a movable weight and attachments on the shock-absorbing rod.
- If you have parts of the handle of an old hammer drill or hand drill in your garage, this is a great success; if not, you can attach to the rod any handle-like clamp that can cope with the task and is comfortable for your hands.
- The handle clamp is attached to the part where the threaded connection is located on the rod. Screw on two nuts as bushings and weld securely. The top cap of the rod is put on from the opposite end and is also welded to the nuts. Irregularities, drops and sagging from welding can be ground off with a grinder, and then the handle-clamp can be screwed on.
An alternative option is to weld a washer of suitable diameter to the rod at a distance of the width of your palm from the edge, cover the handle with a fuel hose against slipping and secure it to the thread with a small washer and nut.
- To make a movable weight, you can use the cut off upper part of the rack. In addition, it is necessary to select a pipe of the required diameter: so that it slides freely along the rod and fits into the prepared cylinder from the shock absorber strut, leaving free space inside.
- The inner and outer parts of the future weight must be centered with nuts or washers, and one of the ends must be welded so that the pipe hole remains open. The gap between the parts is filled with molten lead or zinc, for example, from an old battery or carburetor, to add weight to the blank. Before pouring the molten composition, the body of the weight must also be heated with a burner.
- After the metal has cooled, the resulting bumper weight is cleaned with a grinder to give it a neat appearance and remove excess drops from welding, and installed on the rod.
- To use the full potential of the reverse hammer and use it for various jobs, make attachments that screw onto the free end of the rod: bolt hooks, head attachments, etc. To straighten simple dents on a car body, a reverse hammer can be used in conjunction with search magnets, which can be purchased in specialized stores.
Who did it? Share in the comments the problems you encountered.
Varieties
There are four types of reverse hammer for body repair:
- The vacuum reverse hammer is the most versatile, at the same time the most expensive. It is attached to the metal using a suction cup, the vacuum in which is created by a compressor. To work with dents of various sizes, manufacturers equip the tool with suction cups of several sizes. The quality of vacuum fixation is not inferior to that of other types of fasteners. This model can be attached to various surfaces, regardless of curvature, the presence of paint or any contamination.
- On a glued suction cup – they are made with a rubber suction cup, which is attached to the surface with glue. After the glue has dried, the pin is glued to the nozzle with a threaded fastener. The dent is then pulled out in the usual manner. Then the pin is unscrewed, and the attachments are removed by heating the glue with a hair dryer. Residues of glue are removed with solvent. The disadvantage of this type is that it is almost impossible to work with it in winter, since the glue does not set. Please note that the solvent is designed specifically for this type of glue and will not affect the car’s painting.
- With welding fixation - this type used to be the most common, but due to a large number of disadvantages and limitations, such hammers are used much less frequently. To use it, you need to weld a nut to the body into which the tool pin is screwed. The work surface must first be cleared of primer paint so that exposed metal is accessible. The nut is welded using spot welding. After straightening, the nut is cut off, the welding area is cleaned and painted. Due to its great complexity, this type of instrument is used only in very complex cases.
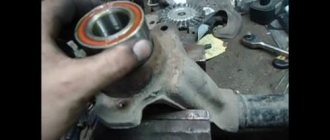
- Mechanical hammer - has a classic design, differs only in the type of fastener. Usually hooks and clips are used. It is used only in cases where there is a mounting point on the body. In some cases, a hole may be made in the housing, which is welded after the work is completed. Very often, mechanical hammers are used to dismantle bearings when there is no access to their reverse side. In this case, the bearing remains intact.
Read also: Welding equipment for argon arc welding
Do-it-yourself reverse hammer: mechanical and pneumatic
The impact impulse of a simple hammer is directed inside the struck surface, as a result of which it is deformed. In a reverse hammer, the direction of the impulse is opposite, making it possible to eliminate the deformation. The device is widely used in body repairs of damaged cars and, in capable hands, can even remove deep dents. A reverse hammer will also help when removing bearings in hard-to-reach places. A pneumatic version of the device is used to remove burnt-out diesel engine injectors. The article will tell you how to make a reverse hammer with your own hands.
Making a reverse hammer and do-it-yourself body repair
This type of automobile repair, such as body repair, is a rather complex operation.
You will need a number of special knowledge, as well as equipment and tools. The reverse hammer plays an important role in body repair. This tool is quite simple and can be made independently without any problems. Moreover, there are many recommendations and videos on this topic, as well as drawings. Today you will learn how to make a reverse hammer with your own hands and how to properly use it for its intended purpose.
Mechanical return hammer
For production you will need:
- The construction tank is cut along the circumference from the side of the rod at a distance of 2 cm from the edge.
- The strut cylinder is removed.
- The guide sleeve of the rod is knocked out with a hammer.
- The rod is removed.
- The two rods are connected with threadless ends and welded. The joint is cleaned and polished. The resulting rod is about 60 cm long with threads on both ends.
- On one side, a 60 mm washer is put on the rod and welded. The distance from the edge to the attachment point is selected depending on the length of the handle.
- The handle is secured with a nut.
- Pieces of pipes (one is slightly thicker than the rod, the second can be cut from the rack tank) are inserted into each other and aligned - the walls of the tubes should not touch each other. On one side, a washer of a suitable size is welded onto the pipe cuts.
- Pieces of lead are placed in the space between the pipe sections.
- The part is heated with a torch until the lead melts.
- After the lead has hardened, the striking weight is ready. For ease of use, the part can be equipped with supports for compression buffers of the racks, which have the form of metal covers with a central hole.
- The weight is placed on the rod.
- A safety washer is secured to the end of the hammer opposite the handle with nuts, which prevents the weight from sliding off the rod.
The device is ready for use.
Types of Reverse Hammers
These tools differ from each other in the way they are attached to a deformed surface. They are:
- pneumatic;
- with suction cup;
- welded;
- mechanical.
Let's look at each type in more detail.
Pneumatic
This is a fairly expensive but very effective device, usually used for injectors that need to be removed from the cylinder head of an internal combustion engine. Its tip looks like a regular home plunger used to clear a clogged drain. There is a small rubber plate at the end of the pneumatic hammer; this is what is applied to the deformed area. The tool is connected to a compressor, which pumps out the air between the plate and the body, and the suction cup is securely attached to the metal surface. After which the master sharply pulls the weight back, a reverse thrust is formed, which pulls out the dent.
As a rule, this type of hammer comes with three rubber attachments of different diameters as standard. The largest of them allows you to level out wide deformations, and the smallest one allows you to level out small defects. The pneumatic hammer, when connected to the compressor, produces high clamping power. The rubber plate can be applied to absolutely flat or inclined surfaces, for example, to streamlined bodies. This tool is very convenient to use and weighs no more than one and a half kilograms.
The main advantage of a pneumatic hammer is the ability to level defects without removing the paint layer. When a car has received a minor flaw, it can be quickly corrected without significant time and material costs, or the need to apply putty, a layer of paint and varnish.
With adhesive suction cup
These are devices that are attached to the car body using special glue. After setting, the reverse hammer pin is screwed into the threaded hole on the nozzle. Next, the curved surface is leveled with sharp movements of the weight. When the work is done, the pin is unscrewed and the suction cup is detached using a hair dryer.
When heated, the adhesive layer becomes soft and the overlay is simply removed. A chemical solvent is used to remove adhesive residue from the metal surface. The disadvantages of a hammer with a suction cup include the inability to set the adhesive in the cold. Because of this, in winter the correction can only be performed in a warm room.
This method allows you to correct problem areas of the car body without removing paintwork - the suction cups are attached directly to the paint, do not dissolve or destroy it. Since the adhesive composition has a different chemical component from the paint, the solvent does not react with it, which prevents the color from blurring when removing residual fixing agent from the metal surface.
With welding fixation
The most popular and common among Russian car enthusiasts are reverse hammers for spotters, in which the fixation with a metal surface is carried out using an inverter. A steel nut is welded to the surface, the tip of the tool is screwed into it, after which the dent is leveled. This device has some disadvantages. This is, first of all, the need to have a welded inverter to perform the work.
Also, for arc welding, the surface of the metal being processed must be completely free of paint. It is possible to spot weld a nut only on shiny steel. After pulling out, the element is carefully removed with a grinder, and the cut area is carefully sanded. Then the nut is moved to the next point on the surface to be leveled, and the steps are repeated.
Note that after each welding, the place where the nut is attached needs to be puttied, primed, painted and varnished; only in this way can the corrected defect be made uniform with the rest of the surface of the machine. A hammer with a welded fastening is used in cases where it is necessary to correct a large area of curvature. Since the nut is fixed using spot welding, this type of hammer is effective even at sub-zero ambient temperatures, unlike self-adhesive suction cups.
Mechanical
By design, this is the same welded device, with the only significant difference - its accessories are clamps and hooks. With its help, it is impossible to level the central part of the deformed surface, since hooks can only be attached to the edges of the body.
Craftsmen who only have such a device at hand, to correct the defect, cut small holes in the metal surface, and hook onto them. After which the slots are carefully welded, sanded, coated with paint and varnish. Due to the fact that the hooks are twisted, nuts of any diameter can be welded to the metal.
Mechanical hammers are usually used to remove CV joints; repairing the undercarriage of a car is indispensable without them, when it is impossible to approach the back side of the bearings to strike them. Often the standard equipment also includes clamps that allow you to grasp the hinge bracket at several points simultaneously and completely disassemble the chassis without breaking the metal bearing.
Pneumatic return hammer
For assembly you will need:
- pneumatic chisel. Compared to a pneumatic hammer, it has smaller dimensions - the converted device will be convenient to work in the engine compartment of a car;
- metal blanks for manufacturing the device body and plug on a lathe;
- metal fitting for hose;
- grinder, hacksaw, gas and wrenches, measuring tool;
- compressor with a capacity of 250-300 liters of air per minute, air hoses.
- The rubber boot, retaining ring, bushing and spring are removed from the cylinder of the pneumatic chisel - these parts will no longer be needed after the alteration.
- The body and handle are clamped in a vice. Using a gas wrench, the cylinder is unscrewed from the body. You will have to make a significant effort - the cylinder thread in many models is made at a certain angle.
- The impact piston and air valve are removed from the removed cylinder.
- A thread 3-4 cm long is cut on the outer wall of the cylinder from the front cut - the plug will be screwed onto it.
- A bushing for the fitting with a mesh is unscrewed from the handle of the chisel to protect against debris getting inside the device.
- The body of the pneumatic chisel is cut into two parts.
- The details of the internal surface of the case are carefully measured: length, angle and pitch of the thread, location of the air hole, shape of the back wall, etc.
- A detailed drawing is prepared.
- According to the drawing, a new cylindrical body is made on a lathe, the internal profile of which, as well as the location of the air hole, corresponds to the sawn part. When turning on a machine, it is desirable that the sawn body is located nearby - additional measurements may be needed. From the outside of the rear wall, the tail part is turned by turning - a rod 5-7 cm long and 1.5 - 1.6 cm in diameter with thread. Devices for fixing and removing the nozzles will be attached to the shank. A plug is machined separately, the internal thread of which corresponds to that previously cut on the cylinder. This stage of hammer manufacturing is the most critical. The performance of the product and the safety of working with it will depend on the accuracy of manufacturing. Therefore, turning must be carried out by a qualified specialist.
- To increase strength, the manufactured body and plug are hardened.
- A metal sleeve is welded above the air hole on the outside of the housing, the internal thread of which corresponds to the thread of the sleeve with a protective mesh.
- The tail part is cut off from a metal chisel for a pneumatic tool. After placing the cut part into the end of the cylinder, it should be flush with its cut. The bit shank is made of carbide material and can withstand piston impacts.
- A piston is placed inside the cylinder.
- The wide part of the cylinder with the air valve installed on it is screwed into the new housing. To obtain the required torque when tightening, it is advisable to make grooves on the cylinder body for a wrench.
- The cut shank of the chisel is inserted into the upper part of the cylinder and the plug is screwed on. To prevent it from unscrewing during operation, a 6 mm hole is drilled in the housing, a thread is cut and a fixing bolt is tightened.
- An adapter with a protective mesh and a fitting for the air hose are screwed into the sleeve above the air hole.
- An air hose is attached to the fitting. The pneumatic return hammer is ready for use.
What is a reverse hammer
A body repair hammer is a tool designed to remove dents from the surface of a car. As a rule, these defects cannot be straightened with conventional tools, so a reverse hammer is often used to straighten dents on the sills, arches and pillars of a vehicle. The instrument has a classic design and is a pin 50 centimeters long. The diameter of the steel rod is two centimeters. It contains two elements: a rubber bushing on one side, and a metal washer on the other. It holds the hammer in a stable position and protects the tool body from vibrations resulting from striking.
The tool is used for straightening small-area damage.
The device for straightening defects is equipped with additional clamps and metal hooks, with the help of which the staples welded to the car body are grabbed during the straightening process.
The use of a reverse hammer largely depends on the location and complexity of the defect. There are several types of tools:
- Tool with pneumatic mechanism.
- Spotter.
- Vacuum hammers.
- With adhesive pads.
For spot straightening of dents on the surface of the body of a new car, it is recommended to use vacuum hammers . The way it works is as follows: using a suction cup, the tool is attached to the area to be restored, then the handle is pulled “towards you”, and as a result, due to air compression, the dent is leveled. The operating principle of this type of device allows you to eliminate defects without damaging the paintwork of the car body.
Communities › DIY › Blog › Reverse Hammer.
I needed a reverse hammer, so it would be today, and not on order for 2 weeks. I decided to assemble it myself from scavenged materials.
After digging around, I found only bolts and something similar to a reverse hammer. But don't worry, it doesn't work)
I cut everything off and kept only the rod itself. I found a piece of tube more or less suitable in diameter.
I decided to reinforce the tube with bolts, since there are a lot of them)
Instead of a handle, I welded a bolt from the axle shaft to one end.
On top is a “strike pad” or puck in Russian. So that the blow would be more clear and would not occur during welding.
I made the same platform for the cue ball.
I decided to protect myself from scuff marks on my hand, and even when you work with axle shafts, you get covered in molybdenum. in short, to prevent the hand from slipping off the cue ball, I made this “antislip”)
I took the belt and made a groove.
And fixed it with a bolt.
Wrapped it, made a bevel and a groove on the other side
And I recorded it the same way.
The handle should no longer slide.
I welded a nut on the opposite side of the rod, immediately with the pitch I needed.
And this is how the hammer turned out.
As soon as everything cooled down, I immediately tried it.
He coped with his task with a bang. It took about 2 hours. Almost all the time I was waiting for the metal to cool down)
How to make a device yourself?
- To make this device with your own hands, you will need an iron, or even better, a steel (stainless) rod with a length of 50 centimeters and a cross-section of 10-20 millimeters, as well as a steel bushing (weight), a hook and an ebonite handle.
- You can either purchase a ready-made hook or make it yourself from steel having a thickness of 4 millimeters.
- To make a vacuum type of reverse hammer, you can use a suction cup from a tool, such as a regular plunger, instead of a gripper.
- After assembling the device, carefully process all its elements, first with a file and then with emery cloth in order to remove all nicks and burrs.
- After that, try the new tool on some unnecessary car part.
Read also: Connecting an electric stove to a three-phase network
- Design and use of a reverse hammer, making a tool with your own hands
- What is a reverse hammer for body repair?
- Purpose and types of reverse hammers
- How to use a reverse hammer
- We manufacture our own reverse hammer
Many drivers, when faced with the concept of “reverse hammer,” do not understand what it is. Although, if you have never had to do body repair yourself, there is a high probability that you have never seen such a tool. But if you still have to repair the body, you cannot do without a reverse hammer. In this regard, the purpose of the article below is to tell not only what a reverse hammer is, but also how to make a reverse hammer for body repair with your own hands.
What is a reverse hammer for body repair?
In the process of working with a car body, the hardest and most important part is straightening, that is, leveling the surface of the body. To perform this task, even specialists need to have professional equipment on hand, which includes a reverse hammer.
In addition to this, many reverse hammers also have hooks, with which the device can grab staples welded to the body, and thereby be securely held on it during straightening.
Purpose and types of reverse hammers
Often, a back hammer is used to remove small dents on metal parts of a car body that either cannot be accessed directly or need to be leveled from the reverse side. Using a reverse hammer is very convenient for working with car sills, wheel arches and pillars.
There is a classification of reverse hammers for body repair, which includes:
• With weights (two and three are used).
• Reverse hammers operating thanks to a pneumatic mechanism.
The specificity of straightening work depends on the type of reverse hammer. To level the surface of the body of a new car, it is better to use a vacuum return hammer, since only it allows you to perform such complex work without first removing the paintwork. In the same case, if you are going to use one of the remaining types of hammers, the part of the body where the dent is located will first need to be thoroughly cleaned with sandpaper. Otherwise, the paintwork will still be damaged by the reverse hammer.
How to use a reverse hammer
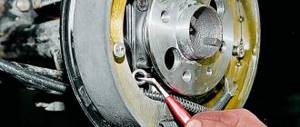
The entire process of straightening dents on a car body using a reverse hammer should be performed in the following order:
1. Rinse the entire work surface with water to remove all contaminants, and be sure to treat the entire surface with a degreaser.
2. If necessary, remove the paint coating from the work surface. To do this, it is more practical to use a grinding machine.
3. Weld round repair washers to the area with the dent.
4. Attach a special hook to the reverse end of the hammer, which should come with the tool.
5. Hook the hook onto the washer.
Read also: How to bend a muffler pipe with your own hands
6. While holding the tool by the handle with one hand, grab the weight with the other hand and point it towards the handle. In this case, your movement should be as sharp as possible.
Due to the fact that the reverse hammer is tightly coupled to the body surface, with each of your movements with the weight, the reverse dent is leveled. At the same time, the harder you hit the weights, the faster the process of straightening the car body will go.
You must be extremely careful when working with a reverse hammer. Do not rush under any circumstances and after each impact evaluate how the dent has changed. This will help you avoid creating new dents at the edge of an existing defect. But if you work slowly and follow all the instructions correctly, you can remove a small dent in just a few minutes.
It is often impossible to repair a car body without a reverse hammer, although each time it is necessary to soberly assess the situation, and if the work area is too large, resort to using other tools. As for the reverse hammer, fortunately, such a tool for body work can be made with your own hands.
We manufacture our own reverse hammer
Today, reverse hammers can be purchased at any auto store. It is worth noting that they can be sold either as a separate unit or as part of a set of tools specifically designed for body repair. But since there are no complicated mechanisms in the reverse hammer, it can be made at home.
To make your own body repair tool, you will need to prepare some materials:
• The pin is made of durable steel, 50 cm long and 2 cm in diameter.
• A handle or attachment that can be placed on a steel pin. The handle should be made of ebonite or rubber.
• Welding machine and protective equipment for it (gloves, mask).
• Steel hook no more than 0.5 mm thick.
• A 16cm weight is about 6cm thick.
• Steel washers in the amount of 2 pieces (a diameter of 2.5-3 mm is suitable).
We recommend doing all other work on making a reverse hammer for body repair with your own hands in the following sequence:
1. If necessary, we clean the metal pin from rust by grinding and treat the perfectly flat surface with any degreaser.
2. A hook must be attached to one end of the pin. If the hook has a thread on one side, it can also be threaded on the pin, creating a removable connection. Otherwise, you will have to use welding to attach the hook.
3. It is necessary to place a washer at the base of the hook, which will prevent the weight from moving to the working surface and accidentally damaging it.
4. To put a weight on a metal pin, you need to make a hole in it, the diameter of which should be 1 millimeter larger than the diameter of the pin. Thanks to this, the weight will be able to move freely, and you will be able to give it any possible acceleration.
5. The weight is placed on a pin, and steel sheets are attached on top of it, which will allow it to be grasped as securely as possible to strike the body. It is also worth putting and welding another washer on top of it so that the weight does not hit the handle.
6. Proceed to fix the handle. Please note that it should sit on the pin as securely as possible, so if possible it should be welded to the base of the pin.
This completes the process of making a reverse hammer. As you can see, if you prepare materials and tools in advance, all work will take no more than 40 minutes. With your own hands, you can even make a reverse hammer with a vacuum suction cup, which will greatly simplify the performance of repair work on the body. To do this, instead of a hook with which the tool is attached to the working surface, it is necessary to use special suction cups that can provide the same reliability of fastening.
Subscribe to our feeds on social networks such as Facebook, Vkontakte, Instagram, Twitter and Telegram: all the most interesting automotive events collected in one place.