Installation and replacement of VAZ-2112 camshafts 16 valves: photo, video
Replacement of camshafts on the 16-valve VAZ-2112 engine occurs when they wear out and the support journals wear out. Most often this happens when the time for a major overhaul of the power unit or cylinder head passes. This is a rather complicated procedure, but you can really do it yourself.
The video below shows the installation of camshafts and split gears on a 16-valve engine of the VAZ family
The video material will tell you how to replace camshafts on a VAZ-2112 16 valves, and give some recommendations and advice.
Camshaft replacement process
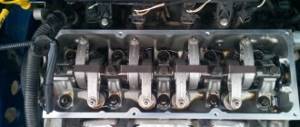
Camshafts with gears and fasteners
In order to install camshafts on the VAZ-2112 16 valves, they must first be dismantled. Like any spare part, they are installed in the reverse order from disassembly.
So, let's look at the step-by-step process of removing and installing the intake and exhaust camshaft.
Removing camshafts
- To begin with, as with any repair operations, it is necessary to remove the “minus terminal” from the battery.
- Remove the timing belt cover.
After unscrewing the mounting bolts indicated in the diagram, remove the timing cover - Now, you need to remove the valve cover.
Please note that the bolt tightening order must be followed during assembly. Unscrew the fastening nuts and remove the valve cover. - Disconnect the wires of the emergency oil pressure sensor, and then unscrew it.
Disconnect the emergency oil pressure sensor - Using a socket wrench or 8mm socket, unscrew the 20 bolts securing the camshaft cover.
Scheme for dismantling and tightening the camshaft bearing housing bolts - We dismantle the camshaft bearing housing.
- Now, there is free access to two plugs that are located on the rear side of the cylinder head. We take them out.
You need to be careful with the camshaft plugs; if you install them incorrectly, oil will leak out. If you don’t notice it in time, you’ll shorten the engine’s lifespan or end up in need of a major overhaul.Remove the two rear cylinder head plugs
- We take out the intake camshaft.
- We take out the exhaust camshaft.
We remove the camshafts from their seats - We press the seals out of the camshafts.
Remove the seals from the camshaft. If it does not come off, carefully cut it or pry it off with a screwdriver.
Installation of camshafts
Now that everything is removed, you can proceed to installing new camshafts on the car:
- Lubricate the cams and shaft support journals with engine oil.
Lubricate the camshaft journals and cams with engine oil. - We place each camshaft in its seat.
It is worth considering that camshafts are not interchangeable, so they should not be confused. The intake camshaft is shown on the left and the exhaust camshaft on the right. - Apply sealant to the surface of the cylinder head and camshaft bearing housing.
How to apply sealant to the camshaft bearing housing cover - We put the camshaft cover and cylinder head in place. Tighten the bolts evenly to a certain torque.
- We press new oil seals and install the rear plugs.
We press new oil seals onto the camshafts - We collect the remaining parts that were removed from the car.
Choice
Cylinder head camshafts for the VAZ-2112 are produced only by the manufacturer, so there is no need to look for analogues.
Original catalog numbers: inlet - 2112-1006015, outlet - 2112-1006014. Each camshaft costs an average of about 3,000 rubles.
Intake camshaft marking Exhaust camshaft marking
Nuances
When installing the bearing housing and cylinder head, do not apply sealant that contains silicone. This is due to the fact that the motor heats up, and accordingly the sealant heats up, which releases vapors that can get into the cylinders and further through the system. You should use a sealant whose instructions or packaging indicate that it is safe for the oxygen sensor.
When applying sealant to cavities, you should not apply a lot of it, because when tightening the bolts, it can get inside and this will lead to clogging of the oil channels, and therefore there will be no lubrication. The lack of lubricant will lead to increased wear of parts that will quickly fail.
conclusions
Replacing and installing camshafts on a 16-valve VAZ-2112 is not entirely easy, but it is quite possible. The main thing to ensure results is caution and following instructions. It is worth noting separately that the intake and exhaust camshafts are different and not interchangeable. On the intake there is an additional border for the phase sensor.
carfrance.ru
Instructions for repairing, removing and installing the Lada 2110 engine shaft with your own hands, adjusting the Lada 2111 engine, VAZ 2111, VAZ 2112, VAZ 2110 engines. Maintenance of the Lada 2112 engine. Repair instructions for the cooling system, exhaust gases, power supply of the Lada 2111 Features of the 8 and 16 valve Lada 2110 engine. Operation of the main components and assemblies of the engine
Remove the valve cover of the VAZ 2110 cylinder head (see Adjusting thermal clearances in the valve mechanism of the VAZ-2110, -2111 engine). On the VAZ-2111 engine, using a “10” wrench, unscrew the two nuts securing the “mass” wires to the studs of the VAZ 2112 cylinder head plug and remove the wires from the studs. Using a 10mm wrench, unscrew two nuts and one bolt securing the plug. Remove the plug... ...and its O-ring. On the VAZ-2110 engine, remove the housing of the auxiliary units (see Removing the housing of the auxiliary units of the VAZ-2110 engine). Remove the camshaft timing belt. We unscrew the upper nut securing the rear cover of the timing belt for Lada 2111, 2110 (see Removing the coolant pump on VAZ-2111, -2110 engines). Using a “13” wrench, evenly in several steps (until the pressure of the valve springs is removed), unscrew the ten nuts securing the camshaft bearing housings. Remove the front... ...and rear camshaft bearing housings from the studs. Moving the rear cover of the VAZ 2111 timing belt slightly away from the cylinder head, remove the camshaft.
Remove the camshaft oil seal VAZ 2110.
We install the camshaft in the following sequence. We clean the mating surfaces of the cylinder head and bearing housings from old sealant and oil. Lubricate the bearing journals and cams of the VAZ 2112 camshaft with engine oil. Place the shaft in the cylinder head supports so that the cams of the first cylinder are directed upward. On the surfaces of the cylinder heads mating with the bearing housings in the area of the outer supports, apply a thin layer of silicone sealant. We install the bearing housings and tighten the nuts securing them in two steps. Pre-tighten the nuts in the sequence shown in the figure until the surfaces of the bearing housings touch the cylinder head. In this case, it is necessary to ensure that the installed housing bushings fit freely into their sockets. Finally tighten the nuts to a torque of 21.6 N•m (2.2 kgf.m) in the same sequence. After tightening the nuts, carefully remove any remaining sealant squeezed out of the gaps. Check the clearances in the valve mechanism. We press in a new camshaft oil seal (see Replacing the camshaft oil seal of VAZ-2110, -2111 engines).
Further assembly is carried out in the reverse order of disassembly.
Replacing camshafts on a VAZ 2114 with your own hands
Camshafts, like other mechanisms and components of a car, determine the quality of engine operation. This material will tell you how to determine the malfunction of the shafts, how to replace the camshafts on a VAZ 2112 16 valves, and what needs to be prepared for this.
The pulleys of the 16-valve VAZ 2112 must be replaced when they are worn out or have mechanical damage. In particular, we are talking about:
- failure or exhausted service life of the pulley bearing journals;
- mechanical bending of the camshaft;
- spent service life, as well as scuffing of element cams.
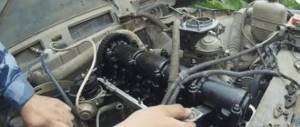
Lada 2112 with 16 cl internal combustion engine
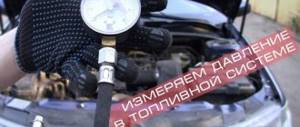
If some kind of extraneous knock appears in the valves while the engine is running, it is usually caused by one of these damages. If you have recorded a reduced pressure of the engine fluid in the system, this may indicate an increase in the clearances in the bearings.
To do this, in order to eliminate this malfunction, it is necessary to grind and restore the pulley bearing journals. You should also enlarge the grooves through which the engine fluid flows. This is done so that the lubricating fluid, after the next grinding, lubricates the internal combustion engine elements. As for the necks, after grinding they should be polished with green GOI paste.
Step-by-step instructions for a 16 valve car
Required Tools
You need to prepare:
- new replacement parts (exhaust and intake timing pulleys);
- 8 mm socket wrench;
- sealant.
New sports shafts Socket wrench “8” Glue sealant
Stages of work
To correctly carry out the process of replacing exhaust elements, we suggest you use the instructions prepared specifically for our users. This manual is also suitable for those who want to replace exhaust camshaft seals, sensors or plugs.
- Open the hood of your 16 valve VAZ 2112. Remove the protective cover of the timing belt.
- After this, it is necessary to remove the cylinder head cover, as well as the engine fluid emergency pressure monitoring device (sensor). The sensor is removed so that it is not damaged during the work. You can also remove the sensor wire tip.
- Once the sensor is removed, you need to remove all the screws that secure the camshaft bearing housing. This is done using an “8” socket wrench. All bolts should be unscrewed evenly, not one at a time.
- After this, dismantle the bearing housing of the exhaust camshafts of the 16 valve VAZ 2112. It should be noted that the housing is dismantled with spark plug wells. They need to be pulled out of the case.
- Now regarding the plugs for technological holes. During the camshaft replacement procedure, motorists often lose the plugs. The plugs are small round shaped parts.
The plugs need to be removed from their installation locations in the cylinder head; there are two plugs in total, and they are located in the area of the rear ends of the camshafts.Once these items are removed, place them separately. It's better not to lose the plugs.
- After this, you can dismantle the exhaust camshaft. It is advisable to remove the exhaust camshaft first. With the exhaust camshaft removed, proceed to remove the intake valve element.
- Now it's up to the seals. We begin to dismantle the oil seals and put them aside. By the way, when dismantling the oil seals, also be careful not to damage them. After removing the seals, inspect the dismantled devices. The oil seals must be free of mechanical damage, signs of wear, microcracks, etc.
- If you decide to install sports timing pulleys on your 16 valve VAZ 2112, then you need to purchase tuning parts in advance. Installation of sports elements is common among Russian motorists. Take your sports camshafts and lubricate their cams, as well as the supporting elements, with engine fluid.
- Please note: the exhaust and intake sports components are not interchangeable, they are marked. For example, exhaust valve components are marked with the numbers 1006014.
- After this, a small layer of sealant must be applied around the perimeter of the cylinder head 16 of the VAZ 2112 valve, as well as along the surface of the pulley bearing housing. More precisely, the application sites are marked in the photo. It is better not to overdo it with sealant.
- Once the sealant is applied, the pulleys can be placed in place.
- Then install the bearing housing on the cylinder head. Tighten all screws evenly until the body parts are flush with the cylinder head. By the way, it is also advisable to tighten the screws in a certain sequence; you can learn more about this in the video and photo.
- Then you should press in the oil seals, and also install the plugs in the cylinder head of the 16 valve VAZ 2112. After this, the assembly must be done in the reverse order, do not forget about the sensor.
1. Remove the sensor and unscrew all the bolts 2. Remove the bearing housing 3. Remove the plugs 4. Dismantle the shafts 5. Apply a layer of sealant 6. Tighten the bolts evenly
Video from Artem Ershov “Replacing pulleys on a VAZ 2114”
In this video you can watch the process of replacing pulleys in a 16-valve VAZ car.
AvtoZam.com
Step-by-step instructions for a 16 valve car
Required Tools
You need to prepare:
- new replacement parts (exhaust and intake timing pulleys);
- 8 mm socket wrench;
- sealant.
Stages of work
To correctly carry out the process of replacing exhaust elements, we suggest you use the instructions prepared specifically for our users. This manual is also suitable for those who want to replace exhaust camshaft seals, sensors or plugs.
- Open the hood of your 16 valve VAZ 2112. Remove the protective cover of the timing belt.
- After this, it is necessary to remove the cylinder head cover, as well as the engine fluid emergency pressure monitoring device (sensor). The sensor is removed so that it is not damaged during the work. You can also remove the sensor wire tip.
- Once the sensor is removed, you need to remove all the screws that secure the camshaft bearing housing. This is done using an “8” socket wrench. All bolts should be unscrewed evenly, not one at a time.
- After this, dismantle the bearing housing of the exhaust camshafts of the 16 valve VAZ 2112. It should be noted that the housing is dismantled with spark plug wells. They need to be pulled out of the case.
- Now regarding the plugs for technological holes. During the camshaft replacement procedure, motorists often lose the plugs. The plugs are small round shaped parts.
The plugs need to be removed from their installation locations in the cylinder head; there are two plugs in total, and they are located in the area of the rear ends of the camshafts.
Once these items are removed, place them separately. It's better not to lose the plugs.
Read more: Auto 33 Vladimir reviews
- After this, you can dismantle the exhaust camshaft. It is advisable to remove the exhaust camshaft first. With the exhaust camshaft removed, proceed to remove the intake valve element.
- Now it's up to the seals. We begin to dismantle the oil seals and put them aside. By the way, when dismantling the oil seals, also be careful not to damage them. After removing the seals, inspect the dismantled devices. The oil seals must be free of mechanical damage, signs of wear, microcracks, etc.
- If you decide to install sports timing pulleys on your 16 valve VAZ 2112, then you need to purchase tuning parts in advance. Installation of sports elements is common among Russian motorists. Take your sports camshafts and lubricate their cams, as well as the supporting elements, with engine fluid.
- Please note: the exhaust and intake sports components are not interchangeable, they are marked. For example, exhaust valve components are marked with the numbers 1006014.
- After this, a small layer of sealant must be applied around the perimeter of the cylinder head 16 of the VAZ 2112 valve, as well as along the surface of the pulley bearing housing. More precisely, the application sites are marked in the photo. It is better not to overdo it with sealant.
- Once the sealant is applied, the pulleys can be placed in place.
- Then install the bearing housing on the cylinder head. Tighten all screws evenly until the body parts are flush with the cylinder head. By the way, it is also advisable to tighten the screws in a certain sequence; you can learn more about this in the video and photo.
- Then you should press in the oil seals, and also install the plugs in the cylinder head of the 16 valve VAZ 2112. After this, the assembly must be done in the reverse order, do not forget about the sensor.
How to distinguish the intake camshaft from the exhaust camshaft of a VAZ-2112: photo
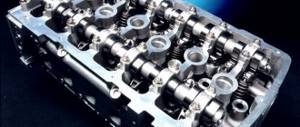
The camshafts of the 16-valve VAZ-2112 admit the working mixture and release exhaust gases. Unlike an 8-valve engine, where one camshaft serves for intake and exhaust, on a 16-valve engine there is a separate element for each phase. This improves not only engine performance, but also contributes to lower fuel consumption.
Photo of intake and exhaust camshafts
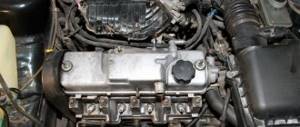
The intake and exhaust camshafts are indicated by arrows in the photo. The photo shows the engine with the valve cover removed.
Camshaft difference
The difference between the intake and exhaust camshafts is the presence of a groove for the phase sensor
In fact, there is no difference in the design of the exhaust and intake camshafts. There is only one reason why they are not interchangeable. There is a lip on the intake camshaft that is designed for a valve timing sensor.
Some car enthusiasts install sports camshafts instead of standard factory camshafts, which increase power. This is where the significant difference begins.
The intake camshaft has a larger cam size, which in turn opens the valve not by 7.6 mm, but by 13.2. This allows the engine to increase power characteristics. So the exhaust itself has slightly different characteristics - the valve opens not by 7.6, but by 10.8 mm, which significantly adds power.
Differences in sporty camshafts
conclusions
The camshafts of the 16-valve engine on the VAZ-2112 do not differ in design features, except that an additional edge is machined on the intake shaft for the camshaft (phase) sensor. If the intake and exhaust elements are swapped in places, this will lead to a violation of the valve timing, and if the engine operates in this mode for a long time, the owner will inevitably face a major overhaul of the cylinder head, at best.
carfrance.ru
Camshaft VAZ 2110 8 valves characteristics
I decided to highlight the question of whether the camshafts 2108 differ from 2110 (eng), and how much. The values are not reference, but very close to the actual ones, no worse than +- 2.5 g. The measurement was carried out with a marker disk, with the valves raised by 0.5 mm (+- 0.015), the thermal gap was no more than 0.03.
As a result, I intended: 1. Camshaft 2108, from a 1.3 engine, 2108 block. Intake cam lift - 8.95mm Exhaust cam lift - 8.95mm Intake valve opening angle - 220 degrees. (240 degrees) Exhaust valve opening angle - 220 degrees. (240g.r) Cam camber angle - 108g. The valve overlap height is practically absent. 0.20-0.3mm, by eye. In parentheses, given the measurement according to the methodology of OKB "Engine".
2.Camshaft 2110, from 1.6 engine, 11193 block. Intake cam lift - 9.5mm Exhaust cam lift - 9.2mm Intake valve opening angle - 230 degrees. (251gr.) Exhaust valve opening angle - 230gr. (251g) Cam camber angle - 106g. Valve overlap height - 0.725mm (+- 0.25) In parentheses, given to measurements according to the methodology of OKB "Engine".
3. Camshaft MS-04, OKB "Engine" Inlet cam lift - low pressure (10.9) Exhaust cam lift - low (10.9) Intake valve opening angle - 268 degrees. (294 degrees) Exhaust valve opening angle - 266 degrees. (290g) Cam camber angle - 117.5g. Valve overlap height - n.a. (1.9mm) Factory values in brackets.
I tried to re-measure, the closest result was obtained with a thermal gap of 0.25mm and a rise of 0.05mm. Didn't bother to fix anything.
If for 2108 and 21083 there is one camshaft, then... According to the Murzilka 21083 and 2110, we find that the r-shaft 2110 shifts the torque peak from 3500 rpm. at 3000 rpm (credit to the cam camber), but due to the wider phase and higher valve lift, there is an increase in torque of 2.8% and maximum power at the same 5600 rpm. increases by 4.3%. Of course, this is not much, but the 10th shaft can also be found for a spear.
Here's another Murzilka, tyts Intake valve lift 2108 - 8.8mm
| home |
| Place an order / ask a question |
| Product prices |
| Contacts |
| Patents and know-how |
| Camshafts of the XXI century |
| 25 years of DynaCAMS camshafts |
| RS pushers |
| Experience using RS pushers |
| Camshafts: |
| VAZ 2110/2111 |
| VAZ 2112 |
| VAZ 2112 RS |
| VAZ 2112 SR |
| VAZ "classic", Niva and ChevyNiva |
| UZAM 331x...3320 |
| ZMZ 402/410, UMZ 417 |
| ZMZ 405/406/409 |
| CHEVROLET / DAEWOO / OPEL SOHC-8v |
| PEUGEOT / CITROEN / SAMAND XU7 JP SOHC-8v |
| Accessories |
| Tuning examples |
| VAZ |
| Foreign cars |
| Partners |
| Publications |
| FAQ |
2110/11–26 For engines of 1.5 ... 1.6 liters. “Lower”, economical camshaft, increasing torque in the range from 1000 to 6000 rpm.
2110/11–49 For engines of 1.5 ... 1.6 liters. Universal camshaft up to 6500 rpm.
2110/11–52 For engines of 1.5 ... 1.7 liters. Universal camshaft up to 7000 rpm.
2110/11–54 For engines of 1.5 ... 1.8 liters. Increases torque at mid and high frequencies up to 7500 rpm.
Camshafts VAZ 2110/2111–58 … 684 DynaCAMS ®
* with a base cam diameter of 36 mm and lightweight valves.
- 2110 – camshafts with an eccentric for the fuel pump, 2111 – with a pin for the phase sensor.
- All camshafts work with standard lifters and shims.
- Camshafts with a basic cam diameter of 38 mm do not require modification to the cylinder head. With a base cam diameter of 36 mm, it is necessary to countersink the valve seats by 1 mm and modify (lighten) the valves.
- Modified valve spring retainers must be used.
- The phases are given when the valve overlap is set to TDC.
2110/2111–58 For engines with a volume of 1.5 ... 1.8 l. Smooth XX 900 rpm. Increases torque at mid and high frequencies up to 8000 rpm.
2110/2111–62 For engines with a volume of 1.6 ... 1.8 l. Smooth XX 1200 rpm. Increases torque at mid and high frequencies up to 8500 rpm.
2110/2111–68 For engines with a volume of 1.6 ... 1.8 l. Sports camshafts up to 9000 rpm.
2110/2111–584, 588, 624, 684 Additionally increase torque relative to the basic options. To ensure smooth engine operation, it is necessary to increase the idle speed.
Tightening torque for VAZ-2112 camshaft bed 16 valves: order
Many motorists have heard that it is necessary to correctly tighten the threaded connections on the 16-valve VAZ-2112 engine, but they have never done it themselves. Thus, the tightening torque is determined by the manufacturer and is indicated in the service repair manuals.
Video about installing camshafts and split gears on a 16 valve engine
The video will tell you how to properly tighten the threaded connections on the camshaft beds
Torque and sequence of tightening the camshaft bed
Camshaft cover tightening sequence
Correct tightening of the camshaft bed, as well as other parts of the cylinder head, determines the normal functioning of all components and assemblies. So, in order to tighten threaded connections, a standard tightening pattern and a torque wrench are used.
Before installing the bolts in place, they must be washed thoroughly and lubricated with silicone grease.
In order to properly tighten the bolts, you need to know the sequence. It starts from the middle part and gradually moves directly to the edges. The detailed sequence can be seen in the photo below.
Tightening diagram for each camshaft bed bolt with numbering
As for the tightening force itself, it is 8.0-10.0 Nm. After the bed is installed on the block head, the connection bolts are tightened by hand or without much force using a ratchet with a head.
We tighten all the bolts by hand, but do not tighten them
When all the bolts are in place, you need to take a torque wrench and tighten them according to the standards in the order indicated above.
Torque wrench for tightening threaded connections
In what cases is it necessary to tighten the camshaft bed?
The bolts are tightened. Marked with arrows
Tightening the camshaft bed will be necessary if it was previously dismantled for restoration and repair work. So, in what cases will you need to remove the bed, let’s look at it in more detail:
- Replacing camshafts, lifters or valve seals.
- Overhaul of the block head.
- Engine repair operations.
- Replacement of individual elements of the cylinder head.
Consequences of improper bed tightening
The consequences of improperly tightening the camshaft bed include the following:
- Oil leakage due to a gap or loose connection.
- Passing air inside the cylinder head.
- Malfunction of the engine or cylinder head.
- Ingress of foreign objects (water, dirt, dust).
All these factors can negatively affect the performance of the cylinder head and main power unit.
conclusions
The torque and sequence of tightening the camshaft bed on the 16-valve VAZ-2112 engines must be correct, since this factor affects the operation of the cylinder head and the engine as a whole. Thus, incorrect implementation of the procedure can lead to more serious consequences. If the car enthusiast is not able to do this on his own, then it is necessary to contact a car service, where everything will be done quickly and efficiently.
carfrance.ru
Diameter of the camshaft journal VAZ 2112
That's how loud I decided to title this article