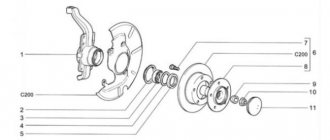
Removal and installation of front wheel drives Niva Chevrolet
You will need: keys “13”, “17”, “27”, a wrench for the wheel nuts.
1. Disconnect the front driveshaft from the front axle gearbox (see “Removing and lubricating the Niva driveshaft”).
2. Raise the car and remove the front wheels.
3. Disconnect the shock absorbers from the lower front suspension arms.
4. Unscrew three nuts securing the bearing housings of the inner hinge of the right and left drives.
5. Remove the bolt securing the right front axle gearbox bearing cover to the front suspension cross member.
6. Unscrew the four nuts securing the suspension brackets of the front axle gearbox.
7. Unscrew the nut and remove the bolt securing the left front axle gearbox bearing cover to the front suspension cross member.
8. Raise the front axle gearbox and secure it in this position in any available way.
9. Remove the front wheel hub cap and unscrew the hub nut
The hub nut is tightened to a large torque.
Therefore, we recommend using a head with a strong knob.
10. Remove the nut and centering sleeve.
11. Compress the suspension spring by jacking up the lower arm.
Unscrew the three nuts and remove the ball joint bolts from the lever.
12. Move the steering knuckle to the side.
13. Disconnect the exhaust pipe from the exhaust manifold and exhaust gas converter and take it to the engine (this operation is not required to remove the left drive).
14. Pull the gearbox back
15. Remove the right drive
16. Remove the left drive in the same way.
17. Install the drives and all removed parts in the reverse order of removal.
When tightening the wheel hub nuts, adjust the clearance in the bearings (see “Adjusting the wheel hub bearings of Niva Chevrolet”).
CV joint on Niva Chevrolet
With its help, torque is transmitted from the engine to the drive wheels. It's mostly front-wheel drive. Due to the CV joint, torque is transmitted uniformly, taking into account the fact that the wheel is at a different angle relative to the car.
On a Chevrolet, a grenade can be:
Like all other parts in the car, this unit has its own specific service life. Therefore, every Niva owner sooner or later is faced with the need to replace the CV joint.
Reasons for grenade failure
The CV joint can fail for the following reasons:
- Long service life of the mechanism . This is the most common cause of breakdown. Usually the part has to be replaced after 10,000 kilometers (on average), but it may happen that repairs are required even earlier.
- Sloppy driving . This could be sharp turns, driving on an uneven road at high speed, or turning the steering wheel when the car suddenly starts. In all these cases, the maximum load is placed on the CV joint.
- Water, dust or dirt gets into the device . For this reason, the hinge may also fail prematurely. Water gets inside due to damage to the rubber boot. The protection can crack due to any factors during operation, so it is recommended to periodically check its condition.
Malfunctions
There are three main signs of problems in the operation of the node:
- A crunching sound that occurs from the front axle, which intensifies when the steering wheel is turned to its extreme position. It occurs when constant velocity joints wear out. These parts cannot be repaired, so they should be replaced with new ones.
- Vibration and noise in the area of the front axle, which occurs when the wheel drive shaft is deformed. It can only be eliminated by replacing the damaged part.
- Leakage of lubricant from CV joints. The cause of the malfunction is a damaged boot, which must be replaced immediately. If this is not done in time, you will also have to change the CV joint, which quickly wears out when dirt gets in.
Grenade replacement
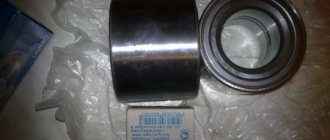
Right inner CV joint close up, you can see the article number and markings
This unit consists of parts that are constantly in motion. As a result, they may burst or wear out , requiring replacement.
The device can only be repaired if the owner of the car has identified damage to the boot in time, and therefore foreign substances have not yet managed to get inside the mechanism.
But this happens quite rarely, since it is almost impossible to detect damage to the boot in time. It should also be said that the cost of the CV joint is not high, and therefore it can be purchased if necessary.
Video about restoring the Niva Chevrolet CV joint
Troubleshooting
You can determine the malfunction of the grenade yourself . To do this, while the car is moving, turn the steering wheel in any direction until it stops. In this case, the driver will hear a crunching sound in the area of the front wheel. In this case, you need to replace the hinge.
During the repair process, it is important to determine whether it is necessary to change both hinges or one, because such work is recommended to be carried out only in a comprehensive manner.
Video on how to determine if a grenade is faulty
Changing a grenade on a Niva Chevrolet with your own hands
To replace a grenade, you must first remove the old one. In the process, you will have to dismantle the axle shaft along with the CV joint (you can find a disassembly video on the Internet). Then the car owner must perform the following actions:
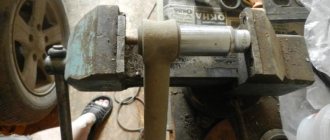
- Clamp the removed assembly in a vice.
- Remove the old boot.
Read more: Oil mobil delvac 1 5w 40
Installing a new hinge
Install the axle with CV joint on the car in the reverse order
Video about replacing a grenade on a Niva Chevrolet using a reverse hammer
Replacing oil seals
To change the drive seals, in addition to the listed tools, you will need:
- mount;
- flat screwdriver;
- wooden block;
- hammer;
- hex wrench 12;
- puller (two- or three-legged);
- mandrel (a piece of pipe whose diameter corresponds to the size of the seals);
- circlip puller;
- dynamometer.
Before replacing the seals, the drives will have to be removed.
To replace the drive gear seal, you must perform the following steps:
- Using a dynamometer, measure the starting torque of the drive gear.
- Fix the flange: screw a couple of bolts into its holes and insert a pry bar into them.
- Unscrew the fastening nut.
- Remove the washer and flange from the splines (here you will have to use a puller).
- Using a flathead screwdriver, remove the oil seal from the mounting hole.
Replacing the drive oil seal is done as follows:
- Remove the retaining ring and spring washer.
- Using a hammer, knock the bearing out of its seat.
- Remove the cover together with the oil seal
- Knock out the old part using a pipe.
- Lubricate the new oil seal with grease and press it into the cover.
- Assemble the knot.
Considering the low price and high labor intensity of replacing the oil seal, during repairs you should not skimp on components and use parts from trusted manufacturers.
Removal and installation of front wheel drives Chevrolet Niva
Tools:
- Driver for 3/4 socket bit
- Extension for socket wrench
- Knob attachment 13 mm
- Knob attachment 17 mm
- Knob attachment 19 mm
- Knob attachment 27 mm
- Large flat screwdriver
- Small hammer
- Mounting blade
- Straight box spanner 13 mm
- Straight box spanner 17 mm
- Rolling jack
- Adjustable support
Parts and consumables:
- Aerosol lubricant type WD-40
- Sealant
- Bearing cover gasket
Note:
We carry out the work on an inspection ditch or overpass.
1. Drain the oil from the front axle gearbox as described here.
2. Disconnect the downpipe from the exhaust manifold and exhaust gas converter as described here.
3. Move the exhaust pipe to the engine (this operation is not required to remove the left drive).
4. We disconnect the driveshaft from the front axle gearbox, as described here.
5. Disconnect the shock absorbers from the front suspension lower control arms as described here.
6. We install an adjustable stop under the front axle gearbox. We move the steering knuckle to the side.
Replacing the left drive - yikes! - not so simple!
Chevrolet Niva 2004
- The replacement of the previously right drive, which had cracked on the road, prompted thinking about replacing its brother, which happily played with balls in turns and sent a slight, subtle trembling and knocking noise into the car body when starting, which, against the background of the blows of the deceased right CV joint, was simply not heard before. At the first financial opportunity, I ordered it, and when it arrived at the warehouse, the caring hand of the seller solemnly handed me a drive assembly from the notorious Chinese company with pasta roots “Trialli” - since this is the case, then let both be from the same company.
Removing the drive itself did not cause any special trouble, compared to the right one, which forced me to get a little perverted in the position from below, so with a satisfied face, I placed the removed drive on the workbench and began to carry out the actions of removing the cover. wow! This took me almost 1.5 hours, since the previous owner of the pepelats, when replacing the internal grenade, apparently hammered the bearing with a hammer. The CV joint was of an unknown brand, with a journal size larger than normal by several hundred, but since it got in there, it had to come off. The difficulty lay in the silumin lid, knocking on which was risky with the possibility of breaking it, therefore a rubber kilogram sledgehammer was pulled out of the barn, with the help of which (well, such and such a mother), and at times an ordinary hammer, the lid with small non-critical dents still slid down.
Reinstallation on the new drive was not difficult. The mating surfaces of the cover and the gearbox itself were cleaned of the old sealant, which served instead of a gasket, which the old owner did not bother to purchase or cut out and glued it purely in Russian at random. However, there were no leaks.
CV joints on Chevrolet Niva: what are they?
The purpose of the CV joint on a Chevrolet Niva is to uniformly transmit torque to the drive wheel, regardless of its angle of rotation. According to the design features, the parts are:
It is impossible to transfer rotation to a wheel with one CV joint on a Chevrolet Niva, so there is always a pair of them in the drive. The one located near the gearbox experiences a heavier load. It is easy to distinguish - it has large dimensions compared to the outer hinge. The external unit transmits rotation to the wheel. Its dimensions are also affected by the limited space in the area of the drive wheel.