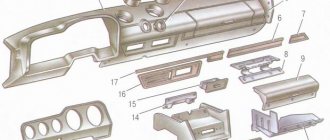
For thirty years, the Volzhsky Automobile Plant has been producing the legendary VAZ 2106 car model. The last copy was released back in 2006. Today this car can rightfully be considered obsolete. However, in the vast expanses of the former CIS it is still exploited in huge quantities.
Only a few 6 models were equipped with a contactless ignition system. The VAZ 2106 was mainly equipped with a contact system. However, installing contactless ignition will not be difficult. Especially if you arm yourself with the knowledge from this article.
What is BSZ and what is the principle of its operation?
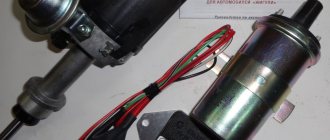
The system consists of the following components:
- Ignition distributor sensor. People call it a distributor. Unlike the contact system, this mechanism is equipped with a Hall sensor.
- Switch. Creates a pulse current that is transmitted to the ignition coil.
- Ignition coil. Takes low voltage pulse current and converts it into high voltage current. The aluminum housing contains two windings: primary and secondary.
- Candles.
- Spark plug wires.
A diagram that will help you understand the principle of operation and installation of contactless ignition on a VAZ 2106:
The primary contact on the coil is connected to the generator, and the secondary contact is connected to the control unit. The coil is connected to the distributor by a high voltage wire. The distributor, in turn, is connected using wires to the spark plugs and to the switch. The operating principle of the system is as follows:
- After the driver turns the ignition key, a low voltage is applied to the coil.
- After one of the pistons reaches the dead center, the switch receives a signal and stops supplying voltage to the coil from the generator or battery.
- At this moment, a high voltage current is generated in the coil, which is supplied to the distributor slider.
- The impulse is transmitted to the spark plug, which is connected to the piston at dead center. A spark occurs, which ignites the fuel mixture in the cylinder.
The difference between a contact system and a non-contact system is that the supply of energy from the voltage source to the coil is stopped mechanically. The distributor has a shaft cam that physically presses the contact group.
Adjustment: how to set
It is recommended to use a special tool - a strobe light - to adjust contactless ignition. But if it is not there, you can use the following method.
- We set the distributor slider: unscrew the first spark plug, plug the hole with a finger and turn the crankshaft pulley. If air begins to press on your finger, it means you are on the compression stroke. At this moment, position the distributor so that the slider faces the first cylinder.
- Seize the moment of ignition. To do this, connect the central wire from the coil to the spark plug and short it to ground. Turn the distributor against the movement of the slider until the spark jumps from the spark plug. This point should be in the area where the slider interacts with the first cylinder.
- Set the ignition timing completely: with a warm car in second gear, give the gas sharply to the floor. When detonation is heard, set it later, if not, then set it earlier.
This is interesting: ICE design
What is the advantage of the electronic system
The world's leading manufacturers abandoned the contact system back in the eighties of the 20th century. AvtoVAZ installed these mechanisms until the nineties. Today they are no longer installed on any modern car. And there are four good reasons for this:
- The contacts required regular maintenance. As a result of the action of the spark, they burned out and had to be carefully cleaned.
- The classic system was subject to wear and tear. We had to replace it with new parts every 15 thousand kilometers.
- Due to bearing wear, the engine was unstable.
- The contact system led to stretching of the balancer springs.
These problems arose one after another, leaving the car owner unable to breathe. The spark power regularly decreased, the engine began to work worse, and consumption increased significantly. Modern electronic ignition systems of the VAZ 2106 operate much more stable and durable. The spark is powerful and the fuel mixture ignites better.
Note : when choosing a specific BSZ kit, carefully read the box for which car it is intended for. You also need to ensure that the distributor can ensure the operation of your particular motor. Different distributor models can be very similar to each other in appearance. But under no circumstances should you install a distributor intended for another engine.
Experienced car enthusiasts believe that the most reliable for Zhiguli are the contactless ignition system kits for the VAZ 2106 from SOATE. You can learn more about choosing a specific kit in the following video:
Purpose and characteristics of the circuit
The timing drive mechanism of the VAZ 2106 engine solves 3 problems:
- Rotates the camshaft, which opens the intake and exhaust valves in the cylinder head.
- The oil pump is driven by an intermediate sprocket.
- Transmits rotation to the ignition distributor shaft - distributor.
The length and number of links of the main drive element - the chain - depends on the type of power unit. The manufacturer installed 3 types of engines with a displacement of 1.3, 1.5 and 1.6 liters on the “sixth” Zhiguli models. In the VAZ 21063 (1.3 l) engine, the piston stroke length is 66 mm, on modifications 21061 (1.5 l) and 2106 (1.6 l) - 80 mm.
Many manufacturers indicate information about the number of links directly on the packaging
Accordingly, on power units with different displacements, chains of two sizes are used:
- 1.3 l engine (VAZ 21063) – 114 links;
- engines 1.5-1.6 l (VAZ 21061, 2106) - 116 links.
How to check the length of a chain when purchasing without counting the links? Pull it out to its full length, placing both parts close to each other. If both ends look the same, you have a 116 link part for long stroke engines (1.5-1.6L). On a short chain for VAZ 21063, one end link will rotate at a different angle.
If the ends of the stretched chain look the same, there are 116 sections.
Replacement process and setup
Be sure to prepare the following set of tools for installation:
- Pliers
- Two types of screwdrivers
- Drill and drill bit, the diameter of which coincides with the diameter of the screws for fixing the switch
- Keys for 8 and 10
- Open-end wrench 13 millimeters.
By the way, it will be much more convenient to rotate the crankshaft using a wrench like this with a long handle:
First we disassemble:
- Remove the negative terminal from the battery
- Disconnect all high-voltage wires from the spark plugs and from the distributor cover
- Unscrew the spark plugs
- In the spark plug hole of the first cylinder, use a screwdriver to turn the crankshaft until the piston is at top dead center. The mark on the shaft should be opposite the long mark.
What should those who could not find a special key for turning the shaft do? You can get out of this situation by hanging the rear wheel of the car. Spin this wheel and the crankshaft will also spin.
Now let's dismantle the old system:
- Remove the high voltage wire from the coil and the distributor cap. Pay attention to the position of the slider. To remember better, it is better to make a mark with chalk.
- Remove the wires and vacuum tube from the distributor. Unscrew the fastening nuts and remove the distributor.
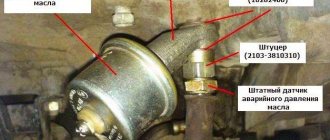
- We remove the wires from the coil contacts, noting where the lock and tachometer relay wires should be connected.
- We take out the coil.
Try to keep the gasket that is located in the distributor seat on the block.
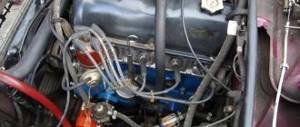
The process of installing electronic ignition on a VAZ 2106:
- Place the gasket on the new distributor. Remove the lid. Turn the slider in the direction you marked with chalk. Place the distributor in place and secure it with the nut. Don't screw it all the way in just yet.
- Fix the spark plugs in place with the correct gap. Install the distributor cover, connect the high voltage wires in accordance with the cylinder numbers.
- Install the ignition coil. If the contacts on it are incorrectly installed, loosen the fastening and turn the housing half a turn.
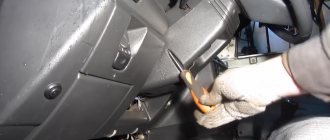
- Replace the switch. You'll have to tinker with the drill. You need to remove the washer tank and make two holes in the side member to mount the switch. Some models, by the way, already have holes made. So before you start drilling, take a close look at the left side of the spar. Place the electronic element no lower than the tank so as not to accidentally wet it with liquid in case of leakage.
- Connect all wires in their places. To do this, you need to use the diagram that is included in the packaging of the electronic ignition kit.
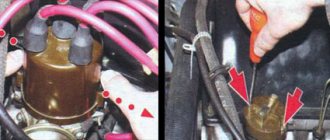
- Connect the distributor fitting to the carburetor with a vacuum tube.
Signs of critical wear of a part
As the vehicle is used, the chain drive slowly stretches. Deformation of the metal joints does not occur - the reason for the phenomenon lies in the abrasion of the hinges of each link, the formation of gaps and backlash. Within 1-2 bushings, the wear is small, but multiply the gap by 116 and you will get a noticeable elongation of the element as a whole.
How to determine the malfunction and degree of wear of the chain:
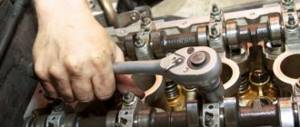
- The first symptom is an extraneous noise coming from under the valve cover. In particularly advanced cases, the sound turns into loud rattling.
- Remove the valve cover and check the alignment of the marks on the camshaft sprocket and crankshaft pulley with the corresponding protrusions on the body. If a shift of 10 mm or more is observed, the element is clearly stretched. Correct operation of the mechanism is determined by the simultaneous coincidence of the marks on the crankshaft pulley and the camshaft sprocket
- Tension the chain, start the engine and set the marks again. If the part has significantly lengthened, these measures will not produce results - the plunger reach is not enough to remove the slack.
- With the valve cover removed, check the technical condition of the damper. Sometimes a chain drive that is too stretched simply breaks off its lining or the entire part. Metal and plastic fragments fall into the oil sump.
Once, during the process of diagnosing the “six” engine, I had to observe the following picture: the elongated chain not only broke the damper, but also made a deep groove in the cylinder head housing. The defect partially affected the valve cover contact plane, but no cracks or engine oil leaks occurred.
When the damper is broken, the chain rubs against the edge of the cylinder head platform and makes a groove
A chain stretched by 1 cm or more can jump 1-4 links along the gears. If the element “jumped” one section, the valve timing is disrupted - the engine vibrates strongly in all operating modes, significantly loses power and often stalls. A clear symptom is shots in the carburetor or exhaust pipe. Attempts to adjust the ignition and adjust the fuel supply are useless - the engine “shaking” does not stop.
When the chain moves by 2-4 teeth, the power unit stalls and will no longer start. The worst-case scenario is that the piston hits the valve plates due to a large shift in valve timing. The consequences are disassembly and expensive repair of the motor.
Video: determining the degree of wear of timing gears
First start
Sometimes after installing electronic ignition on a VAZ 2106, the car refuses to start. This suggests that you need to check whether everything was installed correctly. Pay attention to the connection of high voltage wires. The problem may also arise due to the fact that the slider, as a result of turning the distributor cap, began to supply an impulse not to the first, but to the fourth cylinder.
It is best to adjust the system using a strobe light. Not everyone has it available. But it’s not worth buying in a store just for once. It is best to go to a car service center and order an initial adjustment service there.
Once the contactless ignition is installed, you will feel a significant increase in driving dynamics. The engine will run smoothly and stably, fuel consumption will decrease. You will have to repair the ignition system less often. However, it would be a good idea to carry a backup Hall sensor with you just in case.
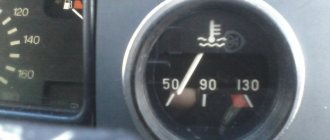
How to understand that the set advance angle is correct
Now all that remains is to check your car while driving. The procedure here is quite simple - you should navigate by your hearing. We start the engine, move away and accelerate the car to 50 kilometers per hour. Next, engage 4th gear and sharply press the accelerator pedal, listening to the engine. If you did everything correctly earlier, the picture will be as follows - after about 2-3 seconds, detonation will appear. As the car picks up speed, it should disappear.
It affects the dynamics of the car, fuel consumption, ease of starting the engine and its service life. The following describes the procedure for setting up the ignition for a VAZ-2106 car with a contact ignition system, incl. when used as additional devices of a transistor or thyristor ignition system. Similar techniques are valid not only for the VAZ-2106, but also for all cars with a contact ignition system
, you just need to check the adjustment values for a specific engine in the “Operation Manual”.
The adjustment itself comes down to three stages: setting the value of the contact closed state angle (UZSK), which depends on the size of the gap in the contacts of the distributor-breaker (distributor), setting the ignition timing angle (IAF), checking and adjusting the results obtained while driving.
Stage 1. Adjusting the angle of the closed state of the contacts
Adjusting the UZSK is necessary when using a classic or transistor ignition system. When using a thyristor system, the UZSK value is not critical.
To make adjustments, you must remove the distributor cover. If you use a classic ignition system
, then before adjusting, I recommend using a file to clean the contacts of the distributor, removing the formed tubercle on one of the contacts. After stripping, it is necessary to check that the contacts are adjacent to each other with their entire plane. If necessary, adjust by carefully bending the fixed contact.
Next, you need to turn the crankshaft to such a position that the distance between the contacts of the distributor is maximum. Unscrew the screw that secures the contact group on the bearing plate, insert a 0.4 mm thick probe between the contacts and select a position for the contact group such that the probe moves with little force. Fix the found position of the contact group by tightening the screw. Check the gap size by trying to place a probe between the contacts that is thinner (less than 0.35 mm) and thicker (more than 0.45 mm) than the nominal one. The thicker probe should not fit into the gap between the contacts, and the thinner one should move without any effort.
A special key is used to rotate the crankshaft. If you don’t have such a key at hand, then slowly rotate the crankshaft, engage fourth gear and carefully push the car. It is difficult to use a starter for this, because It is difficult to achieve the required rotation angle accuracy.
The resulting gap between the contacts of the distributor gives the required UZSK value (and it is the angle, not the gap, that is critical!) with a given accuracy, as a rule, only in new distributors, when the contacts have not yet been developed. Therefore, it is advisable to check the adjustment made by measuring the angle itself, which should be 55±3°.
The easiest and most accurate way to do this is to use an electronic tachometer that has an UZSK measurement function, or a special automotive measuring device (some were produced that included the functions of a voltmeter, ohmmeter, ammeter, tachometer, and UZSK meter). To do this, the distributor is assembled, the tachometer is connected, and the engine is started. The tachometer is switched to the UZSK measurement mode. If the UZSK value goes beyond the limits recommended by the factory, then the gap adjustment is repeated.
The second way is to directly measure the angle. To do this, remove the central high-voltage wire from the distributor cover and lean it against the ground of the car (you don’t have to do this, but there is a chance of getting a breakdown in the coil), connect it to the wire going from the distributor to the ignition coil, a 12 V light bulb or the one described at the end LED sample page. When the ignition is on, the light will light up when the contacts of the distributor are open, and go out when they are closed. If a transistor or thyristor system is used, the light bulb may not light when the contacts are open due to the current limiter through the distributor contacts in these systems. In this case, you can use a voltmeter instead of a light bulb. With open contacts it will show a voltage of about 12 V, with closed contacts - 0 V. Rotate the engine crankshaft clockwise until the contacts are closed (the light goes out or the voltmeter shows 0 V). We note the position of the slider, marking it, for example, on the distributor body. We continue to rotate the crankshaft until the contacts open (the light bulb lights up, the voltmeter needle switches to 12 V). We note the resulting position of the distributor slider. We measure the angle between the obtained positions. This can be done by measuring the length of the circular arc along the distributor body, and then calculating the angle in degrees using the well-known formula (360pd)/l,
where p=3.14 is the Pythagorean number, d=70 mm is the diameter of the distributor body, l, mm is the measured length of the arc along the distributor body between the marks. With the UZSK correctly set, the arc length for the VAZ-2106, VAZ-2103 engine is 33±2 mm .
Stage 2. Adjusting the ignition timing
Fig. 1. Location of marks for setting ignition timing. Front view of the engine.
For the VAZ-2106, VAZ-2103 engine, the moment of opening the contacts of the distributor-chopper, corresponding to the spark in the 1st cylinder, should advance the top dead center of the piston stroke in the first cylinder by 0±1°, and on the VAZ-2101 engine - by 2± 1° (location of marks - see Fig. 1).
There are several ways to perform this operation: using a strobe light, using a light bulb, “by spark” and “by ear”.
Method 1: Adjustment using a strobe light
This is the fastest way to adjust. You will need any car stoboscope. It is better if it is powered from the on-board 12 V network, and the signal for operation is taken from a sensor placed on the high-voltage wire of the first cylinder. Other designs showed me either unstable operation or low reliability when working with a thyristor ignition system.
We connect the strobe to the car's electrical network. We remove and turn off the vacuum corrector hose from the distributor. We start the engine and warm it up to such a temperature that it steadily maintains idle speed. Loosen the bolt securing the distributor body. We direct the light from the strobe to a pulley located on the crankshaft. By rotating the distributor body, we achieve its position so that the visible position of the mark on the pulley is positioned in a given manner relative to the marks on the cover of the gas distribution mechanism (see Fig. 1). In the found position, we fix the trawler body by tightening the bolt that secures it.
It is important that the engine is at idle speed when adjusting. At higher speeds, the centrifugal regulator comes into play, and the adjustment results in this case will be inaccurate.