Payment for goods and downloading of the book in electronic form (PDF format) is made on the website.
To do this, you need to find the book you are interested in and click on the “Buy” button. The price of the book is indicated on the button.
For convenience, the price on the website for residents of Russia, Belarus and Kazakhstan is presented in rubles.
For residents of Ukraine in hryvnias, and for all other countries - dollars.
After clicking on the “BUY” button, a payment window will open where you can select a payment system with which you can pay for the selected book using any bank card (Visa, MasterCard, MIR, etc.)
When you click on the “Pay by bank card” button, the Portmone payment system will open, which is the easiest way to make a payment.
In addition, the website offers four payment systems for payment:
- Yandex (payment from any bank cards, Yandex Money account, QIWI Wallet, terminals, etc.);
- Portmone (payment from any bank cards, Portmone account);
- PayPal (payment from any bank cards, PayPal account);
- WebMoney (payment from any bank cards, payment from WebMoney wallets).
Payment via Yandex Cashier
After selecting payment via Yandex, the Yandex Cashier payment system will launch, where you need to select a convenient payment method (bank card, QIWI, Yandex Money account, etc.)
After specifying payment details and confirming payment, payment for the goods will occur.
If you have a bank card in a currency other than the ruble, then the money will be debited from the card at the rate of the Central Bank of Russia at the time of the purchase.
This payment method is optimal for residents of Russia, Kazakhstan and Belarus.
Official website of the Yandex Kassa payment system https://kassa.yandex.ru
Payment via Portmone
After selecting payment through Portmone, the payment system will launch, where you need to select the payment method: bank card or Portmone account.
The price in the Portmone payment system is converted into dollars at the exchange rate of the Central Bank of the country where you are located.
If you have a bank card in a currency other than the dollar, then the money will be debited from the card at the rate of the Central Bank of your country at the time of the purchase.
After specifying payment details and confirming payment, payment for the goods will occur.
Official website of the Portmone payment system https://www.portmone.com
Payment via PayPal
After selecting payment via PayPal, the PayPal payment system will launch, where you need to select the payment method: bank card or PayPal account.
If you already have a PayPal account, then you need to log into it and make a payment.
If you do not have a PayPal account and you want to pay using a bank card via PayPal, you need to click on the “Create an Account” button - shown with an arrow in the picture.
PayPal will then prompt you to select your country and provide your credit card information.
After specifying the information required to make the payment, you must click on the “Pay Now” button.
Official website of the PayPal payment system https://www.paypal.com
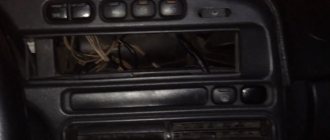
Instrument panel VAZ 2106 - removal and installation of the instrument panel
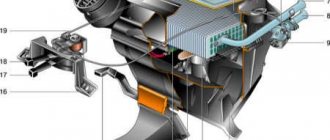
Panel 1 (Fig. 10.3) of the instruments is a non-separable structure consisting of a steel frame filled with polymer foam and covered with a polymer film. Using removable elements, control devices, controls, a radio receiver and a heater are attached to the instrument panel.
Removing and installing the instrument panel The instrument panel is removed for replacement and during body repairs. To remove the instrument panel from a VAZ 2106 car you will need: a “10” key, two screwdrivers.
Instrument panel installed on a VAZ 2106 car: 1 - instrument panel (panel); 2 - deflector; 3 — clock; 4 — glove box cover; 5 — radio panel.
1. Remove the storage shelf by removing the four fastening screws.
2. Unscrew the screw of the lower fastening of the radio panel on the left and...
3... screw for the lower fastening of the radio panel on the right.
4. Remove the screw from the top right fastening of the radio panel.
5. Using a screwdriver, remove the mounting plate with additional controls from the radio panel.
6. Remove the two radio panel mounting screws located under the mounting plate.
7. Lift the mounting plate with additional controls and remove the radio panel.
8. Remove three screws and remove the rack cover. Removing the second cover is done in the same way.
9. Remove the decorative lining of the steering column by removing the five fastening screws.
10. Using two screwdrivers, pry the instrument panel fastening plates at the installation locations and remove the instrument panel.
11. Unscrew the nut securing the cable to the speedometer, disconnect the cable and move it to the side.
12. Label the connectors of the wires coming from the instrument panel and disconnect the wire connectors. 13. Remove the instrument panel from the VAZ 2106 car.
14. Carefully pry with a screwdriver and remove the watch.
15. Label the ends of the wires, disconnect them from the clock and remove the backlight. 16. Take off your watch.
17. Use a screwdriver to pry the heater switch (operating mode switch) and remove it from the ashtray facing panel and heater control levers.
18. Label the wire ends, disconnect them from the switch and remove the switch.
19. Use a screwdriver to release the latches of the heater control handles and remove the handles.
20. Disconnect the wire lug from the glove compartment light socket.
21. Remove the two screws securing the side of the glove box and remove it.
22. Remove the four screws that secure the instrument panel to the body.
23. Unscrew the two nuts of the upper fastening of the instrument panel, located in the glove box, and...
24... two nuts located under the instrument panel.
25. Lifting the panel up and towards you, disconnect the tip of the “mass” wire from the glove box light switch. 26. Remove the instrument panel from the VAZ 2106 car, pushing it up and towards you. 27. Install the instrument panel in the reverse order of removal.
Rice. 10.3. Instrument panel of the VAZ 2106 and its elements: 1 - instrument panel; 2 — deflector pipes; 3 — deflectors; 4 - ring; 5 - sidewall; 6 — lining of the glove box lid; 7 — facing of the right instrument panel; 8 — hinge of the glove box lid; 9 — glove box cover; 10 — glove box body; 11 — facing of the radio receiver panel; 12 — loudspeaker lining; 13 — radio panel; 14 — radio receiver bracket; 15 — ashtray; 16 — lining of the ashtray and heater control levers; 17 — middle instrument panel trim; 18 — frame of switches; 19 — instrument panel
- Author: admin
Rate this article: Share with friends!
Related posts:
Removal and installation of the VAZ 2106 instrument panel
Disassembly and assembly of the VAZ 2106 instrument panel
Removing and installing the rear seat of a VAZ 2106
Payment via WebMoney
After selecting payment via WebMoney, the payment system will launch, where you need to select the payment method: bank card or WebMoney wallet.
If you already have a WebMoney wallet, then you need to log into it and make a payment.
If you do not have a WebMoney wallet and you want to pay in another way, you need to select any of the methods that WebMoney offers and make the payment
After specifying payment details and confirming payment, payment for the goods will occur.
Official website of the WebMoney payment system https://www.webmoney.ru/
Downloading a book
After successfully completing the payment (by any method) and returning to the KrutilVertel store from the payment system website, you will be taken to the successful payment page:
On this page you need to indicate your e-mail, where access to download the book will be sent.
If you are already registered on our website, then simply follow the link to your personal account.
The book you purchased will be in your personal account, from where you can always download it.
Please note that after making the payment, you need to return back from the payment system website to the KrutilVertel website.
If for some reason you did not return back to the site and closed the payment system tab with a message about the successful completion of the payment, please let us know - we will send you a letter indicating access to download the book.
Removing the instrument cluster of a VAZ 2106 Zhiguli
- Repair manuals
- Repair manual for VAZ 2106 (Zhiguli) 1976-2005.
- Removing the instrument cluster
↓ Comments ↓
1. General information
1.0 General information 1.1 Safety precautions
2. Diagnosis of faults
2.0 Diagnostics of faults 2.1 diagnostics of faults in the engine and its systems 2.2 Diagnostics of faults in the clutch 2.3 diagnostics of faults in the gearbox 2.4 Diagnostics of faults in the driveline, rear axle, chassis, steering and braking system 2.5 Diagnosis of faults in the body 2.6. Diagnosis of electrical equipment faults
3. Engine
3.0 Engine 3.1 Cylinder head and timing mechanism 3.2 Lubrication system 3.3 Oil change 3.4 Replacing the camshaft drive chain guide 3.5 Replacing the camshaft and valve levers 3.6 Replacing the valve stem seals 3.7 Replacing the intake and exhaust manifold gaskets 3.8 Replacing the cylinder head gasket ov 3.9 Disassembling the head cylinder block, valve grinding
4. Engine power system
4.0 Engine power system 4.1 Replacing the air filter element 4.2 Replacing the fuel pump 4.3 Repairing the fuel pump 4.4 Replacing the fuel tank and its hatch cover
5. Carburetor
5.0 General information about the carburetor 5.1 Cleaning the fuel filter 5.2 Replacing the idle air system solenoid valve 5.3. Adjusting the carburetor 5.4 Replacing the carburetor 5.5. Carburetor repair
6. Engine cooling system
6.0 Engine cooling system 6.1 Replacing the coolant 6.2 Replacing the coolant pump 6.3. Replacing the thermostat 6.4 Replacing the engine radiator
7. Exhaust system
7.0 Exhaust system 7.1 Replacing exhaust system parts
8. Clutch
8.0 Clutch 8.1 Replacing fluid and bleeding the clutch hydraulic drive 8.2 Adjusting the drive 8.3 Replacing the clutch master cylinder 8.4 Repairing the clutch master cylinder 8.5 Replacing the clutch slave cylinder 8.6 Replacing the pressure plate assembly and clutch release bearing
9. Gearbox
9.0 Gearbox 9.1 Checking the level and changing the oil in the gearbox 9.2 Replacing the reverse light switch 9.3 Replacing the secondary shaft cuff 9.4 Replacing the gearbox 9.5 Repairing the gearbox 9.6 Replacing the speedometer drive 9.7 Features of repairing a five-speed gearbox
10. Cardan transmission
10.0 Cardan transmission 10.1. Maintenance 10.2. Replacing the driveshaft
11. Rear axle
11.0 Rear axle 11.1 Checking the serviceability of the rear axle 11.2 Changing the oil 11.3 Replacing the axle shaft and its cuff 11.4 Removing and installing the rear axle 11.5 Replacing the cuff of the drive gear 11.6 Replacing the gearbox 11.7 Repairing the gearbox
12. Front suspension
12.0 Front suspension 12.1. Maintenance 12.2 Replacing the bearings and hub cuff 12.3 Replacing the cushions and stabilizer bar 12.4 Replacing the ball joints 12.5 Replacing the shock absorbers 12.6 Replacing the springs 12.7 Replacing the upper arms and their rubber-metal hinges 12.8 Replacing the rubber-metal joints of the lower arms on a car 12.9 Replacing the lower arms 12.12 . Adjusting wheel alignment angles
13. Rear suspension
13.0 Rear suspension 13.1 Checking technical condition 13.2. Replacement of rear suspension parts
14. Steering
14.0 Steering 14.1 Adding oil 14.2 Checking the condition of the steering 14.3 Adjusting the gear engagement 14.4 Replacing steering rods 14.5 Replacing and repairing the pendulum arm 14.6 Removing and installing the steering wheel 14.7 Removing and installing the steering shaft 14.8 Removing and installing the steering mechanism 14.9 Removing the bipod
15. Brake system
15.0 Brake system 15.1 Checking the condition of the hydraulic drive 15.2 Checking the vacuum brake booster 15.3 Checking the functionality of the pressure regulator 15.4 Replacing brake fluid and bleeding the brake system 15.5 Replacing the brake pads of the front wheels 15.6 Replacing the brake pads of the rear wheels 15.7 Replacing the brake caliper of the front wheel 15.8 Replacing the brake cylinders of the front wheels 15 .9 Repair of front wheel brake cylinders
16. General information
16.0 General information 16.1. Checking electrical circuits 16.2 Fuse blocks 16.3 Replacing fuses 16.4 Replacing the main and additional fuse blocks 16.5. Replacing the relay 16.6 Replacing the ignition switch 16.7 Replacing the contact part of the ignition switch 16.8 Battery 16.9. Generator 16.10. Starter 16.11. Ignition system 16.12. Lighting, light and sound alarms 16.13. Windshield cleaner and washer 16.14. Repair of the electric heater motor 16.15. Control devices
17. Body
17.0 Body 17.1 Replacing the front bumper 17.2 Replacing the radiator grille 17.3 Replacing the hood latch 17.4 Replacing the hood 17.5 Replacing the windshield 17.6 Replacing the interior rear view mirror 17.7 Replacing the sun visor 17.8 Replacing the headliner 17.9 Replacing the ceiling grab handle
18. Heating and ventilation system
18.0 Heating and ventilation system 18.1 Replacing the electric heater fan 18.2 Replacing the heater radiator 18.3 Replacing the radiator casing 18.4 Replacing the heater valve
19. Car body care
19.0 Car body care 19.1 Car washing 19.2 Preservation and protection of paintwork
20. Applications
20.0 Applications 20.1 Tools used in addition to the standard set 20.2 Electrical diagram of VAZ-2106, VAZ-21061, VAZ-21063 cars produced in 1976–1987. 20.4 Tightening torques for threaded connections 20.5 Basic data for adjustments and monitoring 20.6 Characteristics of spark plugs 20.7 Fuel, lubricants and operating fluids used 20.8 Lamps used on the vehicle 20.9 Lip seals (oil seals)
| EXECUTION ORDER |
Problems when paying with bank cards
Sometimes difficulties may arise when paying with Visa/MasterCard bank cards. The most common of them:
- There is a restriction on the card for paying for online purchases
- A plastic card is not intended for making payments online.
- The plastic card is not activated for making payments online.
- There are not enough funds on the plastic card.
In order to solve these problems, you need to call or write to the technical support of the bank where you are served. Bank specialists will help you resolve them and make payments.
That's basically it. The entire process of paying for a book in PDF format on car repair on our website takes 1-2 minutes.
If you still have any questions, you can ask them using the feedback form, or write us an email at [email protected]
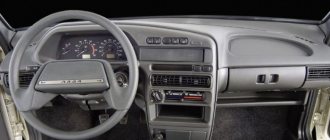
VAZ 2106 car controls (instrument panel, instrument cluster)
Rice. 1.8. Dashboard of a VAZ 2106 car
1 — hood lock drive lever; 2 — fuse blocks; 3 — headlight switch lever; 4 — direction indicator switch lever; 5 — ignition switch; 6 — clutch pedal; 7 — windshield wiper and washer switch lever; 8 — brake pedal; 9 — socket for connecting a portable lamp; 10 — carburetor choke control handle; 11- accelerator pedal; 12 — heater cover levers; 13 — button for the electric window drive of the left front door*; 14 - warning lamp for insufficient fluid level in the hydraulic brake reservoir; 15 — instrument lighting switch; 16 — parking brake lever; 17 — decorative cover of the radio socket; 18 — alarm switch; 19 — gear shift lever; 20 — power window drive button for the right front door*; 21 — cigarette lighter; 22 — storage shelf; 23 — glove box; 24 — ashtray; 25 — rotary deflectors; 26 — three-position switch for electric heater fan; 27 — hours; 28 — clock hand adjustment handle; 29 — air supply hatch control lever; 30 — heater tap control lever; 31 — sound signal switch; 32 - instrument cluster.
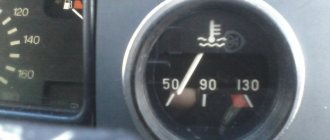
Rice. 1.9. Instrument cluster of a VAZ 2106 car
1 — fuel level indicator;
2* — fuel reserve warning lamp; 3 — liquid temperature indicator in the engine cooling system; 4 — oil pressure indicator in the engine lubrication system; 5 - warning lamp for insufficient oil pressure in the engine lubrication system; 6 — speedometer; 7—daily trip counter; 8 — summing counter of the distance traveled; 9 — control lamp for turning on the high beam; 10 — control lamp for turning on the direction indicators; 11 — control lamp for turning on the side light; 12 — handle for setting the daily trip meter to zero; 13 — tachometer; 14 — control lamp for covering the carburetor air damper; 15 — battery charge indicator lamp; 16 — indicator lamp for turning on the parking brake; 17 — rear fog lamp switch*; 18 — rear window heating switch*; 19 — external lighting switch. *The equipment is installed on some VAZ 2106 vehicles.
- Author: admin
Rate this article: Share with friends!
Related posts:
instrument panel VAZ 2106 - device, design features
instrument cluster of a VAZ 2108, VAZ 2109, VAZ 21099 - design features
controls - instrument panels VAZ 2108, VAZ 2109, VAZ 21099