Adjusting the Grant's handbrake
Adjusting the parking brake of a VAZ 2190 is no more difficult than on a classic or “chisels”. Let's look at the step-by-step principle , starting with inventory.
Necessary tool for tightening the handbrake
What you will need for work :
- Inspection pit, overpass, lift;
- Keys: open-end and ratchet with long head 13;
- Socket wrench or ratchet with a 10mm head;
- Possibly WD-40.
Parking brake adjustment principle
So, the car is on a pit/lift, the tool is in your hands - the handbrake is loose. What to do?
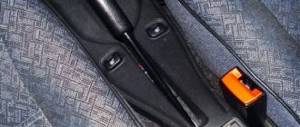
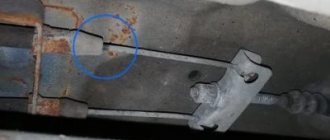
Step 1 : find a resonator under the bottom. We remove its mount, located closer to the front of the car. Then, using a socket wrench or a ratchet with a 10mm socket, unscrew the 4 bolts securing the heat shield.
This way we get the opportunity to move the screen forward without removing it. Underneath there is access to the parking brake adjustment mechanism.
Step 2 : slide the screen forward to access cable adjustment.
Remove the cushion mount 1, unscrew the bolts 2. Move the screen 3.
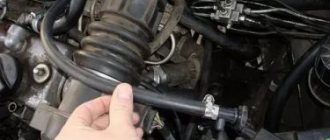
Step 3 : holding the adjusting nut (open-end wrench size 13), loosen the lock nut (head size 13).
Step 4 : Rotating the adjusting nut clockwise, tighten the cables. Periodically check from the inside how the handbrake is holding.
As soon as the parking brake lever reaches 3-4 clicks, tighten the locknut.
1-lock nut. 2-adjusting nut. For convenience, you can loosen the locknut and rotate them both clockwise with a long head of 13.
Step 5 : return the heat shield to its place, fix the fastening screws and the rubber suspension of the resonator.
Checking work:
- the rear axle is suspended, the parking brake is removed - the rear wheels rotate freely;
- the rear axle is suspended, the brake lever is raised (to maximum tension - 3-4 clicks) - the rear wheels do not rotate even with force.
Adjusting the handbrake cable on the LADA “Granta”
To carry out the work, access to the cable from the bottom is necessary, so the adjustment of the Grant handbrake cable after replacement is carried out while the muffler heat shield has not yet been put in place. Next you should do the following:
- lower the handbrake lever all the way;
- loosen the locknut on the adjusting device (if it is tightened);
- screw the adjusting nut onto the cable shank until the latter is tensioned;
- make sure that the free play of the lever in the cabin is from 2 to 4 clicks;
- if necessary, adjust the cable tension;
- tighten the locknut while holding the adjusting nut with a wrench;
- Install a muffler heat shield.
When the handbrake cable is adjusted, you can check the car while driving.
General questions about the parking brake on Grant
Let's look at a few basic questions about VAZ 2190 brakes.
Operating principle of the Granta handbrake
When raising the handbrake lever in the passenger compartment:
- the drive brake cable is tensioned;
- through the equalizer he pulls the cables going to the rear brake pads;
- The pads are pressed against the brake drums through expansion bars, stopping the wheel from moving;
- When the tension is loosened (removed from the handbrake), the tension of the cables also weakens, and the wheels move freely.
Lever 1 pulls cables 3 through cable 2. Those, through levers 4 and strips 5, push the brake pads apart.
Why is it necessary to tighten the parking brake?
When the cable tension is loosened, there is a danger of the vehicle rolling away .
This means that as the rear pads wear out, the original parking brake setting will lose effectiveness.
Handbrake adjustment video 2190
Adjust the handbrake
Adjusting the parking brake of a VAZ 2190 is no more difficult than with classic or “chisels”. Consider a step-by-step principle , starting with inventory.
The tool is needed to tighten the handbrake
What is needed for work :
- Inspection hole, overpass, elevator;
- Wrenches: wrenches and ratchets with long head 13;
- Socket wrench or ratchet with 10 head;
- Possibly WD-40.
Parking brake adjustment principle
So, the car is standing on a pit / lift, the tool is in hand - the handbrake is loose. What should I do?
Step 1 : Find the resonator under the bottom. Remove its mount located closer to the front of the car. Then, using a screwdriver or ratchet with a 10-bit bit, unscrew the 4 heat shield bolts.
This gives us the ability to move the screen forward without removing it. Under it, access to the parking brake control mechanism is available.
Step 2 : We move the screen forward to access the cable settings.
Remove the mounting pad 1, unscrew the bolts 2. Move the screen 3.
Step 3 : holding the adjusting nut (open the key to 13), loosen the lock nut (head to 13).
Step 4 : Turn the adjusting nut clockwise to tighten the cables. Periodically check in the cabin how the handbrake holds.
Once the parking brake lever has reached 3-4 clicks, tighten the locknut.
1 nut 2 adjusting nut. For convenience, you can loosen the lock nut and turn them clockwise with a 13 long head.
Step 5 : Return to the place of the heat shield, secure with the mounting screws and the rubber suspension of the resonator.
Checking work:
- The rear axle is suspended, the parking brake is removed - the rear wheels rotate freely;
- The rear axle is suspended, the brake lever is raised (to maximum tension - 3-4 clicks) - the rear wheels do not turn even with force.
Lada Granta .:*
Yesterday I finally adjusted the handbrake on my grant. For 14 months of operation and almost 25 thousand mileage, this was the first procedure for adjusting the handbrake. During this time, it weakened greatly, there were at least 12 clicks and practically did not hold the car. According to Murzilka, the optimal handbrake stroke is 3-4 clicks. If there are less than 3, it is necessary to loosen the tension, if more than 4, it is advisable to tighten it. For those who are doing this for the first time, as I did it, I will describe the procedure:
1. Place the car on a pit or overpass;
2. Fully lower the parking brake lever;
3. Remove the cushion from the bracket of the additional muffler and unscrew the four nuts that secure the protective screen
4. Move the protective screen in the direction of travel of the car
5. Holding the adjusting nut with one wrench set to “13”, loosen the tightening of the lock nut
6. We adjust the length of the drive using the adjusting nut. When screwing it in, the length of the drive is shortened, and when turned away it increases (during the adjustment process, we periodically check the handbrake stroke);
7. If you have achieved the desired result, you can lock the adjusting nut and fasten the protective screen and additional muffler in place.
The handbrake now holds perfectly!) You can twist the nickels)).
I also threw additional weight onto the car body. I took it from the generator and secured it to a stud near the headlight. Those who have not seen the entry about “Strength and Mass” can read it here