Device
Oil seals are a modern version of valve seals, which are equipped with a powerful steel sleeve inside and an expander spring. Springs are used to secure the edges of the caps and valve stems.
Actual size of the caps
Gaskets are made primarily of rubber, which becomes harder over time and wear occurs, so the element ceases to properly perform its functions. As a result, oil ends up inside the combustion chamber.
There is only one sign of wear on the valve stem seals - thick blue smoke begins to actively pour out of the exhaust pipe, plus oil consumption increases.
There is only one solution to this situation - replacement.
How to know when it's time to change
It's simple: if thick bluish smoke comes out of the car's exhaust pipe, then it's time to change the caps . As a rule, this smoke appears only when the engine starts and when it stops. But if the caps are very worn, thick smoke constantly comes out of the chimney. However, smoke is not the only sign that the caps need to be urgently replaced. Sometimes smoke is practically not visible, but oil consumption in the car increases several times, while no external oil leaks (through various oil seals and gaskets) are observed. All this also suggests that it’s time to change the caps.
Replacement methods
There are a few basic options you have if the caps stop working properly.
| Option | Peculiarities |
| Let it be as it is | The most unfortunate decision, which can lead to serious consequences, engine breakdowns and huge restoration costs. Do not choose it under any circumstances |
| Contact a garage service station | There are many service stations created on the basis of a simple garage in an auto cooperative. Many people use their services, but we do not recommend that you do so. The prices are not as high as at a good car service center, but the quality of services is appropriate, there are no clear deadlines. Once you give the car away, you may not see it soon |
| Verified car service | A good option for those who do not want to do their own repairs and have enough money for high-quality car maintenance. There is only one disadvantage to this method of repair - high cost. |
| Do it yourself | The option preferred by most domestic car owners. Expenses will only be required for materials. With the right approach, you will make a replacement no worse than any good service station |
When choosing the option to replace the caps yourself, make sure you have sufficient experience and skills. Otherwise, doing the repairs yourself is strictly not recommended.
Replacement
To work on replacing oil scrapers you will need:
- Set of flat screwdrivers;
- Head for removing spark plugs;
- New caps;
- Cap puller;
- Desiccant (for valves);
- Platypuses;
- Rod with a cross section of 8 mm.
Extraction process
Having prepared everything you need, you can start working.
- First remove the air filter, fuel pump, ignition distributor. All this is relevant for carburetor VAZ 2109.
- Some argue that to replace the caps it is necessary to remove the cylinder head. Not true. To get around this step you will need a rod. Next we will talk about how to change oil scrapers without removing the head.
- Remove the negative from the battery.
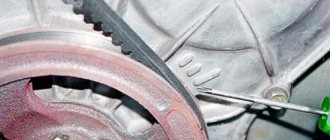
- Remove the gear from the camshaft.
- When disassembling, try to preserve the key. It is located in a pair of camshafts. Pull it out carefully and there will be no problems.
- Dismantle the cylinder head cover by unscrewing all the bolts located around the perimeter.
- Remove the rear part of the cylinder head cover - the ignition distributor plug. Here you will have to unscrew the 2 nuts securing the ground wires, plus remove the conductor tips from the studs.
- On both sides of the camshaft bearing housing, unscrew the nuts, put them aside, but do not lose them.
- Remove the camshaft from the cylinder head and after that you can dismantle the oil seal.
- Rotate the crankshaft until the piston on which the oil seal needs to be replaced is not at top dead center.
- Using a special head, unscrew the spark plug from the block head, insert a rod prepared in advance with a diameter of 8 mm. Preferably made of tin. Insert the rod so that it is between the piston and the valve.
Spring
- Gently compress the valve springs using a depressurizer.
- Using a platypus or tweezers, remove the valve crackers, and then remove the element.
- Remove the upper plate and valve spring from their seats. Don't forget that there are two springs - upper and inner. Both are subject to removal.
- Press out the oil scraper cap located on the guide sleeve. To do this, you need to install a collet of a special tool on the valve, which is used to dismantle these elements. You can easily find it in any auto store or market.
- Place the bike and hit the bushing with it, then hit the bike with the handles.
- Press the cap off the sleeve and remove it from the collet. Ordinary pliers will help here if you don’t have a special tool.
- Be careful when removing as there is a risk of damaging the bushings. Pull straight up and under no circumstances rotate the element when pressing out.
Remove carefully
- Take new caps and remove the springs from them.
- Drop a little oil on the cap and insert it into its rightful place.
- Press the cap with a tool. Make sure that the element is seated all the way and as tightly as possible.
- Replace the spring you removed.
- By analogy, replacement is performed on all other pistons.
- Replace the spring and valve plate. The valve cotters are mounted into the grooves with a special tool.
- Remove the rod. To make the crackers fall into place, hit the edges of the valve with a hammer. For best effect, arm yourself with a small metal rod and strike through it.
- Be sure to lubricate the camshaft supports and washers with engine oil.
- Replace the camshaft. Don't forget to make sure that the cams of the first cylinder are directed strictly towards the tappets.
- Lubricate the camshaft cams and journals with oil.
- Return the camshaft bearing housing to its position. Also make sure that the guide bushings are in the holes in the bearing housings.
- Tighten the fastening nuts and install the camshaft oil seal.
- Reassemble the unit in reverse order.
Changing valve stem seals is not as difficult as it might seem at first glance. But if such work raises concerns, contact a trusted car service center.
Replacing oil seals (valve seals)
I've been experiencing oil consumption for a while now. Everything would be fine, but over time it began to increase. All signs indicated that the oil removal was coming to an end. It was decided to change them.
Since this is the first time I’ve encountered this question, I started to find out, ask and search: which manufacturer’s caps are better.
Almost everyone said that the best are VICTOR REINZ
GOETZE
,
ELRING
and
CORTECO
variants .
I bought VICTOR REINZ
.
The appointed day came, and, with the help of a friend, we began to sort everything out. I was immediately confused by a couple of things: scuffs on the outermost support of the camshaft bed and uneven abrasions on the journals of the camshaft itself.
In general, there was nothing to photograph, the whole process was familiar to everyone, and taking a photo after each valve was pointless. I took photos of a couple of general views.
All the old seals, except one, were sitting quite tightly. One was removed by hand. This already means that the work is not being done in vain.
We changed the valve seals of cylinders 1 and 4, then set pistons 2 and 3 to TDC. The four valves were behind, but when they started filling in the next oil seal, it was immediately removed by hand. We tried another new oil seal: same story. We already thought that the valve guide had come to an end. We decided to try any old one, it fit tightly.
The thought immediately came to me: “Here’s VICTOR REINZ
!”
Let's go look for other seals. Of all, only CORTECO
.
We started stuffing them, and it was a completely different matter: the seals sat evenly and tightly. We completed cylinders 2 and 3 and redid cylinders 1 and 4. There were no problems with these.
As for the old ones: almost all the oil seals were oval, some strongly. One, as I said, was removed from the guide by hand (this is not
the same guide that VICTOR REINZ easily climbed onto).
Judging by the markings, I had CORTECO
, but with time and temperature they turned brown and only the inner surface showed their original color.
We reassembled everything, reset the ignition, and I took the car to a good mechanic to adjust the valves. I picked it up a few hours later. The mechanic said that the valves were clamped and the camshaft was normal. He also said that when it’s cold, one of the pistons knocks.
That's how things are...Thank you all for your interest))
Causes and symptoms of malfunction of valve stem seals VAZ 2109
As a rule, rubber is used as a gasket material. During operation, due to constant reciprocating motion and the action of an aggressive environment (changes in temperature, exhaust gases, overheating, etc.), the edge of the caps wears out , and the rubber itself loses its elasticity and hardens. And as a result, the valve stem seals begin to leak. As a result, engine oil enters the combustion chamber.
As a rule, on domestic cars the oil seal replacement interval is 80,000 kilometers. For modern engines, this period can be increased by 2-3 times.
The first signs of wear on the valve stem seals are the appearance of blue smoke from the exhaust pipe. Also, the “oil appetite” of the car engine increases. The engine consumes more than 1 liter per 1000 kilometers .
Of course, you don’t have to think about a major overhaul, of course, if the dynamic characteristics have not decreased and fuel consumption has not increased. It is worth remembering that leaking oil burns on hot valves, as a result of which carbon deposits build up on the internal walls of the engine, the cross-section of the intake and exhaust channels narrows, and the engine loses power. When the engine is actively throttled, carbon deposits begin to crumble, and its particles clog the valve seat and working chamfer. The seal is broken and the engine is already running intermittently and stalls. Another outcome of a breakdown is burnout of the exhaust valve , which can lead to repair of the engine block.
These problems can be solved by replacing the valve stem seals on the VAZ 2109. You can change the caps yourself in the garage.
On carburetor engines, replacing oil seals is carried out in the same way, but before starting work it is necessary to additionally remove the air filter, fuel pump, ignition distributor and auxiliary drive housing.
You will need the following repair tool:
- wrench “10”, “13”, “17”;
- standard flat and Phillips screwdriver;
- head for unscrewing spark plugs;
- cap remover;
- desiccant for valves;
- a set of new valve stem seals for VAZ 2109;
- tweezers or thin-lipped pliers.
The most necessary thing is a valve cotter remover . You can find it at an auto tools store.
Malfunctions of valve stem seals
High quality materials do not guarantee the eternal operation of valve seals; sooner or later, under the influence of negative factors (high temperatures, aggressive chemical composition of oil, etc.), slight wear of a regular nature occurs, which ultimately leads to the fact that these parts can no longer perform their functions fully. The working surface is rubber and over time the structure becomes compacted, as a result of which elasticity is lost and cracks begin to appear. Long-term operation and exposure to an aggressive environment with high temperatures does not have the best effect on the damper spring. Ultimately, all this leads to the fact that the valve stem seals no longer effectively remove oil from the valve stems, and it ends up in the combustion chambers.
When is it recommended to replace valve seals?
| Causes | Subtleties |
| Depending on mileage. | In practice, the service life of oil seals on a VAZ 2109 with an 8-valve engine rarely exceeds 100,000 km. After this, these parts should be changed, even if there is no excessive oil consumption. |
| If the car has not been used for a long time. | Lack of operation will also have a detrimental effect on the condition of the devices. |
| There are cases when replacement is necessary even when the size of the valve stem seals is reduced prematurely. | This is not uncommon for domestically produced components. |
The fact that it is necessary to change the seals is indicated by some characteristic features.
Symptoms of a problem
Since these caps are installed inside the motor, it is impossible to visually assess their serviceability. However, there are a number of signs that may indicate their poor condition.
- The engine begins to consume oil. There are motors for which consumption of 100 grams per thousand kilometers becomes the norm. If you add a liter of oil every week, your engine is definitely consuming lubricant.
- Oil consumption will certainly be accompanied by bluish smoke from the exhaust pipe. You cannot see this at idle, but if you give the engine a good load, then this phenomenon can be seen in the rearview mirror.
This is interesting: Mazda 6 fuse diagram: location and replacement methods
Causes of wear
At idle speed, the VAZ 2109 crankshaft rotates at a speed of 800 rpm, the maximum speed is 4,500–5,000 rpm. Each valve can perform from 120 to 1,200 working strokes in a period of time of one minute, i.e., lower and rise. Accordingly, each valve stem seal bears a serious load. In this case, one should take into account the aggressive environment in which they are located (high temperatures, chemically aggressive composition of oils, exhaust gases).
With use, the soft rubber part of the valve stem seals loses its original elasticity. And the diameter of the working edges on which the pressure falls decreases over time. The quality of the seals does not matter; even the best parts will need replacement.
How to know when it's time to change
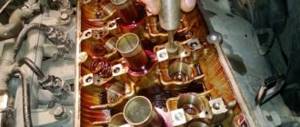
Worn caps of a VAZ 2109 car
It’s simple: if thick bluish smoke comes from the exhaust pipe of the car, then it’s time to change the caps . As a rule, this smoke appears only when the engine starts and when it stops. But if the caps are very worn, thick smoke constantly comes out of the chimney. However, smoke is not the only sign that the caps need to be urgently replaced. Sometimes smoke is practically not visible, but oil consumption in the car increases several times, while no external oil leaks (through various oil seals and gaskets) are observed. All this also suggests that it’s time to change the caps.
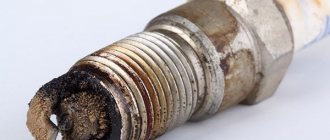
The result of worn valve stem seals
When the first signs of wear of parts appear, it is necessary to immediately diagnose the causes of malfunction of the gas distribution mechanism. Including checking the condition of the valve seals. Experienced car enthusiasts who know the structure of the engine are aware of how to check it themselves. Beginners are advised to address this issue to qualified car repair service specialists. Operating a power plant with all signs of wear on the valve stem seals is highly not recommended for a long period of time.
The consequences of operating an engine with such malfunctions are not the most pleasant:
- engine power is significantly reduced;
- unstable operation at idle (stalls);
- “floating” engine speed;
- reduction of compression in cylinders;
- coking (carbon deposits on pistons, spark plugs and cylinder walls).
The appearance of characteristic soot is a serious symptom. Further operation without identifying and eliminating the causes of its occurrence is fraught with engine failure and major (and therefore expensive) repairs.
What valve stem seals should I put on a VAZ 2109?
Original number 21080100702686, average price 221 rubles. You can buy an analogue of Trialli CV 537 for 181 rubles.
1. Tool required for replacing oil scraper valves.
2. Remove the crankcase ventilation hoses and the supply hose from the valve cover fittings. Using a 10mm wrench, unscrew the two nuts securing the valve cover and remove it.
3. Using a “10” wrench, unscrew the two nuts securing the throttle drive cable bracket to the receiver and remove it.
4. Unscrew the spark plugs.
5. Using a 10mm wrench, unscrew the bolts of the front timing cover: two on the side and one in the center. Remove the timing cover.
6. Using a 17mm wrench, loosen the nut securing the tension roller.
7. Using a 17mm wrench, unscrew the camshaft pulley.
8. Using a 10mm wrench, unscrew the nut securing the protective casing.
9. And bend the casing.
10. Using a “10” wrench, unscrew two nuts and one bolt securing the plug. We remove the plug.
11. Using a “13” wrench, evenly, in several approaches (until the pressure of the valve springs is relieved), unscrew the ten nuts securing the camshaft bearing housings.
12. Remove the front and rear camshaft bearing housings from the studs.
13. Remove the camshaft.
14. Using a syringe, pump out the oil from the camshaft block.
15. Remove the pusher with the adjusting washer from the cylinder head socket.
17. Install the desiccant rail. Set the crankshaft to the TDC position of the pistons of the 1st and 4th cylinders. In the same position of the shaft, we change the oil seals of the valves of the 1st and 4th cylinders.
18. Install the valve depressurizer. We rest the desiccant thrust bearing against the valve plate, and place the hooking lever behind the rail. We compress the springs and remove the crackers with tweezers.
20. We take out the valve spring and the upper “plate”. Please note that there will be two valve springs - internal and upper. Both of them need to be removed.
21. Install the collet of the device for removing oil seals onto the cap, and then the device itself.
22. We adjust the striker and sharply hit it on the sleeve of the device, and after that on the striker of the handle, thereby pressing the oil seal off the sleeve.
23. Remove the oil seal from the collet of the device.
24. We perform the same operations on the adjacent valve.
25. Lubricate the new oil seals with engine oil and place them on the valve guides.
26. Using a mandrel, press each cap onto the guide sleeve. We assemble the valve mechanism of the 1st cylinder in the reverse order. Then we repeat this work for the 4th cylinder. Then, turning the crankshaft 180° (TDC of the pistons of the 2nd and 3rd cylinders), similarly change the oil seals of the valves of the 2nd and 3rd cylinders.
27. Put the camshaft in place. We install the camshaft bearing housings, put washers on the studs and screw in the nuts securing them in two stages in the order indicated.
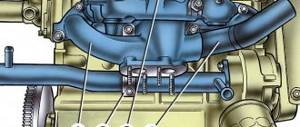
Correct replacement of valve stem seals on a VAZ 2109 without removing the head
Valve seals are shown by arrows
If your VAZ 2109 has bluish-blue exhaust smoke, this is a signal that engine oil has entered the combustion chambers. Don’t panic and immediately take the car to a car service center to have the engine overhauled:
- The reason for this may be not only worn compression or oil scraper rings, but also worn-out valve stem seals, which allow oil to pass through the valve stems and the oil enters the combustion chambers
- And all you have to do is replace the valve stem seals of the VAZ 2109.
- Replacement is carried out in-house.
- In this case, you don’t even have to remove the block head.
- Replacing valve stem seals on a VAZ 2109 is a simple procedure that does not require special tools or the skills of a car mechanic.
- And if you know the structure of the engine, then the replacement procedure is a mere trifle for you.
- And the price of the issue is many times lower than a major overhaul.
What are valve stem seals and where are they located?
Valve seals for VAZ 2109
Currently reading
Motor oil for two-stroke engines
5w40 decoding: basic designations
These caps are located directly on the engine valves, in the cylinder head. Another name for these caps is valve seals. Their main task is to prevent excess oil from entering the engine. These caps are made of special rubber. And rubber, even special ones, deteriorate over time and oil begins to flow directly into the combustion chamber of the engine. In this case, it is worth changing these parts.
ESSENTIAL TOOL
You will need:
- Ratchet socket set
- Hammer
- Tin (or just soft) rod, 8mm in diameter
- Pliers
- Device for desiccation of valves
- Tweezers
- Collet for removing caps (you can use pliers if you don’t have a collet)
- Mandrel for pressing in new caps
- Rags (to wipe your hands off the removed parts)
Replacing oil caps on a VAZ 2109 occurs in the following sequence
So:
- Disconnect the wires from the battery terminals.
- Remove the timing belt.
- Remove the toothed pulley from the camshaft.
- We disconnect the wires from the first fastening, and unscrew the nuts and with them the third fastening bolt.
- Often this mount does not have an O-ring that must be put in place during assembly.
- We evenly unscrew the remaining nuts (there are four of them) on the front cover, then unscrew the nuts of the rear cover (there are six of them).
- Remove the washer and remove both covers.
- Before removing the camshaft, be sure to remove the fastening key so as not to lose it; if the key is tightly fixed, then remove it together with the shaft.
- Remove the camshaft.
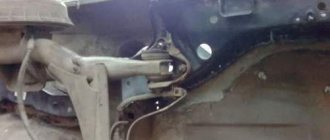
- We take out the camshaft oil seal.
We take out the camshaft and remove the oil seal from it
- We rotate the crankshaft so that in our cylinder with replaceable caps the piston is at top dead center.
- We unscrew the spark plug and insert a tin rod (or another soft metal) (from the list of tools) into the hole between the valve plate and the bottom of the piston, on which we will change the cap.
- Then we install the valve depressurizer.
- Press the valve spring.
Installed valve depressurizer
- We take out the crackers with tweezers
Press the valve spring and remove the crackers with tweezers
- Remove the upper valve plate and the springs behind it.
We take out the upper valve plate
- We pull the valve stem seals off the guide bushing using a collet (we prepared it in advance).
We pull off the oil seal using a collet
- We sharply hit the striker on the handle to compress the valve stem seal (photo below)
- Use pliers to carefully pull it out of the collet.
- We inspect the valve guides to make sure we haven't damaged them.
We compress the cap with a sharp blow of the striker on the handle and remove it from the collet
- Remove the springs from the new caps before installing them.
- We treat the installed valve stem seals with engine oil.
- Using a mandrel, we press the new ones all the way into the bottom plate.
- After installing the new cap in place, put a spring on it.
- Assembly is carried out strictly in reverse order.
- Remove the rod from the spark plug hole.
- We apply a sharp blow to the crackers through a metal rod, this is necessary to fit them more tightly into place (as the instructions say).
- We replace all valves in the same way.
- Be sure to lubricate the entire work area with engine oil.
- Install the camshaft head support.
- Be sure to coat the block head with sealant at the location of the outer support.
- Install the camshaft.
- We install the bearing housings in their places, put on the washers, and tighten the nuts.
- It is recommended to tighten the nuts evenly, tightening them gradually and until they stop.
- Install the camshaft oil seal.
At this point, the work on the VAZ 2109, replacing the valve stem seals, is completed. As you have seen, it is easy to do this yourself.
Note: Be sure to check the valve clearances after repair, adjust the valves if necessary.
We also invite you to watch the video of replacing valve stem seals on a VAZ 2109.
Sequencing
- There is a striker on the collet. You need to hit it accurately with a hammer. This will cause the cap to crumple and it will be possible to remove it from the collet with pliers.
DIY video on replacing valve seals on a VAZ 2109
Important points
- After removing the worn cap, you should carefully inspect the walls of the guide sleeve, since any scratch on this wall left by the collet can lead to renewed oil leakage into the combustion chamber and will negate all efforts to replace the cap.
- Before installing new caps, you must remember to remove the springs from them.
- Before pressing in the new cap, the installation site is generously lubricated with oil. This helps to place the cap in place more accurately, without putting extra effort into it.
As can be seen from the article, it is quite possible to replace valve stem seals on a VAZ 2109 with your own hands. The main thing is to be patient, follow the sequence of operations and not make much effort when pressing the new caps into place.