When replacement is necessary
Signs by which you can determine that the valve stem seal needs to be changed:
- The more worn the cap is, the more oil the engine consumes.
- The exhaust smoke turns blue, which indicates oil has entered the cylinders.
The longer a car owner delays replacing oil seals, the more engine power decreases.
You can replace the valve stem seals on a VAZ-2110 yourself by assembling the following devices:
- open-end and socket screwdrivers;
- hexagons;
- hammer;
- tin rod with a diameter of 8 millimeters;
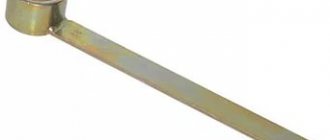
- a device to dry out the valves;
- tweezers;
- collet;
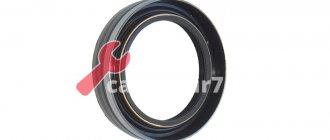
- new caps (it’s better to take extra).
Replacement
Before starting work, you need to prepare the car. Be sure to disconnect the battery; you may accidentally short-circuit it during operation. Put the car on the handbrake. If you have central locking, you must leave the window open. In this case, when the lock is activated, you will get into the car without any problems.
- The work is carried out in the following order:
- Using a Phillips screwdriver, unscrew and remove the clamp securing the crankcase ventilation hose;
- Remove the remaining hoses in the same way;
- Using a wrench, unscrew the nuts securing the valve cover;
- Remove the cover;
- Unscrew (wrench “10”) the nuts securing the mass to the cylinder head;
- The plug is removed. To do this, you need to unscrew the screw and 2 nuts;
- Unscrew the screws securing the front timing cover and remove it;
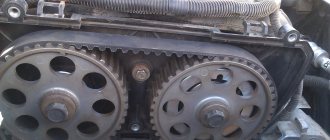
- The crankshaft is rotated in the direction of the arrows until the marks completely coincide. We remove the plug on the clutch housing and check the marks for matches;
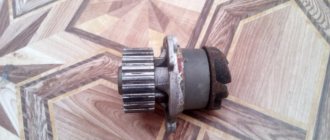
- The generator pulley is removed;
- The tension roller fastenings are loosened and the belt is removed;
- Remove the pulley from the camshaft;
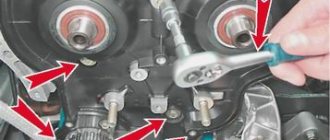
- Using a 13 socket, we first loosen and then unscrew the 10 nuts securing the camshaft;
- We dismantle the camshaft;
- Unscrew the spark plugs;
- The crankshaft is installed according to the position of the top dead center (TDC) for cylinders 1 and 4;
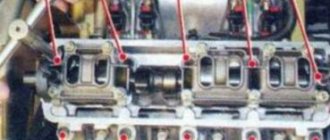
- We remove the pusher along with the adjustment washer located in the socket of the block head;
- Insert a tin or lead rod (diameter 7-9 mm) into the first cylinder. We place the rod under the valve where the cap is changed;
- The desiccant is installed on the valve stem. With its help we compress the springs. Using tweezers, take out the crackers;
- The plate and spring are removed together;
- Using tongs (pliers), remove the oil seal;
- Remove the thrust washer;
- After lubricating the replacement cap (machine oil), press it into place. This is done through a special mandrel.
Remove the hose;
The rest of the procedure is performed in reverse order. We perform the same actions for the 2nd valve of this cylinder. Next we move on to cylinder 4. Having changed the caps on it, we rotate the crankshaft 180°. Using the same principle, they are replaced on the valves of cylinders 2 and 3. Replacing oil seals on a 16-valve engine differs only in the need to remove 2 camshafts. When installing the camshaft, be sure to tighten the nuts with a torque wrench. This should be done from the middle to the edge.
Conclusion
. The engine of any car requires attention. Therefore, it is extremely important to correct even small problems in a timely manner. Therefore, replacing valve seals on VAZ 2114 (2115) 8 and 16 valves should be done at the first sign of a problem. You don't need any additional equipment for this. When carrying out repairs, you need to do all actions as carefully as possible.
Replacement algorithm for an 8-valve engine
- It is necessary to remove the terminal with the minus sign from the battery of the immobilized car.
- Next, the air filter trim, fuel pump, ignition distributor and auxiliary equipment drive housing are removed from the engine. This applies to the rear of the car. From the front, you need to remove the housing that protects the camshaft drive.
- The next step is to unfasten the camshaft drive belt, timing pulley and key.
- Then you need to unfasten the valve cover from the head of the block and from its rear part. To do this, you first need to unscrew the ground nuts, remove the wiring, then disconnect the fastening and remove it.
- Under the valve cover there are fasteners that hold the camshaft. The screws must be unscrewed and then dismantled.
- Next, you need to remove the camshaft along with the oil seal, and replace it with a new one during assembly.
- Now on the cylinder (in order for the operation to proceed smoothly and without problems), on which the replacement will take place, the piston is installed at TDC. To do this, a tin rod must be inserted into the gap located under the spark plug.
- When the piston is installed at TDC on the cylinder, the rod must be positioned so that it is between the piston and the throttle (where the replacement will take place). This is necessary so that the valve does not drop after desiccation.
- Next, you need to place a desiccation device on top of the head. They also squeeze the springs at the required throttle, and use tweezers to remove the crackers. Then the plate and springs are dismantled.
- Now use a collet to press the oil seal onto the throttle guide.
- Before installing a new oil seal, it is recommended to remove the spring from the cap, lubricate it with oil and press it onto the guide. And only after that you can put on the spring.
- Next, you need to replace the plate and springs, then use a special device to clamp them and return the crackers to their place. To ensure they fit neatly into the connectors, it is recommended to lightly hit the end of the valve with a hammer.
The valve stem seals are changed in the same way. You need to raise the piston to TDC, install the rod, dry it, remove the cap, then install a new one in its place, dry it and move on to the next valve.
Replacing valve stem seals for Lada 21124 (VAZ 21124)
Operations performed when replacing valve stem seals on a VAZ 2170 2171 2172 Lada Priora
An external sign of wear on the oil seals is the short-term appearance of blue smoke from the exhaust pipe after starting the engine and when braking the engine after prolonged driving under load. In this case, constant smoking is usually not observed. Indirect signs are increased oil consumption in the absence of external leaks and oily spark plug electrodes.
Tools necessary for replacing valve stem seals on a VAZ 2170 2171 2172 Lada Priora
You will need: all the tools necessary to remove the cylinder head cover (see “Replacing the cylinder head cover gasket on a VAZ 2170 2171 2172 Lada Priora”), the timing drive (see “Replacing the timing belt and tension roller on a VAZ 2170 2171 2172 Lada Priora), the rear timing belt cover (see “Replacing the cylinder head gasket on a VAZ 2170 2171 2172 Lada Priora”), removing the head cylinder block (see “Replacing the cylinder head gasket on a VAZ 2170 2171 2172 Lada Priora”), as well as tweezers (or a magnetized screwdriver) for removing crackers from the valve spring retainers...
...device for compressing valve springs...
...a device for removing and a mandrel for installing valve stem seals.
Sequence of operations when replacing valve stem seals on a VAZ 2170 2171 2172 Lada Priora
1. Disconnect the negative terminal wire of the battery.2. Remove the spark plugs (see “Replacing and servicing spark plugs on a VAZ 2170 2171 2172 Lada Priora”). Replacing spark plugs on a Priora car is carried out in the same way as on a VAZ 21124.3 engine. Set the piston of the 1st cylinder to the TDC position of the compression stroke (see “Installing the piston of the first cylinder to the TDC position of the compression stroke on a VAZ 2170 2171 2172 Lada Priora”).4. Remove the timing belt (see “Replacing the timing belt and tension roller on a VAZ 2170 2171 2172 Lada Priora”).5. Remove the camshaft pulleys (see “Replacing the cylinder head gasket on a VAZ 2170 2171 2172 Lada Priora”).6. Remove the rear protective cover of the timing belt (see “Replacing the cylinder head gasket on a VAZ 2170 2171 2172 Lada Priora”).7. Remove the cylinder head cover (see “Replacing the cylinder head cover gasket on a VAZ 2170 2171 2172 Lada Priora”).8. Remove the cylinder head (see “Replacing the cylinder head gasket on a VAZ 2170 2171 2172 Lada Priora”). 9. Use a socket head to turn out twenty bolts securing the camshaft bearing housing...
10. ...and remove the housing.
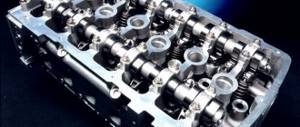
11. Remove the camshafts from the cylinder head supports.
12. Remove the valve lifters from the holes in the cylinder head.
13. Install a device for compressing the valve springs by screwing the camshaft bearing cover bolt into one of the holes in the cylinder head and hooking the device onto this bolt. Compress the valve spring with the tool.
14. Remove the two nuts from the top spring plate using tweezers or a magnetized screwdriver. Then remove the fixture.
Useful advice If the force of movement of the device lever increases significantly, and the crackers do not come out of the valve groove, apply a light blow to the spring plate with a hammer to release the crackers.
15. Remove the spring plate.
16. Remove the spring.
17. Press the valve stem seal off the valve guide.
Warning: If you do not have a tool for removing the caps, carefully remove them using pliers. The force must be applied strictly upward and not rotate the caps, so as not to damage the valve guides. The use of two screwdrivers for this purpose is prohibited!
Helpful advice: If the set of new caps includes an installation sleeve, put it on the valve stem to protect the working edge of the cap from damage by the sharp edges of the grooves for crackers on the valve stem.
18. Dip the valve stem seal in engine oil and insert it into the mandrel.
19. Carefully press the cap until it stops.
Note: If a guide bushing was installed on the valve stem, remove it.
20. Install the springs and spring plates.
21. Compressing the spring with a tool, install the crackers so that they fit into the grooves of the valve stem.
Helpful advice: After installing the cotters and removing the device for compressing the valve springs, apply several gentle blows with a hammer to the end of the valve stem so that the cotters are guaranteed to be fixed in the groove of the stem. If the crackers installed skewed remain unfixed, when the engine is started, the “uncracked” valve will fall into the cylinder, which will lead to a serious engine failure.
22. Install the hydraulic valve tappet.23. Replace the oil seals of the remaining valves in the same way.24. Install the cylinder head on the engine (see “Replacing the cylinder head gasket on a VAZ 2170 2171 2172 Lada Priora”). 25. Lubricate the camshaft supports in the cylinder head and hydraulic tappets with engine oil.
26. Install the camshafts into the cylinder head supports so that the cams of the 1st cylinder are directed away from the valve tappets.
Note
The intake camshaft is equipped with a distinctive belt.
27. Lubricate the journals with engine oil...
28. ...and camshaft cams.
29. On the surface of the cylinder head mating with the camshaft bearing housing, apply Loctite-574 type sealant with a roller with a diameter of 2 mm.
Warning: The engine may not be started earlier than 1 hour after applying the sealant.
30. Install the bearing housing and tighten its mounting bolts evenly in a cross pattern, starting from the middle supports.
Note The bearing housing is centered by bushings pressed into the cylinder head. Before installing the housing, check that they are present and that they are pressed correctly.
31. Install the removed parts of the gas distribution mechanism (see “Replacing the cylinder head gasket on a VAZ 2170 2171 2172 Lada Priora”) and adjust the tension of the timing belt (see “Replacing the timing belt and tension roller with car VAZ 2170 2171 2172 Lada Priora (Lada Priora).32. Install the removed parts of the generator drive and adjust the tension of the generator drive belt (see “Checking the tension of the generator drive belt on a VAZ 2170 2171 2172 Lada Priora”).
You can replace the valve stem seals without removing the head from the cylinder block. To do this, you will need a tin rod with a diameter of about 8 mm (for example, solder), tweezers, a screwdriver, a mandrel for pressing the caps and pullers for oil seals and valve springs.
- tighten the nuts until the bearing housings touch the surface of the block head, while making sure that...
Sources
- https://www.autosecret.net/motor-vaz-2170-2171-2172/uplotneniya/530-zamena-maslosemnyh-kolpachkov
- https://vaz-omg.ru/engine/replacement of engine seal parts/replacement of valve stem seals.html
Replacement process on a 16-valve engine
Here the process is a little different. It is not possible to use a rod here. The head must be removed from the engine to be able to press the valve against the seat during replacement. In all other respects, by and large, the work is carried out similarly.
The differences in replacement between carburetor and injection engines lie in the features of disassembly performed in order to get to the oil seal. But the replacement sequence itself is identical.
As for tools, you can exclude the collet, but be sure to have a device for loosening the valves. To compress the seals, pliers are sometimes used. But in this case, during removal, you need to pull the cap exclusively vertically and make sure that the oil seal does not rotate, otherwise there is a high probability of scratches on the surface of the guide.
In conclusion, we note that the process is quite labor-intensive, but you can cope with this task yourself if you wish.