When is it necessary to replace and remove the exhaust manifold on a VAZ-2114
Huge temperature changes are the main problem faced by the exhaust manifold and the gasket, for which it is removed. The collector itself is made of a special grade of cast iron; it can withstand high temperatures (up to 800-900 degrees) , however, these are critical values, after which the collector may warp or crack.
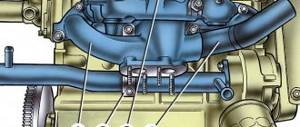
Exhaust manifold VAZ-2114
Its main task is to collect exhaust gases and distribute them into the exhaust pipe of the muffler.
Replacing or dismantling the VAZ-2114 exhaust manifold is necessary in the following cases:
- Mechanical damage to the collector.
- Warping and loss of tightness at the junction with the cylinder head.
- Burnout of the gasket between the head and the manifold.
- The appearance of cracks as a result of engine overheating.
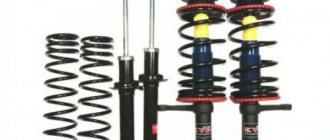
- Replacing the collector with a device of a different configuration, adapted to a more severe operating mode.
In the event that we are not going to participate in high-speed races for the prize of the head of the regional traffic police, replacing or dismantling the collector may be necessary in a number of cases.
Tools and materials for dismantling
There are a number of symptoms that will indicate that you need to prepare to remove the exhaust manifold:
- increased noise level in the engine compartment , the engine produces a characteristic, loud sound in any operating mode;
- breakthrough of exhaust gases into the engine compartment and sometimes into the cabin;
- reduction in engine power due to a mismatch between the exhaust gas outlets in the cylinder head and in the manifold.
Many people decide to replace the standard manifold with a “tuning” one, made of stainless steel and having a different configuration, thereby wanting to increase engine power and reduce the resistance that the standard manifold provides to exhaust gases. As a rule, the most common reason for dismantling a unit is gasket burnout .
Exhaust manifold gasket
The manifold gasket on the VAZ-2114 is made of pressed reinforced asbestos and is designed to ensure a tight connection between the block head and the manifold flanges. Asbestos is used to correct the coefficient of thermal expansion of the aluminum alloy from which the head is cast and the cast iron from which the manifold is cast. At high speeds and under prolonged loads, the gasket may burn out. Then its replacement and dismantling of the collector are inevitable.
To dismantle the manifold, you will need a standard set of tools, a set of sockets with extensions, and WD-40 penetrating lubricant or its equivalent. In case of broken studs, a stud extractor, drill, drill bits and a set of taps will be useful. A day or two before dismantling the collector, it is worth moistening all the fasteners several times, this will significantly simplify the removal procedure .
Replacing the exhaust manifold of a VAZ 21099 with a spider video with an injector
The exhaust system does not have a complex design or device at all. Its main task is to release exhaust gases.
But it's not that simple. If you released exhaust gases into the atmosphere, the damage to nature would be enormous. Therefore, modern developments have been applied that allow gas to be purified before exiting, making them safer for the environment.
System element Functions Receiving pipe A special probe is placed inside this pipe. This device studies the composition of exhaust gases, controls and analyzes the composition of the mixture that goes into the cylinder block
How to Remove the Exhaust Manifold of a VAZ 2109 Injector
Bibliothèque Populaire sur FRclip Vues 105 kIl ya 3 ans Thank you so much for watching my videos, tell your friends, leave comments and subscribe. Vues 55 kIl ya 3 ans Removing manifolds on a VAZ. replacing manifold gaskets.
installation of collectors on a VAZ 2109.
VAZ. We remove the receiver and. Vues 39 kIl ya 3 ans you can drive through the car service, see for yourself.
Vues 40 kIl ya anVues 2.6 kIl ya an In this video, I wanted to show how not easy it is to install an intake and exhaust manifold, what awaits you, which ones.
Vues 102 kIl ya 4 ansVues 93 kIl ya 3 ans Replacing the exhaust pipe gasket is a very simple process and you don’t need to contact the service again or pay.Vues 4 kIl ya 9 moisSubaru
Replacing the exhaust manifold gasket of a VAZ 2109
Burnout of the gasket under the exhaust manifold is a rather unpleasant and common malfunction on a VAZ 2109 car. The manifold gasket is made of a specially pressed asbestos mixture, reinforced with steel thread; it can be purchased at any spare parts store.
Tuning VAZ 2109
The VAZ 2109 exhaust manifold is a structural element of the exhaust system, the main purpose of which is to remove exhaust gases from the engine cylinders into a common exhaust pipe. As you know, tuning this object is a specific and difficult process, but if you understand its essence, you can do it yourself.
The collector can also be replaced with a new one, but it must meet a number of requirements discussed in this article.
Paying special attention to such design parameters of the spider as length and shape began relatively recently.
The design of the pipes does not imply the presence of various curvatures and sharp corners.
If they are present, this leads to increased fuel consumption and less power of the car.
Design of pipes Modern engines are modified in such a way that the length of all channels of the exhaust manifold, regardless of their distance, is equal.
Repair of the exhaust manifold on a VAZ 2109 (carburetor)
The exhaust manifold is a component of the exhaust system that carries out the process of removing exhaust gases from the cylinders of the power unit into the exhaust pipe.
But before you get to the element you are looking for, you will first need to go through some preparatory steps.
Namely, tighten the fasteners, and then remove the air filter and carburetor if the first stage does not help. Stage of work Your actions Tightening the fasteners Quite often, loose fastenings of the collectors caused the entry of contaminants, which disrupted the performance of the exhaust system.
We remove the exhaust manifold on the 8-valve VAZ-2114 for replacement
The exhaust system of a VAZ-2114 car with an injection engine is not particularly complex, however, sometimes you have to spend a lot of time, and maybe money (if the work is done at a service station) to bring it to normal condition.
Exhaust manifold VAZ-2114 Its main task is to collect exhaust gases and distribute them into the exhaust pipe of the muffler.
And don't forget to fill in the coolant that was drained when dismantling the carburetor!
In order for the new gasket to last as long as possible, before installation it is recommended to cover the product with a layer of graphite lubricant on both sides - this will extend the service life of the material and increase the tightness, and will also help avoid burning. It is also recommended to coat the cylinder head studs with a layer of graphite lubricant.
Good luck! VAZ 2109 pants are replaced extremely rarely, since it is an all-metal unit. The gasket is changed more often, since the effect of hot exhaust gases on it is very strong. But to tell the truth, over the life of the car of 10-15 years, there is a possibility that the metal pipe of the VAZ 2109 pants will burn out.
And the reason is that hot gas, leaving the exhaust manifold, enters the exhaust pipe. Moreover, its metal has a relatively small thickness, and the result is the formation of cracks on its surface and the pants can simply fall off the bar.
see also
How to check DBP
- 32 0 21k
Will exhaust manifold 2115 fit 2109?
- 0 1 1k
Smoke under the hood of VAZ Samara 2
- 0 2 1k
How to unscrew a broken bolt
- 3 1 15k
How to remove the exhaust manifold if the pin is stuck
- 4 0 18k
The collector (resonator, “pants”) is an engine attachment; it is a closed reservoir of complex shape with a common chamber (receiver) and outlet pipes. Depending on the nature of the functions performed in a car, there are two types of manifolds - exhaust and intake.
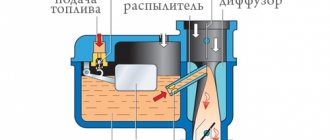
The main task of the intake manifold is to supply air from the distribution system, mix it with fuel and transform it into an air-fuel mixture of the desired consistency, followed by a uniform supply to the combustion chamber of the cylinders. Therefore, the main task of the exhaust manifold is to collect exhaust gases from the engine cylinders into a single pipe.
The main signs and causes of failure of the VAZ 2114 intake manifold
- The main symptom of a failed intake manifold is a sudden loss of car engine power.
- at the same time, there is an increase in fuel consumption , with a deterioration in traction and a drop in engine performance.
- Often a problem is indicated by a missing stud in one of the manifold flanges. It simply comes off when the collector goes “screw”, that is, due to temperature changes, for example in winter, or over time (average service life is 7 years), the collector begins to bend along the plane, and the pin simply “spits out”, pulls out .
- Due to the fact that the manifold has “leaded”, a crack may form and, as a result, exhaust gases from the engine escape, and the manifold must be replaced.
Tips for replacing the intake manifold
Also, do not neglect the procedures for repairing and cleaning the intake manifold. The stability of the VK is very important for the normal functioning of the car. A certain vacuum is formed in the intake manifold, which is the source of drive force for many systems: cruise control, windshield wipers, vacuum brake booster. In the event of a collector malfunction, this threatens the failure of one or more of the above systems.
To avoid the appearance of cracks and distortions, you must use a torque wrench to tighten the nuts on the manifold and follow the tightening order of 20.9-25.8 (2.13-2.63) N_m (kgf_m). As a rule, it is recommended to start tightening the nuts from the center and gradually move towards the periphery, alternately tightening the nut on one side or the other.
To work on removing and replacing the VAZ 2114 intake manifold on an 8-valve engine, we will need:
- keys “for 8”, “for 10”, “for 13”, “for 17”;
- “cardan” type nozzle and socket heads “17”, “19”;
- magnetic screwdriver;
- screwdrivers, pliers;
- new intake manifold.
By the way, the price for an intake manifold from a VAZ (article 21110100801420) will be 1,350 rubles.
The cost is indicated for spring 2020 in Moscow and the region.
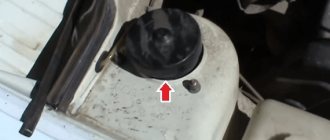
Loosen the clamp and disconnect the crankcase ventilation hose.
How to find the air leak into the carburetor yourself?
The “suction” of excess air into the carburetor, to one degree or another, depletes the fuel mixture it prepares (gasoline/air ratio).
Since the proportion of air increases. A car engine runs reluctantly on a lean or lean fuel mixture, since in order to obtain a certain power it often needs a rich mixture composition, rather than a lean one.
Hence a number of engine malfunctions well known to owners of carburetor cars: lack of idling, dips and jerks after pressing the gas pedal, loss of power and throttle response, etc.
Using the example of a 21083 engine with a 21083 Solex carburetor of a VAZ 21083 (21093, 21099) car, we will try to find out in detail where excess air is sucked into the carburetor, and how to detect and eliminate this “suction” ourselves. A quick, preliminary analysis of the malfunction is outlined in the article “Air leaks into the Solex carburetor.”
How can you quickly determine where air is leaking into the carburetor?
There are only a few places for possible leaks. Let’s identify them and try to take measures to eliminate them independently in relation to each specific situation.
Gaskets for carburetor
The Solex 21083 carburetor is installed on the engine intake manifold through two gaskets and one heat-insulating spacer between them (see photo, details of the gaskets: “Solex 21083 gaskets”). Over time, or from frequent repairs, the gaskets wear out and, under the influence of vacuum, begin to suck air under the carburetor directly into the intake manifold. In addition, the “suction” of air is facilitated by the curvature (deformation) of the mating surface (flange) of the carburetor as a result of tightening the fastening nuts while hot (or tightening with great force). In this case, it will not be possible to tightly clamp the gaskets between the carburetor and the intake manifold and “suction” will be ensured.
To identify the malfunction, it is necessary to spray a soap solution or penetrating liquid at the junction of the carburetor and the manifold while the engine is idling. If the idle speed stabilizes or even increases, there is a “suction” of excess air.
The methods for troubleshooting the problem yourself are as follows: first, slightly tighten the carburetor mounting nuts. It didn’t help, we installed an additional upper gasket under the carburetor. If even after this the engine “troubles”, remove the carburetor and gradually grind its flange with a large file or large emery wheel to eliminate deformation.
Eliminating deformation of the Solex 21083 carburetor flange using a file
In this case, it is necessary to constantly check the quality of work by installing the carburetor on a flat surface (for example, a sheet of glass) and checking the gap under it. Details of such carburetor repair “Elimination of deformation of the Solex carburetor flange.”
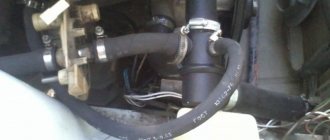
Hose from brake booster to engine intake manifold
The vacuum brake booster operates from the vacuum (vacuum) generated in the intake manifold when the pistons move (therefore, the brake pedal becomes lighter after the engine starts). Vacuum is supplied to the amplifier directly from the intake manifold through a hose. If this hose loses its tightness, air “sucks” under the carburetor and subsequent depletion of the mixture occurs. At the same time, the driver may not notice a slight increase in the force of pressing the brake pedal that accompanies such a “suction”.
Hose for supplying vacuum to the vacuum brake booster from the intake manifold (shown on a disassembled engine for clarity)
Therefore, first of all, it is necessary to check the reliability of the hose fastening on the intake manifold fitting and on the vacuum brake booster fitting. Clamps on them are required.
If the “suction” is still present, the hose may be leaking and leaking air. We pinch it using pliers near the fitting on the manifold. Has the idle speed stabilized? Yes. Then the hose needs to be replaced. No, we are looking for a place of “suction” further.
Crankcase ventilation hose
The small circle hose of the crankcase ventilation system goes from the fitting on the valve cover to the fitting on the bottom of the Solex 21083 carburetor. Further along the channel, the gases are removed under the throttle valve. If the hose itself or its connections are not sealed, additional air, under the influence of vacuum, is drawn directly into the intake manifold, causing a lean fuel mixture and interruptions in engine operation.
Usually drivers do not pay due attention to this hose and the “suction” of air through it. We, on the contrary, will devote a little time to check it. Remove the hose and, at idle speed, plug the fitting under it on the carburetor with your finger. If the XX speed has stabilized, then the reason for the “suction” is in it. If not, the problem may be something else, or the fitting on the carburetor or its channel may be clogged with deposits (which is quite common).
Crankcase gas exhaust hose behind the throttle of the Solex 21083 carburetor and fittings
If the hose malfunctions (cracked, leaky, etc.), replace it with a new one. We tighten the places where it fits on the fittings with clamps.
Tube from the vacuum ignition regulator on the distributor to the carburetor
At idle, air does not leak through a loose, loose or leaky tube. Since the hole for supplying vacuum is located above the edge of the throttle valve of the first chamber of the carburetor. And it's closed. When you press the gas pedal, the throttle valve opens slightly and the vacuum regulator begins to operate. If there is a “suction” of air through its tube, then it will not be particularly noticeable and noticeable at speed. The only thing is that the engine will stall because the vacuum ignition timing regulator stops working when its system is depressurized.
Therefore, just to be on the safe side, we check the condition of the tube and the tightness of its fit on the fittings.
The sealing ring on the carburetor solenoid valve is damaged
The connection of the electromagnetic valve (EMV) with the cover of the Solex 21083 carburetor is sealed with a wide rubber ring with a protective washer. Wear or damage to this ring will create favorable conditions for foreign air to enter directly into the idle system. The engine will immediately start and twitch at idle, and may even stop starting without the gas pedal.
Rubber sealing ring on the solenoid valve (EMV) of the Solex carburetor 21083
To check the serviceability of the ring, it is necessary to unscrew the EMC and visually assess the condition of the seal. If necessary, replace it with a new one.
In addition, air may leak through the solenoid valve if it is not fully closed. There may be problems with screwing the EMC all the way, since you need to know certain features of its installation. Therefore, before work, you should read “Features of installing a solenoid valve on a Solex carburetor.”
The sealing ring on the screw for adjusting the “quality” of the fuel mixture is damaged
A small rubber o-ring is installed on the screw for adjusting the “quality” of the fuel mixture, which prevents air from entering the CXX and depleting the fuel mixture. Its wear or damage will create problems with the idle speed of the car engine, but at medium and high speeds it will not have any significant effect on its operation.
Rubber sealing ring on the screw for adjusting the “quality” of the fuel mixture of the Solex 21083 carburetor (the screw channel is cut for clarity)
If there is a suspicion that this seal is faulty, you must first tighten the “quality” screw all the way, counting the turns (so as not to make a mistake when installing it), then unscrew it completely and replace the rubber ring.
Thus, knowing the places of possible “suction” of excess air into the Solex 21083 (or similar) carburetor and knowing how to eliminate the problem, you can find and fix the problem yourself in a short time, restoring the normal operation of the carburetor and car engine.
Notes and additions
If, as a result of the manipulations carried out to search for a “choke”, the engine either troits or troits, try covering the top of the carburetor with your palm while the engine is idling. The engine stalled - there is no “choke”, there is a “choke” somewhere that continues to work.
In addition to the listed places where excess air is likely to get into the carburetor and intake manifold, there is one more place - this is the junction of the intake manifold and the engine block head. The connection is sealed with gaskets that can wear out, burn out, or be installed misaligned. The manifold mounting nuts may not be tightened to the required torque, etc.
The tightening torque of the carburetor mounting nuts is 13 - 16 N.m. The tightening procedure is crosswise in several passes.
More articles on malfunctions of the carburetor engine 21083
The needle shut-off valve of the float chamber of the Solex carburetor 21083 (2108, 21081) does not maintain the fuel pressure. The air jet of the transition system of the second chamber of the Solex carburetor (plug) does not work. 83 Solex carburetor air damper drive does not work
Repair of the exhaust manifold on a VAZ 2109 (carburetor)
The exhaust manifold is a component of the exhaust system that carries out the process of removing exhaust gases from the cylinders of the power unit into the exhaust pipe.
If the collector malfunctions, the culprit may be either the element itself or its gasket. Replacing the exhaust manifold (exhaust manifold) gasket is a common procedure when repairing a VAZ 2109.
Appearance of the unit
Preparation stages
To replace the manifold or its gasket, in any case you will have to dismantle the VK. But before you get to the element you are looking for, you will first need to go through some preparatory steps. Namely, tighten the fasteners, and then remove the air filter and carburetor if the first stage does not help.
Stage of work
Your actions
Often, loose manifold fastenings caused the entry of contaminants, which disrupted the performance of the exhaust system. If the tightening did not give any result, then the gasket is definitely burned out or the collector itself is damaged, which is less likely
Removing the air filter
Removing the carburetor is carried out in the following sequence:
- Disconnect the coolant supply hose to the engine starting device from the fitting. To do this, unscrew the clamps;
- Be sure to drain the coolant into a prepared container;
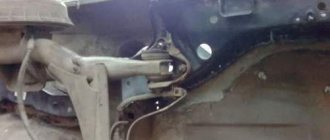
- Disconnect the exhaust pipe that comes from the exhaust manifold and the BC bracket;
- Disconnect the throttle cable bracket. To do this, you need to remove one end of the spring from the damper control rod, and then remove the entire spring. Now loosen the nut on the bracket, which will allow you to remove the cable from the engagement;
- Disconnect the EPH sensor from the power plug;
- Disconnect the vacuum tube and a pair of hoses from the carburetor heating unit;
- Remove the engine crankcase ventilation hose;
- Remove the four mounting nuts holding the carburetor and intake manifold;
- Remove the carburetor carefully without yanking. It must be gradually removed from the studs.
Dismantling the unit
Removing the carburetor and intake manifold
You need to have the following tool on hand:
- Flathead and Phillips screwdrivers.
- 8" socket or tubular wrench.
- Open-end or socket wrench set to “13”.
- Ratchet (if necessary).
To remove the VAZ 2109 manifold (carburetor), you must first dismantle the injection system. The disassembly process looks like this:
- Disconnect the hose that supplies antifreeze from the cooling system to the carburetor starter. To do this, loosen the clamps and carefully drain the liquid. Work must be carried out on a cold engine.
- Remove the exhaust pipe. To do this, unbend the fixing plate and unscrew the nuts with a “13” wrench. Using the same wrench, unscrew the nuts that secure the pipe to the bracket.
- Remove the throttle valve drive cable mounting bracket. Remove the spring and loosen the nut, disengaging the cable.
- Disconnect the idle air solenoid valve.
- Disconnect the vacuum tube and carburetor heating hoses.
- Remove the crankcase ventilation pipe.
- Unscrew all four nuts that secure the carburetor body to the intake manifold.
- Carefully lift the carburetor body, being careful not to damage the studs.
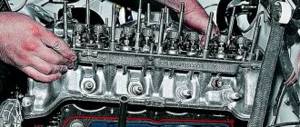
The next step is to dismantle the intake manifold. You will need the same tools as in the previous step. The procedure consists of the following steps:
- Unscrew the two fastening nuts and bend the platform under the carburetor back.
- Remove the hoses that connect to the intake manifold.
- Unscrew all the nuts (there are 7 of them) that secure the manifold.
- Remove the intake manifold of the VAZ 2109, slightly rocking it to the sides.
Dismantling of collectors
Now comes the turn to remove the intake and exhaust manifolds. Having dismantled them, you can understand whether it is possible to get by with replacing the gasket, or whether the collectors themselves will need to be completely replaced.
The gasket is a consumable item, the purchase of which will literally cost you 50-250 rubles, depending on the manufacturer and region. Services for replacing the gasket at a service station cost more than 1,500 rubles. Add to this the cost of a high-quality gasket and you will get quite a lot of money. Such costs can be avoided if you do everything yourself.
Dismantled unit
Intake manifold
By removing the air filter and carburetor, you will gain access to the intake manifold.
To dismantle it you will need a certain set of tools:
- Ratchet with 10mm head;
- Collar;
- Ratchet;
- Deep head 13;
- Regular head 13;
- Open-end wrench 13.
When everything is ready, you can start working.
- Unscrew a couple of mounting nuts to bend back the platform located under the carburetor.
- Disconnect the hoses that are connected to the intake manifold.
- Remove the six mounting nuts located on the intake manifold.
- Remove the manifold itself from the studs. To do this, simply rock the knot to the sides. It often sticks to the gasket, which causes problems with removal.
- Inspect the condition of the unit. If there is damage, the collector must be replaced.
- If the problem is only with the gasket, put the intake manifold aside for now and start removing the outlet.
An exhaust manifold
To dismantle a graduate you will need:
- Ratchet;
- Open-end wrench 13;
- Socket wrench 13;
- Deep head for 13.
All is ready? Then let's get started.
- Unscrew the four exhaust pipe mounting nuts from our exhaust manifold.
- Pull the so-called pants off the heels and take them to the side. Now you can unscrew three more fastening nuts securing the VK.
- Carefully, without sudden movements or jerks, pull the graduate off the stiletto heels.
- It is not uncommon that during the process of dismantling this unit, the manifold or its mounting nuts become stuck to the seats. To prevent this, treat the assembly with WD40 in advance, let it react, after which there will be no problems with dismantling work.
- If the studs break off during removal, you will need to drill out the old element, make a new thread and install a fresh stud.
Removing the exhaust manifold and replacing the gasket
The tools you will need are 13" wrenches of all types. The removal procedure consists of the following steps:
- If you have not yet removed the nuts that secure the pants, do so.
- Move the exhaust pipe to the side, unscrew the remaining nuts that secure the manifold.
- Carefully dismantle it, try to do it without jerking. If the studs are stuck to the nuts, it is necessary to use WD-40 pre-penetrating lubricant.
It also happens that the studs break off. If one of them is missing, the gasket will burn out very quickly and you will have to do all the work again. And it is possible that you will have to install a new exhaust manifold on the VAZ 2109, since the old one cannot be restored.
Well, that's all, now you can remove the old gasket. If it is burnt and strongly adheres to the metal, you can use a thin knife to remove it. But even better is to buy a solvent. With its help, you can painlessly remove the old gasket. Be careful not to damage the metal. If necessary, remove any remaining gasket using sandpaper. Install a new gasket and reassemble in reverse order. For convenience, coat the gasket and the cylinder head studs with a thin layer of graphite grease before installation. This will improve the tightness and prevent the gasket from sticking to the metal.
A short video about dismantling collectors on a VAZ 2109
The exhaust system of a VAZ-2114 car with an injection engine is not particularly complex, however, sometimes you have to spend a lot of time, and maybe money (if the work is done at a service station) to bring it to normal condition. Today we will look at the exhaust manifold of the VAZ-2114, with the features of its dismantling and installation.