Cars of the VAZ-2108-09 family are not distinguished by a strong body or durable body iron; the metal rusts especially quickly if it is not treated with anticorrosive. Over time, rust appears on the metal surface, and the rear spar often rots on either side, and cracks appear on it during use. If you drive for a long time with a rotten side member, the rear beam can tear out, which will lead to unpredictable consequences. To avoid a major nuisance or even disaster along the way, it is better to change the spar in advance; this work can be done in a car service center or with your own hands in a garage if you have sufficient experience, the necessary tools and materials.
Replacing the rear right side member 2109
The condition of the rear spar is determined by external inspection; if the body element has traces of severe corrosion and is thoroughly rotten, it must be replaced; in many cases its repair is impractical. Even before performing work, it is necessary to inspect the car body itself; often the iron on the 2109 rots to such an extent that there is practically nothing to weld to.
To carry out repair work you will need:
You must first buy the floor spar itself (LP), the average retail price of the body element in auto stores is from 1800 to 2500 rubles, catalog number is 2108-5101372. This spare part is suitable for model 2108-09-13-14, with minimal modifications it can be installed on VAZ cars 21099 and 2115. Since when replacing a spar you basically have to work under the car, you need to think about how to make it easy to get to below. There are several options here:
- use a car lift;
- carry out work in the inspection pit, hanging the rear part of the body on “goats” or other stands;
- turn the car over on its side, using a reliable support.
Before you start drilling out the old spar, you need to partially disassemble the car and remove:
- rear seats;
- gas tank;
- rear floor trim;
- rugs;
- rear beam (you will have to disconnect the handbrake cables and brake hoses).
After disassembly, you can begin to directly remove the rear LP; to do this, you need to find the attachment points, drill them at the spot welding points using a drill clamped into the drill chuck. After dismantling the body part, it is necessary to thoroughly clean the metal under the spar and prime it, remove the shipping primer from the new part (it can be removed very effectively and quickly using sandblasting). In order for the right side member to fit exactly in place, you should use measurements (there are control points for attaching units), there must be a certain distance between the elements of the front and rear suspension (between the fastening of the rear beam and the front wishbone).
After determining the control points, the spar is tacked by welding in several places, the correct installation is checked, then the part is finally welded to the seat. The final stage of repair consists of the following steps:
- cleaning welding scale with a grinding wheel;
- degreasing the metal surface;
- application of primer and anti-corrosion coating.
Very important conditions when performing welding are an intermittent seam, a maximum length of 4-5 mm. A continuous weld is unacceptable; with such welding, the body loses its elasticity and becomes very rigid. The left rear lip on the “Eight” or “Nine” changes in exactly the same way as the body element on the right side, the procedure for performing the work and the installation principle are the same.
How to weld the spar of a VAZ 2109
Content
Cars of the VAZ-2108-09 family are not distinguished by a durable body, a solid iron body, and metal rusts especially quickly if it is not treated with an anti-corrosion agent. Over time, rust appears on the surface of the iron, and the back speckles often rot on both sides and cracks appear during use. If you continue driving for a long time with a depressing side member, it may break the rear support, which will lead to unpredictable consequences. To avoid major problems on the road or even breakdowns, it is better to replace the spar in advance; this work can be done in accordance with the criteria of a car service or you can do it yourself in a garage if you have enough experience, the right tools and materials.
Rear right rear element 2109
The condition of the rear spar is determined by external inspection; if the body of the element has traces of severe corrosion and is rotten, it must be replaced; its repair is impractical in almost all cases. Before the work is even done, you need to look at the body of the car, often at 2109 rotting iron so that virtually nothing can be welded.
For repair you will need:
- welding device;
- electric drill with drills;
- screwdriver;
- a set of keys;
- hammer;
- core;
- bit;
- cleaning mugs.
- use a car elevator;
- create work on a viewing hole by hanging the back of the body on “goats” or other supports;
- tilt the machine to one side by replacing the safety stop.
READ Where is the VAZ 2109 pump located?
Before drilling the old side element, it is necessary to partially disassemble the car, remove:
- rear seats;
- fuel tank;
- back panel;
- rugs;
- rear support (disconnect the brake cable and brake hose).
After disassembly, you can begin the special removal of the drug from the back, for this you need to find the attachment points, drill them at the welding site, using a drill clamped in a drill chuck. After disassembling the body part, it is necessary to thoroughly clean the metal under the spar and secure it, remove transport soil from the new part (it is very easily and quickly removed by sandblasting). In order for the right side member to sit evenly in place, measurements must be used (there are controls for attaching the blocks) and there must be a distance between the front and rear suspension elements (between the rear beam mount and the front cross member).
After determining the control points, the spar is hammered by welding in several places, the installation is checked, then the part is completely welded to the saddle. The final stage of repair consists of the following steps:
- grinding welding scale with a grinding wheel;
- degreasing metal surfaces;
- application of primer, anti-corrosion coating.
Very important conditions when performing welding. interrupted seam, maximum length 4-5 mm. Continuous welding is unacceptable; with such welding, the body loses its elasticity and becomes very rigid. The left rear lip on an eight or nine changes in the same way as the body element on the right, the working order and installation principle are the same.
READ Installing EUR On VAZ 2109
Rear spar repair kit 2108-09
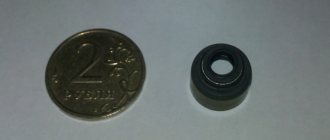
Repairing the rear spar allows you to change only part of the body, which simplifies the repair and reduces the cost. The repair kit is a curved reinforcing element; it is believed that this is the place on the body that is subject to intense rust.
Replacing the rear side elements with a nine in a car service center
LP rear end replacement. a painstaking and difficult job requiring vigilance, machinist skills and the ability to use welding. Not every car enthusiast is required to carry out such repairs without outside help, so owners of front-wheel drive VAZs often turn to professional technicians. The cost of replacing rear side member 2108-09-099 can vary significantly depending on various reasons:
- the location of the car repair company is usually in the capital and large cities, repairs are more expensive;
- car service level;
- general technical condition of the car.
If the car body is very rusty, not all technicians agree to repair such a car. It is also pleasant to note that in many repair vehicles it is forbidden to take VAZ cars in principle, preferring to do more profitable repairs of foreign cars.
The average price for replacing the 1st rear spar 2108-09 ranges from 3,500 to 5,000 rubles; obviously, motorists consider such prices to be simply predatory. The cost of body work including materials at other times is one third of the cost of the used car itself, which in no way can be considered trivial. For car repairs in garages, prices are more affordable (from 2000-2500 rubles), but here they have their pitfalls:
- It is difficult to find a good repairman and difficult to get to him, because due to high demand, repairs are carried out by prior arrangement;
- among low-cost private traders there are many outright hackers;
- in garage conditions, not everything is always required for high-quality repairs;
- work is carried out by repairmen without experience;
READ What Wheels Can You Put on a Nissan Hell?
When replacing the rear lip, it is important to accurately weld a part of the body, if the spar is shifted to the side, the geometry of the body is broken, the rear support “goes” to the side, the car will go sideways with all the consequences.
Recommendations for replacing the rear side elements of the VAZ-2108-09
- Many craftsmen cut the old body element with a gas cutter when replacing the product, but it is better to drill the parts.
- When installing a new spar, it is very important to find the control points correctly and not to disturb the geometry of the body, otherwise you will have to redo the work and obstacles will arise.
- It is recommended to grip the spar at three or four points before carefully welding the parts, it is recommended to try the rear support. fastenings must match the studs.
- The landing area must be thoroughly cleaned of rust before installing the body element and perfectly primed; if the new metal is rusty, new plates must be welded.
- It is impossible to weld with a continuous seam, as this will weaken the metal of the body.
Replacement of rear side elements. This is hard work, if you are not confident in your abilities, you should not do it, it is better to use the services of experts.
Source
Rear spar repair kit 2108-09
The rear spar repair insert allows you to replace only part of the body part, which simplifies the repair and makes it cheaper. The repair kit is a reinforcing element located on a bend; it is believed that this particular place on the body is subject to intense rusting.
In practice, it is not always possible to use a repair insert, since both the rear beam fastening in the side member (the main problem of 2109) and the jack often rot. The average cost of a repair insert in auto stores is 700-800 rubles, catalog numbers are 2108-5101372 and 2108-5101373 (right and left sides).
Replacing rear side members on a Nine in a car service center
Replacing rear LPs is a labor-intensive and quite complex job that requires care, metalworking skills, and the ability to use welding. Not every car owner undertakes to carry out such repairs on their own, so quite often the owners of front-wheel drive VAZs turn to professional technicians. The cost of replacing the rear spar 2108-09-099 can vary significantly, it depends on various factors:
- the location of the auto repair company, usually in the metropolitan region and large cities, repairs are more expensive;
- car service level;
- general technical condition of the car.
If the car body is heavily rusted, not all craftsmen agree to repair such a vehicle. I would also like to note that many auto repair shops fundamentally refuse to hire VAZ-produced cars, preferring to engage in more profitable repairs of foreign cars.
The average cost of replacing one rear spar 2108-09 is from 3,500 to 5,000 rubles; of course, car owners consider such prices to be simply extortionate. The price of body work, including materials, is sometimes a third of the cost of the used car itself, which cannot be considered normal. Private auto repairmen in garages have more affordable prices (from 2000-2500 rubles), but there are pitfalls here:
- a good repairman is not easy to find, and it is difficult to get to him, since due to high demand, repairs are carried out by appointment;
- among private traders working at low prices, there are many outright hacks;
- in garage conditions there is not always everything necessary for high-quality repairs;
- the work is carried out by repairmen with insufficient experience, technology is violated.
When replacing rear LPs, it is important to weld the body part exactly in place; if the spar is shifted to the side, the geometry of the body will be disrupted, the rear beam will “move” to the side, and the car will drive sideways with all the ensuing consequences.
Features of replacing the rear side members of the VAZ-2109, the cost of repairs in a car service center
Cars of the VAZ-2108-09 family are not distinguished by a strong body or durable body iron; the metal rusts especially quickly if it is not treated with anticorrosive. Over time, rust appears on the metal surface, and the rear spar often rots on either side, and cracks appear on it during use. If you drive for a long time with a rotten side member, the rear beam can tear out, which will lead to unpredictable consequences. To avoid a major nuisance or even disaster along the way, it is better to change the spar in advance; this work can be done in a car service center or with your own hands in a garage if you have sufficient experience, the necessary tools and materials.
This is interesting: The procedure for adjusting valves on an 8-valve VAZ-2110 with your own hands
Recommendations for replacing the rear side members of the VAZ-2108-09
- When replacing a LP, many craftsmen cut off the old body element with a gas cutter, but it is better to drill out the part.
- When installing a new spar, it is very important to find the control points correctly and not to disturb the geometry of the body, otherwise the work will have to be redone and problems will arise.
- It is recommended to grab the spar at three or four points; before thoroughly welding the part, it is recommended to try on the rear beam - the fasteners must match the studs.
- Before installing the body element, the seat must be thoroughly cleaned of rust and well primed; if the metal is rusty, new plates must be welded.
- You cannot weld with a continuous seam, this will weaken the metal of the body.
Content
Replacement or welding
Removing the rear side member
Installing the rear side member
Front spar
Removing the front side member
Installing the front side member
From the author
About 1.4 million copies of VAZ-2109 cars were produced and it, along with classic VAZ models, became a truly people's car. Not least of all, this was achieved thanks to the high maintainability of the “nine”. In this article I would like to dwell on such an important problem as replacing side members on VAZ-2109 and 2108.
Replacing side members on a VAZ-2109
Replacement or welding
Welding of the spar is used in two cases:
- When fatigue cracks started to appear. Then it makes sense to put a patch over the crack and weld it using semi-automatic welding.
- When there are small pockets of corrosion. In this case, the metal is cleaned, treated with a rust converter and primed. If necessary, small patches are applied.
Welding the spar is possible even if it is destroyed, but this will only be a temporary repair, and driving such a car is dangerous.
If the car was involved in an accident in which the side member was significantly deformed or rotted, then a complete replacement would be advisable. It is necessary to understand that you need to repair the spar if you have sufficient skills in body work and welding. For an inexperienced person, this process will be quite complicated, so if you are not confident in your own abilities, then it is better to trust the professionals.
Required tool:
- Semi-automatic welding.
- Bulgarian.
Semi-automatic welding
- Electric drill.
- Wire brush.
- Spars for VAZ-2109.
- Mastic, primer, solvent.
Removing the rear side member
Dismantling of the spar must be carried out on a slipway or with the machine turned over on its side. In addition, you need to completely remove all the trim and soundproofing of the trunk. After this, we clean the weld seams. Next, we will need to find all the resistance welding points of the spar and drill them out using a 7-mm drill. At the end of this process, we need to completely cut off the old spar. We clean the place of its attachment from rust and paint. This is done using a metal brush on an angle grinder and a rust converter. If necessary, we cut out the rotten body elements and put patches in their place.
Removing the rear side member
Installing the rear side member
Before installation, the mounting area is degreased and primed. The new spar also needs to be cleaned of transport soil, primed and holes made in it for welding points. If everything is done correctly and the geometry of the body is not damaged, then the new spar will fit into its seat without any problems. We weld the spar at the welding points to the body and cross member. At the end of this process, coat the seams with automotive mastic.
Front spar
The front spar is more loaded than the rear. This is because it bears the entire weight of the engine and gearbox. If we add to this operation on bad roads and aggressive driving, then its service life will be only about 4-5 years. In some cases, a special repair insert, which is welded into place of the damaged fragment, can save you from the labor-intensive process of completely replacing the spar.
Just as when replacing the rear spars, replacing the front ones must be done on the slipway. Otherwise, you can break the geometry of the body.
Before you begin replacing the side member, you need to remove the entire front suspension and engine and partially disassemble the interior. When disassembling the front part of the car, pay attention to the condition of the remaining body elements, such as glasses, radiator frame (most likely, the frame will have to be changed along with the side members, since it serves as a structural reinforcement), mud flaps. It is possible to partially replace the front spar. In this case, the old one is cut off, and a new one is welded in place of the cut out part. However, next we will look at the process of completely replacing the front side member.
Left front side member of VAZ-2109
Removing the front side member
The process is similar to removing the rear side member. We drill out the resistance welding points (this is partly done from inside) and remove it. After this, we clean the seat and, if necessary, put patches on the body and get rid of corrosion. We prime the new spar and drill holes in it for attaching the suspension arms.
Installing the front side member
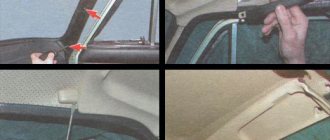
For proper installation on the body, near the beginning of the front door, there is a special “window” that must be aligned with the hole in the lower part of the side member. Then it will be considered that the rear part of the spar is installed correctly. Next, we completely place the spar in its seat and in the process adjust it for maximum fit.
An indicator of correct installation is also that the stabilizer pin fits into the hole on the side member. Ideally, it will be in the center of the hole.
If it doesn’t hit at all, then you will need to edit the body or spar. For ease of operation, the entire structure is temporarily fixed with clamps and jacks. After installing the spar on the seats, you need to attach the radiator frame to the bolts. This is done so that the spars do not move to the sides during further work and to fix the distance between them.
To check the correct installation and geometry of the body, a drawing with exact dimensions between structural elements is required. It can be found on the Internet or in books on the repair and operation of this car. If the geometry of the body has not changed and the new side members are of high quality, then they should fall into place without much labor. However, this happens quite rarely, therefore, armed with a drawing, tools and patience, you will need to adjust the spar to the body and vice versa. At the end of this process, we take measurements, and if everything is correct, we weld the side members to the body and mudguards.
When is it necessary to repair or replace the spar on a VAZ 2109
The decision to straighten or replace a side member on a damaged car depends largely on the length of the deformed zone, the degree of deformation, and also on the qualifications of the repairman. If there is slight deformation of the spar over a long length, even if there is a small fold, does not need to be replaced . Using a jack or square, you can restore the original shape and position of the spar while maintaining its characteristics. On the other hand, if there is significant deformation, the spar must be replaced, since straightening will cause a change in the metal structure and strength, which will lead to a change in the characteristics of the body itself.
If the metal is rotten, then the side members (front and rear) cannot be repaired or restored. Even if you weld, the rot will continue around it. In addition, welding on soft metal can disrupt wheel alignment, tires will begin to wear out faster, transmission parts will begin to break, and body deformation may occur. Such repairs will be enough for a couple of weeks.
If possible, it is always better to purchase a new part, which costs more than temporary repair work. But, even with a limited budget, in some cases you cannot save. Therefore, replacement is much cheaper, but if the crack is the result of an impact or collision with a VAZ, welding will be sufficient.
When repairing a spar, you should never lose sight of the fact that it is a reinforcing element of the body and largely determines its rigidity. At the same time, it is not recommended to strengthen the spar during partial replacement , mainly in the front and rear parts of the body, since this increases the strength of the area intended for crushing, i.e. for depreciation. If the depreciation of this zone turns out to be insufficient, then in the event of an impact, the deformation of the body will pass further, to the car cabin, which should not be deformed.
Replacement of the VAZ 2109 spar
From the instructions you will learn how to cope with replacing the spar without the help of experienced specialists. Of course, when a spar fails, it’s not at all pleasant, but everything is easy to fix. We will tell you a couple of ways to deal with the problem. Here you can either completely replace or weld. When should a part be repaired or replaced? -What to choose, of course, depends on how great the degree of damage to the part is, as well as on how experienced a worker (car owner) you are. If the damage is not significant, then there is no need to change the spar. You will need a jack and a square, then you can install it in its original shape, while all its properties and characteristics will be preserved. But if the deformation is large, then it cannot be dealt with without replacing the part; if you simply repair it, then the amendment will completely change the structure of the metal and strength, after which the characteristics of the body will change. If you notice that the metal has become rotten, then the parts cannot be repaired. If you weld elements, they will rot around the weld. Moreover, soft welding can lead to wheel alignment. Everything here will only worsen the situation, the tires will soon become unusable, all the transmission parts will peel off, and the body will be deformed. When you weld on the spar you will need to install spacers, it should not be pulled in other directions. Again, the body will begin to deform. It will be much better, you just buy a new part, it costs a little more. But there are cases in which you cannot save. Replacing it is a cheap option, but if the crack is not very large and was caused by an impact, then you can simply weld it. IF YOU ARE REPAIRING: You can’t miss anything here, this part is an important part of the body. Experts also say that strengthening the spar is detrimental, especially if it is partially replaced. Cracks after an accident usually form in a weak area of the body. We recommend that the first step be to level the surface and only then weld the part. Where to carry out repair work? Remember!!! You only need to carry out repairs yourself if you have experience in body work; of course, you will also need experience in welding. You can straighten and repair the body at a car repair shop. You can do this even if you do not have the skills or other equipment. Getting ready for work: Replacement and repair must be performed using the same technology. Usually the tools needed are also the same. Remember that it is better to buy spars together with other parts. You will need to be sure they fit. What tools will you need for replacement? — A unit for welding, we used semi-automatic welding, this is an ideal option. — You will also need welding and a disk; take a brush that can be used to clean metal. — Grinding tool. - Electric drill. - Bench tool. — Take car mastic. — A couple of paint brushes, let them be small. - Primer. - Solvent.
We'll take out the battery and remove the bumper. We also need to get rid of the rugs and check the soundproofing and doors.
You need to inspect the work surface, inspect everything. We need to find those places where the surface is most damaged. Use straightening.
We can cut everything else using a grinder.
Let's take a grinder and a ratchet.
Now treat with orthophoric acid to get rid of rust.
Let's clean the entire surface.
Apply degreaser to all areas.
You will need reactive primer.
Prime with primer.
Clean the welding points down to metal.
We primed the spar and made holes in it. We begin to connect the spar and the bottom. Clean all connections until the metal is visible. Treat with sealant.
Adjust the spar to the places where everything connects. Secure with clamps.
We weld the spar to the bottom of the body; here you don’t have to loosen the clamp.
The first step is to weld the back part.
Carefully weld the front part, take your time.
We check the spar in operation and now begin to weld all the elements.
- Exactly those feelings. Experience with Bridgestone Turanza T005 tires.
See all photo news >>
Preparatory work for replacing the VAZ 2109 spar
Since spar replacement and repair are carried out using the same technology, the set of tools will also be the same.
If you nevertheless decide to repair the side member on a VAZ 2109 yourself, first you will need to acquire the following tools for the job:
- welding unit (the most convenient and simplest option would be semi-automatic welding);
- grinder and discs, hard metal brush for the grinder;
- a set of new side members and connectors for the VAZ 2109;
- grinding tool;
- electric drill;
- metalworking tools;
- packaging of automotive mastic;
- 2 medium-sized paint brushes;
- can of primer;
- bottle of solvent.
Procedure for replacing rear side members
Before properly welding the rear side member, the car owner must perform some preliminary work, namely:
- drill out all the points where the spar is attached. If this does not work, the bolts must be cut off using a chisel;
- when the dismantling procedure is completed, the welding area is cleaned most thoroughly;
- you need to make a new part, and it should replicate the factory one as much as possible;
- the part is also prepared so that its attachment points coincide with the factory welding;
- after the first part of the bolts is completed, the part is installed on the body using removable fasteners;
- welding work, thanks to which the spar falls into place;
- At the end, the area is sanded and primer and paint are applied.
In addition, many people often think about the question of how to strengthen the side members. To do this, experts recommend using additional fasteners that are welded both to the part and to the car body.
It is worth noting that work related to replacing the spar can be carried out either with the help of professional craftsmen or on your own. At the same time, the owner of the car who decided to replace the rear side member on a VAZ 21099 with his own hands must not only have certain experience, but also have a special tool.
Which side members should be installed on the VAZ 2109?
The original number of the right spar is 21080-8403280-10, average price is 2714 rubles, the left one is 21080-8403281-00, average price is 2819 rubles.
We take out the battery and dismantle the front bumper. We also remove mats, sound insulation, doors and turn the car over.
A visual inspection of the bottom and side members is carried out. Places of maximum corrosion are identified, as well as places that can still be restored by straightening, priming and painting.
We cut off the rusted spars using a grinder.
Now, using a grinder and a brush, you need to clean everything down to the metal.
Then we treat it with orthophosphoric acid to completely remove the rust.
We clean the dust after the “anti-rust” to the metal.
Degrease the entire surface under the spar.
Prime with reactive primer.
Prime with regular primer.
We clean the welding points down to metal.
Primed spar with holes made for welding points. The connector between the spar and the bottom has already been welded, all welding spots on the spar have been cleaned to bare metal. Sealant applied.
The spar is adjusted to the connection points as accurately as possible. The spar is finally secured with clamps.
After this, the spar, without loosening the clamps, should be welded to the bottom of the body.