EngineOil
Author Artem
Date
Nov 3, 2017
906
Share
The internal combustion engine operates as a single complex mechanism. The effective interaction of the gas distribution and crank mechanisms and with the engine lubrication system is largely ensured by valve stem seals. The driver must not only be familiar with the functions of the parts, but also correctly diagnose wear and the need to replace oil seals.
- What are valve stem seals used for?
- How many are there and where are they located on the engine?
- Causes of wear
- How to determine the need for replacement
- Which caps are suitable: sizes and price
- Selecting a puller
Installation of oil seals (valve seals)
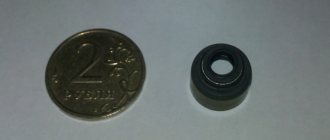
The oil seal has the shape of a cylinder with a truncated cone. For tight contact with the surface of the valve guide, a polymer ring with an expander spring is provided. A plastic (or rubber) ring removes excess oil when the valve stem moves, and the spring allows it to be tightly fixed to the stem.
For a long time, a rubber ring was used in the design of the oil seal. Options made of rubber and fluoroplastic have appeared recently. This is due to the fact that rubber hardens faster and loses its properties. Manufacturing the ring using modern polymers extends the service life of the seal.
What are valve stem seals used for?
In internal combustion engines, lubrication is combined, that is, oil enters the camshaft journals under pressure, and the remaining parts of this design are lubricated by splashing.
When the engine is running, so much engine oil collects in the top of the cylinder head that it even coats the top of the valve guides.
The function of valve stem seals is that they prevent the oil accumulated at the top of the head from flowing down the valve stems. If the caps are worn, then the oil flows through the valves directly into the working combustion chambers of the cylinders, hence the thick smoke from the muffler. The wear of the caps occurs gradually. Due to the high temperature of the engine, over time the rubber caps do not fit tightly to the walls of the valve rods and the oil begins to flow down.
Which valves burn out?
The exhaust valve operates at a higher temperature. Therefore, when the valve stem cap is worn out, oil flows onto the facet of the valve cap and at high temperatures it burns, forming carbon deposits on the valve cap. Then this carbon deposits fly off and sometimes the valve cap breaks off or breaks off at the edges.
Purpose of valve stem seals
Long-term uninterrupted operation of the internal combustion engine is ensured by high-quality lubrication of rubbing parts. The oil distribution mechanism provides a small volume of oil. The camshafts in the cylinder head and the piston group require constant lubrication. The shaft rotates and a cloud of oil forms around it. The amount of lubricant is regulated by valve stem seals.
Carbon deposits on the valve surface lead to incomplete closure and the appearance of a gap. In the combustion chamber, the combustible mixture ignites, and excess oil settles in the form of varnish deposits. When the valve is lowered, the stem seal prevents excess oil from entering. Protects the piston group from deposits that occur during the combustion of oil and fuel mixture. Oil seals are classified as consumable items, as they require periodic replacement.
This is interesting: Review of Citroen C-Crosser
Signs of wear on valve stem seals: how much oil does a 1.8 engine take?
The initial and main symptom of hardened, worn valve seals is excessive consumption of engine oil. True, for some engines the regulations allow noticeable deviations from the generally accepted norm of 200-300 ml per 1000 km. Thus, turbocharged 1.8 engines installed on models of the Volkswagen AG automaker (Volkswagen, Audi, Skoda, Seat) on legitimate grounds require adding lubricant to 500-700 ml for every thousand kilometers. A similar situation arises with PSA Peugeot Citroën engines, developed jointly with BMW (also installed on Mini models) - these data sheets indicate a “norm” of 1000 ml of engine oil, which must be added to the engine every 1000 km.
Things like this highlight the importance of knowing your oil consumption. If the power unit consumes significantly more than the recommended values between service operations, then this is a serious reason to think about replacing the valve stem seals.
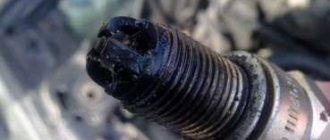
Another sign of oil leaving the cylinders due to the caps losing their condition is bluish-gray smoke from the exhaust pipe, which can be clearly seen in the first minutes of engine operation and further when changing gears, while pressing on the accelerator pedal. Also clear evidence of the above problem are oil deposits on the threaded portion of the spark plug. When pressure increases in the combustion chamber, the mixture supersaturated with oil is partially squeezed out through microscopic gaps. For example, through the thread of a candle, where the gap is not much 0.3 mm. Under the influence of high temperature, gasoline evaporates from the mixture, leaving behind a significant “reserve” of lubricant. Indirectly indicates the end of the caps and dark deposits on the electrodes.
Reliably the same soot appears on the cylinder walls. And if you ignore the problem, then one fine day the valve will simply burn due to plaque.
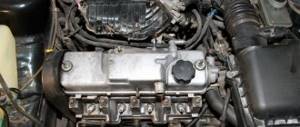
Location of valve stem seals in the engine
A head with camshafts and valves is installed on the cylinder block. The valve stem moves through the guide sleeve. The thermal gap between the leg and the bushing is closed with caps. The oil seal is located so that oil from the head does not enter the combustion chamber. The camshaft journals receive oil under pressure, while the remaining components receive oil through splashing. By removing the engine head and camshafts, you can see the location of the seals in the valve seats.
Causes of wear
Along with constant mechanical stress, the cap experiences the aggressive action of heated oil and impurities in it. Don't forget about the hot exhaust gases during the exhaust stroke.
Over time, natural rubber becomes rougher, the walls of the sleeve crack and wear out. Despite the fact that the technical maintenance regulations have not determined the exact interval for replacing the caps, if the corresponding symptoms appear, you should not delay replacing with new parts.
How to determine the need for replacement
Among the main criteria that directly indicate the need to replace valve stem seals are:
- Oiling of spark plug electrodes. Oil has the ability to leak into the combustion chamber.
- Increased oil consumption. Compared to the traditional “appetite” of 1 liter/10,000 km, the same consumption increases to a liter per thousand.
- The appearance of bluish smoke during the exhaust. Some of the oil has time to burn during the compression stroke.
- Google+
- LJ
- Blogger
Sometimes a dilemma arises as to what causes blue smoke from the exhaust pipe. By mistake, wear of parts of the cylinder-piston group is often cited as such a cause. To finally decide whether an engine overhaul or oil seal replacement is needed, just check the compression. The normal value of this indicator allows you to confidently point to the caps.
By the way, the problem of increased oil consumption can be resolved in the short term by using special products. A special additive for softening oil seals will restore the functionality of the parts for a couple of thousand kilometers. The additive takes effect 500-700 km after addition. Do not delay repairs; most likely, similar symptoms of engine wear will appear again soon.
Signs of wear on valve stem seals
You can find out about the need for replacement without disassembling the engine. The valve stem seals have the following signs of wear:
- excessive oil consumption;
- bluish smoke;
- carbon deposits on spark plugs.
When oil seals wear out, oil consumption increases. This also happens when the piston group is “coked,” but there is a visual difference. Oil streaks are noticeable on the breather pipe. The emission of bluish smoke is a sign that oil is entering the combustion chamber. “Trippling” of the engine and carbon deposits on the spark plugs are caused by oil leakage through the rod seal. The car needs diagnostics and replacement of oil seals.
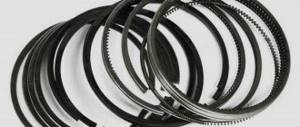
The service life of oil scrapers does not depend on the price and manufacturer. For budget and “premium” cars, the service life is calculated for a mileage of up to 100,000 km.
Symptoms of worn valve stem seals
Wear of oil seals reveals itself primarily during sudden throttle changes: when the throttle closes sharply at high speeds, a high vacuum is created in the intake manifold. At the same time, the slightest problems with the seals immediately reveal themselves: the oil drawn into the intake manifold produces bluish smoke when burned. Moreover, in contrast to similar smoke that occurs due to wear of the piston rings, when oil enters the combustion chambers along the valve stems, the maximum amount of smoke is formed at idle and during throttling, and decreases to zero as the speed increases.
Since it is impossible to check valve seals in this way (smoking indicates oil penetration into the intake manifold, and not the cause), take into account the characteristics of a particular engine. In motors where valves are actuated through rocker arms, there is a lateral load on the valve stem: by pressing on the end, the rocker arm simultaneously presses the valve against the wall of the guide sleeve. Over time, this leads to the appearance of an ellipse in the bushing. The valve seal is designed for strictly translational movement of the valve stem, and its lateral displacement can only be compensated within small limits. Therefore, with each stroke of the valve, the edge of the oil scraper cap is pulled back, and a gap appears on the opposite side through which oil penetrates. Simply replacing the caps with new ones will not provide any tangible benefit in such a situation.
For this reason, automobile engine designers tend to use direct valve drive whenever possible, where the camshaft presses on a pushrod, which takes on the lateral load and imparts only translational movement to the valve. The simplest example is the engines of front-wheel drive VAZs, starting with the VAZ: here the pushers are installed in the bores of the cylinder head, and due to the relatively large diameter they are able to withstand long runs without noticeable wear. And the service life of valve guides on such engines is higher than that of engines with rocker arms.
However, when replacing valve stem seals, you need to check the lateral play of the valve stem in two opposite directions: a difference in play will definitely indicate egg-shaped wear on the guide sleeve. In this case, it will be necessary to change the guides, and not be limited to just replacing the caps.
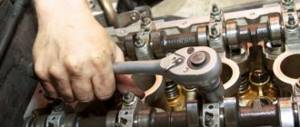
Procedure for replacing valve stem seals
- Disconnecting the air filter, removing the cover and air ducts. The pipes and technical openings are closed with plugs. Unscrew the spark plugs and cylinder head bolts.
- The piston in the first cylinder is set at top dead center. Removing the lock washer and star. The valve locknuts are loosened, and the control nuts are unscrewed until they stop.
- The crackers and springs are removed. The seals are removed using a puller. The bushings are lubricated with oil, placed on the rod and installed with a hammer and socket.
- Reassemble the components and parts in the reverse order. Afterwards, using a similar algorithm, the remaining caps are changed in the order of cylinders 4 - 2 - 3.
To service each cylinder, the crankshaft needs to be rotated 180 degrees.
Replacing valve stem seals without removing the head
Replacing valve stem seals begins with allowing time for the engine to cool and for the oil to drain into the sump. Once the engine has cooled down, you can begin removing the valve covers. When removing the timing cover, be careful not to damage the gasket. To do this, do not pry it with a screwdriver if it is not removable, but rather hit it with your palm from the side. Replacing oil seals on a diesel engine is no different from the same operation on a gasoline engine.
Purpose of valve stem seals
Since the lubrication of the gas distribution mechanism is combined (the camshaft journals are lubricated under pressure, and the remaining components and parts are lubricated by splashing), a lot of oil accumulates in the upper part of the head while the engine is running, which even covers the upper edge of the valve guides. Therefore, through the gap between the valves and the guides, oil, if there were no valve stem seals, would flow in large quantities into the combustion chamber along the valve stems. Due to the high temperature of the head, the rubber of the oil seals becomes hard, and their working edges over time cease to tightly cover the valve stems and begin to leak oil.
When the engine is running, the exhaust valve is at high temperature. Therefore, the oil that gets on its working chamfer burns, and the carbon deposits from it create conditions for the valve to burn out (when a slag particle breaks off, hot exhaust gases rush into the resulting leak between the valve and the seat and the valve sometimes burns out along with the seat). The intake valve has a lower operating temperature; the oil does not burn on it, but flows from it into the cylinder. Therefore, the intake valve never burns out.
Required tools and materials
Self-replacement will require a special tool. The main specific device is a valve desiccant. You will need it to replace the valve seal. Devices and materials:
- sets of socket and socket wrenches;
- extension cord with heads;
- rod and hammer;
- Collet clamp;
- press frame;
- tweezers;
- head gasket;
- a set of new caps;
- sealant.
During the work, it is possible to replace the gaskets under the block and cylinder head. New oil seals are selected for a specific engine model.
This is interesting: Fuse box on Nissan cars
Replacing caps
- First of all, you need to disconnect the battery terminals for safety reasons.
- After disconnecting all the wires, you need to unscrew the spark plugs.
- Remove the cylinder head cover.
- At this stage, it is necessary to set the first cylinder to top dead center (TDC). There is a very simple way to do this: engage fourth gear, jack up the rear wheel and then, by rotating it, set the desired position according to the marks on the timing gear sprocket. After this, the jack can be removed.
- Now you need to remove the cylinder head. This is a rather labor-intensive process. Therefore, valve stem seals are often removed without removing the head. However, this simplified method has its drawbacks, as will be discussed below.
- Next you need to remove the camshaft. After this, it will be possible to remove the rockers from the valves (it is important to follow the order: where they are removed from, they are then placed there). By the way, this action is performed even when the engine head is not removed.
- After dismantling the camshaft, access to the timing valves will open and it will be possible to replace the seals.
- Using a puller (desiccant), you need to press on the valve spring, and when it goes down, carefully remove the crackers with tweezers or long-nose pliers (some people use their own fingers, but this is not very convenient).
- Now carefully remove the valve plate, springs (inner and outer) and the washer under them. It is important to install all parts in their places during assembly. That is, the springs and valves must match each other.
- Using a puller, you need to remove the valve stem seals.
- Before installing a new cap, the spring is removed from it (it is in the form of a ring). The cap is well lubricated with oil and, using a special adapter (a tube of suitable diameter will do), is pressed into place with light blows of a hammer. After this, the spring is put on.
- After replacement has been made on all valves, they are assembled and the entire engine is further assembled. In other words, everything needs to be put in its place.
Procedure for replacing valve stem seals
Let's look at how to replace valve stem seals on an 8-valve engine without removing the head:
- Remove the fuel pump and air filter.
- Turn off the battery power and remove the ignition distributor.
- Unscrew the top cover of the block, disconnect the toothed pulley and ground.
- Evenly unscrew and remove the fastening nuts on the camshaft and bearings.
- We dismantle the shafts and seals.
- By turning the crankshaft, we raise the piston to TDC on the cylinder being serviced.
- We insert a soft tin rod under the valve through the hole for the candle.
- We remove the springs with a special device and remove the plates. We replace the oil seals by pressing the old ones from the bushing and installing new ones.
- We carry out the assembly in reverse order. We proceed to sequential similar replacements on the remaining cylinders.
Before installation in the frame, the caps are lubricated with oil. They are pressed into the plate carefully, without sudden strong blows. Gaskets and seals are installed under the bolt heads. Sort small items to avoid losing them.
After replacing all valve seals, reassemble the head using sealant and a new gasket. Tighten the nuts to a certain torque, according to the operating instructions for this engine.
Features of replacing caps on a 16-valve VAZ Priora
To gain access to the caps on the Priora, you will first have to unscrew the spark plugs from the wells, remove the ignition coils, and also reset the throttle assembly. After this, you can unscrew the valve cover bolts to remove the rocker arms and actually replace the MSC using a puller. In one piece, the situation is the same as in the case of the Lancer: TDC is set in the cylinders, crackers and springs are removed, new seals are installed, and reassembly is underway. As a rule, the entire complex of work takes the performer from 8 to 12 hours.
Useful tips
Valve seal kits vary in design for different engines. Installation is carried out in accordance with technical recommendations for a specific car model. When carrying out work yourself, be careful:
- matching diameters of the bushing belt and the valve stem;
- lengths of the guide bushing and cap seats;
- oil installations with reliable fixation (without the slightest backlash);
- selecting a set of caps for a specific engine model.
A high class of precision in the manufacture of parts allows for increased joint density and complete matching of dimensions.
Additives for restoring oil seals are available on the market. Their operating principle is to soften the hardened rubber of the o-ring. Manufacturers differ in the quality of their additives. There are different effects on rubber: no effect or excessive softening, which leads to excessive oil consumption.
When replacing without a collet, proceed with caution. The seat ring is thin and fragile. Replacing with pliers may damage the bushing step. Subsequent repairs to the seat and valve are more expensive than purchasing tools and a new set of seals.
General information about valve stem seals
Oil seals (oil seals) are part of the oil distribution mechanism in the engine. The presence of oil is the most important condition for the operation of the internal combustion engine. But it doesn’t have to be everywhere. For example, the camshaft is always surrounded by oil mist during its rotation. But there should be no lubricant in the combustion chambers. There is only a fuel-air mixture, which burns. If you add oil to it, combustion will worsen, which will affect the increase in gasoline consumption.
In addition, carbon deposits will form on the bottom of the valves. As a result, the valve begins to close loosely. The same carbon deposits accumulate on the cylinder walls and on the piston rings. This phenomenon is called engine coking. Of course, all this does not improve its performance, but, on the contrary, reduces its service life. And it increases the cost of oil and fuel. Located on the stem, the cap (also known as the valve stem seal) removes oil from the valve during its downward movement and prevents it from entering the combustion chamber.
Valve stem seals are considered consumable items and must be replaced from time to time. Previously, they were made of fluoroplastic. Today, manufacturers use fluorine rubber and acrylate rubber. The service life of such caps is significantly longer than that of their predecessors.
It is curious that this indicator practically does not depend on the manufacturer of the part itself: on expensive and budget cars they serve approximately the same. This will be useful for those who are thinking about the question: which valve stem seals are better? In this case, it is much more important to buy only those that match the engine and make of the car.