The headlights of a new vehicle are set correctly by the manufacturer. However, during operation a situation may arise when it is necessary to adjust the direction of the headlight beams. To do this, it is not necessary to contact specialists; adjusting the headlights is not difficult with your own hands. Let's look at the features of this event using the Lada Priora car as an example.
Basic Setup Aspects
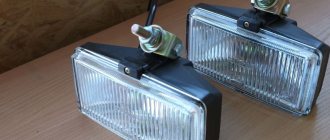
After the fog lights are installed, their luminous flux will need to be properly adjusted so that the operation of the optics is most effective. Adjustment of fog lights should be carried out in conditions that are closest to real ones. Therefore, make sure that there is a spare tire in the trunk, the tank itself is fully filled, and the tire pressure should be the same. In addition, for greater realism, a load weighing about two hundred kilograms can be placed in the car interior.
When all these conditions are met, you can begin adjustment. First of all, the vehicle must be placed on the most level surface, this will allow you to get the most accurate result. If this condition is not met, the adjustment will be incorrect. The setting is done in front of a wall or garage door, this is a prerequisite.
To begin the adjustment, measure the distance from the ground to the middle of the lantern. After this, you should draw a straight line on the wall or garage door that corresponds to the distance measured earlier. Having done this, you will need to draw another stripe - it should be 5 centimeters lower, while the first line can be erased. The anti-fog optics should be adjusted so that the upper limit of illumination is located on the horizontal strip that you draw on the network.
Adjusting the fog lights
When the installation is complete, you are convinced that the fog lights are operational, it’s time to move on to adjusting them:
- We park the car on a flat surface, it is important that there is a wall, a garage door or something like that in front.
- Check to see if the tire pressure is the same.
- We measure the distance from the middle of the headlight to the asphalt (ground).
- Subtract 5 cm from the distance of the headlights to the floor, draw a strip on the wall corresponding to this value.
- We turn on the fog lights and adjust them so that the upper limit of the light flux is on a horizontal line.
Diagram of correct installation of fog lights
On Priora, fog lights are installed according to the same rules as any other car. Installation is carried out at a height of no more than half a meter from the level of the road surface. Low-mounted fog lights are out of the wet condensation zone and can actually significantly improve visibility. If you install PTFs on the roof of the trunk (as jeep owners often do), then they will turn out to be completely useless, especially during fog, rain, or a snow or dust storm. Therefore, the most effective way was and remains to install foglights under the bumper (for outdated metal structures) or directly into it (for new generation metal structures).
The fog lights that you install on your Priora must meet not only all traffic regulations, but also UN standards. The latest changes clearly state that any fogs must distribute light at a wide angle and have a clearly defined upper border. The dispersion index should be seventy degrees horizontally. Only a device with such characteristics will create an anti-fog effect.
Most often, fog lights with a halogen illuminator inside are installed on the Priora. They are enough to ensure that the space thirty meters in front of the car is sufficiently illuminated in any weather.
Installing PTF in Priora 1 and 2: are there any differences?
The PTF connection on the Priora differs in the position of the headlights: in the pre-restyling version, the round headlights are located closer to the center of the front end, and in the Priora 2 - restyling: the trapezoidal PTFs are located closer to the edges of the front bumper.
Installing PTF in Priora 2 can be complicated by the fact that instead of a trapezoidal headlight, the headlight of a pre-restyling Priora car will be installed; you will have to stock up on screws and patience in order to secure the headlight well in the frame, and the plastic frame to the bumper. You can install fog lights in a couple of hours, the main thing is to understand the wiring connection order.
The procedure for installing the button inside the cabin, powering the circuit
In order to connect the PTF button, you need to perform the following steps:
- Remove the negative terminal of the battery;
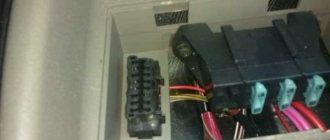
- Disassemble the steering column. It is secured with three plastic latches; they need to be turned 90 degrees. Find the safety block;
- The block holds a self-tapping screw, unscrew it;
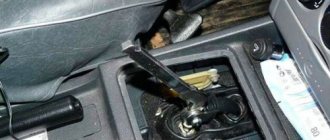
- Disassemble the center console by unscrewing four screws: under the ashtray, under the radio and near the OPEN sign. In place of the plug, put the on/off button for the fog lights and connect the blue wire to the safety block, possibly through a relay;
- Using clamps, connect the remaining wires to the heated rear window button.
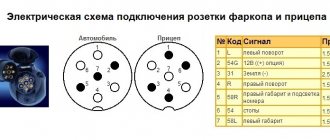
Connecting Priora foglights
Let's take a closer look at the connection diagram for the Priora fog lights. The fog lights are controlled by the lighting control unit. Specifically, the switches for the front (A5) and rear (A4) fog lights. Upon examination, we can only notice one wire to enable each option. This wire passes through pin 2 to both switches through various resistances because it is a signal wire. It runs from the electrical package control controller to the switch. From the controller side, a stabilized voltage is supplied to this wire. The electrical package control unit controls changes in the amount of current passing through it.
We recommend: Gap size on spark plugs, its measurement and adjustment
Turn on the rear fog lights.
The rear fog lights of the Priora are turned on as follows. When you press the button on the module (A4), the wire from the electrical package control controller is connected through a negative resistance. In this case, a current of the appropriate magnitude will flow through the circuit, so the controller will receive a signal that this button is pressed. If there is power at pin 14 of block X2 and the low beam headlights are on (see “Prior headlight diagram”), then the processor, through the appropriate key, will supply power to pins 10 and 13 of block X3, to which the rear wiring harness is connected. Voltage will be supplied to the rear fog lamps and to the lighting control module. At the same time, the indicator light on the module will light up.
Turn on the fog lights.
Connecting the Priora fog lights is almost the same. The difference is in the value of resistance, and accordingly in the value of the passing current. Based on the current value, the processor of the lighting control controller determines the position of the front fog lamp button. Therefore, if there is power at pin 12 of the X2 block, the side lights are turned on (see “Prior Dimensions”), power will be supplied to pin 19 of the X2 block.
The green wire with a black stripe will supply voltage to the coil of the K10 electromagnetic relay. The coil armature will be attracted and close the contacts. In this case, fuses F17 and F18 with a nominal value of 10A will receive power, and from them, through the connecting connector of the instrument panel harness and the front harness, the lamps in the fog lights will receive power. In addition, the LED on the lighting control module will receive power from fuse F17, signaling that the headlights are on.
When you press both power buttons simultaneously, the current value will also change. Since in a parallel connection the total resistance is always less than the smaller one. That is, the value of the passing current will be maximum. Connecting Priora foglights according to this scheme makes troubleshooting very difficult, without the presence of diagnostic equipment for the electrical package control controller. If malfunctions occur, it is necessary to check the integrity of fuses, relays, operation of side lights and low beam headlights.
Installing PTF on Priora
We remove the bumper and crankcase protection of the Priora. We remove the plugs on the bumper and in their place we attach the headlights with PTF screws. The set of fog lights for Priora must have 2 wires in the harness. We connect the negative wires of these cables to the body, and the harness itself through the connector to the fog lights. We install the Priora bumper and protection in place. We extend the second end of the cables into the Priora’s interior through the hole under the windshield wiper motor, closed with a plug. To do this, you need to remove the expansion tank, and then the left edge of the upholstery.
We install the PTF power button in the Priora's interior:
- under the plug located to the left of the clock, remove the decorative trim by turning the three locks 90 o;
- instead of a plug we put a button;
- We connect the connector of the internal wiring of the PTF switch to it.
We stretch the cable from the button to the Priora fuse box (under the glove compartment), which we open. In the block we put the K10 relay in the reserve place (we buy it separately) - it will turn on the headlights. We connect to its contacts:
- to terminal “85” – one of the wires from the power button;
- “86” – to “ground”;
- “30” – to contact “30” of relay K7;
- from “87” - to the headlight fuses (F17 and F18).
Then the second wire from the button is +12 V. To the free, second contacts of the fuses we connect the wires supplied from the Priora fog lights themselves.
Installation Guide
Before installing and connecting fog lights on Priora 2, weigh your strengths. If installing fog lights on a Priora 2 or restyling may cause difficulties, then it is better to contact an electrician. A specialist, like no one else, knows how to install headlights on a Priora and how to connect fog lights. If you decide to do everything yourself, then first prepare the necessary tool. To do this, you only need a set of keys and screwdrivers, as well as pliers (the author of the video about choosing fog optics for the Priora is the Simple Opinion channel).
Algorithm of actions
To ensure that installing fog lights on a Priora SE or 2 does not cause difficulties, simply follow the instructions:
- First you need to disconnect the battery, remove the negative terminal from it, and then disconnect the front bumper clips. Self-tapping screws for its dismantling are located on the sides, bottom and top. You need to unscrew them and remove the bumper.
- Next, you can move on to the stubs. The plugs are also fixed using self-tapping screws, but to unscrew them it will be more convenient to use a short screwdriver with a Phillips blade.
- Fog lights on Lada Priora 2 are mounted instead of previously removed plugs. To ensure that the lights are securely fixed, they can be secured using the same screws.
- After completing these steps, you need to find the longest cable in the PTF kit. This wire is connected to the left headlight, after which it is routed to the right headlight. And then the wire must be pulled from the battery side into the engine compartment.
- Using an AN 10 wrench, it is necessary to dismantle the expansion tanks in the engine compartment, which will interfere with the process. Having done this, using a 13mm wrench you will need to unscrew the fastenings of the windshield wiper blades. Eventually you will need to gain access to the left edge of the trim, and to do this you will need to remove the guard itself. When these steps are completed, the pipe can be moved to the side, and then loosen the clamp. The upholstery can then be completely removed.
- Your task is to lay and stretch the wires from the lights through the plug into the vehicle interior, and then secure them with a clamp. This clamp should be included in the kit for the PTF Priora 2.
- When the PTFs are installed on the restyled Priora, all elements are assembled in the reverse order. Don't forget to connect the wires to the crankcase protection screws.
1. Open the hood and disconnect the battery, then unscrew the bumper fasteners and remove it.
2. Then remove the plastic plugs, and instead install fog lights and connect them.
We recommend: Insulating the hood of a car
Connection diagram
The installed fog optics will need to be connected.
The PTF connection diagram is as follows:
- First of all, in the car interior, under the steering column, you will need to remove the protective cover. To do this, the three latches should be rotated 90 degrees.
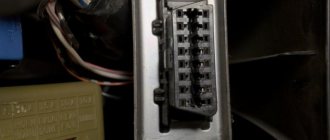
- Having done this, under the mounting fuse block you will be able to see a self-tapping screw - you need to unscrew it, after which you will have access to dismantling the block. In any case, the anti-fog optics kit should come with installation instructions and it must contain a connection diagram. Please use this as a guide during installation.
- Next, you can move on to the torpedo. On the center console, you need to remove the plug, as well as the button for activating the rear window heating system. These components are installed near the clock.
- Next, you will need the fog light button that comes with the kit. The blue wire must be connected to the mounting block, and all other wires are connected to the heating button. This can be done using special clamps, which are also included in the kit.
- At the final stage of connection, you will need to install the relay responsible for the operation of the fog lights in the unit. When performing this task, be careful - the wires that come from the engine compartment must be connected to F18 and F17, and the yellow cable should also be connected to the same contacts. The connection procedure is described in more detail in the diagram.
Wiring diagram for fog light control buttons
Installation of fog lights on Priora
Installing a PTF does not require special knowledge and skills from you, the main thing is to acquire the necessary list of tools and strictly follow the instructions below.
To install you will need:
- Keys for "10" - "13".
- Flat/Phillips screwdrivers.
- Heat shrink.
- To insulate the wiring - corrugation.
- Regular pliers.
- Insulating tape.
Step-by-step installation instructions for LADA Priora PTF:
- We open the engine compartment and make sure that the negative terminal of the battery is removed without fail. We dismantle the wipers and frill; for this purpose we use the key set to “13”.
- Using the 2nd key, remove the bracket and expansion tank. This is necessary for the convenience of work, and removing/installing these units is not at all difficult.
- The front bumper is attached with 10 screws. We unscrew them all.
- Use a Phillips screwdriver to unscrew the fasteners of the plastic plug. We put the headlights in their standard places and fasten them securely with self-tapping screws so that they don’t come loose when shaking from driving.
- At this stage we begin to do the wiring. For this purpose, we hide the wires in corrugation in order to prevent chafing and fasten the wires so that the contacts do not come off.
- We take the longest one from the set of wires; it is always blue. We divide the wire into 2 ends and connect one end to the left headlight, and the other to the right one, respectively. Next, we extend the wire into the engine compartment, or rather into the area of the main brake cylinder.
- Using a flat-head screwdriver, we pull off the interior trim of the LADA Priora and insert a wire into the interior.
- Already in the cabin we connect the wire to the safety block.
- At the end of the work done, we install everything in its place and carry out the adjustment of the fogs, which was mentioned above.
Prices for headlights and work
Installing headlights in the showroom (where you buy a car) will cost 2,000 - 3,000 rubles, plus the price of fog lights is 2,600 rubles, which is much more expensive than in a store. Installation of fog lights in a car service center averages from 1,500 to 2,000 rubles. You can buy headlights yourself. It is not necessary to pay money for installation, because fog lights can be installed on your own.
The price of a set of fog lights varies from 1200 to 1800 rubles. For headlights you need to purchase a connection kit - 400 rubles.