The light source in most cars is a lamp with an H4 socket, providing low and high beam. This lamp can only be double-filament. If we are talking about switching to “xenon”, then the “H4” lamp must be replaced with a bi-xenon module. Inside such modules there is one light source, and it cannot change its brightness. The problem is solved by the presence of curtains and an electric drive.
What is bi-xenon?
Note that if the lamp is covered with a lens, then the system looks like one sealed module (bilens). If there are no lenses, the design is called a “bi-xenon lamp”.
We disassemble headlights at home
Logically, the H4 bi-xenon installation cannot be done without removing the headlight assembly. We will not consider in detail how to dismantle headlights - each car has its own design features. We only note that the battery must be disconnected before dismantling. Which includes the following steps:
- disconnecting the DRL connector, turn signal,
- disconnecting the block from the terminals of the main lamp,
- as well as removing the hydraulic corrector.
- The fastening screws are unscrewed at the last stage.
The headlight modules themselves will have to be disassembled. This action is simple to perform. It is necessary to reach the temperature at which the butyl sealant melts. In general, the module must be placed in a box filled with hot air. And the air source will be a hairdryer.
There is only one task - to melt the sealant
It is permissible to use only an industrial hair dryer. A diffuser - a wooden board - is installed opposite the nozzle. Carry out all the steps in order:
- The box is closed;
- Turn on the hairdryer (use minimum power);
- After 10 minutes, turn off the hair dryer and remove the headlight module with gloved hands.
When disassembling, use a flat-head screwdriver. The result of all work is shown in the photo.
All that remains is to remove the excess sealant
"Old" sealant applied around the edge of the reflector will interfere with assembly. Remaining sealant must be removed. And it’s better to do this before it cools down.
Video of removing glass from a headlight + professional advice
The standard H4 lamp is attached to the headlight with a wire bracket. In order to install the bilens, the bracket is removed in any case. The same applies to all metal equipment. And the protrusions located on the back side of the reflector are cut off or broken off:
Next, taking a regular or feather drill, make a hole in the plastic, the diameter of which is 25 mm. The location of this hole must be selected precisely - the electric drive cable will go into it.
Additional hole is ready
Install the module on the reflector and secure it with the nut included in the kit. Then you need to align the lens by moving the module itself a small distance.
The module is connected to the battery via the adapter included in the kit
When the last operation is completed, the nut is outlined with a felt-tip pen. Then the entire structure is temporarily dismantled. Hot melt adhesive is applied to the points of contact between the reflector and the module and assembly is carried out.
In theory, installing bi-xenon with your own hands takes a few minutes. The main thing is not to forget about the hot glue stage. Otherwise, the xenon module will sooner or later shift.
The remaining question is how to assemble the headlight and how to connect it correctly.
Build process
Before assembling the headlights, the glass on the module is degreased. Pure alcohol or Secunda is used here.
Applying sealant to the headlight reflector
To carry out the assembly according to all the rules, you will need butyl sealant. The material is applied to the edge of the reflector, leaving no gaps. Instead of a liquid mass, sealing tape is also suitable (see figure). And the hole into which the wires are routed should also be treated with sealant.
It will be necessary to perform “baking” again, but before that, an experiment is carried out. The adjusting screws are scrolled from one extreme position to the other. The bottom line is that the length of the cable running from the xenon module to the reflector must be sufficient. Otherwise, an unpleasant effect may occur - the wires will become short-circuited.
Butyl sealant must be “baked” in any case. Therefore, the assembled headlamp is placed in a box with a hairdryer and the steps indicated in “Chapter 1” are carried out. To avoid repeating everything again, keep the hairdryer on for 10-15 minutes.
After baking, the headlight should cool down. Cooling time – 2 hours. After this time, installation can be carried out; before, it is not possible.
Anyone who touches heated plastic with their hand can get burned. The problem will be solved by using gloves with pimples. Maximum caution won't hurt either. Happy installation.
How to install bi-xenon in a car
Before you start working directly, you need to briefly understand the design of this lighting device. A bi-xenon lamp consists of the following main elements:
- A module that contains a curtain with a high and low beam switch mechanism;
- Reflector
- Dimensional lighting element
- The lens itself.
This optics is installed in the standard reflector of the car. The advantage of the system is that it leaves the opportunity to adjust the light both manually and automatically, if such an option is provided for by the design of the car.
The optical system is connected to a 12 Volt network through a special ignition module. Once the basic structural system is understood, installation can begin. To do this you need to take the following steps.
First of all, remove the standard headlight unit and place it on a flat surface, such as a table. Then remove all covers from the back wall of the optics. To do this, rotate the caps counterclockwise. When you're done, you'll have access to the lamps. Pull the plug towards you. On most passenger cars, the low beam connector is painted green, the high beam connector is blue.
To remove the lamp:
- Push the low beam lock down;
- Move slightly to the side.
- Lift the part up
- Remove the lamp from the block.
The distant glow element is removed in the same way. The cartridge of this size can be removed from the landing site without unnecessary movements and complex manipulations.
Take a Phillips screwdriver and remove the retainer along with the latch and caps. Don't forget to mark the direction and location of the clip on the optic body using a marker. To remove the part itself, use a minus screwdriver.
Standard connection diagrams
Let's say a headlight with a bi-xenon module is already installed. Then, after connecting, it is adjusted using adjusting screws. In the meantime, let’s look at what the diagrams recommended by the manufacturer and relevant for bi-xenon look like.
Removable block contacts
The socket designed for H4 lamps is equipped with three contacts. One of them is “mass”. The cord going to the ground contact will always be in black insulation.
Perhaps the owner has two ignition units and one 5-pin relay. Then the connection can be made by implementing a simple circuit:
Circuit with one common relay
As you can see, only one of the two H4 connectors is used here. The other needs to be insulated.
The manufacturer often offers in the kit not only an ignition unit, but also a control module. The headlights are then connected according to the following diagram:
Scheme with separate control units
From each line supplying the dimensions, the unit can read additional data. However, connecting these lines is not necessary.
When carrying out installation, follow these tips:
- There is no need to install a powerful fuse (30 A), shown in most diagrams - it is included in the standard wiring. Simply, connect to the line that powers the lights, not the accessories;
- High-voltage wires that go from the ignition unit to the headlight should not touch metal surfaces. Also, these wires cannot be bent into a loop - use an S-shaped laying;
- Once you have ensured that the headlights turn on, be sure to adjust the adjustment screws.
Operating a car without headlight level control is now prohibited by law. This applies to a greater extent to “xenon” light sources. Draw conclusions.
A simple action that causes great damage to any arc lamps is turning them on and off frequently. Therefore, in low beam mode, try never to “blink” your headlights. But this does not apply to the high beam - in this mode only the electric drive switches.
Correction for reverse polarity
Reverse polarity of the base connection is implemented in many cars. The word “reverse” means that “plus” is applied to the common contact of the lamp (see figure).
The "reverse polarity" option is shown on the right
If the car uses reverse polarity, buy a universal bi-xenon kit:
Kit with two connection options
As you can see, the kit is equipped with an inverting jumper, as well as a control diode. When carrying out installation, follow the recommendations:
- If switching between modes does not work, change the polarity of the diode;
- If the switching does not work correctly, install a jumper.
No further explanation is required here. Happy installation!
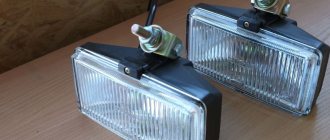
Installation of bi-xenon lamps
A bi-xenon lamp is a module containing a lamp and a curtain. The appearance of such a module is shown in the photo:
Bi-xenon module for H4 base
Such modules can be installed on a standard “mount”:
Bi-xenon lamp installation diagram
The bracket provided in the headlight design will press the metal part “A”. Then the remaining elements are attached to this part.
To mount a bi-xenon lamp, the headlight unit does not have to be disassembled or modified. Sometimes installation can be carried out without even removing the headlight from the car.
Before installing bi-xenon headlights, you need to make sure of the following:
- The curtain or metal cap must not touch the headlight elements. That is, the dimensions of the module itself should not be too large;
- If the glass has a standard reflector cap, use modules without a reflector. This rule cannot be broken;
- The reflector cap, attached to the module itself, can usually be removed. And they do this in one case - when the headlight already has “its own” cap.
Bi-xenon lenses 3G. (installation), installation of xenon, bi-xenon.
What are bi-xenon headlights? The gas-discharge xenon lamp of bi-xenon headlights is a light source in which electrical energy is converted into light when an arc discharge burns in a xenon atmosphere. The main advantages of xenon lamps:
1. continuous emission spectrum close to the solar one. 2. large range of brightness and power 3. increasing current-voltage characteristic, simplifying the conditions for powering and regulating lamps
What does the consumer get from the installed set of G3 bi-xen lenses ?
Driving becomes safer and the ability to detect various obstacles increases significantly. Good illumination of the roadway, road signs, intersections in bad weather. All this allows you to recognize an obstacle in time and take action.
Reduces driver stress when driving . The bi-xenon light beam is equivalent to daylight, which allows the driver to remain alert and alert. The light from bi-xenon lenses stimulates the human eye in the dark and in poor visibility conditions.
Energy saving . Bi-xenon is 50% more economical in energy consumption compared to halogen headlights. The service life of xenon is much longer than that of halogen. Less stress on the engine and less headaches about constantly replacing burnt out lamps.
Individual look and distinctive style . The chrome-plated bi-xenon lens housing looks great with the standard reflector of all brands, which creates the effect of structural integrity. The light from the LED ring (angel eyes) built into the lens makes the car stand out from the crowd. In terms of brightness, LED angel eyes are similar to daytime running lights and it is not uncommon for drivers to use them as DRLs.
Initially, it was planned to put a lensed bi-xenon in place of the standard low beam, make an eyelash, and put “angel eyes” in the low and high beam headlight reflectors. In fact, it was limited to bi-xenon in the standard place of low beam.
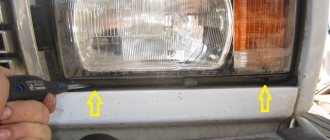
On some cars, the bumper prevents removal of the headlights. This is our case.
Carefully remove the headlight. Do not scratch the headlight glass on the body part.
Disconnect all wiring. Dimensions, low/high beam, turn signal, headlight range control.
We remove all unnecessary parts before heating the headlight.
We remove the old light bulbs and seals. We unscrew the control screws that tighten the rear headlight housing with the glass.
A heating cabinet is ideal for heating the headlight, but we didn’t have one on hand. A box is what suits us! This folk method has proven itself well in installation centers. The flow of hot air cannot be directed at the headlight, as this can have unpleasant consequences. For this purpose, a partition was installed in the box.
Set the heat gun to 200 degrees (if using a heat cabinet, set the same value). The headlight housing should warm up to 80-90 degrees in about 12-15 minutes. At this temperature, the sealant becomes soft and elastic. To avoid burning your hands while working with the headlight, use gloves.
We take the headlight out of the box and begin disassembly.
At the end of the video you can see how the light bulb reflector is removed. It will get in the way when installing the bilens, but its seat will be useful for wiring.
Buy bi-xenon lenses
Bi-xenon lenses are designed to enhance and better focus the light beam in headlights with H1, H4, H7 sockets, 9004, 9005, 9006, 9007 and non-corrugated glass. The lens is a compact, perfect device that structurally combines a reflector, a lamp, a focusing lens and a metal shutter that forms the upper boundary of the beam in the near and far modes, as well as “angel eyes”
Below is our xenon lamp connection diagram. This circuit is no different in any way from the usual methods of connecting xenon, except that RGB LED backlighting is added. We have posted a detailed description of installing lens illumination in the article “Bi-xenon lenses. LED backlight"
We ran the power wires for the backlight, angel eyes and electromagnet (for high beam) through the hole in which the small lamp reflector was held.
An adapter for an H4 socket was installed on the back. The adapter prevents the bi-xenon lens from rotating due to the groove in the thread of the bi-xenon module.
We screw the locknut onto the thread, which presses the lens to the headlight reflector.
The entire bi-xenon module is in place. We begin the reverse assembly process. Before assembly, it is necessary to remove dust from the surface of the reflector and the inside of the headlight glass.
We repeat the process of heating the headlight.
We assemble the headlight, screw the standard screws into place
Bilinza is in his place
Preparing to install xenon. Before installing and connecting headlights with bi-xenon installed, be sure to disconnect the vehicle’s “+” terminal. Carefully study the recommended connection diagram for xenon lamps. Next, choose a place to install xenon lens ignition units.
This is what lens lighting and angel eyes look like in practice.