March 29, 2019
8 min
…
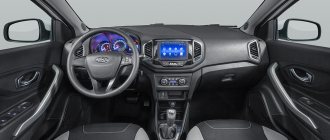
Modern Lada Vesta cars in all types of body styles and modifications continue to increase sales in Russia. They are at the level of budget Korean and European sedans, while demonstrating a completely different level of comfort and equipment. Today this is a completely relevant car with good equipment and decent engines. In most cases, owners are satisfied with the purchase and consider the car one of the best in its segment. However, there are those who consider Vesta to be far from AvtoVAZ’s best invention. One of the most common breakdowns on a new car is wiring problems. The electrical part traditionally fails the car at the most unexpected moments. And to repair some parts of this very wiring, you have to disassemble the plastic elements of the interior and go into the hidden places where the wires are laid. If the wiring of the central locking or power window is faulty, you will have to crawl under the door card.
Also, the Lada Vesta door trim must be removed if you want to gain access to the central locking mechanisms, door opening mechanisms, window lifters and parts of the anti-theft system. Another possible purpose of this work is additional sound insulation of the car, which from the factory turned out to be far from the best. The doors at AvtoVAZ are not insulated at all, and they constantly generate vibration and increased noise. It is better to remove and throw away the factory semblance of sound insulation, performing the normal packaging of the metal part of the door in several layers of good anti-noise. All this work can be carried out in your own garage, but to do this you need to understand exactly what problems may arise during the process of disassembling the interior trim. The doors in the Lada Vesta are designed far differently than they were in Kalina or Priora. You must try not to damage expensive parts.
What tools will you need for the job?
The set of tools depends on the goals you are pursuing. For example, to install new sound insulation you need high-quality insulating materials, special mounting parts, and sharp office knives. To replace the speaker with more powerful equipment, you will also need a set of electrical equipment to install and connect all the elements. We will consider a set of tools directly for removing the door card, and we will leave further actions at the discretion of the car owner.
So, you will need the following devices:
- work gloves - it is better to carry out work in thick protective gloves, otherwise the plastic can crush the hand and damage the upper tissues of the skin, this is an unpleasant injury;
- a flat-head screwdriver with a thin working part, as well as a set of Phillips screwdrivers and Torx 20 - it is better to have several sizes on hand at once in order to choose the optimal one and not lick the fastening bolts;
- several plastic spatulas made of soft material, which will serve to carefully pry up the plastic elements; this cannot be done with a screwdriver, otherwise marks will remain;
- flashlight - you will need high-quality light in places where regular lighting does not reach, so a headlamp will be a very necessary piece of equipment to get the job done;
- door trim clips for Lada Vesta - usually several clips break during dismantling, so you will have to buy them at once; for all four doors it is better to have a dozen spare clips.
Of course, the set of tools may be smaller. Many craftsmen manage to make do with a hole, which is used to pry off all the parts. But if you don’t have much experience, it’s better to prepare more tools to get the job done. Otherwise, already in the first stages, you can severely damage expensive parts of your car and completely eliminate the financial effect of doing the work yourself. In this case, there will be no savings, but there will be more problems for the car owner.
Removing the door card
If you are still planning to reupholster the Lada Vesta door trim inserts yourself, you must first remove them.
The algorithm for dismantling the front and rear cards is generally identical, with the only difference that there are slightly fewer latches for the rear door, and you will also have to remove the handle for the mechanical opening of the glass if your Vesta does not have full electrical accessories. To work, you will need a Torx20 bit, a ratchet, and a plastic spatula. However, if you don’t have such a spatula, you can replace it with a thin screwdriver or a knife, but first wrap them with cloth so as not to scratch the interior plastic.
Removing the front door trim of Lada Vesta
The front cards are the most difficult to remove. They are attached to a larger number of fasteners, and there are more regulators. It is necessary to take into account the adjustment of the mirrors so as not to uproot any electrical wiring clips. Also, care should be taken when dismantling the power window unit - it is this unit that is most often damaged by inept actions with a screwdriver. Caution and lack of haste will be the key to getting the job done correctly.
The order of actions is as follows:
- Using a plastic spatula prepared in advance, unclip the plastic triangle lock in the area of the rear view mirror control unit. Just pry this element off at the top.
- Disconnect the electrical control connector to prevent it from being torn off when removing the card.
- At the bottom of the card, use the same spatula to remove the lampshade. Disconnect it from the connector and set it aside. Also unscrew the three card fastening screws located at the bottom of this element in the area of the lampshade.
- At the top of the end part (in the plane where the door lock is installed), carefully remove the round plug. Underneath there is another fastening screw that needs to be unscrewed.
- Inside the door closing handle there is another screw for securing the card, which also needs to be carefully unscrewed with a Phillips screwdriver.
- Next is the most difficult part - using a plastic spatula, carefully pry off the window regulator unit so as not to damage its delicate body. Remove the unit from its installation location and disconnect it from the connector.
- There is another fastening screw under the power window control unit that needs to be unscrewed.
- At the bottom of the casing, place a plastic spatula in any corner of the card and gradually pull the plastic towards itself. The clips will begin to come out of their installation locations, and the card will gradually be dismantled.
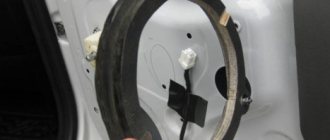
Once all the clips are removed, you will be able to completely remove the card and get to the metal part of the door. This is a simple procedure that you can do yourself without experience. But you should pay special attention to accuracy when working with the power window unit. It is at this stage that most inept performers incur additional costs for themselves. The case cannot be pryed off with a screwdriver, as it will be damaged and will look very ugly.
Removing the rear door card on Lada Vesta
In the rear of the car, everything is a little simpler, since manual windows are most often installed here, and there is also no mirror control unit. Up to and total number of fastenings is significantly less. This allows you to spend half as much time on doing the same work. However, you will have to be careful, otherwise you may damage one of the elements and incur additional costs. It is best to also use a plastic interior disassembly kit to avoid scratching or damaging anything.
The instructions will be somewhat shorter than for the front door:
- First you need to remove the window handle or button if you have an electric control option. To do this, use a plastic spatula to pry up the retaining ring and then pull it out with your hands. The rest of the device can be easily removed by hand.
- The door handle trim is also secured with latches. It is enough to snap them off using the same spatula and then remove them with your hands.
- Here you will need a socket wrench of 10, since two mounting bolts are waiting for you under the handle lining. Unscrew them first so as not to violate the card removal technology.
- At the bottom of the card there is a hole with a fastening screw for a Torx 20 - asterisk. This fastener is easy to unscrew; you just need to choose the right tool.
- Next, you just have to snap off the clips one by one, starting from the bottom. It's very simple and don't be afraid to break them, this is a normal process. Then you need to buy and replace them with original fasteners.
The process of removing the Lada Vesta rear door card is quite simple, it will take about 15 minutes. All four car cards can be removed in 1 hour, even if you do not have much experience in doing this work. However, a car service center will charge you a lot of money for such work, so it makes sense to do the work yourself and save your budget. Whatever the purpose of disassembling this element, it makes sense to perform additional sound insulation of the doors. To do this, buy the necessary materials in advance.
How to remove the door trim of a Lada Vesta
Door trims (cards) are dismantled to repair the elements that are located under it (window lifters, locks), or to modify the car. For example, to install additional sound insulation or more powerful speakers. Let's look at the features of replacing Lada Vesta door trim.
You will need: a TORX T20 wrench (asterisk) and a plastic spatula, or a flat-blade screwdriver (to avoid scratching the surface, you can wrap it with a rag/electrical tape). New fasteners (like on Renault) in case they break during work.
What else can be improved when disassembling cards?
Most often, this process is performed to repair electrical wiring, and not to improve the car. But gradually various recommendations appear on how to improve the car and make it more enjoyable to drive. And this is worth using, because otherwise you will face troubles with a gradual deterioration in comfort. Experience in operating a car is gradually accumulating, and you can already find many interesting recommendations.
Some tips for disassembling the card include the following:
- improving the acoustics of the car to get better sounding music - it is under the maps that the main speakers of the car are located, which are not the best from the factory;
- lubricating or modifying the window lift system in the rear, if you have mechanical means installed, this is a rather important point for lovers of the general comfort of car operation;
- improving sound insulation is the most necessary and useful advice, but to complete this task you need to buy high-quality and proven materials, so it’s worth reading reviews;
- tinting - it is much easier to perform high-quality pasting of the film by dismantling the card, this will allow you to gain access to the entire glass in order to evenly stick the lower part;
- sizing with anti-creaking and vibration-proof materials - this will significantly increase comfort in the car; various unpleasant sounds will no longer be heard from the doors.
As you can see, there are quite a few options for improving the car, and each of them deserves attention. But it is worth paying close attention to the question of the appropriateness of using funds. Since you can spend several thousand rubles on one door just to replace the speakers. So the investment in upgrading your car can be quite large. It is worth immediately considering how much such changes are worth the investment.
We invite you to watch a video with the process of dismantling the door card on Vesta:
Let's sum it up
The Lada Vesta car is gradually becoming popular and replacing many other options for inexpensive budget sedans. This is not the simplest or most budget car, but it is a quite confident horse for Russian roads. Of course, this is a VAZ, so you shouldn’t hope that everything in the car is perfect and nothing will have to be modified. Most likely, you will have to perform many different modifications yourself while using the machine, especially after it is removed from the warranty. However, there are far fewer problems and improvements needed here than in most other cars in this price class.
It is quite possible to remove the door card and perform the necessary work in your own garage. To do this, it is enough to carefully carry out all the work according to the instructions. Each stage should be performed with due caution, otherwise you will not avoid problems with the car. A broken mount or a scratched power window control unit will have to be replaced, and this costs some money. It is best to be as vigilant as possible so as not to break anything. In this case, doing it yourself will pay off and save you a lot of money. Have you ever disassembled a car door card with your own hands?
Lada Vesta body parts
Products from the Dustershop77 range on the topic of the article:
| Name | Manufacturer | Price | Availability | Add to cart |
| V114-1420501 | Radiator grill LADA Vesta (Luxe, Exclusive) | Pt GROUP | 4500 / 3900 rub. Discount: 3600 rub. | 2 |
| V115-1430501 | Radiator grille LADA Vesta (Classic, Comfort) | Pt GROUP | 4000 / 3900 rub. Discount: 3900 rub. | 1 |
| DC1266-FR2238 | Duster 10 - wing turn signal (L=R) | Taiwan | 350 / 200 rub. Discount: 150 rub. | 5 |
| V116-1500505 | Radiator grille LADA Xray | Pt GROUP | 3700 / 3500 rub. Discount: 3500 rub. | 1 |