VAZ 2109 carburetor accelerator pump for sharp acceleration
The accelerator pump of the VAZ 2109 carburetor (in this case, “Solex”) is an additional mechanical fuel supply system that provides a forced supply of gasoline when the throttle valves are opened. The accelerator pump of the VAZ 2109 carburetor does not depend on the air flow through the diffusers.
Why is an auxiliary fuel supply system necessary? The thing is that in the first second, after sharply pressing the gas pedal, only part of the fuel mixture supplied by the carburetor reaches the cylinders. The accelerator pump of the VAZ 2109 carburetor provides the required amount of combustible mixture in the cylinders already in the first second of acceleration.
The device of the accelerator pump of the carburetor VAZ 2109 (Solex)
- accelerator pump diaphragm;
- accelerator pump drive lever;
- cam on the throttle valve axis of the primary chamber;
- accelerator pump suction valve;
- accelerator pump discharge valve;
- accelerator pump nozzles;
- suction stroke spring;
- diaphragm head;
- damping spring.
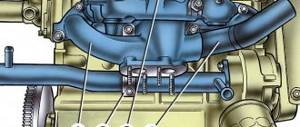
The accelerator pump design of the VAZ 2109 (Solex) carburetor is shown in the photo above. The spring-loaded diaphragm number 1 is connected through a lever number 2 with a cam number 3 on the throttle axis of the primary chamber, as well as a ball suction valve number 4, which freely passes gasoline from the float chamber into the cavity that is located under the diaphragm during closure throttle valve and prevents it from backing out when the throttle valve is opened.
Also important is the ball discharge valve number 5, which prevents air from being sucked into the pump cavity during suction, and allows fuel to flow to the nozzles number 6 during the injection period.
The suction stroke is carried out due to the elasticity of the diaphragm spring 7, the discharge stroke occurs due to the force influence of the drive lever on the end of the diaphragm head 8.
A rigid spring number 9 is installed in the diaphragm head 8 between the thrust bearing, which is in contact with the lever, and the plate.
During a sharp opening of the throttle valve, the diaphragm of the accelerator pump, which is held by the removed fuel relatively slowly, is not able to quickly move to a length determined by the stroke of the lever, spring 9 is compressed, and then, as the fuel disappears from the pump cavity, it slowly unclenches, thereby thereby protecting the diaphragm from rupture by enormous fuel pressure; as well as increasing the injection time by 1-2 seconds, this is necessary in order to ensure stable engine operation.
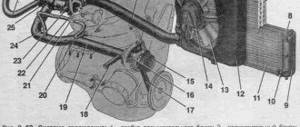
The fuel supplied by the accelerator pump of the VAZ 2109 Solex carburetor goes to two nozzles - nozzles number 6 on long tubes, which are led into two chambers of the carburetor and installed on a holder number 10 (pictured 2), which also houses a ball injection valve at number 5 (photo 1).
Solex carburetor with spaced components (right view)
10 - nozzle holder, which has a discharge valve inside.
Under the nozzle holder, the suction valve of the accelerator pump is pressed into the bottom of vertical channel 1 (Fig. 3).
Solex carburetor (top view)
- the opening of the suction valve, as well as the housing of the carburetor accelerator pump nozzles;
- fuel intake hole of the carburetor accelerator pump.
Fuel is taken from the carburetor float chamber through a hole that goes into a horizontal channel with an end plug at the lower right screw of the carburetor accelerator pump cover, which is connected to the vertical channel in front of the suction valve.
A nozzle holder is installed in the socket of the carburetor body, and it is also sealed with a rubber ring and secured only by the carburetor cover. This is a rather complicated device for the accelerator pump of the VAZ 2109 carburetor.
You can also read on this topic:
Alex S January 10th, 2014
Published in: Useful tips and car devices
Tags: How a car works, Carburetor, Tips for motorists
auto-all.com
Carburetor adjustment
Even with long-term use, there is no need to regularly flush the carburetor. But before you start making adjustments, conduct an external inspection of the unit. It is possible that the moving parts of the device are very dirty and there is a risk of their free movement becoming difficult. In this case, the device should be washed. It is better to use special means. Do not use rags or brushes. If lint or fibers get into the jets, they can be completely damaged.
We begin work by adjusting the throttle valve drive. We check the tension of the cable (it should not sag excessively, but there is no need to tighten it too much).
Procedure:
- Using a wrench, hold the nut on the tip, and with a second tool unscrew the cable lock nut (several turns);
- lower the gas pedal (full pressure - the throttle opens as much as possible);
- tighten the locknut.
Check and adjust the fuel fluid level. To solve this problem, we adjust the operation of the float chamber.
Procedure:
- Warm up the engine thoroughly (5–6 minutes);
- sequentially remove the air filter element;
- disconnect the pipe;
- unscrew the fastening bolts, open the lid and place it on a flat surface (this must be done very carefully and strictly vertically. Carelessness can lead to damage to the floats);
- We take a measurement. If the readings deviate from the permissible value (26 mm), we adjust (we bend the tongues of the float bracket). Most likely, the operation will have to be performed several times to obtain the required value;
- adjust the floats (using brackets we install them in parallel).
Setting up the launcher.
Procedure:
- dismantle the carburetor;
- check the diaphragm (change it if necessary).
- close the damper (with the drive lever);
- We take measurements. If the indicators deviate from the set parameters (see the instructions for the specific carburetor model), we make adjustments by turning the adjusting screw (unscrew it - the gap decreases, and vice versa).
- We take measurements in the first chamber. See the instructions for the permissible value. The operation is carried out with the valve closed. If there is a deviation, we adjust it using the adjusting screw.
After completing all operations, we will adjust the operation of the motor. It’s great if you have a tachometer and a gas analyzer on hand. But if the last device is not there, you can do without it.
Procedure:
- thoroughly warm up the engine;
- screw in the screw for adjusting the quality of the fuel mixture (all the way). Then we turn it back a few turns;
- turn on the ignition, start powerful consumers of electricity (headlights, fan, etc.).
- using the adjusting screw (amount of combustible mixture), we bring the speed to about;
- set the maximum possible number of revolutions (with the mixture quality adjustment screw);
- we adjust until we get the number of revolutions recommended for a particular season (adjusting screw for the amount of mixture). For the summer period - 800–900 rpm. Winter period - 900–1000 rpm.
The main task is to ensure uninterrupted operation of the engine at the speed recommended by the instructions.
Replacing the accelerator pump diaphragm on VAZ 2108, VAZ 2109, VAZ 21099
Welcome! Today in this article you will learn how to properly replace the diaphragm, which is located inside the accelerator pump. The diaphragm will be replaced on front-wheel drive vehicles of the Samara family.
Summary:
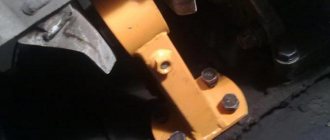
Where is the accelerator pump itself? It is located at the very bottom of the carburetor, and it is secured with four screws, which hold it to the end of the carburetor. To help you understand better, look at the photo in which the location of the accelerator pump is indicated by a red arrow:
When is it necessary to change the diaphragm in the accelerator pump? If the diaphragm of the accelerator pump is faulty, the following problem may begin with the car engine:
- When driving a car, dips may begin to appear, these dips will be especially noticeable when you sharply press the gas pedal; in other words, the car will respond to it with a delay.
How to replace the diaphragm in the accelerator pump on a VAZ 2108-VAZ 21099?
Removal: 1) First, before starting work, remove the air filter housing from the carburetor cover. (You can find out in detail how to remove the filter housing in the article: “Replacing the air filter housing”, in the “Removal” section)
2) Then, taking a screwdriver in your hands, use it to unscrew the four screws that secure the pump cover.
Note! If you look closely, under one of those screws that you unscrew, you will find a carburetor nameplate!
3) Next, when all the screws are unscrewed, remove the accelerator pump cover.
4) Then remove the diaphragm and spring from the place where the accelerator pump cover was previously installed.
Note! In some cases, the diaphragm may also remain in the inside of the accelerator pump cover, so remove this cover carefully, and after removing, check where the diaphragm remains!
Installation: 1) In the reverse order of removal, first install a new diaphragm into the accelerator pump cover.
Note!Before installing the diaphragm, be sure to check the mobility of the pusher, which is present on the diaphragm itself!
2) Then install the previously removed spring into the carburetor body, exactly in the same place where it was before.
Note! If the old spring fails, namely when it is strongly compressed and weak, it is recommended to replace it with a new one. To check the stiffness of the spring, compress the pusher and the spring itself, and then press them with your fingers. If the pusher began to move in the cup only after compressing the spring until the coils touched, then the spring does not require replacement!
3) And at the end of the operation, compressing the spring, install the accelerator pump cover in its place.
Note! After replacing the diaphragm, do not forget to install the housing in which the air filter is located in its place, using the same article with which you removed this housing!
vaz-russia.ru
Setting up the carburetor on a VAZ-2109
Design and adjustment of the OZONE VAZ 2107 carburetor
Both partial adjustment and complete adjustment of the carburetor on the VAZ-2109 can be done quite simply. If these steps are performed correctly enough, then there is a high probability that most of the above problems will be eliminated.
By the way, you can adjust or tune the carburetor on this car yourself. This is necessary in order to save significant money that will be required to perform this action at the service center. It is much more convenient to carry out this work independently if you have an assistant next to you. In this way, you will also be able to save wasted time.
Before you begin adjusting the carburetor, you need to prepare. To do this you should:
- ensure a constant flow of fresh air in the room where the carburetor will be adjusted or adjusted;
- place the car in a horizontal position;
- prepare rags that do not leave lint behind;
- get a flat-head screwdriver;
- Prepare cleaning products. In the worst case scenario, it could be gasoline. But it is best to use compressed air.
Replacing the Solex accelerator pump diaphragm
On carburetors 2108, 21081, 21083 Solex installed on the engines of VAZ 2108, 2109, 21099 cars and their modifications, the accelerator pump has a diaphragm. With its help, fuel is pumped into the accelerator pump nozzle.
If the car engine suddenly stops responding quickly to pressing the gas pedal, dips and jerks appear, one of the reasons may be a worn out diaphragm in the accelerator pump housing.
You can replace it without removing the carburetor from the car engine.
Preparatory work
— Remove the engine air filter housing
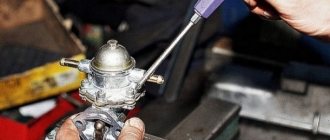
Replacing the Solex carburetor accelerator pump diaphragm
1. Using a slotted or Phillips screwdriver, unscrew the 4 screws securing the accelerator pump housing cover.
2. Remove the cover, diaphragm with pusher and return spring located between the diaphragm and the cavity of the pump housing.
We check the mobility of the pusher on the diaphragm and the integrity of the return spring.
components of the carburetor accelerator pump housing 2108, 21081, 21083 Solex
3. Install a new diaphragm.
Its pusher must fit into the accelerator pump housing cover. We install the return spring with its narrow end on the protrusion in the accelerator pump housing and press it with the cover with the diaphragm inserted into it. Screw in the screws securing the cover and tighten them crosswise.
Notes and additions
— After replacing the diaphragm of the accelerator pump of the carburetor 2108, 2081, 21083 Solex, you should press the gas pedal as much as possible and check whether there are any fuel leaks around the pump cover, and whether the fuel jets are flowing correctly from its nozzles.
If leakage is detected, you should try to correct the situation by tightening the screws of the UN housing cover more firmly, or by grinding it to eliminate deformation.
Adjustment of fuel jets should be done with the carburetor removed from the engine. See the article “How to target fuel jets from the accelerator pump nozzle of carburetors 2108, 21081, 21083 Solex.”
Five more articles on the website on repair and maintenance of Solex carburetors
— Checking and repairing the accelerator pump of the carburetor 2108, 2081, 21083 Solex
— Checking and repairing the economizer of power modes of the carburetor 2108, 21081, 21083 Solex
— Check and repair of the EPH system of carburetors 2108, 21081, 21083 Solex
— Checking the serviceability (tightness) of the needle valve of the carburetor 2108, 21081, 21083 Solex
— Cleaning the idle system of the carburetor 2108, 21081, 21083 Solex
twokarburators.ru
Operation and repair
The VAZ 2109 carburetor, like all other parts, tends to break. Typically, a breakdown involves the failure of any spare part. In such cases, repair usually helps.
The first thing that can break is the accelerator pump. Its purpose is to enrich the fuel mixture, regardless of the air supply, when the throttle valves are opened. If, when you sharply press the gas pedal, the car jerks, it means that there is either not enough fuel, and significant gaps occur in the supply, or, on the contrary, there is too much of it, and it overflows the spark plugs. So, to avoid this problem, an accelerator pump is used. It regulates the exact amount of fuel required for normal engine operation, even when the gas is pressed hard.
The accelerator pump more often becomes clogged with sediment than breaks down, and then repairs are not needed, but simply cleaning is enough. But, if this is not the case, but there is still a breakdown, then the pump needs to be repaired urgently, otherwise operation of the engine of the VAZ 2109 car will be impossible, and you are guaranteed to have pedal failures.
The first symptoms that the pump is faulty is that when you press the pedal, the speed does not increase steadily, but floats. This is due to a shortage, or vice versa, an excess of fuel. The spark plugs do not have time to burn out all the gasoline, and they are simply flooded, so the car jerks while driving. Also, the pedal may fail when pressed.
Repair for such a breakdown is as follows:
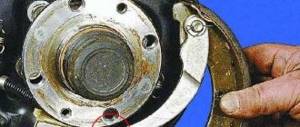
- We take out the sprayer;
- Shake it. If there is a characteristic knocking sound of the ball inside, then the sprayer is working, if not, then this will be the reason why the pedal failed;
The pump has a rather heavy structure with parts. A large number of holes and channels increases the chance that the pump will clog, and pedal failure will be inevitable. If the holes are clogged, then repairs are not needed. You just need to buy carburetor cleaning fluid and use it to blow out the channels.
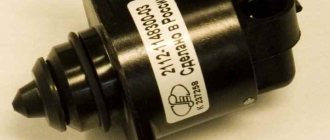
Scheme of operation of EPHH
If the VAZ 2109 jerks when idling, and there are dips when you sharply press the gas pedal, then the EPHH control unit has a malfunction. Its repair primarily depends on which control unit is installed. They can be 4 or 6 pin. Repair of EPHH must be carried out by a specialist. If you do not have the appropriate knowledge, simply replace the part with a new one.
The reason that the VAZ 2109 jerks when driving, or even stalls, and when you press the gas pedal, failures occur, may be not only the carburetor or the EPHH control unit, but also the spark plugs. When used for a long time, carbon deposits appear at the contact site. Because of it, the spark plugs do not completely burn out the fuel in the cylinder.
Sometimes the spark plugs flood even at idle. This is due to the fact that the EPHH control unit is selected incorrectly. The valve opening does not occur synchronously, and the engine speed fluctuates. At the same time, gas pedal failures and late ignition are observed. In order to understand which EPHH is better to install, you need to decide on the choice of carburetor jets. The type of device depends on their diameter.
Replacing spark plugs
In general, before repairing the carburetor, make sure that the speed is fluctuating precisely because of it. Also, gas pedal failures occur for this reason. After all, maybe the candles are to blame for everything. If they are flooded, the car will jerk and stall. But in this case, the cause must be sought in the fuel lines, pump and similar components. But this is better than repairing the carburetor, since this work is quite painstaking.
VAZ 21099 - carburetor accelerator pump repair
Repairing the carburetor accelerator pump on a VAZ 21099 car involves disassembling it and replacing failed elements. Repair work can be carried out without dismantling the carburetor; you just need to remove the air filter housing and disconnect all the attachments that will interfere. To carry out repair work, prepare a standard set of tools and perform the following sequence of actions:
- The accelerator pump cover is secured with four screws; use a Phillips screwdriver to unscrew them and remove them.
- Next, remove the diaphragm itself and the return spring.
- Now that the pump is disassembled, conduct a visual inspection of all its parts for mechanical damage.
- First of all, check the spring; if it has lost its elasticity, replace it with a new one.
- Check the condition of the pump cover. If it has deformations, chips, cracks, then replace it with a new one. Also check the cover on its plane; if it is warped, it needs to be replaced.
- Replace the diaphragm if it is damaged, has tears, abrasions, or has lost its elasticity.
- Check the condition of the drive lever on the pump cover. It must move freely and without binding, otherwise the cover must be replaced.
At this point, the repair work on disassembling and repairing the carburetor accelerator pump on the VAZ 21099 car has been completed. Perform subsequent assembly in reverse order.
zubilovaz.ru
if the diaphragm of the accelerator pump VAZ 2108 is faulty - Autosite
Possible malfunctions of the power system, and the carburetor in particular, can be judged by the characteristic signs of the car’s behavior on the road. There are several such signs:
FAILURE - when you press the gas pedal, the car for some time (several
Possible malfunctions of the power system, and the carburetor in particular, can be judged by the characteristic signs of the car’s behavior on the road
buy motorized stroller sz There are several such signs:
FAILURE - when you press the gas pedal, the car continues to move for some time (several seconds) at the same speed, or slows down, and only then begins to accelerate. JERK - similar to failure, but it is more short-term
JERKING - several jerks following each other. SWING - several successive failures. Sluggish Acceleration - The car does not accelerate fast enough.
Also, possible malfunctions of the engine power supply system can be judged by the following signs: inability to start the engine; Difficulty starting a cold engine; Difficulty starting a hot engine; unstable engine operation in idle mode; increased or decreased idle speed; increased fuel consumption.
As I already said, the technical condition of the engine as a whole also plays an important role. And in particular, wear of the camshaft cams, displacement of valve timing, violation of thermal clearances, burnout of valves, uneven or low compression in the engine cylinders lead to loss of power and increased fuel consumption. When parts of the piston group are worn out, crankcase gases and oil vapors enter the cavity above the carburetor, clog the filter element, settle on the jets and other elements of the carburetor, making their operation difficult. How to identify the causes of these symptoms (in addition to carburetor malfunctions) is described in the article “Finding faults in engine systems on your own.” As for the carburetor, it is most often the cause of all twitching, dips, jerking, etc. malfunctions of the accelerator pump or severe leanness of the mixture in all engine operating modes appear.
Malfunctions related to the accelerator pump:
a breakthrough in the accelerator pump diaphragm and, as a result, fuel leakage from its cap. (replace the diaphragm) the accelerator pump nozzle is clogged, its operation is checked by pressing the gas pedal (to avoid injury, this procedure is best performed with the engine not running) while pressing the gas pedal from the nozzle without delay A smooth stream of fuel should appear, without any air bubbles in it. If this does not happen, then you have a problem. This can happen for the following reasons: lack of fuel in the carburetor float chamber (this is another story and we will look at it below) the accelerator pump nozzle is clogged (clean with a thin copper wire and blown with air) the nozzle check valve is faulty accelerator pump (debris got under the valve ball - rinse and blow out)
Now let's figure out what concerns the lack of fuel in the float chamber. First of all, I recommend checking the presence of fuel at the carburetor inlet.
If fuel is supplied, we check the mesh filter and the shut-off needle in the carburetor; if it is not supplied, we go further along the chain - check the presence of fuel at the outlet of the fuel pump... etc. The reason could be either a lack of fuel in the tank or further down the chain:
clogging of the mesh filter of the fuel intake tube in the tank or the fine fuel filter. clogging, pinching or loose connection of the fuel line from the tank to the fuel pump. We check the throughput of these elements by blowing them with air. A malfunction in the fuel tank ventilation system may prevent fuel from reaching the pump. When you unscrew the cap on such a tank after a long trip, you may hear a characteristic hissing sound of intake air.
If, with the fuel tank cap removed, the engine runs stably in all modes, and after installing it back, interruptions begin after a while, especially under heavy load, it means that the tube of the Zhiguli tank ventilation system is clogged or pinched, or the fuel tank ventilation valve of the Moskvich is faulty "or "IZH". We check the throughput of the tube of the Zhiguli fuel tank ventilation system by blowing it with air. We replace the faulty filler plug of the Moskvich or IZH.
If fuel flows to the suction fitting of the pump, but is not present at the outlet of the pump, the pump or its drive is faulty. How to check - pump or drive, I think everyone understands
If the pump pumps with a manual drive, but does not when cranked with the starter, the reason is obvious - we’ll deal with the drive.
I would like to remind you that for the manual drive to work, the resistance of the rod spring and the diaphragm on the manual pumping lever must be felt.
As for the lean mixture, this may be caused by the following reasons:
If the fuel pump is working properly and there is no fuel in the carburetor float chamber, we check the flow capacity of the fuel supply hose to the carburetor, the carburetor strainer and, last but not least, the serviceability of the fuel valve needle. Jamming of the needle in the closed position is unlikely and is possible only if there is no pull-out bracket connecting the valve needle to the float, or the needle is severely worn. We wash the clogged mesh filter with acetone or solvent, first removing it from the carburetor body, blowing the filter with compressed air and installing it in place.
We replace the faulty fuel valve as an assembly. A violation of the mixture composition can be caused by an incorrect position of the air damper, which is possible if its axis, lever or drive rod is jammed, if the starting device is faulty or incorrectly adjusted. A lean mixture, both when starting the engine and during its operation, is caused by a low fuel level in the float chamber, air leaks into the intake manifold, at the junction of the carburetor with the manifold, the manifold with the cylinder head, as well as through the hose of the vacuum brake booster, as was described in the article “Troubleshooting engine systems on your own.” At negative ambient temperatures, water may freeze in the carburetor channels, fuel lines and become clogged with ice plugs, as well as freezing of the mixing chambers in the diffuser area.
As a result, there is a drop in engine power or it stops.
The following is a common malfunction:
No or unstable idle speed.
If all other carburetor systems are working properly, regardless of modification, problems are possible due to clogged jets and idle channels, a loose solenoid valve, damaged rubber sealing rings of quality and quantity screws. If there is an EPH system, in addition to those listed above, there are likely to be such malfunctions as incomplete tightening of the fuel nozzle holder, malfunction of the control unit, solenoid valve or other elements of the EPH, or damage to the economizer diaphragm. Since the transition system of the first chamber is combined with the idle system, if the idle speed is unstable, the engine may fail or stop when the vehicle begins to move smoothly.
Clogged channels are washed and purged after partial disassembly of the carburetor. We replace faulty parts.
High or low speed, unstable engine idle:
may be caused by the same reasons - incorrect adjustment of the fuel level, fuel level, or leakage of foreign air, as well as wear or incorrect adjustment of the dampers of the first and second chambers of the carburetor.
Difficulty starting or impossibility of cold starting the engine:
Possible due to incorrect adjustment of the starting device, or wear of the starting device diaphragm.
Difficulty starting a warm engine:
Most often associated with over-enrichment of the mixture, increased fuel level. The reason is a violation of the adjustment of the float mechanism, or a leak in the fuel valve.
Increased fuel consumption:
Troubleshooting this problem is the most difficult - there are too many possible causes. I’ll tell you only about a few of them, so that it becomes clear that any deviation from the normal operation of the engine, as well as the chassis of the car, directly affects fuel consumption
Increased resistance to vehicle movement, tire pressure, jamming of brake pads, wheel alignment problems... Driving style plays an important role. In my experience there was a case - VAZ 2109 - fuel consumption for the father was 10l/100km, for the son 8l/100km, draw your own conclusions , the father’s driving style, contrary to generally accepted standards, was much less thoughtful than that of his son.
As it turned out from further conversation, the son more often used “coasting”, and the father did not monitor the situation on the road, and his driving style was limited to acceleration and braking.
But as for the three pillars on which good fuel consumption is based, I can say with full responsibility:
Precise timing adjustment Then adjustment of the ignition system And finally carburetor adjustment
And don’t forget about the general technical condition of the car, even the pressure in the wheels, as well as malfunctions of the chassis that lead to deterioration in rolling and additional body kits and decorations that change the aerodynamics of your car - everything affects fuel consumption not for the better. If you have additional questions, you can always ask them in the comments; to do this, you just need to register. It will only take a couple of minutes.
If the information was useful for you, I would be grateful for the retweet (the button is in the upper right corner of the article) and there is also an interesting button on the left side of the title, thank you.
My blog is found using the following phrases
carburetor how to adjust the ignition carburetor VAZ 2107 carburetor adjustment DaAZ 2107
Similar articles:
Helpful tips → How to properly drive over a speed bump
Useful tips → Secret letters in your car
Useful tips → How to protect your car and property from theft?
Useful tips → Winter driving rules
Useful tips → How to get out of a skid correctly
vintasik.info