Simple stylish headlight tuning
With the help of eyelashes you can emphasize the individuality of your car with minimal investment. The stylish and simple accessory began to be used after manufacturers applied a new hood design, which is called “Bed Boy”.
It involves creating an aggressive appearance for the front of the car by covering the upper cut of the headlights with the protruding part of the hood. During the tuning process, changing the hood configuration is quite difficult. It is much easier to install plastic covers on the headlights - cilia, which you can make yourself. They are easy to install and can be removed at any time if necessary. With the hood, such manipulations cannot be performed so quickly and cheaply.
Benefits of overlays
- the ability to minimize the gap between the hood and the headlights;
- creating an original appearance of the front of the car;
- simplicity and low cost of tuning;
Flaws:
- some difficulties with fastening;
- the likelihood of losing eyelashes when moving at high speeds.
Types of cilia for headlights
You can make your own eyelashes for headlights from the following thin materials:
- PFC plastic;
- fiberglass;
- decorative multi-colored film.
To make your own mounts, you first need to choose a stylish profile for your optics. The contours and color of the eyelashes should fit harmoniously into the design of the car. If necessary, the overlays can be painted in any color.
There are no limits to the realization of design fantasies here. The most common option is overlays that correct the rectangular shape of the headlights towards rounding or vice versa.
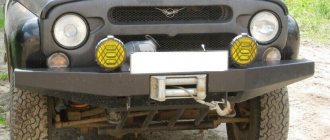
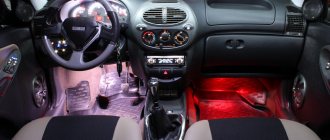
To give your car an exclusive, unique look, you need to experiment. Today, eyelashes using LEDs are popular among tuning masters. At night, headlight covers with LED modules create a unique and colorful glow that will stylishly make your car stand out from other vehicles.
Once the desired tuning style is formed, the outline is applied to the material and carefully cut out. Then you can start attaching the eyelashes to the headlights.
The easiest way to attach the pads is to use double-sided tape or sealant. To ensure maximum connection reliability, experts recommend the integrated use of both methods.
What are eyelashes on headlights?
The essence of tuning is the application of small overlays of different shapes, thicknesses and volumes to the surface of the headlight. Despite their compactness, eyelashes under the headlights transform the car, making it unique and different from others. As for the material, there are a lot of options - you can use film, carbon, metal, plastic, fiberglass and so on. The advantage of this tuning:
Video: LED eyelashes for headlights
- Simplicity. It takes no more than a day to complete the work. In this case, the duration of work depends on the total complexity of tuning and the materials used; minimum costs. For such work you do not need to involve specialists or go to a service station. Making eyelashes for headlights yourself is a matter of several hundred rubles. As a rule, a standard set of materials is required - sandpaper, film, putty, and so on;
- Original appearance. If everything is done correctly, the car becomes more attractive and is memorable for its appearance;
- Wide possibilities. Today there are many options for making car eyelashes. We will present the best of them in this article;
- Reliability. When using high-quality materials, the new tuning will last a very long time and will please the eyes of the owner and people around him.
DIY eyelashes
- Plastic eyelashes . The easiest way to make headlight covers is from plastic or film. This procedure is quite simple and there is no point in describing it in detail. We take the material, draw the required profile and carefully cut it out. Then we sand the edges of the workpiece and glue it to the headlights using double-sided tape. Before this, we first degrease the surface of the glass and linings. After the eyelash is glued to the headlight, it is recommended to press it for a while using masking tape.
- Fiberglass and epoxy eyelashes. Overlays based on fiberglass and epoxy resin are considered more original and exclusive. To make eyelashes for headlights with your own hands, we will need fiberglass, epoxy resin, putty, masking tape, sealant, double-sided tape, primer, sandpaper and paint. With tools, you should prepare keys to dismantle and install the headlight, scissors, knife, napkins, marker and gloves.
First we remove the headlight. As a rule, it is secured with four bolts. After dismantling the optics, seal the glass surface with masking tape. Then we prepare four strips of fiberglass and epoxy resin. You should work with epoxy very carefully, as it cannot be completely removed from the surface. Fiberglass along with resin is applied in several stages in thin layers. Each layer must first dry before applying the next for 4-5 hours. In principle, you can apply a thick layer at once. But thin eyelashes look more impressive. After installation, the fiberglass fabric must be pressed well so that it is completely saturated with resin. After laying four layers, cover the workpiece with masking tape and press it with something heavy. Alternatively, sandbags.
It takes at least 10-12 hours for the resin to dry completely. After that, we remove the blank and begin making eyelashes. We draw the outline of the future overlays on the workpiece with a marker and cut out the desired profile.
At this stage, the most important thing is to create a unique shape and style. As an option, you can stick a decorative film on the workpiece to match the color of the car body. Such overlays will fit harmoniously into the design. They may look like real ones, made in a factory. One way or another, you need to experiment. Having made several options, you can choose the most unique one.
To make eyelashes for a headlight with your own hands on the other side of the car, just prepare an identical stencil from durable paper. After you have prepared the desired version of the eyelashes, apply a layer of putty to the workpiece. Then we sand it after drying with sandpaper and prime it.
The final stage of making the overlays is painting. Before this, it is necessary to carefully prepare the surface of the workpiece. It should be perfectly even and smooth. Otherwise, unevenness can ruin the entire appearance of the eyelashes. Painting should be done in several thin layers to avoid smudges.
How to make eyelashes for headlights with your own hands: the best options
Let's look at proven methods for making eyelashes and the features of their implementation:
Fiberglass eyelashes
Fiberglass eyelashes are one of the most popular options.
The algorithm of actions is as follows:
- prepare the necessary material to complete the work. You will need gloves, putty, a piece of fiberglass, a special roller, epoxy resin, a small grinder with a sanding wheel, fine-grit sandpaper and masking tape;
- Be sure to take the necessary measurements that will allow you to accurately prepare a template for the headlights of your car. To make it more convenient to work, it is better to remove the headlight from its place and take measurements somewhere on the workbench with good lighting;
- Before starting work, thoroughly wash the headlight - there should be no dirt or dust on it. Otherwise, your efforts will be in vain - the newly glued eyelashes will quickly fall off; cover the headlight with masking tape so as not to spoil the surface of expensive optics;
- cut fiberglass or fiberglass into small pieces (this will make it easier to work with);
- Apply epoxy resin to the surface of the headlight and lay the fiberglass prepared in pieces on top. After this, immediately coat the surface with another layer of epoxy resin. Wear a respirator, because fumes from epoxy are very toxic and can harm the body;
- make several such layers of fiberglass (two or three are enough). After applying each, allow about 40-50 minutes to dry (in warm weather). Thus, we get two blanks for the left and right headlights. The next goal is to cut out the eyelashes we need from them;
- Using masking tape, attach the blanks to the headlights and decide on the shape you are interested in. Take the necessary measurements and cut off any excess using scissors.
Work very carefully so as not to spoil the workpiece. The result should be two eyelashes. But don't rush to attach them.
The workpiece is removed
The next task is processing.
- remove the finished structure and sand it. This can be done using a regular grinder or sandpaper;
- As soon as the workpiece is cleaned on all sides, you can move on to the next stage - priming, and after that puttying. The main task here is to perfectly align the product for further paint application. After the surface becomes perfectly smooth to the touch and without a hint of roughness, the cleaning stage is completed;
- Apply paint using a sprayer at a distance of 25-30 centimeters from the product. To achieve maximum quality work, make several layers (at least 3-4). After each new layer, let it dry for several hours;
- after the last drying, open the finished eyelashes on the headlights with varnish;
- Now, using double-sided tape or sealant, attach the finished products to the headlights of your car. For greater reliability, provide a margin on the top of the eyelashes, place them under the hood and secure them with mounting bolts.
Final result
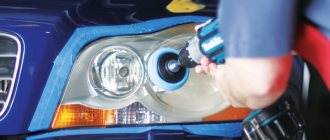
Plastic eyelashes are one of the most budget options
Most car enthusiasts choose this method due to the low costs of materials and the minimal complexity of the work. It is unlikely that you will be able to buy ready-made plastic blanks, so they will have to be cut from a sheet of plastic (it is much easier to find). Large size PVC sheets can be found in automotive stores or markets, advertising agencies or art stores. It does not matter what format the product will have. The main thing is that its thickness is about 2-3 millimeters. The advantage of thin plastic is ease of processing.
Video: How to make eyelashes for headlights yourself. Headlight styling.
As soon as the material is purchased, decide on the future shape of the eyelashes. Make a sample and cut out the finished part for tuning. Proceed carefully so that no unnecessary burrs remain on the part. Upon completion of the work, the surface of the product must be carefully sanded and sanded. The big advantage of this method is the ability to choose the shape of your own and change the color without using paint or a spray gun. All that is required is to apply the self-adhesive film of the desired color. Please note that before attaching the eyelashes, it is important to thoroughly clean, degrease and dry the surface of the headlight. To make the overlays look natural, take the time to choose the right type of plastic. Ideally, it should bend well and be of small thickness. The more natural the eyelashes look on the car, the better. If desired, the shape of the eyelashes can be changed - just bend them slightly upward. For these purposes, you can use a hairdryer (construction or regular).
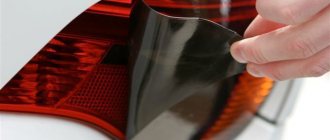
Film eyelashes
Film eyelashes
Photo: drive2.ru
This option is also considered simple to implement and inexpensive. The main disadvantage is the short service life. In practice, such eyelashes last no more than one or two seasons. But here, of course, a lot depends on the activity of operation, the quality of the work performed and the frequency of visits to the car wash. To work, you will need a glossy film (black will look best), some electrical tape, scissors, a felt-tip pen (or a regular pencil), tracing paper and tape. Using tracing paper and electrical tape, make a special pattern, and then transfer the product to the surface of the headlight. To make eyelashes denser and last longer, it is better to do them in two layers. At the same time, calculate everything in such a way that the applied film does not interfere with the high-quality lighting of the road.
LED eyelashes are one of the most modern ways to transform your car.
LED eyelashes for headlights
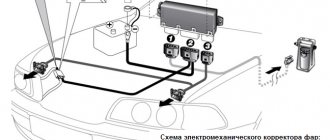
As a rule, to perform such work it is necessary to remove the glass from the headlights and lay an LED strip inside. Power is supplied from the side lights. For the best effect, the part of the surface where the LED strip will be located should be made in a matte form. There is no need to invent anything here - you can use a grinding machine. But don’t get too carried away, otherwise you can damage the surface of the headlight and deteriorate the quality of lighting. The ideal location for such eyelashes is from the bottom of the headlight (with the tape bending to the left or right side). In this case, the LEDs seem to emphasize the elegant shape of the headlight and make the appearance of the car more modern. As for finding a place to connect, if you have a wiring diagram and basic knowledge of electrical engineering, doing such work will not be a problem.
Original eyelashes - extensions
- Women's eyelashes. One of the original car tuning options is “3D” eyelashes. Today they are especially popular among female car enthusiasts. The shape of the pads resembles human eyelashes and is made of durable elastic plastic. Depending on the specific car model, the eyelashes can be attached to the edge of the hood adjacent to the headlight, or to the glazing of the headlight unit so that they do not distort the luminous flux.
- LED eyelashes . Original eyelashes can be made from LED strip. To do this, it is enough to buy 1 meter of DWF-W tape and high-quality glue. The peculiarity of installing such cilia is that they are glued inside the headlight. Therefore, you first need to remove and disassemble the headlight unit. The tape can be cut to any length, a multiple of three LEDs. The power supply for the LED eyelashes is connected to the dimensions circuit, observing the appropriate polarity.
We make eyelashes for headlights
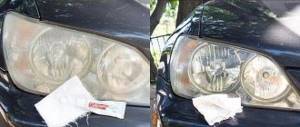
How to remove fog from a headlight without removing it. What can happen if your headlight fogs up from the inside. Headlights sweat, what to do Folk remedies are the best helpers
Despite its apparent simplicity, the procedure for such tuning is quite difficult, and requires not only perseverance and patience. But also basic skills in working with household tools.
Fiberglass is mainly used to make eyelashes. And additional materials for working with it. Although other modern materials can be used.
Ready-made “eyelashes” for Nissan
We will consider the option of how to make eyelashes for headlights with your own hands, from fiberglass. In addition to the fiber itself, we need epoxy resin, masking tape, and putty.
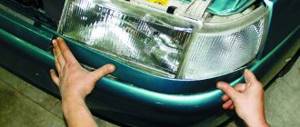
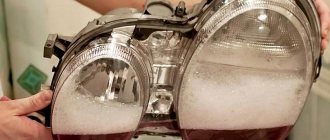
Preparing optics and car for tuning
The procedure for making the overlays itself is performed directly on the headlight glass. Therefore, the headlights must first be removed. After this, we clean the surface of the glass from dirt and carefully seal it with masking tape. After pasting, be sure to make sure that there are no uncovered areas of the headlight between the strips of tape. This is necessary so that the resin used to process the fiberglass does not stick to the surface of the headlight. After all, it will be almost impossible to remove it from the glass.
Making a blank
After the surface of the headlight is prepared, you can begin to form the blank of the future eyelash. To do this, we first apply a layer of resin, and then lay the cut fiberglass on it. In order for the lining to be durable, the fiberglass fabric must be laid in several layers. But remember that you cannot put layer after layer at once. It is necessary for each layer to dry a little. On average, a thin layer of resin and fiberglass dries in 3-6 hours.
There is no need to make the eyelashes too thick; they will not look good on the headlights. After applying all the layers and drying the workpiece, remove it from the surface of the headlight. Using a similar method, we make a blank for the second headlight.
After the blanks are ready, it’s time to start designing and decorating the eyelashes. What form to make them is a purely personal decision. If you have no thoughts about this, well, just visit several Internet sites dedicated to car tuning and see what kind of headlight covers they have.
Design of headlight covers
After this, do not rush to cut the workpiece so as not to spoil it. It’s not a fact that the eyelash of your design will look on the headlights of your car. In order to check this, it is best to cut out a template of eyelashes for the headlights from adhesive tape with your own hands, then glue it to the glass of the lamp. If you like this sample, only then should you start working on the fiberglass blank.
To give the workpieces the correct shape, it is necessary to apply a line using a stencil with a marker. Then we cut our workpiece to the desired shape. In this case, it is desirable that the cuts are smooth and without strong burrs.
After which we carefully putty the surface of the future eyelash for headlights. After the putty has dried, carefully sand the entire product with fine sandpaper. In this case, the main thing is that the sandpaper is not in your hands, but wound on a small wooden block with a flat surface. Because if you press the sandpaper with your hands, you will get an uneven work surface with pits and depressions. Rubbing should be done in a circular motion. And if small cavities and depressions nevertheless appear, you must again apply a layer of putty and wait for it to harden. Then repeat the grinding procedure. Next we need to prime and paint the overlay in the color we need. Before you start coloring, make sure that the surface of the eyelashes is smooth and free of irregularities. You can paint it either in the color of the car body or in another color. The main thing is that it goes well with the main color of the car. It is through coloring that the light optics can be given an aggressive or sporty look.
Making “eyelashes” for headlights using the example of Lada Priora: