Carburetor engines have long been a thing of the past, but despite this, many car enthusiasts continue to drive used cars with this type of fuel injection. In order for the carburetor to work smoothly, it is necessary to maintain it in good condition, not forgetting to clean this unit. You can clean the carburetor yourself - if you have certain skills, it will not take you much time and will not require financial expenses.
In this article we will look in detail at how to clean a carburetor using the example of a VAZ 2109 car, since this is the most common model with a carburetor engine at the moment. The carburetor can be cleaned without removing it from the car, but the most reliable option would be complete removal and cleaning at home. If you are not familiar with the structure of a carburetor, we recommend studying photos and videos on the Internet on the structure of this unit.
How to clean the carburetor on a VAZ 2109
To properly clean the VAZ 2109 carburetor with your own hands, you need to remove the air filter housing, then disconnect all the tubes and wires from the carburetor body, unscrew its mounting bolts and dismantle the unit. After this, you need to prepare a clean surface, and then you can proceed to direct cleaning:
- First of all, remove the jets and clean them with acetone using a toothpick
- Remove the float and, if necessary, replace worn gaskets
- Replace deformed copper sealing washers
- Blow out the emulsion channels with compressed air from a compressor or a simple pump
- Wash all removed metal parts in a separate container with cleaner.
- Use an old toothbrush to clean all visible dirt on the unit body.
How to clean a carburetor without removing it from the car
If you do not have the opportunity to carry out the work of removing and installing the carburetor yourself, you can use the services of a car service center. But before you do this, try to clean it without removing the carburetor from the car. At the moment, there is a wide variety of all kinds of additives and aerosols used for carburetor engines.
Thanks for subscribing!
The first option for such cleaning would be to pour a special liquid into the fuel tank before refueling - this will remove the main contaminants. You can fill in such liquids both for preventive purposes and when unstable carburetor operation is detected.
The second option for cleaning the carburetor is an aerosol, but to use it you will have to remove the air filter. Spray all the internal surfaces of the carburetor, start the engine and let it run at high speed. To do everything accurately and correctly, read the instructions on the package.
The main problem that arises with the carburetor is clogging due to low-quality fuel. Engine operation may be disrupted, and this manifests itself in the following moments:
- the car will be unstable when idling;
- power will decrease;
- toxicity of gases increases;
- fuel consumption increases;
- When accelerating a car, “failures” occur.
Also, the reason may be a clogged air filter, for this reason air enters in insufficient quantities, this will lead to a deterioration in the quality of the mixture. One of the main reasons is cheap fuel. Many drivers use it to save money, but this can only harm their car.
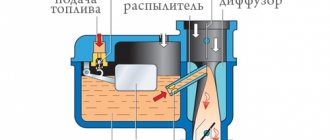
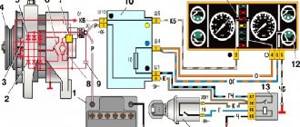
Diagram of Solex carburetors
The Solex carburetor includes the following components.
Location of the unit in the car
- Unit heating system.
- Throttle valve (DZ) 1 chamber.
- The pipe to which the crankcase ventilation hose is connected.
- Accelerator pump drive lever.
- Cam drive of the same pump.
- Pump membrane.
- Fuel jet for power mode economizer.
- Accelerator pump housing.
- Power mode economizer membrane.
- Solenoid valve.
- Idle fuel jet (XX).
- Unit cover.
- Air jet 1 chamber.
- Air damper.
- Accelerator pump nozzles and fuel supply valve.
- Starter membrane.
- A screw with which the starter is adjusted.
- A screw that helps regulate the amount of mixture.
- Lever blocking camera 2.
- The pipe to which the hose from the vacuum ignition timing regulator is connected.
- A screw that allows you to adjust the quality of the mixture.
- Remote sensing control unit for both cameras.
- Drive lever for remote sensing of both cameras.
- A screw with which the opening of the remote control of camera 1 is adjusted.
- Lever that controls the air damper.
- Starter rod.
- Electrical wire of the forced XX economizer switch.
- Air damper lever.
- Air jet 2 chambers.
- Emulsion tube.
- Sprayer 2 chambers.
- The pipe to which the hose from the fuel pump is connected.
- Return pipe.
- Gasoline filter.
- Needle valve.
- DZ 2 cameras.
- DZ lever 2 cameras.
- Fuel jet 2 chambers.
- Drive lever for DZ 2 cameras.
- Float.
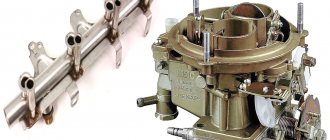
As can be seen from the diagram presented, the design of the DAAZ 21083 carburetor is quite simple. The unit has a mechanical drive for opening the throttle valve of chamber 2, which compares favorably with OZONE brand carburetors.
The VAZ 2108 carburetor has a pipe for draining excess gasoline into the fuel tank. Thanks to this, it is possible to install an electric fuel pump into the power system of this vehicle.
Liquids poured into the tank
In the auto chemicals department you can find many jars and containers designed specifically for cleaning carburetors. Typically the volume of such bubbles is about 150 ml. The contents of these containers are poured into the tank before refueling the car and are completely consumed until the light indicates that the reserve balance is zero. Manufacturers of these products claim that the liquids will help:
- get rid of dirt and deposits;
- increase engine starting efficiency;
- reduce the toxicity of exhaust gases;
- save on fuel.
It is recommended to clean with these liquids once every 13-15 thousand km. It depends on what kind of fuel the car is fueled with.
In order for cleaning to be effective, it must be performed following the instructions. Experts recommend disassembling the carburetor, but you should be careful not to lose small components. During disassembly, you should clean each part. Metal parts can be placed in a jar or box and filled with product. Let stand for several hours. After this, under running water and using an old toothbrush, you can easily remove all dirt.
You should not pick holes and valves, as you can disrupt something and harm the smooth operation of the device. It is better to clean such areas of the carburetor using an aerosol, which we will discuss later.
Cleaning methods at home
Carbon deposits and other contaminants can be cleaned and washed at home as follows:
- Without dismantling or disassembling the device.
- During partial disassembly of the structure.
- When completely disassembling the device.
Without dismantling
Among the features of the method, which does not involve removing the unit, we note the following points:
- Flushing is carried out by adding special chemicals to the fuel.
- Fuel with cleaning agent can be used during normal vehicle use.
- The effectiveness of this method is low.
- Dirt and other impurities, peeling off from the surface of the carburetor, enter the cylinder block. This may negatively affect engine performance.
Before cleaning, you should study the manufacturer's recommendations for using the additive.
With partial disassembly
The method, which involves partial disassembly of the mechanism, is very popular today. The cleaning process has the following features:
- Before washing the device, you need to remove the air filter and protective cover, and also remove some elements.
- The removed structural elements should be washed in a special container, after which reassembly is carried out.
During partial disassembly, it is possible to carry out high-quality washing, since it is possible to visually determine the degree of contamination.
Complete disassembly
If the cleaning procedure in question has not been carried out for many years, then it should be performed when the device is completely dismantled. The work is carried out as follows:
- The unit is removed and completely disassembled.
- All parts are soaked in cleaning agent.
- Washing is done manually.
- All elements are blown through with a stream of compressed air.
There are also companies that provide carburetor cleaning services.
Carburetor cleaning aerosol
Cleaning mixtures in cans are much more practical to use. Thanks to the air pressure with which the liquid comes out, you can clean parts in hard-to-reach places. Such aerosols consist of acetone, propane, alcohol, so when using them you should be very careful so as not to harm your health. Avoid contact of liquid with eyes. Spraying the aerosol in enclosed spaces is also not recommended. These mixtures are very flammable.
Such aerosols cope very effectively with various contaminants of carburetor parts, but they cannot clean the float chamber.
Cleaning the carburetor using aerosols is quite easy. To do this you need:
- Remove the air filter.
- Thoroughly spray all tubes, both outside and inside.
- After a few minutes, you need to start the engine at high speeds, and then spray the aerosol for a couple of minutes.
This procedure takes about 15 minutes. Therefore, drivers prefer to use aerosols more often than other cleaning liquids.
If the carburetor is already in a very poor state, then most likely, liquids and aerosols may not cope with the task. You will have to completely disassemble the carburetor and manually clean every part. Sprays and liquids are used more as prophylactic agents, therefore, in the case of a heavily contaminated part, they may not be effective.
Idle speed adjustment
Allow the power unit to warm up before you begin adjusting the idle speed. Along with this, activate several pieces of electrical equipment: headlights, fan, interior lamp, etc. Ideally, to correctly set the idle speed, you need a gas analyzer, thanks to which you can determine whether the exhaust complies with toxicity standards. If there is no gas analyzer (most likely, this is the case), simply rely on the numbers on the car tachometer. When this is not there, use the tester, as in the case of setting up the starting device.
Find the 2 screws on the carburetor (side, bottom) and start adjusting the idle:
- Using a screwdriver, rotate screw 1, that is, the quality screw, to the position at which the idle speed is maximum. For reference: by tightening the screw, you lower the CO level, and by unscrewing, you increase it.
- Now turn screw 2. This is the quantity screw. It is necessary to reach a speed of 1000-1100 rpm. Remember: tightening the screw lowers the frequency, unscrewing it increases it.
- Go back to screw 1 again: tighten it until you get 800 rpm.
- Thus, the CO level in the exhaust should not go beyond 2%, and the power unit will operate stably.
What you need for cleaning
If the carburetor cannot be cleaned using auto chemicals, then you can take the car to a service station or deal with this problem yourself. To do this you will need:
- Clean cotton rags.
- Rubber gloves to protect hands.
- Safety glasses.
- Wrenches, screwdrivers.
- Toothpicks, cotton swabs.
- Aerosols in cylinders for cleaning.
- Air cans or compressor for purging.
- Metal containers with high sides.
If you are not a very experienced car owner, then before you start working, you should carefully study the instructions and operating manuals. This work will be quite complex and painstaking. After the carburetor is cleaned and installed, it will need to be adjusted.
As you know, the carburetor 2108-1107010 (Solex) is responsible for supplying the mixture to the combustion chambers of the nines in the period from 80 to 90 years of production. Therefore, information on how to clean the carburetor of a VAZ 2109 may be useful to owners of Niva, Tavria, AZLK-2141, as well as “classic” Lada cars.
Before you start working
A car's carburetor needs reading and diagnostics from time to time. The fact is that if this part is clogged, problems may appear in the car's power system, which will lead to increased fuel consumption or unstable operation of the system.
It is known that the main enemy of the carburetor is dirty fuel, which leads to malfunctions of this device in the process of mixing air and fuel. And this will directly affect the operation of the engine.
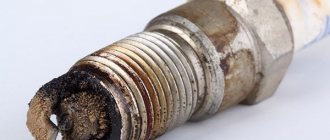
To independently determine the composition of the mixture, you can use a gas analyzer that measures the level of oxygen, hydrocarbons and carbon monoxide. Pay attention to the spark plugs. Black and smoky spark plugs will indicate that fuel predominates in the mixture; white spark plugs indicate a large amount of air in the mixture. The gray-brown tint of the candles indicates that the proportions are correct.
Next, you need to carefully inspect the carburetor. If you find rust or carbon deposits, you will have to quickly start cleaning the device. Moreover, we note that the process itself will most likely take you several days. Therefore, set aside your weekend for repairs.
More on the topic How to wash a car without water: all the intricacies of dry washing
Required Tools
To repair the carburetor you will need: – instructions for your car; – clean, non-terry rags; – a can of compressed air; – rubber gloves; – carburetor cleaner; – toothpicks; – wrenches and screwdrivers; – safety glasses and old clothes.
Note that today there are many options for cleaning fluids and sprays for carburetors. Moreover, they are produced almost all over the world. All you have to do is come to the store and choose any can you like. It is better to avoid a non-specialized cleaner altogether; it is unlikely to be able to overcome dirt in the carburetor.
Before starting cleaning work, carefully read the instructions for using the spray. The fact is that such liquids contain toxic, flammable solvents. They can be aggressive to plastic on glasses, paint, and organic fats, so work with these drugs very carefully. If liquid gets on your body, rinse the affected area with water and, if possible, consult a doctor.
Prerequisites for cleaning the carburetor
To maintain the functional state of the unit, you need to keep its components and compartments clean and prevent the entry of foreign bodies and impurities. The carburetor may stop working properly due to poor fuel quality, improper vehicle operation, or mechanical damage to the carburetor.
Your Nine needs carburetor cleaning if the following “symptoms” appear:
- increase in gasoline consumption (to know the approximate fuel consumption of your nine, use our fuel consumption table);
- reduction in car power when you press the gas;
- idle speed is unstable or absent altogether;
- the level of carbon dioxide and toxins in the car exhaust becomes significantly higher than standard values.
If low-quality gasoline is poured into the car, then you should not “burn through” the fuel system with “95” or “98”, as this will not solve the problem, but can cause significant damage to the engine; in this situation, there is nothing left except cleaning the VAZ carburetor.
Before cleaning: you need to visually inspect it to confirm assumptions about the malfunction of the unit. If the fuel supply is interrupted, rust or carbon deposits form on the walls of the Solex chamber.
Inspect the spark plugs: if they are black or oily, the carburetor is not working correctly and needs to be flushed. See here for any malfunctions what the spark plugs look like.
Ways to eliminate air leaks
Air leaks can be eliminated only by replacing old fuel hoses coupled with careful sealing of the connections. Cleaning the VAZ 21083 carburetor is carried out without dismantling the unit. List of necessary tools and cleaning products:
- key to 10;
- crosshead screwdriver;
- minus screwdriver;
- syringe;
- 200 ml of acetone;
- a can of aerosol for cleaning the carburetor;
- repair kit
Algorithm of actions.
Unit adjustment
- Remove the air filter along with the filter element.
- We start the engine.
- We spray the aerosol into all visible openings of the carburetor and constantly rev it up.
- After visible traces of dirt have been removed, we pull out the choke so that the crankshaft speed is kept within the range of 2500-3000.
- We unscrew the solenoid valve and spray the resulting hole with spray, gas it and blow through the hole using a pump or compressor.
- After this, turn off the engine and tighten the valve.
- Next, remove the carburetor cover by unscrewing several screws.
- Using a syringe, remove all gasoline from the float chambers.
- Pour acetone into the chambers and leave for half an hour.
- We unscrew all the jets, having previously remembered where they were located, and send them into the remaining acetone.
- After half an hour, remove the acetone from the chambers using a syringe and wipe off the undissolved dirt with a minus screwdriver wrapped in a cloth.
- We remove the jets from the solvent and blow them out with a pump, then screw them into their original places.
- Disconnect the fuel supply hose, remove the plug, the O-ring and take out the fuel filter. We replace it. Then screw everything back.
- Pour 3 cm of gasoline into the float chamber, put on the carburetor cap and start the car again.
After cleaning the carburetor, the engine should stop stalling without revving up. If there are still dips in the operation of the power unit, the accelerator pump parts should be replaced.
- We carry out the operations described above in paragraphs 1-12.
- Use a minus screwdriver to remove the accelerator pump nozzle.
- Pour gasoline into the float chamber and turn the control lever of chamber 1. If a strong stream comes out of the hole where the sprayer was located, then only replace it.
- If the flow is weak, remove the accelerator pump cover and change all the internals.
- We assemble the unit.
This completes the repair. We wish you good luck and smooth operation of your car!
Preparing to blow and flush the carburetor
What do we need to clean the carburetor of a VAZ without resorting to the services of a car service center? First, the car owner must understand which elements and chambers of the unit are subject to purging and cleaning.
Most often, the problem can be solved by correcting deficiencies in:
- jets;
- sealing gaskets;
- diaphragms of the accelerator pump and trigger mechanism.
To wash and blow out the carburetor with your own hands, the car owner will need:
- dry and clean rags (during the cleaning process, no lint should fly off the rag);
- toothpicks and cotton swabs;
- washing spray (suitable for all types of devices, including Solex);
- a set of screwdrivers and wrenches for removing parts;
- container for technical liquids;
- personal protective equipment - rubber gloves and goggles.
Before cleaning the carburetor, you need to prepare a work area: it should be a dry, level, illuminated area, since blowing and cleaning often entails the loss of small parts.
Express cleaning methods
The process of blowing and cleaning the parts of a Solex carburetor with your own hands is a long and labor-intensive task, so the question of how to clean a VAZ 2109 carburetor without removing it is relevant for most owners of nines.
For quick washing without dismantling, various auto chemicals are used - the so-called “liquid cleaning”. Sold in cans of 300-500 ml. Some products are designed to be poured into a tank. You need to fill the product with a small amount of gasoline remaining and drive until the fuel runs out. Repeat the procedure after 5-7 thousand km. After first use, clean the gas tank as a preventative measure.
Another group of products is intended for “local” use. The air filter is dismantled and the aerosol from the can is pumped directly through the tubes of the device. After this, you need to start the engine and let the car idle. These products are not a panacea for a heavily contaminated carburetor, but only help in the aspect of prevention and removal of minor contaminants. Even with regular use of this auto chemical, cleaning the carburetor of the VAZ 2109 should be carried out at least three times a year.
Who is too lazy to read: here is a good video review of carburetor flushes
I will also be happy to hear your feedback on the article and possibly correct any inaccuracies in the description of the carburetor cleaning process, and in general, I’m interested in any of your opinions!
Means used
You can clean the surface of carburetor parts from various contaminants and carbon deposits using the following available substances:
- Kerosene.
- Gasoline purified from impurities.
- Solvent.
- Diesel fuel.
In addition, in specialized stores you can find and purchase special products offered in a wide range:
- Hi-Gear fuel additive. It is used to flush the entire fuel system or the carburetor separately. Among the features, high solvent qualities should be noted. The substances used during production do not harm the system. You can purchase this product in the form of an aerosol or liquid.
- Mannol Vergaser Reiniger is an aerosol that is suitable for injectors and carburetors. According to the manufacturer, the product is ideal for removing oil deposits, carbon deposits and other contaminants.
- Jet 100 Ultra is a spray that is applied by spraying onto a surface. Among the features, we note the rapid action of the substance.
It is recommended to give preference to special products, as they are more effective.
Maintenance of a car carburetor mainly comes down to periodic flushing and adjustment. It is recommended to perform these works once a year, as well as when there are clear signs of contamination of the device. We will tell you further how to rinse the device correctly and quickly.