Causes of battery current leakage
The battery is considered one of the main components of a car's operation. It must be charged, thereby ensuring the operation of the engine and other devices. Often the cause of current leakage is the owner's forgetfulness. Many people leave their car overnight with the equipment turned on or put off buying a new battery for a long time. In addition, current may leak due to irregularities in the wiring. Thus, the causes of leakage are:
- Long battery life;
- Headlights, lights, radio not turned off;
- Destruction of the insulating layer of wires under the influence of unfavorable climatic and road factors;
- Oxidation of main components or accumulation of a layer of dirt on them (sockets for connecting devices, contacts of terminal blocks);
- Short circuit in the wiring of additionally installed equipment due to carelessness in laying the wires;
- Damage to wires by metal fasteners;
- Melting of some sections of wiring located near the engine.
Having ruled out the possibility that the driver does not forget to turn off the headlights and electronics, you should look for a current leak in another place.
Troubleshooting a real problem
The situation that will be described in this article actually happened to one of the so-called “masters of garage cooperatives.” We brought the classic and asked to fix the problem associated with the rapid “death” of the battery. Well, then in order.
Let's figure out how to detect a current leak in our car. To do this, we need a multimeter that measures current up to 10A.
We set the measuring device to the DC current measurement mode. Insert the wire plugs into the corresponding sockets on the device.
Diagnostics and standard battery leakage current
There are devices in the car that consume current regularly. These include:
- Watch:
- ECU memory;
- Immobilizer;
- Signaling.
Their functioning requires constant nutrition. After a reboot, the volatile memory starts working again, remembering the current installation functions. The vehicle is protected from the moment it is parked. All of these devices require current, which means it is possible to consume a small amount of energy on a regular basis.
Since current is used to operate many volatile devices, it should be indicated that there is a leakage rate. It is a constant value, which is calculated by summing the consumption volume of each device. If the constant consumers in a car are the clock, alarm system, and audio system, then the sum of their current consumption will be 1mA+20mA+3mA, respectively. When adding the current values for all devices operating constantly, a total sum is obtained in the range of 50–80 mA.
When compared to a headlight bulb, which consumes about 500 mA, a current leakage rate of 50 mA cannot affect battery discharge.
To determine the rate of current leakage in your own car, you should carry out diagnostics. This is done by measuring current consumption. When a consumption value is detected that is greater than normal, it becomes necessary to troubleshoot electrical equipment or the on-board network.
Search for current leaks
Prepare a diagram showing all the fuses for a given car model. Next, leaving the multimeter connected according to the above diagram, you need to remove the fuses from their sockets one by one, monitoring the readings of the device. If the readings remain unchanged, you should reinsert the fuse and move on to the next fuse. As soon as the leakage current shows a normal value, the circuit is considered found.
Next, you should examine all connected devices and all wiring of the suspicious circuit. For convenience, you can use a piece of long wire, alternately excluding different sections of the circuit from work. This way you can find the problem much faster.
In this way, you can quickly identify and eliminate increased current leakage in a car.
Self-diagnosis with a multimeter
Diagnostics is carried out using a conventional multimeter (tester). Current measurements are carried out in a mass discontinuity or in a “positive” section discontinuity. The mass discontinuity detection scheme is considered safe. To do this you need to do the following:
- The multimeter settings correspond to measuring current readings in amperes (10-20 A);
- Disconnect the negative terminal from the battery;
- Connect one wire of the tester to the battery terminal;
- The other wire of the tester should be on the removed wire.
The polarity may not be observed for the electronic tester. Before starting measurements, turn off the ignition and remove the key.
Detecting a leak in the positive gap involves the following scheme:
- Set the amperes on the device;
- Disconnect “+” from the battery;
- Connect the negative connector of the tester to the disconnected battery terminal;
- Connect the positive connector of the tester to the “-” battery.
If the steps are completed correctly, a current value will appear on the tester screen. Exceeding the norm (15–80 mA) by the found current value indicates a leak. As a result, you need to look for the problematic circuit.
How to find a leak
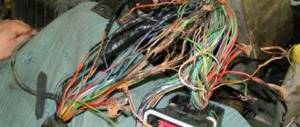
Leakage may be caused by an unauthorized consumer or a short circuit in the circuit. The search begins with non-standard devices and electronic components. Unlike factory wiring, newly installed equipment can be powered by wires laid in the first available location. If you want to quickly place everything, the master does not pay attention to the fact that the wiring may lie near the motor. During operation, the unit generates heat that acts on the insulating layer of the wires. As a result, melted areas appear.
When cables are located near metal places that are constantly in contact, chafing can occur. The integrity of the wiring is compromised, leading to a short circuit.
Therefore, after preliminary diagnostics using a multimeter, it is worth visually inspecting individual areas and elements of equipment placed after purchasing the machine. Often, alarm limit switches are placed where the doors touch. Look for burned, corroded or damaged areas. If these are not found, then it is worth moving on to the stage of in-depth diagnostics.
Rules for using the dialer
The only rule that needs to be remembered is that the dialing process is allowed only in a completely de-energized circuit.
You may be interested in this Features of insulating pliers
Note! If you check live wires, you can get an electric shock and, in some cases, cause a fire.
Below we describe in detail how to check the wire with and without a multimeter.
How to properly test wires (with a multimeter and without instruments)
Step-by-step work process:
- before starting work, you must turn the multimeter handle to the desired position;
- connect the ends of the probes to the required sockets. The black probe goes into the socket marked COM (in some cases indicated as “*” or ground point), and the red one goes into the socket marked Ω (sometimes indicated as R). It must be emphasized that the symbol Ω can be drawn either alone or in combination with the designations of other signs (V, mA). This arrangement of wires will help maintain polarity when making future measurements;
How to connect probes
- turn on the multimeter. Basically, there is a separate button for this or work can start automatically when the handle is turned to the required position;
- close the measuring ends to each other. If a beep is heard, the device is working correctly;
- take the wire to be tested (strip it of insulation in advance). Touch the exposed parts of the cable with measuring probes;
- If it is working properly, a sound will sound and the multimeter readings will be zero or show resistance. If the screen shows 1 and there are no sounds, it means that the tested cable is broken.
You can ring the wires without using a multimeter. To work you will need:
Diagram of a device with a light bulb
- a classic battery (it is advisable to take a 4.5-volt square battery);
- a regular 4-volt light bulb, through which the linear section of the cable is diagnosed (monitored);
- A pair of jumper cables and a breathtaking looking connector.
After preparing the tools for work, you need to use them to assemble a simple measuring circuit. If the circuit is correctly assembled and the wire is in good condition, the lamp will work. If there is a defect in the area, the light will not light up.
How to perform in-depth diagnostics
In-depth diagnostics are carried out after a visual inspection of the wiring. The point of the method is to turn off any equipment and measure the current using a multimeter. Scheme of operations:
- Install equipment to measure current in amperes by removing the negative terminal of the battery;
- Connect the tester wires to the disconnected battery wire and to the negative terminal;
- Pull out the fuses one by one, opening the circuit;
- When the current changes, find out which equipment this fuse is responsible for.
Another way to measure is to make a homemade adapter. A blown fuse is used for this. The multimeter probes are connected to the adapter made. The process is similar - checking different circuits separately.
After identifying the suspicious location, a short circuit is detected by testing the wires using a tester. You must first set the resistance measurement mode.
There are exceptions to testing this way, since not all equipment works together with fuses.
Repairing the leak
When a leak is identified, it is necessary to begin eliminating the cause. Before performing any operations, the battery terminals must be removed. Solutions:
- Accumulation of dirt at the connection areas - dust and dirt should be removed using an alcohol solution.
- The insulation is damaged - close the internal conductors and provide protection from further exposure to negative factors (put on a hose to prevent overheating and chafing);
- Water or fogging in devices - dry. If water gets inside the alarm unit, you need to carefully open the module. After moistening with alcohol, wait for the water and dirt to drain. After removing fogging, come up with a protective cover that prevents moisture from penetrating inside.
- Malfunctioning electronic device - repair or replacement.
Having eliminated the cause of the leak, you should again check the current consumption rate with a multimeter.
In the video you can learn more about constant current consumers and checking current leaks. Two machines are compared that have different current consumption depending on the installed equipment.
Causes of leakage
The battery can discharge quickly for the following reasons:
- disruption of the circuit contributes to the rapid waste of battery life, since it is not charged from the generator;
- internal electronics in the form of a monitor, radio or video recorder are not connected correctly (read about how to choose a car radio);
- the terminals are oxidized or dirty;
- the wires are damaged or the wiring insulation is worn out;
- The battery has outlived its usefulness or was initially of poor quality.
From time to time, the battery must be checked and recharged, due to which the service life will reach 4 - 5 years. If the operating life exceeds 5 years, the battery replacement procedure is mandatory. Driver inattention and negligence are the most common causes of leaks.