If the owner of a Priora notices that the battery is no longer charging, then first of all you need to check the condition of the generator brushes. It is worth noting that at first the battery charge will decrease slightly, but if the problem is not corrected in a timely manner, the battery charge will soon disappear altogether. Replacing the worn brushes of the Priora generator will help correct this problem. And since this process is not so complicated, you can carry out such work yourself, taking into account advice from professionals in your field. Subscribe to the channel - .
On automobile forums you can often see complaints from Lada owners with air conditioning about increased current. It is worth saying right away that the current cannot be increased - this applies to voltage. If the instruments show you that the current in the generator is too high, then you need to look for a problem in the relay.
If you chose the complete replacement method, all you have to do is install the new part and assemble all the elements in the reverse order. In any case, we recommend that you at least check the generator bearings and the condition of the collector plates. If the wear of the plates is within normal limits, before installing new brushes, clean the surface to a shine with fine-grained sandpaper.
If you need to replace a Priora generator with air conditioning, then there are two nuances that lie in the manufacturer of the air conditioner. Panasonic allows you to remove the unit without a compressor, but the Hull compressor will not allow you to get the generator. Replacing generator brushes on a Priora with air conditioning.
As is known, maintaining charging at the same level is carried out by adjusting the voltage supplied to the generator armature winding. For reliable contact, the brush leads are attached to the contacts of the voltage regulator relay by soldering.
To simplify car repairs, brushes, brush holder and relay regulator are most often sold assembled. The advantage of the complete replacement method is its simplicity. For example, the low cost of the assembly for many VAZ cars makes separate replacement of brushes very impractical. Well, there you are...
PLEASE LIKE AND DON'T FORGET TO SUBSCRIBE)) Brotherly My Instagram: Changing...
If you are sure that the problem is caused by wear of the carbon brushes, then you can change them without removing the generator. It is worth noting that generators on Priors have a non-repairable brush mechanism, that is, this part is completely replaced when the brushes wear out. REPLACING THE GENERATOR VOLTAGE REGULATOR RELAY. GENERATOR BRUSHES. Replacing generator brushes. VAZ 2110, VAZ 2111,…
Recently, the European repair standard has been increasingly used at car service stations. That is, most often the entire assembly is not replaced without attempts at minor repairs.
But there are some operations that continue to be carried out even now. One of them is replacing the generator brush mechanism.
Repair of generator 1118 Kalina, budget option, replacement of the factory voltage regulator with an external one, from…
You can determine whether the generator with air conditioning is working or not by measuring its voltage. First you need to get the readings at the battery terminals, you need to start the engine and take the data while the Priora unit is running. In this video I showed how to replace the voltage regulator of Lada Granta, Kalina 1st generation. If...
Uneven wear of these elements will certainly negatively affect the operation of the generator, so experts recommend replacing them without fail.
But when, after ringing all contacts and checking fuses, the malfunction is not identified, then there is a possibility that the generator will fail. The car owner is puzzled in advance by the question of how to remove the generator on a Priora, and in many cases it is quite reasonable. Do-it-yourself generator repair. One of the reasons for a generator malfunction may be a burnt diode...
Buying original brushes from BOSCH will cost 1000 – 1500 rubles, we will replace them with domestic analogues. We lift the top black cap, we see two contacts with the ends of the brushes on the relay, and disconnect them. What happened to my car?! The generator malfunction light came on!!! The current has stopped being produced...
The operation of the generator is monitored using a low battery warning lamp located in the instrument cluster. If the lamp burns brightly or burns at full intensity, it indicates a malfunction. For the BOSCH F000 BLO 652 generator, which is installed on the Lada Kalina, voltage regulator relay (0272220701 BOSCH)…
The replacement process will be almost the same for all VAZ models, so if you have, for example, a VAZ 2114, this article will also be useful to you. This is the first time I've seen such a crap design.
If you have decided to replace the problematic unit, read below...
On a VAZ 2106, during the last valve adjustment, I discovered: when I put the marks...
According to its design, the VAZ 2106 intake manifold, the price of which…
If you don't loosen it while the wheel is on the ground, then...
I suggest first of all protecting the lower part of the VAZ 2110 bumper, and...
The device is used for repairing cylinder heads of VAZ-2107,…
Such a part as the 2114 drawstring, with the proper desire and skill,…
Now let’s return to the question of how to find out which ECU is...
Repairing a gearbox on a VAZ 2110 with your own hands is not so...
Mounting blocks were installed on VAZ 2109 cars: 17. The difference between...
A diode bridge is one of the elements of a car generator that converts...
There is no need to install the KX either, everything remains on the standard shock absorber...
Source: https://baltikum.ru/rossiya/zamena-schetok-generatora-lada-priora.html
Replacing generator brushes on a Priora
There are often cases when, due to sufficient wear on the generator brushes, the battery is no longer charged. At first it may be a little lower, but over time it will become weaker and weaker.
If you notice similar symptoms on your Priora, then it is possible that the reason is the wear of the generator brushes. In order to replace them, it is best to remove the generator from the car.
And after that you will need the following list of tools:
- Open-end wrench 13
- Flat screwdriver
- 10mm head with crank or ratchet handle
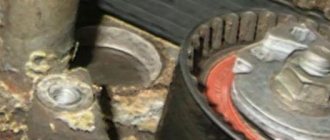
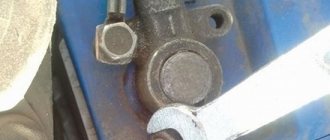
So, when the generator is removed from the car, the first thing you need to do is remove the plastic cover by prying it off with a screwdriver:
Preparation and necessary tools
It is more convenient to remove the generator on a Lada Priora on an overpass or inspection hole. Before you begin dismantling, prepare the following tools:
- locksmith's crank;
- extension;
- cardan from the tool kit;
- heads for 10, 12, 13, 17;
- spanners for 10, 12, 13, 17.
- WD-40 product.
This is interesting: OSAGO will become much more expensive starting from the new year.
When driving onto a pit or overpass, do not forget to install chocks under the wheels so that the car does not roll spontaneously. Then disconnect the negative terminal from the battery. Apply WD-40 to the mounting areas of the generator and air conditioning compressor. Wait 10-15 minutes for the product to take effect.
How to change alternator brushes on a Priora
Recently, the European repair standard has been increasingly used at car service stations. That is, most often the entire assembly is not replaced without attempts at minor repairs. But there are some operations that continue to be carried out even now. One of them is replacing the generator brush mechanism. And “Priora” is no exception here.
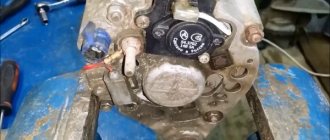
Brush mechanism with relay regulator
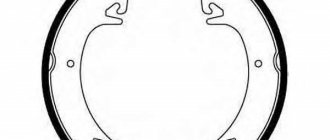
On older models of generators, the brushes that transmit current to the rotor winding to create an electromagnetic field that generates electricity could be replaced individually. They were installed in a special device - a brush mechanism, from where they could be easily removed. In modern generators, brushes are mounted complete with an electronic device - a relay regulator.
The relay regulator is designed to equalize the voltage supplied to the vehicle's electrical system. A transistor with a threshold for turning off the excitation voltage is built into the relay circuit. He is able to change it depending on the engine speed and, accordingly, the generator.
The fact is that without a regulator, as the speed increases, the voltage jumps to 16-18 V, which can lead to failure:
- side lighting lamps;
- low and high beam;
- instrument lighting;
- electric motors of various components.
At low speeds, the generator, on the contrary, produces a low voltage of 11.5-12 V. This leads to insufficient battery charge and premature failure.
By changing the current in the rotor windings, the relay-regulator maintains the voltage parameters supplied to the on-board network within the required limits, from 13.6 to 14.5 V.
Malfunctions of the relay regulator
Most often, the malfunction of the brush mechanism with a built-in regulator is the failure of the semiconductor transistor, a break or a short circuit to the housing. It is also possible for the graphite brushes themselves to wear out or break.
This is characterized by a drop or complete disappearance of the charge current. On the Priora this can be seen not only by the battery indicator lamp, but also on the mini display of the instrument panel. It has a charging voltage monitoring function.
Attention! Under no circumstances should a Priora be checked for charging by removing the battery terminal! The Priora car has many built-in control systems. Disconnecting the battery while the engine is running threatens failure for any of them.
The brush mechanism of the generator on the Priora cannot be repaired. In case of any breakdown, you only need to replace the brush assembly.
How to replace brushes on a Priora generator without removing it
All dynamos installed on Russian Priors are convenient in that the brush mechanism can be replaced without removing the unit itself from the car. This is not a very complicated operation, accessible to almost any car owner who knows how to hold tools in his hands. The replacement is carried out in several stages.
- Battery disconnection.
- Removing the power wire with a 10mm wrench from the generator.
- Disconnecting the test lamp input from the connector.
- Removing the rear plastic cover with snaps.
- Using a screwdriver or wrench, unscrew the 2 bolts or nuts securing the brushes.
- Replace the brush mechanism with a new one, connecting the wires.
- Reassemble in reverse order.
Important! When carrying out any work on the generator or starter, repair, replacement, etc., it is necessary to disconnect the battery.
After replacing the generator brushes, be sure to measure the flow of charging current to the battery with a voltmeter and compare it with the readings on the Priora instrument panel. We need to make sure that its work is objective.
In the video you can watch a repair involving the replacement of a relay with brushes on a Priora generator:
Source: https://mashintop.ru/articles.php?id=2566
How to remove a generator on a Priora: step-by-step instructions
You need to remove it as follows:
- first you need to disconnect the battery from the negative terminal;
- Next you need to remove the generator drive belt;
- then disconnect the block with the wire from the “D+” generator.
- then remove the rubber boot by unscrewing the fastening nut;
- Now you need to disconnect the wires from the contact pin;
- Next, you need to remove the nut of the bolt from the lower fastening of the device;
- then the nut and sleeve are removed;
- then you need to pull out the bolt of the lower fastening of the device;
- then remove the tension bar by completely unscrewing the bolt;
- after this you can safely remove the generator (it is important to check its condition).
Installation of the device is carried out in reverse order. There are times when it is necessary to remove the pulley from the generator. To do this, you need to remove the generator drive belt, loosen the radiator mounting bolts, then unscrew the adjusting bolt, and then remove all the mounting nuts. It is advisable to perform this procedure with two people so that one holds the generator and the other removes the mounting bolt. Only then can you begin to remove the pulley.
It is also advisable to do this work with a partner, since the pulley is quite difficult to remove.
Generator Lada Priora
The main function of the generator is to provide continuous power to all electrical equipment while driving. The failure of a node will lead to the failure of the entire system, so its condition should be monitored especially carefully.
Let's consider the main characteristics of the factory generator installed on the Lada Priora car, as well as similar models.
Selection of components
The original generator, installed on a car with a 16-valve engine at the factory, is marked with article number 5102.377. Its cost, as a rule, fluctuates around six to seven thousand.
Carefully check the generator itself and its packaging before purchasing so as not to encounter a counterfeit. It is important that the part is free of unevenness, chips and paint runs, as well as extraneous markings.
To avoid overpayments, you can purchase a similar original spare part. The following devices are suitable for installation on Lada Priora:
- VAZ (power 120/115a);
- KZATE (115a);
- BATE (90a);
- BOSCH (120a).
The price of analogues can be either higher or lower than that of the original. As a rule, it is in the region of 3500-6000 rubles. We choose a generator device with a large power reserve so that it lasts longer.
Priora generator brushes: how to replace them correctly and do it yourself
If the owner of the Priora notices that the charge from the battery is disappearing, first of all, he needs to check the condition of the generator brushes. Of course, at first the charge decreases insignificantly, but if the problem is not corrected in time, the charge will very soon disappear altogether. Replacing the brushes of the Priora generator, which are clearly worn out, will help correct this problem.
Important! The brush mechanism of the generator on the Priora cannot be repaired. If any breakdown occurs, only a replacement along with the brushes will be required.
Since this process is not so complicated, you can do everything yourself. You just need to take into account the recommendations of professionals.
What tools are needed for work?
Before changing the brushes on the generator, prepare the tools you will need for the job:
- flat screwdriver;
- wrench – it’s better if it’s an open-end wrench (size 13);
- car head with wrench (size 10).
Changing the generator brushes, process sequence
It is quite possible to replace the alternator brushes on a Priora that have worn out without removing it. But, according to experts in their field, the process is simplified if replacing the generator is preceded by removing it from its usual location.
Important! When carrying out any work on the generator (replacement, repair, etc.), be sure to disconnect the battery.
After removing the generator on the Priora, replacement is carried out as follows:
- Use a screwdriver to remove the plastic cover, which is designed to protect the device. Having done this, you gain access to the brushes;
- disconnect the connecting plug from them;
- slowly unscrew both fasteners (they are located along the edges of the elements that are inspected);
- Take the above key and unscrew the locking bolt. Do this in the center of the element;
- Having unscrewed all the fasteners, remove the brushes, inspect them, assess their condition and replace them with new ones, connect the wires.
What are the signs that indicate that the generator brushes have become unusable?
The following external “signs” will help with this:
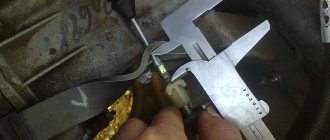
- if, upon examining this element, you find that its length is less than 5 mm, it certainly requires replacement;
- if the brushes are worn unevenly, this will also negatively affect the functioning of the generator, so they need to be replaced.
There is no need to skimp on buying new brushes. If you find a cheap option, it is highly doubtful that they will last long. It is more likely that such savings will lead to the need to re-replace the above-mentioned components.
Priora generator brushes
As for the generator brushes, in the Lada Priora they cannot be replaced as a separate part. The brushes are part of the voltage regulator, which cannot be repaired but replaced entirely, but fortunately this part is inexpensive - 200-800 rubles, depending on the manufacturer.
What voltage regulators can be installed? There is no single original number that would fit the generator - the spare part code depends on the manufacturer. The table shows the most common articles of brushes assembled with a regulator.
| Voltage regulator code | Which generator is it suitable for? | Manufacturer |
| 844.3702 | For 80A generators | Orbit |
| 849.3702 | For 90A generators | Orbit |
| 897.3702 | For 90A and 115A generators | Orbit |
| 9444.3702 | For 80A generators | VTN |
| 9454.3702 | For 90A and 115A generators | VTN |
| 611.3702-01 | For 80A generators | Energomash |
Regulator 611.3702-01
Regulator 844.3702
Regulator 897.3702
Replacing the Brushes of a Priora Generator With Air Conditioning ~ AUTOINTERLINE.RU
How to Priora generator brushes
If the owner of a Priora sees that the battery , then first you need to check the condition of the generator brushes . Priora with air conditioning. Do not rush to remove the gene to replace brushes, oil change +.
In what cases is it necessary to replace the charging relay? The opposite of removing the relay from the VAZ 2107 generator. It is worth noting that at first the battery charge will decrease slightly, but if the problem is not corrected in a timely manner, the battery charge will soon disappear altogether.
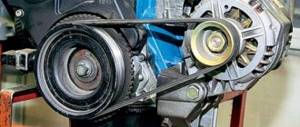
Alternator belt Kalina 2 with air conditioning and at. the worn brushes
of the Priora generator correct this problem .
And since this process is not so complicated, you can carry out such work yourself, taking into account advice from professionals in your field.
Tools for work
Before you begin replacing worn elements, you should prepare the necessary tools:
- wrench size 13, it is best to use an open-end wrench;
- a screwdriver; a flat tool is better suited for this task;
- a car head with a so-called size 10 wrench.
Step-by-step replacement of generator brushes
replace worn brushes without removing the generator from your car. Replacement of the Lada Lada Priora generator - replacement of the diode Priora with air conditioning and power steering.
However, according to experts, this process will be much simpler if you remove the generator from its permanent place before replacing it. Replacing the VAZ 2107 generator brushes, checking the VAZ 2107 charging relay.
After the generator is removed, the replacement process is performed in the following order:
- using a screwdriver, remove the cover, made of plastic to protect the generator
, in order to be able to get to
the brushes ; - the connecting plug with the wires is disconnected from the brushes ;
- two fixing fasteners, which are located at the edges of the elements being inspected, are carefully unscrewed;
- using a size 13 wrench, unscrew the fixing bolt in the center of the element;
- after all the fasteners have been unscrewed, the brushes should be removed to inspect their external condition and replace them.
How to replace the LV without removing the generator on a Priora Luxury with air conditioning (voltage regulator)
Subscribe to the channel.
How to remove the generator brushes without removing the generator itself | Priora 2
Removing and installing the generator
Lada
Priora
16 valve with
air conditioning
,
alternator
.
Replacing brushes with removing the generator on a Priora with air conditioning
Removing the generator through the headlight
In the case of a Priora equipped with air conditioning, one nuance arises - the compressor of this very air conditioner interferes with dismantling the generator. This complicates the process and makes it more energy-intensive and expensive (if done at a service station). This also explains why many choose the procedure without removal - because removing the generator on cars with air conditioning is quite difficult. Otherwise, the replacement algorithm is no different.
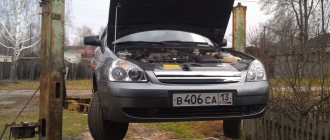
An alternative replacement option without removing the air conditioning compressor is to dismantle the generator and remove the headlight. To do this, you need to remove the protection over the optics, loosen the bumper fastenings, dismantle the headlight and thus gain access to the Priora generator to remove it.
In one of the sources we found information that it is necessary to remove the compressor only for cars with Halla air conditioners. But cars with Panasonic air conditioning do not require this. But there is no clear confirmation of such information, and if you know this, then share your experience in the comments.