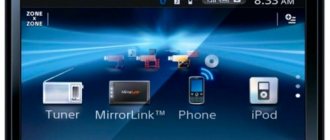
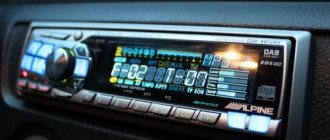
The standard tape recorder on a luxury Priora received a more positive rating among users than a negative one. This is a very good device with extensive functionality, the only drawback of which is the not very high power of the built-in amplifier. There are not many sound settings, but the receiver is not designed for musicians with refined ears; it is more suitable for the average user. For those who want more “sound” in their car, the Ural radio is recommended, and we will tell you how to install it below.
Main characteristics and functions of the radio on a Priora car
Device in the car
To prove the acceptable quality of the Priora radio, let's consider its main characteristics. The car radio operates on FM and AM frequencies, with the former being perceived in the range from 65 to 108 MHz, having stereo separation of more than 30 dB and sensitivity at a noise/30 dB ratio of 12 decibels. The AM band operates at frequencies of 522-1620 kHz, with an intermediate frequency of 450 kHz and a sensitivity of less than 43 dB.
The closest buttons to the driver of the Lada Priora on the radio are the buttons located on the left side:
- turning on/off the receiver;
- instant mute (Mute);
- selection of operating mode (Mode);
- selection of frequency range (Band);
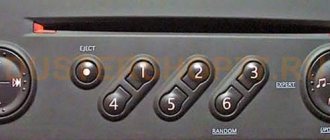
- scanning frequency range / tracks / sequential tuning on a station (Scan). In scan mode, the receiver will pick up all stations in the selected range and play for a few seconds. By pressing again you can select the corresponding station;
- start/pause playback or select a radio station (1);
- scanning tracks or selecting a radio station stored in memory as number 2 (2\Int);
- to select a station recorded at number 3 or to play tracks repeatedly (3\RPT);
- to select a radio station recorded under number “4”, or to play music in random order (4/RDM);
- button “5” makes it possible to either go to the radio station stored in memory as number five, or go to the next folder when playing an MP3 disc (F+/5);
- button “6” makes it possible to either go to the radio station stored in memory at number six, or go to the next folder when playing an MP3 disc (F-/6).
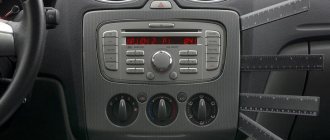
Driver's seat
In the center of the radio panel in the Lada Priora there is an SD card loading window (at the top), a disk loading window, a liquid crystal display, cell phone control buttons, a slot for the built-in microphone, a hole from the “Reset” button (activated by a sharp thin object when an error is displayed , all buttons to initialize the system do not work). At the bottom there is an encoder knob, control buttons, and a menu selection confirmation button.
Closer to the passenger located in the front seat of the Lada Priora, on the radio panel there are such functions as:
- disc eject button (top);
- enabling the automatic search function for alternative frequencies (AF). This option allows you to find the best broadcast for a specific channel;
- automatic tuning to stations, scanning of stored stations, searching for a folder or a specific track (using the AS/PS search method);
- Search for thematic radio stations using the RDS (PTY) function. For example, you can select stations that broadcast only rock, pop, weather, finance, etc.;
- enable the feature for the messaging service (TA);
- button for displaying additional data (Info);
- selecting equalizer mode (EQ)
- selecting a radio station stored in memory under numbers 7, 8, 9, 0 (buttons 7-0).
- The standard radio on the Priora has the ability to use buttons “1” to “0” to dial a phone number.
The choice of tape recorder mode is carried out through the “Mod” button, in the menu of which you can select a radio receiver, memory card, disk, USB or information from the navigator using a brute force method. The recorder will play navigation signals (if a navigator is connected) while playing the currently selected main function (eg radio) in muted mode.
Firmware for Lada Priora radio
Modern technologies are rapidly moving forward, also improving car gadgets. Firmware for the standard Lada Priora radio allows car enthusiasts to expand the capabilities of the player by adding additional functions that the standard software does not have. The updated radio interface can be supplemented with a convenient touch keyboard, fresh programs and new versions of players with the ability to play all audio and video formats.
Radio set from Priora 2
The firmware of the VAZ 2170 audio player system is carried out using an SD card with a capacity of at least 4 GB, formatted in the FAT system.
Firmware for the Lada 2170 radio is quite simple:
- 1. You need to find a suitable program on the Internet and save it to your PC. As a rule, such programs are shared by car enthusiasts on thematic forums;
- 2. Write downloaded files to a memory card;
- 3. Insert the SD card with the necessary information into the provided slot on the radio;
- 4. Restart the player by pressing the “Reset” button, after which the update program will automatically start. Thus, the firmware goes through to completion, as evidenced by the scale on the radio monitor;
- 5. When the firmware is completed, you should remove the memory card and reboot the player, after which you can use the updated interface.
When choosing a program that will be used to flash the Lada Priora head unit, you should pay special attention to its description. Various options for updating may include redundant and unnecessary functions, which will subsequently overload the device's memory and lead to its slowdown.
You should also select a program to expand the device display, otherwise the firmware will require constant screen calibration. The best solution to updating the radio software is to contact experienced specialists who provide this service. This will help avoid some unexpected difficulties when installing the wrong firmware.
Choosing the sound in the car
The device looks impressive.
Owners of the Lada Priora can choose one or another sound timbre for their interior by pressing the EQ key and then selecting the style “classic”, “rock”, “pop”, “vocal”, etc. To more accurately configure the parameters, you need Briefly press “8”, then select the mode using keys 4-5 and 5-6 - the desired value. Here you can select “Fade” - balancing the front and rear speakers, “Balance” - harmonizing the side speakers, “Bass” - low frequencies, “Treble” - high frequencies. A review of the manual indicates that improved sound quality can be achieved by using the "Loud On" mode. In addition, in the same “section” you can set stereo or mono mode, enter sound signals for pressing keys (Beep On / Of), etc.
What are RDS features? Radio stations sometimes accompany their broadcasts with such options. For example, RDS in text form allows you to broadcast the name of a song, station, etc. on the display. In the “TA” mode, you can receive traffic information from certain radio stations on the display.
The disc playback mode is quite simple. The CD is inserted, started, paused using the "1" key, and after removal the radio automatically turns on. Scanning tracks (Int key) allows each track to be played for 10 seconds; to stop scanning, the key must be pressed again. Music from a disc can be played repeatedly (RPT button) or in random order (RDM). The radio successfully reads music from memory cards or via a USB connector. If the media contains music tracks, playback begins immediately after placing the media in the appropriate slot. Memory cards are ejected by pressing again.
Using the radio to make phone calls
Device control panel
The instructions from the Priora radio also contain information that the device supports the Bluetooth function and can be used for a wireless headset or playing tracks from Bluetooth devices. To do this, press one or the other key with the phone icon, and the device name (or Disconnect) will appear on the display. First you need to turn on Bluetooth on your mobile phone and perform a search. If everything is in order, the “hands free” message will appear on the phone and you can connect (the PIN code is “0000”). Then a beep and Bluetooth icon will appear.
As the manual says: if you need to accept a call, you need to press the left button with the phone icon, and to interrupt the connection, press the right button. You can dial a number after switching to Bluetooth mode. After this, use the numeric keypad to type the name of the mobile phone, after which you need to call the subscriber with the left button with the phone icon. Ending a conversation, as well as disconnecting, is done by pressing the right button with the phone icon (short or long, respectively). A PIN code for the phone (instead of four zeros) can be set by pressing the Scan button in Bluetooth mode, entering a new code and pressing confirmation (button “8”).
In Bluetooth mode, for some phone models, you can transfer address book data from the phone to the radio. To do this, press AF/PS, view the address book via PTY, select the desired number by rotating the encoder knob. In addition, you can delete one number via AF or all numbers via TA. Therefore, you need to be careful when using Bluetooth.
As we can see, the standard radio on the Priora actually has a variety of functionality, so its cost can reach up to 5-6 thousand rubles, but many drivers don’t like it, which is why they change it. In the “standard” configuration (as opposed to the “luxury”) there is no radio, but the car has all the necessary preparation to install any receiver, including the “Pioneer”.
Installation on the first generation Priora
To install the car radio in its original location, you need:
- Disconnect the battery from the vehicle's on-board network.
- Remove the 1DIN decorative frame with a box for small items from the center console of the instrument panel. The assembly is held in place by plastic latches located in pairs at the top and bottom of the drawer. Removal is carried out by pulling the part towards you; it is possible to bend the edges with a plastic mounting spatula.
- The rear has mounting points for the factory patch harness equipped with ISO connectors. It is necessary to disconnect the plugs from the box, which is then set aside.
- Connect the pads to the radio and check the operation of the device. Priora cars are supplied from the factory with a constant supply of positive power, independent of the position of the key in the ignition switch. It is necessary to change the wire connection, following the operating instructions for the head unit. The positive signal sent when the ignition is turned on is taken from the rear window heating button.
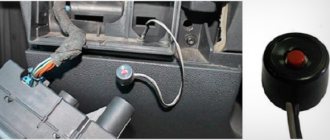
- Lay the wire leading to the external antenna. The cable runs under the plastic trim of the A-pillars and the roof panel. To reduce the likelihood of noise, the wire is wrapped in fabric insulating tape or foam rubber.
- Reinstall the removed trim elements.
- Connect the antenna power from the ISO connector and check the functionality of the acoustic device in radio receiver mode.
- Place the standard mounting shaft into the hole in the center console. The part is attached using tabs that are pressed out with a screwdriver. During installation, it is necessary to ensure maximum fit density, which will reduce vibrations of the radio when moving.
- Connect the power, speaker and antenna plugs to the connectors on the back of the head unit. Place the radio in the guide shaft until the locking latches engage. Check the tightness of the installation, and then place the decorative frame in place.
installation of 2 DIN radios in prio
It's about how to put
Clarion tape recorder in a double height version instead of two pockets in the car's center console. This 1 DIN hole (there is a pocket or glove box scientifically) in the car is already there, and there is no problem installing a radio of the same size. This standard has been around for a long time and most automakers follow it. Device with two devices for assembly. task for the Master. Remove the glove box using a flathead screwdriver by pressing on the top and bottom edges of it and pulling it towards you. The latches holding it in place can be seen in the picture to the right. At the back of the pockets are the radio connectors, from which the wires go to the speakers and come from the battery. Disconnect them. The lower part of the compartment is usually covered with a decorative cover. Take it off, it won't be useful. The mounting screws are visible on the back wall of this recess. They must be unscrewed. The center console contains six screws. Two of them. in the hole under the upper glove box, screwed at an angle of 45 degrees. Two more. under the convertible top is an ashtray that folds back.
It is also deleted. Did you unscrew? Remove the console. Carefully disconnect all connectors from the switches and fuser unit. In this car one wire did not have a connector within reach. alarm LED wire. But he is not regular. It was cut off and later restored after all the work was completed. This is what the Priora center console looks like from the rear. We remove it from the car. Then unscrew the internal spacer to support one head unit. This is also an optional part in this car.