10/12/2020 1,392 Alarms
Author: Victor
Programming the Starline A9 key fob, like other models, begins with binding (maximum 4 pieces) to the microprocessor control module using the Valet button and keys on the remote control. After this, you can configure the assignment of buttons and the launch of modes (autostart, immobilizer, turbo timer, etc.) on the main or additional communicator - both devices can perform similar options.
[Hide]
How to remotely turn off the shock sensor
This option has several levels. You can use it as many times as you need. This will be counted during one security cycle. To carry out this action, move the cursor over and make two clicks on the button located on the key fob. After that, you will see this icon and hear sounds - sirens and key fob melodies. This means that the first level of this sensor has been disconnected. To turn off the second one, do the same steps again. If you need to enable this function again, repeat the manipulations and the image will disappear. One beep will also sound.
Recording key fob codes
The maximum number of key fobs that can be used to record into the car alarm memory is four. This must be done with the security mode turned off. The plan is as follows.
- Turn on the ignition.
- Next, find the Valet service button. Now you need to press and hold it until the siren appears. Only 4 signals.
- In order to record the main key fob with a screen, you need to simultaneously press buttons 1 and 2. Additional key fobs without screens are recorded by pressing buttons 3 and 4. This action is done with all additional key fobs. The main thing is to maintain an interval of no more than 5 seconds.
- When finished, turn off the ignition. It will be accompanied by 5 size flashes.
Important! When you need to record new key fobs, overwrite the old ones as well, otherwise they will be deleted from the system.
Programming the control panel
You can program the buttons of the new Starline A9 alarm remote control with auto start after installing the batteries in the device. To do this, remove the cover protecting the rear compartment of the pager, into which the battery is inserted. It must be installed taking into account the polarity.
Setting the I Button
More information about how to flash button 1:
- Control 3 on the pager is pressed quickly several times to move the cursor on the screen. To change the direction of its movement, you need to take a short pause - for 1-2 seconds.
- Using the third key, you need to set the indicator to the position of the icon that corresponds to the required command, for example, to the symbol G or F.
- Then button 3 is pressed and held for six seconds until two and then three sound pulses are played.
- After this, key 1 is briefly clicked.
The user can change the assignment of the first key of the communicator an unlimited number of times. It is recommended to register this element to activate and disable the security mode, since it is marked accordingly.
To perform flashing in accordance with the instructions for programming the Starline A9 key fob, similar actions are performed. When an option is activated, the indicator of the selected mode lights up on the communicator screen.
User Alexander Shkurevskikh in his video spoke in detail about setting up the key fob, as well as programming the first control element.
Setting Button II
To configure the second key, similar actions are performed. Using the third button, the user moves the cursor on the display to the position of the corresponding indicator to select the desired mode. The principle of movement is similar - for this, use key 3, and if you need to change the direction of movement, then a short pause is made for 1-2 seconds. After selecting the required function, press the second button.
Setting the clock
If you purchased a new communicator and need to set the current time on it, use the third key fob button:
- Key 3 is pressed for a few seconds until the pager plays two short beeps. The clock display will start blinking.
- To increase the current time reading, press the first button; to decrease it, press the second button. To quickly change values, these controls are pinched and held.
- To go to the minutes setting menu, briefly “click” the third key. Increasing and decreasing parameters is done in the same way, using buttons 1 and 2.
- After the current time has been set, you need to press and hold key 3 for several seconds. The Starline A9 communicator should play a short sound pulse.
Setting an alarm
You need to turn on the alarm clock by performing the following steps:
- The third pager button is pressed and held for several seconds. The communicator should play a double beep.
- By successive “clicks” on control element 3, the cursor on the screen is moved to the position of the indicator in the form of a clock. The icon will start blinking.
- To increase the time values, use the first button; to decrease the time, use the second. To quickly change readings, the keys are held down. The subsequent transition to setting the minutes is made by pressing the third key.
- After making the settings, control element 3 is “clicked” briefly. This will enable or disable the function. To turn it on, press the first button, to turn it off, press the second button.
- To leave the alarm settings menu, control 3 is “clicked” and held for a few seconds. You can release the key after a short beep from the communicator. After turning on, the alarm indicator will appear on the remote control display. When it is triggered, the device will begin to emit melodic signals; to interrupt the option, press the third button.
Setting the timer
Setup Guide:
- Key 3 is pressed and held until the remote control plays a double pulse.
- By successive “clicks” on the same button, the cursor is moved to the position of the hourglass-shaped indicator. To configure the time parameters, the same steps are performed as in the case of an alarm clock.
- When the function is activated, an hourglass-shaped indicator appears on the communicator display. When the timer fires, the remote control will play eight beeps and the time indication will disappear from the screen. To interrupt impulses, use the third button of the key fob.
The maximum allowable timer value that can be set during operation is 19 hours 59 minutes.
Setting modes
The Starline A9 alarm system allows you to program the following modes:
- energy saving;
- notifications and warnings to the car owner;
- security;
- autostart;
- engine blocking;
- turbo timer.
Energy saving
This function allows you to reduce the battery discharge in the remote control. The battery will consume less current two minutes after the security mode is turned off. This occurs due to the fact that the electrical board of the receiver is deactivated.
Activation is done as follows:
- Key 3 of the communicator is pressed and held until the device plays a double sound pulse.
- The third control is pressed sequentially to move the cursor on the screen to the position of the indicator labeled “Save”.
- The first button activates the energy saving mode, the second button turns it off. When using the keys, an indicator with the words On or Off will appear on the key fob display, respectively.
- Control 3 is pinched and held to exit the setup menu. You can release the button after the remote control plays a short beep.
Alerts
The Starline A9 communicator has two modes of alerting the user - with sound signals or via vibration.
To select the type of warning pulses, press the third and first keys of the remote control simultaneously. When the vibration mode is activated, the key fob will trigger with two vibration pulses, and an icon with the inscription “Mite” will appear on the device screen.
Security
When activating protection with audible support signals, you must make sure that the ignition is turned off and all doors, including the hood and trunk, are locked. The parking brake lever must also be raised. If the first key is configured to activate security by default, then this element is pressed briefly. In confirmation, the siren will play a short beep and the car's parking lights will blink once. Icons in the form of a loudspeaker and a locked lock will appear on the communicator screen.
To activate silent protection, the conditions must be similar: all doors with the hood and luggage compartment are locked, the handbrake is raised. To arm the system, the cursor on the key fob display moves to the position of the corresponding indicator F. After this, the second button on the remote control is pressed. When the protection is activated, only the car's headlights will blink, the siren will not work. The alarm status LED will blink as usual, and the device display will show an indicator in the form of a crossed-out speaker and a lock.
Activating the security of a vehicle with the power unit running is done as follows:
- On a car with the engine running, the parking brake lever rises.
- The first button of the communicator is pressed and held until the device plays a melodic signal. The vehicle's side lights should blink three times. An indicator in the form of smoke from the muffler will be displayed on the remote control screen, the diode will light continuously. The operating time of the power unit with configured heating during automatic start will be 10, 15, 20 minutes or without limitation.
- The key is removed from the ignition, the driver leaves the vehicle. The motor will remain running.
- All door locks, luggage compartment and hood are manually locked.
- The first key of the communicator is pressed. The car will sound with one siren signal and the lights will blink. The impact controller and ignition system are not protected when this security mode is activated. Automatic closing of the door locks will occur if these devices have been connected to the anti-theft system control unit.
Autostart
Setting up different modes of automatic engine start:
- For daily autostart and warming up of the power unit, the cursor on the key fob display is set to the indicator labeled “Start”. The second key of the communicator is pressed twice. The side lights of the car will blink once, the siren will sound, the remote control will play a melodic pulse, and the diode light will begin to blink with an intensity of two flashes. To disable this feature, move the cursor to the position of the same icon, and then press the second button.
- Autostart by temperature is activated by moving the indicator to the corresponding icon, after which key 2 is pressed. The temperature value is set by entering the options programming menu. Pressing button 1 will start the motor at -5 degrees, button 2 - at -10°C, button 3 - at -15°C, and button 4 - at -20°C. To disable this feature. The cursor is moved to the position of the indicator in the form of a thermometer, then control element 2 is clicked.
- To configure auto-start at a certain time, the alarm settings must first be adjusted. The option is enabled in the same way, by moving the indicator to the position of the clock icon. If all parameters are set correctly, then the second key of the communicator is pressed. To stop the power unit, started according to the alarm clock, the first button of the remote control is “clicked”.
- If it is necessary to increase the engine warm-up time, the cursor on the display must be moved to the position of the indicator with the inscription “Start”. Each time you press the second button, this value increases by five minutes. If it is necessary to extend the operating time of the power unit by 20 minutes, then key 2 is “clicked” four times. The key fob screen will display the total time remaining until the engine stops.
The “Nuyr Gun” channel in its video showed what problem a user may encounter when setting up autorun on Starline A9.
Immobilizer mode
If this function is configured, the power unit will be blocked automatically, 30 seconds after the ignition is turned off. The operation of the security function does not matter. When the immobilizer is turned on, the system status LED will be constantly on. To disable the mode, use the first button of the communicator; as confirmation, the side lights will blink twice.
Turbo timer mode
Setting up the turbo timer function:
- On a car with the power unit running, press and hold the first key of the communicator. It must be released after the vehicle blinks its lights three times and the key fob plays a melodic impulse. An indicator in the form of smoke from the muffler will be displayed on the remote control screen, and the turbo timer duration will also appear. If it is one minute, then the inscription will be “r01”.
- The key is turned to the “Off” position, after which it can be removed from the lock. The power unit will operate for the configured time. Use of this option is only permitted on vehicles with the handbrake applied.
User Dmitry Tonoyan in his video showed how the turbo timer works on cars with a Starline alarm system.
Additional functions (at the will of the owner)
- Automatic control of the central locking, which occurs from the ignition key when turning on and off. If this option is disabled, then when turned on, the locks will unlock automatically. There are several options:
- do not close;
closing after 10 or 30 seconds after the ignition is turned on.
If one of the doors is opened during this time, the action will not complete.
Tired of paying fines? There is an exit!
Forget about fines from cameras! An absolutely legal new product - Traffic Police Camera Jammer, hides your license plates from the cameras that are installed in all cities. More details at the link.
- Absolutely legal (Article 12.2);
- Hides from photo and video recording;
- Suitable for all cars;
- Works through the cigarette lighter connector;
- Does not cause interference to radios and cell phones.
Find out details
Main and spare key fobs
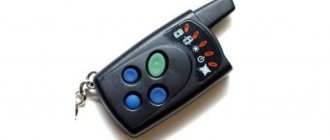
The Starline security system is supplied with two communicators for control - the main one with a screen and feedback and an additional one without a display.
The only difference between the key fobs is that the replacement pager cannot be used to monitor the status of the anti-theft system.
Purpose of the buttons
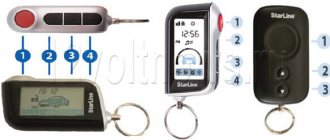
Correspondence of controls on the main and additional communicators:
Buttons on two Starline A9 alarm pagers
Key designation on the main communicator:
| Control element | Purpose |
| 1 | Description:
|
| 2 | Any command that corresponds to the location of the cursor on the communicator screen. By holding the key for three seconds, you can open the tailgate. |
| 3 | This button is used to control several functions:
|
| 1+2 | A short press will activate the “Search” mode for the vehicle. When you hold down the key for 3 seconds, the “Panic” function will be activated. |
| 3+1 | Control element for selecting the remote control notification mode - melodic signals or vibration |
| 3+2 | Quick entry to the communicator timer settings menu |
Spare keychain:
| Control element | Purpose |
| 1 | Activation and disabling of security mode. When you hold down the button for three seconds, you will enter the control menu for the third additional channel. |
| 2 | Used to configure three options:
|
| 3 | A short “click” activates the “Search” option. Long-pressing the key will allow you to enter the control menu for the first additional channel. |
| 4 | Silent arming and disabling mode. To enter the setup menu for the second additional channel, press the key for three seconds. |
| 1+2 | Enabling or disabling the “Panic” option, in which the car blinks its lights and sounds a siren to attract attention |
| 1+3 | Deactivating the Sensitivity and Shock Controller |
| 1+4 | Enabling the service mode for servicing the anti-theft system |
| 2+3 | Activation of the power unit start function in accordance with the air temperature |
| 2+4 | Enabling the daily remote engine start mode |
| 3+4 | A short press will activate the “Anti-robbery” option, which will block the engine in the event of a forcible seizure of the car. By holding these keys for a long time, you can bind the communicator to the alarm system in reprogramming mode. |
Meaning of indicators on the display
Designation of icons on the screen of the main communicator:
Starline A9 key fob display indication
Description of symbols:
- The battery installed in the communicator is low.
- Enter the control menu for the second additional channel.
- Automatic start of the power unit in accordance with air temperature readings.
- Engine running indicator.
- Open tailgate icon.
- A symbol of one or more open doors in a car.
- Indicator alerting the car owner via vibration mode.
- Entering the anti-theft system service menu.
- Automatic reset to protection mode.
- Silent vehicle security.
- Enabled vehicle protection function with audible alarms.
- Open car hood.
- Indicator that the impact controller is triggered as a result of physical impact on the body. Only the warning or alarm zone of the sensor could be activated.
- The handbrake in the car is disabled.
- Closing car door locks.
- Opening doors.
- The standby mode is enabled, in which only the communicator receiver functions and sending commands is impossible.
- Icon for sending data from the remote control to the transceiver.
- Calling the car owner from the salon.
- The power saving mode of the communicator is activated.
- The car's ignition is turned on.
- The auto-start alarm has been triggered.
- Evening time of day.
- Indication of the morning time of day.
- Daily automatic start of the engine in accordance with the alarm clock.
- Display with the current time, temperature level and operating autorun modes.
- Temperature display.
- Countdown timer mode is activated.
Indication of symbols on the display:
- A — the “Anti-robbery” function is enabled if the symbol is lit;
- B — enter the setup menu for the third additional channel;
- C - automatic start of the power unit in accordance with temperature readings;
- D — daily engine start by alarm clock;
- E - remote start and stop of the car engine by command;
- F—silent protection activation mode without sound signals is enabled or disabled;
- G - protection of a vehicle with alarming impulses;
- H - remote disabling of the sensitivity and impact controller;
- I — enter the security system service menu;
- J - vehicle condition, as well as temperature indication in the car interior;
- K — enter the setup menu for the second additional channel;
- L - remote opening of the tailgate.