To ensure efficient engine operation, hydraulic compensators can be installed. On the VAZ-2107, the installation of such devices turns out to be quite problematic, and also expensive - the cost of alteration is simply sky-high. But on the other hand, the noise when the engine is running is reduced, and all knocks from the valves go away. But the most important thing is that you no longer need to adjust the thermal gaps. But on “sevens” and “classic” series cars this is a disease - adjustments need to be done every 10-15 thousand km, otherwise the engine will stall after warming up.
How do hydraulic compensators work?
Hydraulic compensators on the VAZ-2107 allow you to eliminate thermal gaps in the valves when the engine is running. Operation occurs in a fully automatic mode; adjustments and any other settings are not required.
When repairing the gas distribution mechanism, it is enough to just change the valves and grind them in. There are no washers or adjusting nuts in the design. Engine oil moves to the hydraulic compensators, and due to pressure, the dimensions of these elements change. The valve is displaced under the influence of a hydraulic pusher on one side and a spring on the other.
Are there hydraulic compensators for the VAZ 2107 injector?
- Registration
- Entrance
- To the beginning of the forum
- Forum Rules
- Old design
- FAQ
- Search
- Users
but on 1.6i 07 there is no gk, how can I understand this?
Shah was Izhevsk.
but on 1.6i 07 there is no gk, how can I understand this?
Shah was Izhevsk.
but the engines are the same VAZ 21067
Ahez. You need to ask the manufacturers about this. It came from the factory with a 214 head. In theory, the compression should increase with it.
but the engines are the same VAZ 21067
Ahez. You need to ask the manufacturers about this. It came from the factory with a 214 head. In theory, the compression should increase with it.
but the engines are the same VAZ 21067
Ahez. You need to ask the manufacturers about this. It came from the factory with a 214 head. In theory, the compression should increase with it.
but the compression ratio decreased and did not increase at all, but became 8 units instead of 8.5,
And it seems to me that it will become 9.0 on the 06 engine. No ?
Information on icons and features
You can not
start topics You
cannot
reply to messages You
cannot
edit your messages You
cannot
delete your messages You
cannot
vote in polls You
can
attach files You
can
download files
Advantages of hydraulic compensators
If you install hydraulic compensators on a VAZ-2107 car, you will receive the following advantages:
- High-frequency sounds that appear when the engine is running will completely disappear.
- The overall engine noise is reduced several times. Of course, the sound of the moving chain will still not disappear.
- The noise level from the engine in the cabin is reduced. If you drive at speeds less than 80 km/h, there is almost no sound.
- The wear of the gas distribution mechanism elements is reduced, and significantly. Constant shock loads that occur when there are gaps in the elements disappear.
- The integrity of the cams and rockers is maintained, regardless of the vehicle's mileage. You definitely need to know how to check hydraulic compensators yourself - this will improve their performance.
- If you mount hydraulic lifters on a timing mechanism in which the rockers and cams on the camshaft are worn, all surfaces are gradually leveled.
- All engine parameters remain the same - power and throttle response do not change when installing hydraulic pushers. But due to the fact that there is no difference in valve clearances, the engine runs as evenly as possible.
- If there is a sufficient amount of lubricant, all elements of the hydraulic compensators have a huge service life - there is practically no wear.
Over 20-30 thousand kilometers after installing the hydraulic pushers, the bushings and plungers grind in, their contacting surfaces acquire a mirror-like appearance. Subsequently, the development does not appear, the dimensions do not change.
Disadvantages of using hydraulic compensators
There are practically no disadvantages when installing hydraulic compensators on the VAZ-2107. But one point should be taken into account - you need to use only high-quality oil and filters. When small particles get inside the hydraulic pushers, complete or partial failure occurs.
The size of the gap changes, which leads to the appearance of shock-type loads. And they are the reason for the reduction in the resource of the mechanism. Similar consequences will occur if the oil pressure in the system decreases. Therefore, if you decide to install hydraulic compensators on a VAZ-2107, you will have to purchase only high-quality oil and filters, and also monitor the level.
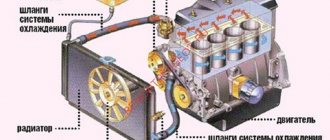
Operating principle of hydraulic compensator
A ball-shaped valve supplies engine oil to the hydraulic element cavity. Under the influence of lubricant, the piston of the device extends, which leads to an increase in the height of the hydraulic valve. This leads to a reduction in the valve clearance in the gas distribution mechanism to a minimum level.
The oil stops flowing when it reaches the maximum compression level. When production occurs, the valve again releases the required amount of oil. Thanks to this, pressure is constantly maintained in the GKK, which reduces the valve clearance.
If you decide to install a compensator, be prepared to use only high-quality oil.
What is required to install on the seven
To install the elements on the “seven” yourself, you need to have the following tools and accessories on hand:
- Torque wrench.
- A set of wrenches (socket wrenches, socket heads, open-end wrenches).
- Drills and electric drill.
- Copper and steel wire.
- New gasket for the timing cover.
- Angle grinder or some files.
- Rags.
- Fine abrasive grinding disc.
- Set of hydraulic compensators.
- Frame for block head washers.
- Mechanism for replacing plungers.
Even before checking the hydraulic compensators, you need to prepare a special tool - without it it is quite difficult to carry out all the work.
Preparatory work
Preliminary preparation includes the following manipulations:
- Removing the air filter housing and element.
- Removing the throttle cable. It is installed on the gas distribution mechanism cover. You can install hydraulic compensators on a VAZ-2107 (carburetor). They are installed not only on injection engines.
- Rotate the crankshaft so that the distributor is installed in such a way that the marks on the sprocket and the housing align.
- Flaring the washer under the camshaft sprocket mounting.
- Unscrewing the fastening bolt.
- Unscrewing the camshaft pastel fastening nut, then dismantling it along with the rockers. Be sure to mark in which places they were installed - when assembling, mount them in the same way.
- Complete dismantling of the camshaft, unscrewing the adjusting cams.
After the preparatory work, you need to cut off the tide, which is located near the second valve - it will interfere.
How to install hydraulic compensators on a VAZ 2107
The procedure for installing hydraulic compensators on a VAZ 2107 engine is as follows:
- Remove the air filter housing together with the filter element.
- Remove the accelerator linkage from the guide on the timing cover.
- Unscrew the fastening nuts and remove the timing cover.
- After turning the crankshaft, align the camshaft so that the marks on the sprocket and the camshaft housing coincide.
- Flare the washer under the camshaft sprocket mounting bolt.
- Unscrew the camshaft sprocket bolt, having first secured the chain to it with a wire.
- Unscrew the camshaft bed mounting nuts.
- Remove the bed along with the camshaft from the studs.
- Dismantle the rocker, carefully folding them so that you can then install each one in its original place.
- Unscrew the adjusting cams and bushings of the adjusting bolts.
Installation of hydraulic compensators
It will be much easier to purchase an assembled cylinder head with hydraulic compensators for a VAZ-2107. But if you still decide to redo it yourself, then follow these steps:
- All channels through which oil flows must be closed during the work.
- Install hydraulic pusher bushings.
- Press the block head washers.
- Press the O-rings into the hydraulic tappet plate.
- Mount the entire mechanism on the head.
- Install the springs and plungers, then install the valve drive levers 4, 6, 7, 8.
- Check the stroke of the plungers and make adjustments if necessary.
- You need to make a hole in the camshaft pastel and place a tube in it.
- When installing the hydraulic system, ensure that all pipes are directed correctly.
Typically, hydraulic pushers come with detailed instructions that indicate the pipe routing diagram for each engine type.
Installation of hydraulic compensators on a VAZ 2107
When we install hydraulic compensators, we will lose such problems as constant adjustment of valves, their knocking (the engine runs quieter). But there are also disadvantages - the hydraulic compensator mechanism on the VAZ 2107 (clogging is possible).
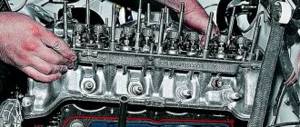
Installation of hydraulic compensators on a VAZ.
We take the engine, remove the pan with the air filter, the gas draft, and the block cover. You can see that everything inside is stained with oil. We flare the sprocket counter washer and install it according to the marks (they should be opposite each other). We unscrew the sprocket mounting bolt and hang the sprocket with wire for reliability. We remove the bed together with the pre-shaft, having first unscrewed the nuts securing it. Here, too, everything is polluted with fuel oil. We also see that the camshaft is worn out, judging by the risks. Next, we proceed to remove the levers, lay them out after removal to remember the position. Then we unscrew the cams, carefully tear off the bushing of the adjusting bolt, and unscrew them too. We wipe everything from dirt and oil; opposite the second valve, the platform is cut down so that it is in the same plane with the sockets. We take kerosene again and clean everything thoroughly and carefully. Using a sharpening stone, we grind the planes of adjacent sockets to create greater tightness. Now let's start screwing in the bushings. But there is a small obstacle here. Not every bushing fits perfectly under the socket. Therefore, in our case, we took a bushing from another kit when it did not fit. In turn, a rejected bushing may fit on another car. Now we unscrew the bushings, remembering their position, throw the support washers into the head, and press them with a special mandrel. Press the O-rings into the distribution plate. And here the problem is again. Not all rings fit perfectly into the plate, and again we can try them from a different set. When everything works out, we assemble the assembly together with the bushings and install it in the head. Next comes checking the plunger so that it does not jam - to do this, the bushing must be loosened until the plungers begin to move freely. We throw the springs inside and install the plungers in their places. Now we will adjust their progress. We install the valve drive levers (4.6, 7.8), bed with the camshaft, which was turned according to the instructions. Using a special device, we measure the stroke of the plungers. To have access to the 1.8 levers we use the bent tip. We remove the bed and install washers to bring the plunger stroke back to normal. We level it with a mandrel. We do the same with the remaining plungers. We drill out the oil drain in the bed, having first removed the camshaft from it, then cut the thread. In order for the tube to go straight down, you need to cut the thread on it to a certain level, then bend it on the spot so that it fits exactly into the hole in the cross. We blow it out, clean the camshaft and bed, then put them in place. Now we install the tubes of the lubrication system, fill it with oil, close those bushings where the oil has reached the top with your fingers. We install the ball valve and plunger. Here again there is a problem. You should check the valve for tightness, for which a ball is thrown into the plunger and purged - it should not allow air to pass through. You can replace the ball if it doesn't work. We took it from another set. Again the valve is checked in place and the plunger should resist when pressed into the bushing. We install the levers in their places, and the bed with the camshaft too. Also, do not forget to put it in its original position. We tighten the nuts with the necessary force. We screw the sprocket into place and lock the lock washer. All that remains is to install the filter and cover.
The installation of hydraulic compensators on the VAZ 2107 has been successfully completed.
- Author: admin
Rate this article: Share with friends!
Related posts:
Installing an alarm system on a VAZ 2107 with your own hands
Installation of hydraulic compensators on a VAZ (classic engine)
Installation of a tuning camshaft on a VAZ 2106, 2107, 2108.