Not a single car will drive without a properly functioning engine, and, unfortunately, practice shows that the engine accounts for the majority of VAZ-2107 breakdowns. Finding high-quality engine components for domestic cars is difficult, but there is a way that will minimize the frequency of malfunctions - change the cylinder head gasket (cylinder head) on time with your own hands.
Cases when it is necessary to replace cylinder head gaskets
Replacing the cylinder head gasket of the VAZ-2107 is mandatory in a number of cases:
- If there is damage near the combustion chambers, engine overheating leads to this unpleasant situation. When the cooling system malfunctions, and the driver prefers not to pay attention to the malfunction and puts off repairs, the condition of the cylinder block and its head leaves much to be desired.
- A leak of antifreeze or coolant is noticed - a breakdown is often accompanied by incorrect operation of the ventilation device, thermostat, or a banal leak of substance from the hoses.
- There is an engine oil leak. If traces of oil leakage are noticed on the outside, it means the gasket is not fitting well. Tighten the head bolts, if this does not help, then you will have to replace the cylinder head gasket yourself.
replacing the cylinder head gasket on a VAZ 2107 with a carburetor engine
We remove the cylinder head from the VAZ 2107 car engine without disconnecting the carburetor, intake manifold and exhaust manifold from the cylinder head. To carry out the work of replacing the cylinder head gasket on a VAZ 2107, you will need a torque wrench.
Removing the cylinder block gasket from a VAZ 2107 car engine
1. We install the VAZ 2107 car on an inspection hole or overpass (Preparation of the VAZ 2107 car for maintenance and repair).
2. For the convenience of replacing the cylinder head gasket, remove the battery from the VAZ 2107 car (see “VAZ 2107 battery - removal and installation”).
3. Drain the coolant from the VAZ 2107 car (see “Coolant - checking the level and replacing”).
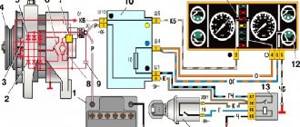
4. Disconnect the wire tip from the coolant temperature indicator sensor (see “Coolant temperature indicator sensor - replacement”).
5. Remove the exhaust pipe from the exhaust manifold studs (see “Reception pipe - removal and installation”).
6. Remove the air filter housing (see “Air filter housing VAZ 2107 - removal and installation”).
7. Disconnect from the carburetor the air damper drive rod, the fuel hose, the EPHH hose, the crankcase ventilation, the vacuum ignition timing regulator and the wire block (see “Carburetor VAZ 2107 - removal and installation”).
8. On the VAZ 2107 car engine, install the piston of the 4th cylinder in the TDC position of the compression stroke (see “The gap between the valve levers and the camshaft cams - adjustment”).
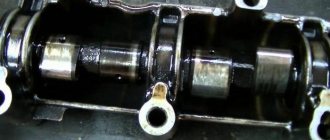
9. Remove the housing assembly with the camshaft. We mark the position of the valve drive levers and remove the levers with springs (see “Camshaft and valve levers - replacement”).
10. We tie the timing chain with a wire and pass it through the window in the cylinder head.
11. Remove the ignition distributor from the VAZ 2107 car (see “Ignition distributor VAZ 2107 - removal and installation”) with high-voltage wires.
12. We unscrew the spark plugs from the cylinder head of the VAZ 2107 (see “Spark plugs of the VAZ 2107 - checking the condition and replacing”).
13. Remove the warm air intake (see “Gaskets of the intake pipe and exhaust manifold of a carburetor engine - replacement”).
14. Unscrew the nut of the upper fastening of the starter heat shield (see “Starter of a VAZ 2107 car - removal, installation”).
15. Remove the tip of the “mass” wire from the exhaust manifold stud (see “Gaskets of the intake pipeline and exhaust manifold of a carburetor engine - replacement”).
16. Disconnect the heating hose from the fitting of the intake manifold of the pipeline.
17. Disconnect the hoses of the vacuum brake booster and the forced idle economizer (ISP) from the fittings of the intake manifold of the pipeline.
18. Having loosened the clamps, remove the thermostat bypass pipe and the supply pipe to the radiator of the VAZ 2107 car.
19. Having loosened the clamp, remove the hose for supplying coolant to the VAZ 2107 heater radiator from the pipe.
20. Using a 12 mm socket wrench with an extension, unscrew the ten bolts of the internal fastening of the head to the cylinder block of the VAZ 2107 engine.
21. Using a 13 mm socket wrench, unscrew the bolt externally securing the head to the cylinder block of the VAZ 2107 engine.
22. Remove the cylinder head of the VAZ 2107 along with the intake manifold of the pipeline, exhaust manifold and carburetor.
23. Remove the cylinder head gasket from the two centering bushings of the cylinder block.
Installing a cylinder head gasket on a carburetor engine of a VAZ 2107
1. We install a new gasket and cylinder head on the engine of a VAZ 2107 car in the reverse order, passing a wire with a timing chain through their windows.
2. We check the coincidence of the previously applied marks.
3. Before installing the cylinder head, it is necessary to lubricate its mounting bolts with engine oil in advance and allow excess oil to drain, allowing the bolts to soak for at least 30 minutes.
ATTENTION The cylinder head bolts may only be reused if they have been extended to a length of no more than 115.5 mm. If the length is longer, the bolt must be replaced.
4. Tighten the cylinder head bolts in four steps:
— pre-tighten the ten bolts of the internal head fastening to a torque of 20 Nm;
— tighten the cylinder head bolts to a torque of 69.4-85.7 Nm.
— turn the bolts 90°;
— turn the bolts again by 90°.
Lastly, tighten the external mounting cylinder head bolt (11) to a torque of 30.6-39.1 Nm.
Tightening procedure for cylinder head bolts
5. Install the housing with the camshaft on the studs of the cylinder head and tighten the fastening nuts evenly (see “Camshaft and valve levers - replacement”).
6. Untie the wire, install the sprocket with the timing chain on the camshaft, tighten the fastening bolt and lock it by bending the tab of the lock washer.
7. “Charge” the timing chain tensioner and, having installed it in its original place, “discharge” (see “Timing chain tensioner - replacement”) and adjust the chain tension (see “Timing chain - adjustment”).
8. Adjust the gap between the levers and camshaft valve cams (see “Gap between the valve levers and camshaft cams - adjustment”).
9. We adjust the tension of the generator drive belt on the VAZ 2107 car (see “VAZ 2107 generator drive belt - tension adjustment and replacement”).
10. We install the ignition distributor on the VAZ 2107 car, directing the contact of the slider to the high-voltage terminal of the 4th cylinder (see “Ignition distributor VAZ 2107 - removal and installation”). We check and, if necessary, adjust the ignition timing on the VAZ 2107 car (see “Ignition timing - checking and adjustment”).
11. Installation of all removed parts on a VAZ 2107 car is carried out in the reverse order.
12. Fill the system with coolant (see “Coolant - checking the level and replacing”).
Step-by-step guide to replacing the cylinder head gasket of a VAZ-2107
To replace the cylinder head gasket in a VAZ-2107, you should perform the following manipulations:
- The initial stage involves dismantling the filter that filters the incoming air flows. If the VAZ-2107 is equipped with a carburetor, this is easier to do than performing the same work with an injector. Your task is to unscrew and disassemble all the parts of the entire system; this is the only way to get to the cylinder head.
- Remove the carburetor.
- Unscrew absolutely all pipes that remain visible.
- Get rid of the cylinder head cover by disconnecting the fasteners. Put the nuts and clamps aside, do not lose them, otherwise you will not be able to assemble the mechanism into a single whole.
- Place a container under the hose and carefully drain the remaining coolant in the car.
- Protect your health from electrical current by removing the battery.
- Place the ignition distributor cap aside.
- Pull out the hoses from the carburetor - one responsible for heating, and the second coming from the vacuum format regulator, which distributes the ignition.
- Remove the air collector and remove the throttle linkage.
- With your own hands, remove the sensor that controls the temperature regime from the cylinder head of the VAZ-2107.
- Connect the indicators on the camshaft drive sprocket with the markings located on the camshaft bearing housing. This simple technique will avoid re-installation of the distribution phase at the time of assembly.
- Next, bend the edges of the sprocket fixing washer in different directions and unscrew the bolt. Let the star remain in its place.
- Loosen the tensioner nut half a turn and use a screwdriver to press out the shoe. As the chain loosens, tighten the fasteners again.
- All that remains is to disconnect the bolt holding the sprocket and remove it. To prevent the timing chain from falling, support it with a soft wire.
- Remove the housing base from the bearing located on the camshaft and disconnect the nuts of the VAZ-2107 cylinder head.
- When the head cover comes off easily, position the new gasket.
- Assemble the components into a single whole, following the reverse order of the proposed instructions.
- Correct valve operation.
Which cylinder head gasket is the best?
The sealing gasket serves to strengthen the engine cooling channels and well preserves the oil channels in the cylinders that have the gas distribution function. Therefore, it is not worth saving on the cylinder head gasket. If the part is of poor quality, a breakthrough may occur between the cooling system channel and the drainage channels of the lubrication system. There is a breakthrough located at the junction of the cooling system channel and the cylinder.
By the way, the same thing happens when the cylinder head is loosely tightened, but in any case the gasket will have to be changed.
Automotive stores sell the following types of cylinder head gaskets intended for installation in the VAZ-2107:
- Asbestos - involves associated engine repairs. The advantages of the material are heat resistance, increased elasticity, and good elasticity characteristics.
- Non-asbestos products are also easy to use, and all thanks to minimal shrinkage and excellent restorative properties.
- Metal ones are considered the best among all other cylinder head seals. The point is that the pressure is distributed evenly throughout the block.
A video of how to replace the cylinder head gasket of a VAZ-2107 with your own hands can be seen below:
When is it necessary to replace the cylinder head seal?
When a gasket burns out, the damage is significant: integrity is lost, the part loses its shape. In the event of a breakdown, the damage is minor, sometimes even invisible to the naked eye.
The gasket becomes unusable for the following reasons:
- overheat;
- During installation, fasteners are tightened with a deviation from the tightening torque standards;
- poor quality refrigerant;
- engine malfunctions;
- defective, low-quality product.
The power unit overheats due to malfunctions of the cooling system elements: radiator, fan, etc. To burn out the gasket, it is enough to drive literally 500 meters. When installing the cylinder head seal, it is important to observe the order of tightening the fasteners and the torque to which they are tightened. If these rules are violated, the seal will be deformed and will subsequently be broken. Poor quality coolant can cause corrosion, causing damage to the seal material and even the cylinder head.
A damaged cylinder head gasket can be identified by the following signs:
- interruptions in the operation of the power unit;
- leaks of working fluids from under the cylinder head;
- rapid heating and overheating of the motor;
- traces of coolant in lubricants;
- steam in exhaust gases;
- condensation on spark plugs;
- increased pressure in the cooling system, smoke appears in the expansion tank.
This is interesting: Kia Rio 3 fuse diagram - where the blocks are located
Symptoms manifest differently depending on the location of the gasket damage. If the edges of the cylinder bores are damaged, the engine may overheat and the pressure in the cooling system may increase.
If the coolant gets into the combustion chambers, the engine will start to stall, since it will be diluted with refrigerant in the fuel assembly and will not be able to burn completely. White smoke with a specific odor will come out of the exhaust pipe.
If there is damage on the edge of the seal, leaks of working fluids may occur at the point of contact between the cylinder block and the head.
Signs of a burned out cylinder head gasket.
If signs of seal burnout appear, you need to take a comprehensive approach to diagnosis. Before you start replacing the seal, you need to make sure that this is the reason. To do this, you need to perform the following series of actions:
- Having discovered fluid leaks on the cylinder block, you need to make sure that it is flowing exactly from under the head.
- We start the engine and analyze the color and smell of the exhaust. If they look like white smoke or smell like antifreeze, turn off the engine and carefully unscrew the cap from the expansion tank. The presence of exhaust gases in the cooling system is indicated by the smell of burnt fuel.
- We start the engine without a cap on the expansion tank; there should be no traces of oil or gas bubbles inside it.
- We turn off the engine and let it cool. We take out the dipstick to measure the oil level and look at its color. If its level has risen too much for no particular reason or there are traces of white-brown liquid, this indicates a mixture of oil and refrigerant.
- Let the power unit run for 5 minutes and turn it off. We take out the spark plugs and inspect the electrodes. If they are wet, then there is a high probability that coolant has entered the cylinders.
Signs of a malfunction of the cylinder head
There are several reasons for the head gasket to burn out on VAZ cars:
- motor overheating;
- poor tightening of cylinder head bolts;
- crack in the block head;
- deformed surface of the cylinder head or cylinder block.
The main cause of burnout of the cylinder head is overheating; the engine temperature is determined by the sensor on the instrument cluster. The engine can overheat due to various factors:
- insufficient level of antifreeze (antifreeze) in the cooling system;
- the ignition is set incorrectly (too late);
- the main cooling radiator is clogged;
- Intake and exhaust valves are jammed.
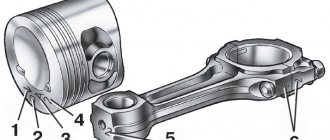
If there is severe overheating, the cylinder head may fail and the piston rings may become stuck. If, after replacing the cylinder head, the gasket burns out again, it is necessary to carry out more serious repairs and deal with the cause of the recurring defect.