Where is the swing arm located?
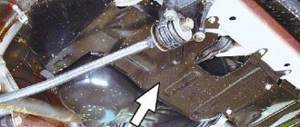
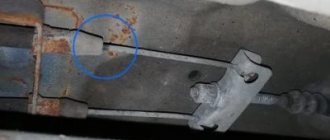
It is located under the bottom of the car, you can see it by opening the hood of the car and looking at the very bottom of the engine compartment, and the easiest way to look at it is from the bottom of the car, to do this, climb under the car and find the lever there that comes from the pendulum itself, and for clarity, this lever is indicated by an arrow.
When to change the swingarm
- Basically, after the pendulum arm fails, knocking noises begin to be heard from the lower part where it is located, which will be especially audible when hitting a bump.
- In addition to knocking, the free play of the steering wheel, popularly called play, can also be increased.
- Also, the steering wheel itself may be difficult to turn due to the failure of the pendulum arm.
Note!
All these signs relate to a malfunction of the pendulum, but they can also occur when the pendulum bolts are loose or the adjusting nut is too tight, so before replacing the pendulum arm with a new one, check the tightness of the bolts and either loosen or tighten them as necessary!
How to replace the pendulum arm, also known as the pendulum, on a VAZ 2101-VAZ 2107?
Replacing the swing arm
The pendulum arm, or simply the pendulum, is a rather vulnerable unit in the steering, and it has to be changed often. Today’s story is about how to replace a pendulum yourself.
(see also the manual page “Removing and disassembling the pendulum arm”)
The reasons for the short life of the pendulum lever are prosaic - this is a tribute to the pedigree. When designing the Niva, the maximum number of minds and units was taken from the light subcompact VAZ-2106. As a result, the original Niva front suspension with a powerful beam and forged arms on indestructible silent blocks, with a reinforced hub unit, was crossed with the steering of the Fiat-124, a prototype of the VAZ-2101-06. From this car, the Niva received (adjusted for the difference in the track) all the steering rods, joints and steering mechanism with a pendulum lever. As a result, the steering parts were subject to significant overloads. The experience of extreme operation of editorial Nivas has shown that the pendulum arm lasts less than other steering components. Impacts from road unevenness are transmitted to it, amplified by significantly larger wheels than the classic ones.
The main faults are: bending of the lever itself (bipod) and wear of rubber bushings or bearings (depending on the type of pendulum), causing play in the lever axis. Driving with a bent arm results in rapid, uneven wear on the front tires due to changes in wheel alignment.
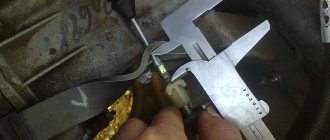
If the Niva is “led away” from its trajectory and the wheels are pointing in different directions, carefully inspect the lever. You should have a good idea of its correct shape. On the VAZ-2121, the lever has a characteristic step between the holes for the steering fingers (see photo on the right). On BA3-21213 there is no step, and the holes are almost in the same plane. Attention: levers are not interchangeable! on working levers the axes of the fingers are parallel. If the fingers seem to cross, the lever is bent and must be replaced.
Which lever should I buy? Levers on rubber conical bushings and bearings are available for sale. Bearings theoretically reduce steering force. But in practice, no significant difference is found. An obvious drawback of the bearing lever is that its bearing can fail if there is a sharp blow to the body. The pendulum on bushings is not afraid of such impacts. In addition, it can be repaired by replacing worn bushings
If you bought a pendulum with bushings, use its collapsible design. Pull out the cotter pin, unscrew the nut and remove the lever along with the axle from the silumin housing (see photo below). The “planted” surfaces of the axle (larger diameter) for the rubber bushings are processed with a cutter and, as a rule, are not ground at the factory. The bushings in the hook lever will quickly be “eaten up” by the rough axle. Polish the surface with fine sandpaper, lubricate the axle with lithol and assemble the lever. This will extend the life of the unit.
Replacing the beacon lever
1. Place the car on a secure jack (photo 1) and remove the right front wheel
2. Unscrew and unscrew the nuts of the middle and side steering rods. The tool is a 22mm head with a cardan and an extension (photo 3-4).
For convenience, you can first dismantle the air filter housing by removing its cover and unscrewing the four nuts from the long studs of the carburetor with a size 8 wrench (photo 2). This will make it easier to access the pendulum from above.
3. Disconnect the steering rods from the pendulum.
To remove the tie rod pins, you can, of course, use a special puller with a multi-digit designation, but we liked the faster method. The fingers are knocked out using a 800-1000 g hammer and a drift 50-60 cm long and 20-30 mm in diameter, which can be easily made from a steel rod (photo 5).
The main thing is that the impact is directed along the axis of the steering rod fingers. Possible damage to the first turns of the thread on them can be easily eliminated with a triangular file (photo 8).
By doing this, you will save a lot of time.
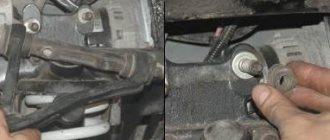
4. Having secured the nuts on the pendulum body with an open-end wrench 17 (photo 6), using a socket head and an extension, unscrew the two bolts securing the pendulum to the spar.
5. Remove the old swing arm and replace it with the new one. Reassemble in the reverse order (photo 9-10).
To make subsequent repairs easier, we recommend lubricating all threaded connections with graphite lubricant. If the case is not advanced, then wheel alignment adjustment will not be required.
Now your pendulum will swing only where it is supposed to. And your Niva is obedient and flexible, to the delight of its owner. Happy renovations!
Time spent replacing the lever:
30-40 minutes.
Tools and equipment:
jack, wheel wrench (preferably “cross”), wrenches and sockets for 8, 10, 17, 22, extension with cardan, hammer, triangular file, pliers, drift
Video
How to remove the pendulum on a VAZ 2107
1) First, disconnect both tie rod ball joints that are connected to it from the pendulum.
2) Then take two wrenches in your hands and with one of them at this time hook onto the bolt that secures the pendulum, so that the bolt does not turn when the nut is unscrewed. After you grab the bolt, use a second wrench to unscrew the nut of the bolt you are holding.
Attention! There should be washers under both nuts, so if you have them, then remove them, and if there is more than one on one bolt, then before removing the washers, remember which bolt had what number of washers and when reinstalling it, place the required number of washers under the nuts !
3) Now remove the two bolts that secure the pendulum and, as a result, remove the pendulum arm from the car.
Pendulum VAZ 2107: replacement, repair
Rear-wheel drive vehicles have a pendulum arm. In VAZ 2104 and VAZ 2107 cars, this is an important part of the steering linkage. It functions as a support on the right side and guarantees the desired steering angle ratio.
Functions and purpose
The steering gearbox is installed on the driver's side, and the steering pendulum mechanism is connected to the bipod on the passenger's side.
They are connected to each other by a steering rod and serve as support points. The driver controls them by acting on the steering rod. The pendulum body is made of cast iron or aluminum and has the shape of a cylinder with holes for attaching it to the spar or to the frame. In the center, an axle is inserted through a hole, which is threaded through the body and makes the handle more movable, and also serves as a support for the steering rod. The other end of the bipod moves like a pendulum and therefore has this name.
Types of pendulums for VAZ 2104–2107
In the manufacture of pendulum levers, bushings are used, and the bearings on which the lever axis rests. They are designed to provide longer service life for moving parts. Manufacturers believe that bushings are more durable because, unlike fragile bearings, they are not subject to influences other than abrasion. However, both materials are subject to wear. If the elements are worn out, the driver will feel more tension in the steering wheel than usual, and it becomes difficult to control the car due to increased play. When hitting a hole or bump, extraneous knocks begin to be heard from the side of the pendulum, and the steering wheel travel increases. And if the mechanism itself is damaged, the bolts are loosened, or the adjusting nut is overtightened, then the wheel will rotate more tightly.
The designers tried to make the pendulum airtight and isolated the internal cavity of the body with two rubber rings, but usually after traveling 45–90 thousand km it has to be completely changed. When a car drives onto country roads, all the dirt is pulled inside.
Rolling bearings solve this problem; they are little subject to wear from contamination and do not require additional lubrication. But, unfortunately, not all manufacturers supply high-quality products to the market.
Selection of pendulum lever.
When choosing bushings or bearings, you need to rely, first of all, on the quality characteristics of the product. So, bushings can be made of polyurethane and will last longer. The pendulum handle on bearings moves more easily and freely, therefore it does not put stress on the steering wheel and is considered by many drivers to be more durable, but in fact, it all depends on the quality. If you buy a good product, you will not have to repair or replace it often.
Replacement of the pendulum lever of VAZ 2107, VAZ 2104.
Pendulum design for VAZ 2104 - VAZ 2107
1 - bipod; 2 — bracket body; 3 — washer; 4 — adjusting nut; 5 - cotter pin; 6 — upper washer; 7 - seal; 8 — bushing; 9 – axis; 10 - lower washer; 11 - lock nut.
Many owners of VAZ 2104 - VAZ2107 cars buy, make repairs and change the pendulum themselves.
To do this you need:
- prepare tools, use the repair kit for the VAZ 2107 – VAZ 2104 pendulum;
- remove the front right wheel;
- unscrew the nuts securing the bracket on the right side member;
- the most time-consuming part is pressing out the ball pins of both steering rods. It is better to use special ones for these purposes. puller for tie rod ends. But you can also go a cheaper way: to do this, you can take a steel rod and rest it on the ball pin, the nut is not completely unscrewed, and start hitting it with sharp blows of a hammer.
This must be done carefully so as not to strip the threads or flatten the castle nut, so it is better to screw on another nut.
- remove by unscrewing two nuts, while on the other side you need to put on an adjustable wrench that will keep the bolt from turning;
- unscrew the top nut;
- remove the axle from the bracket. During assembly, add lubricant to the pendulum arm bracket.
- The bushings should fit tightly in the bracket, and the axle should have no radial play. When the bushings are worn out, replace them with new ones.
- check the turning torque of the axle - by tightening or loosening the nut, observe while turning the bipod. When turning, the bipod should “walk” easily and without effort. The lighter this force, the less it will be transmitted to the steering wheel.
Designs on bearings cope better with this task.
- check the play on both sides;
- tighten the top nut;
- install the bracket in place.
Repairing the pendulum on a VAZ 2104 - VAZ2107 car is not difficult and will not take much time, but to be sure of the result, it is better to contact a professional.
korchim.ru
Installation of a new pendulum
The new pendulum is installed in the same way as it is removed, only to install you will have to read the article in the reverse order of removal.
Attention!
Before installing a new pendulum on a car, make sure that it has been assembled correctly; to do this, clamp the pendulum in a vice so that its bipod is directed strictly horizontally. In this position, under the weight of its own weight, the bipod will have to stand in one place, not moving anywhere. It will only have to move under the influence of a force of “1-2 kg” applied to the part on which the right tie rod joint will be installed, in other words, to the tip of the bipod as shown in the figure:
Didn't find the information you are looking for? on our forum.
Steering pendulum repair
When using a car, the steering also wears out, in particular we will talk about the steering pendulum, or rather about its repair.
All malfunctions of this mechanism lead to the replacement of nylon bushings. In rare cases, it happens that the axle wears out or the pendulum body bursts; in case of such malfunctions, it is better to replace the pendulum with a new one. But in frequent cases, only nylon bushings wear out. In this article we will tell you how to change them.
First of all, to replace the bushings, the pendulum does not need to be removed, but the bushings can be replaced in place.
Using pliers, remove the cotter pin, use a 19 mm wrench to unscrew the nut and remove the lever with the axle.
Remove the rubber o-ring; if it is damaged, it needs to be replaced. Using a screwdriver, we remove the nylon bushings.
Carefully clean everything from dirt and old grease. Next, take the new bushings and press them back in. Lubricate everything thoroughly with lithol-24 and install the lever with the axle back. Attention!!! Before you smear everything with lithol, check whether the axle fits into the new bushings, because if not, then it can waste your nerves a little, and this is not pleasant. If everything is fine, insert the axle, put on the washer and tighten the nut.
Adjustment is made by the degree of tightening of the nut. The nut is tightened so that the lever rotates with little hand force. Next, install the nut so that the holes match and secure it with a cotter pin.
That's all, we changed the nylon bushings of the steering pendulum.
To home.
zerga.ru