It's sad when something goes wrong with your car and it needs repairs. Extra waste of time and money that does not fit into the schedule and budget only causes a feeling of annoyance. Few people will be happy that something has broken down in the car. Even if it was obvious that a breakdown was about to occur, there was no joy from this event. Sometimes you don’t understand: what’s wrong, what’s creating interference and obstacles?
Interruptions in work are a signal for comprehensive diagnostics, but somehow everything is not on the way to the car service, and it would be nice not to forget, but it is forgotten. You have to take a risk, postponing a trip to a car service center until later, although it is known that a car in a faulty condition is dangerous to the life and health of the driver himself and the people around him. Driving carefully is perhaps the most important thing if any problem makes itself felt. Not everyone has the useful skill of self-diagnosis.
Negative emotions in connection with a car breakdown are a natural reaction. It’s still not worth following their lead. Wear and tear is inevitable. Constant care, attention, and careful attitude will allow you to delay this moment and drive more kilometers. A well-maintained car is a source of positive emotions, regardless of the brand.
Fault diagnosis
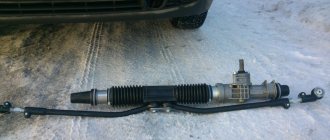
The VAZ 2114 has 2 external and 2 internal CV joints. First you need to determine which one is knocking. The optimal test would be on a suspension diagnostic stand. If this is not possible, diagnosis by ear is possible.
Two signs indicate a grenade malfunction in a VAZ 2114:
- the sound resembles a crunch;
- It usually appears when turning.
The simplest and most accurate way to do a garage check is as follows:
- Place the car on a flat surface;
- Turn the wheels to one side (to the middle position or a little further);
- Drive off with medium speed. It is worth remembering that starting too smoothly may not reveal a crunch due to insufficient load on the CV joint, and starting too abruptly may lead to the drive flying out of the wheel.
- Repeat the operation by turning the steering wheel in the other direction. The appearance of a crunch indicates a malfunction of the outer CV joint on the side in which the steering wheel is turned.
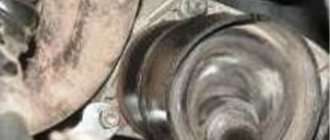
Visual detection of ruptured anthers will also be a sign of a CV joint failure. If you discover a damaged protection for any grenade, it must be immediately removed, disassembled and cleaned. If there is enough grease and there is no significant wear on the hinges yet, it is enough to replace the boot and fill it with new grease. If the wear of the balls is obvious, it is better to change the grenade.
CV joint boot VAZ 2114 with a defect
It is more difficult to diagnose a malfunction of the internal grenade on a VAZ 2114. If it malfunctions, it crunches when starting off in a straight direction, and not when turning. But the same symptoms, for example, include play in the steering rack or wear on the engine mounts.
Sometimes the problem can be diagnosed from the pit by tugging on the drive from the gearbox side: strong play or the appearance of extraneous sounds indicate that the internal CV joint should be replaced.
How to change a CV joint boot
Hello again, dear readers! It’s been a while since I posted anything new on my website, but I found an extra minute and immediately sat down to write an article about how to change a CV joint boot, since in my opinion this topic is interesting and can save many car enthusiasts from premature expenses.
Let's start by finding out what a CV joint actually is and what the consequences of untimely replacement of the boot on it are. So, literally the abbreviation CV joint means “constant velocity joint”, designed to transmit torque between shafts, the axes of which can deviate relative to each other by a certain angle. On a car, this angle depends on the rotation of the wheels (left-right) and the position of the suspension (higher or lower). I think everyone knows what a hinge is. What do equal angular velocities have to do with this? It seems to me that what is meant here is that the angular velocities of the shafts on both sides of the CV joint are equal (in other words, we have the number of wheel revolutions the same as the number of revolutions of the planetary gear in the gearbox). The earliest varieties of CV joints were cardan drives with crosspieces. But they have a big drawback - with an increase in the angle of inclination between the cardan shafts, the power of such a transmission drops significantly, and the load on the connections increases significantly. A cardan drive can provide an angle between the shafts of 10-20 degrees, no more. It is because of these shortcomings that constant velocity joints began to be installed on front-wheel drive cars in the way we see them on cars today. The principle of operation of such a hinge is slightly different than that of a cardan transmission; there are significantly fewer disadvantages; the angle of rotation reaches 70 degrees. The operating principle of cardan and modern CV joints can be understood from the figures below. The more modern one is often called a "grenade".
Operating principle and design of constant velocity joints.
It was a bit of theory. Now let's get down to business. “When do you need to change the boot on the CV joint,” you ask. It is necessary to change the boot not when a crunching sound is already heard when cornering and when the gas pedal is sharply pressed, but immediately after cracks and tears appear on it, in general, if the sealing of the CV joint is broken. A sure sign of damage is the presence of greasy traces of grease flying to the sides. If this is not done, then after a while the water and sand will do their job and crackling will begin when cornering and with a sharp increase in speed. I will give advice from practice that if these signs already exist, then replacing the boot is not enough, you need to change the entire “grenade” or if there is no money, then you can change the boot, but this will be of little use. Possible boot defects are shown in the figure below.
Common defects of the CV boot are cracks and breaks. A mandatory replacement is required.
Let's go directly to the instructions on how to change the CV joint boot. First, we need to drain the oil from the gearbox, for this we will need a 17 key, with which we need to unscrew the drain plug, having previously prepared a container of at least 5 liters for the oil. Next, we tear off the wheel mounting bolts, jack up the car, unscrew the wheel bolts to the end and remove the last one. Now, to avoid injuries and accidents, we put some kind of support under the car (in my garage it’s a stump and a board), lower the jack a little so that the car rests on the support.
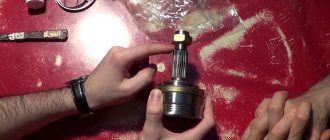
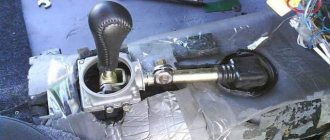
Next, we will need an assistant in the form of a person or a block to press the brake pedal and unscrew the hub nut using a corresponding 30 socket and an extension in the form of a pipe 1-1.5 meters long. This nut must be replaced after each unscrewing. After the nut is unscrewed and the washer underneath it is removed, we proceed to unscrew the ball joint fastening with two 17mm wrench bolts. Then we move the strut to the side and pull out the shank of the outer CV joint from the hub. Next we move on to the inner CV joint. Carefully resting against the box using a pry bar, we pick out our grenade and with some force it should come out. I note that there are times when the inner CV joint just doesn’t want to come out of the box. In this case, you should not try to hit the assembly with a hammer; there will be no result. To remove the CV joint you just need a lot of force, but not blows.
When everything is removed, we move on to how to change the CV joint boot. To do this, you will need to remove the grenade from the shaft using a brass or copper drift, striking it directly at the CV joint itself. First you need to loosen the clamps of the old boot and move it a little to the side. The picture on the left shows how to remove the CV joint from the gearbox. On the right is a clamp for clamps
After this, we wash the CV joint in gasoline or kerosene to remove the old lubricant. Next, we put the CV joint boot on the shaft, lubricate the grenade with a specialized lubricant and also place it on the shaft. After this, we tighten the boot clamp located on the shaft and put on the second side of the boot. Now you need to put the CV joint in a position approximately corresponding to the middle of its stroke and protrude one edge of the boot with a screwdriver to release (or run) air from there (there). This is necessary so that the boot in its normal working condition does not have dents or excessive pressure inside, which can lead to very rapid wear of the boot. After this procedure is completed, you can tighten the second clamp. Let's move on to assembly. We insert the inner CV joint into the gearbox until it stops, after which the retaining ring should snap into place (a characteristic sound is heard and free movement of the shank becomes impossible). If you can’t insert it, you can knock a little on the back side through a wooden block. Next, we insert the second end into the hub, screw on the ball joint, tighten the hub nut, install the wheel, fill the gearbox with oil, and the repair is complete.
remontautovaz.ru
Replacement
It is better to change a grenade yourself with an assistant.
Algorithm:
- remove the wheel, remove the wheel bolts and the hub nut washer;
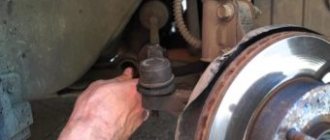
- unscrew the ball from the steering knuckle;
- pull out the splined end of the outer CV joint;
- pull out the drive with the internal CV joint from the gearbox;
- if you plan to remove both drives, remove the internal grenade from the drive and insert it into the gearbox so that the differential does not move after removing the second drive;
- remove or cut off the anthers, thoroughly clean all hinges with a special liquid or just gasoline;
- when filling the CV joint, use a special lubricant suitable for these purposes; ordinary lithol does not have the required temperature characteristics;
- the retaining rings of each CV joint and the hub nut must be replaced;
- The inner CV joints are inserted into the gearbox until they are completely fixed; when adjusting, you can use a hammer with a wooden spacer.
It is quite possible to diagnose and replace a CV joint with your own hands. This does not require sophisticated car mechanic skills and engineering knowledge, but it allows you to get in touch with the car, see and feel how it works. Whatever the reason for the crunching sound, you need to check the condition of the grenade as quickly as possible. Delaying this will almost certainly mean bringing the part to the point of complete wear, and timely repairs will allow you to get by with “little loss.”
Replacing the Boot of the Inner CV Joint VAZ 2109 ~ AUTOINTERLINE.RU
Replacing the boot of the external, internal CV joint of a VAZ 2109
The topic of the article is what you need to know about replacing the VAZ 2109 CV joint, what subtleties there are in this matter. In fact, there is nothing complicated, you won’t even need to drive the car into a pit, everything can be done by placing it on reliable supports. It is best to carry out repairs first on one side, then on the other. This will be much more efficient, and you won’t have to think about what to put in the box instead of a hinge. After all, you understand that when both CV joints are removed simultaneously, the differential is destroyed.
Tool for work
To complete all the work on replacing the VAZ 2109 CV joint, you need to have a certain tool at your disposal. This is something worth talking about. Firstly, it is better to have iron supports that will need to be installed under the side of the car on which the repair is being carried out. Secondly, there must be stops that will prevent the car from rolling away. Thirdly, you need a reliable jack. Fourthly, you will need some special tool.
The most important thing is a good 30mm wrench. A socket wrench with a strong handle is better. With its help, the hub nut is turned out, which is tightened with a huge torque. You also cannot do without a control rod puller. In some cases, a ball puller may be required. But it is needed when the balls have become unusable. Of course, a vice, a hammer, chisels and a set of keys. In general, you can start preparing for repairs.
Preparation for repair
First, lift the car. But before that, secure its position with wheel chocks and remove the nut on the hub. To do this, unlock it and, installing a key with a huge lever, try to unscrew it. Please note that the threads on the hubs are different on both sides. Once you remove the nut, you can lift the side of the car and remove the wheel.
But now the question is, when replacing the CV joint of a VAZ 2109, is it necessary to drain the oil from the box? The answer is concrete - necessary! But you can’t drain everything, but only two-thirds of the total volume. The fact is that the oil will begin to flow out when you remove the drive. And if you don’t plan to change it, then you shouldn’t risk losing expensive oil. Then you need to remove the control tip. To do this, unscrew the nut; you must first remove the cotter pin. Using a puller, press the pin out of the strut knuckle. It is also necessary to remove the two bolts that secure the ball joint housing to the hub.
Removing the drive
Now you can remove the drive. Even replacing the boot of the external CV joint of a VAZ 2109 is better and faster when the drive is completely removed. But this is not the only joke. The fact is that when replacing the boot, it is worth washing the joint and filling it with new lubricant. This way you can increase its service life, if, of course, you do not “kill” the drives with a brutal driving style. Completely unscrew the nut from the hub. Now you can carefully remove the outer CV joint from it.
Replacing the internal CV joint on VAZ 2108, 2109, 2110, 2112, 2114.
REPAIR KIT FOR WINDSHIELD Replacing the inner CV joint on VAZ 2108, 2109, 2110, 2112, …
Replacing the boot of the outer and inner CV joint (grenade) of a VAZ.
CV joint - constant velocity joint! Usually everyone calls them grenades! The service life of a CV joint depends on the properties...
To do this, carefully, trying not to destroy the brake pipe, pull the strut while holding the disc. The hub should come off the splines on the drive without effort. That's all, now you need to extract the internal one. Let's take into account the fact that you have already drained the oil from the box. Therefore, using a small chisel, which you place between the box and the hinge, and also a hammer, you knock out the CV joint from the gearbox. You should not try to use a crowbar; in this case, only a weak but sharp blow will help.
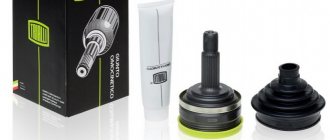
What spare parts are needed for replacement?
Of course, a set of CV joints. Which manufacturer to choose is up to you, but the most important thing is that you have all the necessary elements: clamps, lubricant, hinges, retaining rings. If they are not included in the set, buy them separately; they don’t cost much. Also, from time to time it is necessary to replace the CV joint seals of the VAZ 2109. But only in this case, if you have monitored oil leaks in the box area. Although, if you look at their service life, it is better to replace them when removing the drive. This will be much more effective.
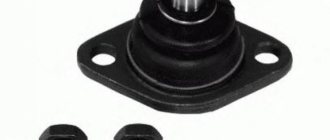
In addition, you may find faults in certain suspension and drive units. For example, excess wear on the wheel bearing. In this case, it is recommended to replace it. It is also possible that you will find a broken ball joint. And it needs to be disconnected to remove the drive. Rotate the ball pin to see if it has any binding. If its movement occurs with jamming, then it is necessary to change the ball, otherwise it will very soon begin to crunch.
Replacing the inner CV joint
Once you remove the drive, you can begin replacing the hinges. If you only plan to replace the boot of the inner CV joint of a VAZ 2109, then only the outer joint needs to be knocked off the axle shaft. But flushing the internal one and filling it with the latest lubricant is very desirable. To completely replace the inner CV joint, it must be knocked off the axle shaft. Because you no longer need the hinge, you shouldn’t feel sorry for it, you can use the most barbaric methods.
Hold the drive firmly in one hand and the hammer in the other. And apply sharp and strong blows to the inner CV joint. To avoid holding the drive in your hand, you can clamp it in a vice. It will be much easier to work this way. Then you wipe the splines on the drive, remove the old ring and put a new one in its place. But before that, install the boot. Then carefully stuff the new joint. Under the boot, squeeze out all the lubricant from the tube that comes with the kit. Apply some specifically to the hinge. Put on the boot and secure it with clamps.
Replacing the outer CV joint
If you plan to only replace the boot of the external CV joint of a VAZ 2109, then in the last step you just need to tighten it and cut off the old one. But if you need to change the entire hinge, then proceed according to the same scheme as in the last Fri. Clamp the drive firmly in a vice and use a hammer to knock the CV joint off it. You shouldn’t feel sorry for it, because the new one will serve you for many years if your driving style is not very brutal.
As in the previous Fri, first wash the axle shaft well, wipe it dry, and then install all the elements. First the boot, then the ring, drive the CV joint onto the splines. That's all, all that remains is to squeeze out all the grease under the boot and put it on, tightening it with clamps. Please note that worm-type clamps cannot be used; they will rest against the hub.
Drive installation
And finally, the entire drive is installed and the entire side of the suspension is assembled. First install the inner CV joint. You hit the splines, then give the drive a couple of sharp blows. This will allow the ring to slide in, having previously contracted to a small diameter. Pay attention to the fact that the lemon should fit snugly against the box; this is its normal position. But don’t forget that the CV joint moves a little along the wheel axis.
The next thing you should know about replacing the VAZ 2109 CV joint is installing an outer joint. To do this, install it opposite the hole in the hub and, pressing slightly on the latter, carefully insert it. To make sure that the lemon has gone in all the way, you can give a couple of sharp blows to the hub. Just place a wooden beam to soften it. In the future, the hub will be one hundred percent installed when you tighten the nut. That's all, now you can assemble the side and start the 2nd.
Conclusion
After replacing all the hinges, do not forget to fill the box with oil. If, when you try to move away, you hear that the box is spinning, but the movement is not transmitted to the wheels, then the diagnosis is specific - a certain internal CV joint has not fallen into place, has not hit the splines. You'll have to find out which one is malfunctioning and install it again, following all the tips. It should also be noted that replacing the CV joint without removing the VAZ 2109 drive can be done, but it will be much more difficult to do. You will spend a lot of time and effort.
autointerline.ru
Replacing the CV joint boot, external and internal
If earlier on cars you could not find anything other than a driveshaft, then on modern cars, to synchronize the rotation of the wheels, a different device has long been used - a CV joint or, as it is popularly called, a “grenade”. Especially often, constant velocity joints (CV joints) are used on cars with front-wheel drive, such as the VAZ 2109, and much less often with rear-wheel drive. This unit is located, to put it mildly, in one of the most critical areas of the wheel axle operation. Moreover, the angle of rotation when using a CV joint is very serious - up to 70 degrees, which for now excludes pathetic attempts to replace it with something else. However, this unit also needs periodic replacement, most often due to wear and tear due to the fault of the vehicle owner. However, some parts wear out without any cavils to the driver. For example, replacing a CV joint boot may be caused by completely normal operation of the machine.
Types and appearance
In automotive nature, there are only three types of CV joints:
- cracker or cam used on trucks;
- outdated twin cardan shafts that were once installed on the first American cars;
- and the current, ball-type ones, developed almost a hundred years ago, but not replaced by anyone, because they didn’t come up with a better one.
Current CV joints consist of several bearings (balls), surrounded around the perimeter by a ring with grooves into which these balls are inserted, an inner ring under them connected to the shaft, and a separator that holds the balls themselves. In order for this entire assembly to work properly, it must be thoroughly lubricated with oil. In addition, like most other components of the car, the CV joint does not tolerate dust, dirt and moisture, although it is located exactly in the place of the car where the most of these are listed.
Inspection, identification of causes and replacement
The reason for wear, as mentioned above, is simple and banal - a large amount of dirt and moisture destroys this important unit easily and quickly. If you don’t periodically inspect it and lubricate it with oil, then replacing the entire CV joint can cost a pretty penny even on a VAZ 2110, not to mention more serious models of foreign cars. However, it is not always necessary to change the entire hinge; it is quite enough to replace its boot and the “grenade” will work as before.
To inspect and replace, you will need to lift the car on a good jack or, which is much better, drive the car onto a repair pit or overpass. When changing the outer CV joint, remove the wheel, unscrew the nut from the hub, of course, remove the crankcase protection so that it does not interfere, and then the entire ball joint. Bend the stand and remove the boot, then thoroughly wipe the “grenade” with a special oil-cleaning aerosol. Only after cleaning can you put on a new boot and reassemble the entire structure in the reverse order, with the obligatory use of new clamps, retaining and thrust rings.
When replacing the inner CV joint boot, the procedure changes slightly, because you need to approach it from the other side and first drain the oil from the gearbox. By the way, you can also change the oil for company, so as not to crawl ten times. The remaining procedures for changing the boot on the hinge are no different from the external version, except for the differences in the design of the ball joint on different brands and models of cars.
What is this?
A grenade on a car is understood as a device that transmits torque and drives the wheels. Acts as an important component of the front suspension. The part looks like a bearing that moves in different planes. The CV joint acts as the connecting link between the transmission and the wheel.
It happens that a grenade malfunctions. The reasons for premature wear of a part are:
- Driving style is too active.
- Poor quality of the road surface.
- Installation of low-quality, defective CV joint.
- Use of low quality lubricants.
- Damage to the boot and the entry of dirt and sand into it.
An experienced driver will guess that it is time to change the CV joint by the appearance of the following signs:
- A characteristic crunching sound appears when the car starts moving or makes a turn.
- Jerking occurs when accelerating the car.
- Appearance of grease on the inner surface of the wheels.