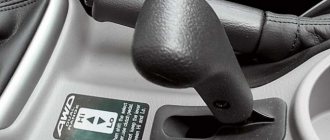
Advantages and disadvantages
Installing a lift kit has an ambiguous effect on the driving performance of the car. The advantages of this type of tuning include:
- Increased ground clearance.
- Improved machine design.
- Possibility of installing larger wheels and mud tires with large lugs.
- Improving cross-country ability on rough terrain.
- Reduces the likelihood of damage to the engine crankcase, exhaust pipe or transmission.
However, the suspension lift not only has a positive effect on the characteristics of the Chevrolet Niva.
A change in the factory design manifests itself in the form of the following disadvantages:
- The breaking angle of CV joints increases. This reduces the service life of the drives.
- The center of gravity rises. The car's behavior when cornering worsens and the likelihood of capsizing increases.
- The load on the transmission and chassis is growing. As a result, parts wear out faster.
Tip: a suspension lift improves off-road traction and worsens the car's performance at speed. Therefore, increasing the ground clearance only makes sense if the Niva is regularly used on a primer, in mud or sand.
The other side of the lifting coin
If everything is clear about the advantages, then the disadvantages of lifting are worth understanding in more detail, because every car enthusiast should know what he will have to face after installing a lift kit on his Niva. In addition, it is important, before starting work, to weigh both sides and make a final decision. So, among the disadvantages of lifting it is worth highlighting:
- reduction of service life due to changes in the angle of their bend of both drives of the model;
- a change in the vehicle’s reaction during a sharp turn or maneuver due to a shift in its center of gravity;
- the appearance of additional load on the chassis and, as a result, a decrease in the service life of its structural components and mechanisms;
- the occurrence of additional load on the transmission, which also causes a decrease in its operating time;
- other unpleasant moments that may arise during installation of the kit.
From the above we can conclude that the lift kit is ideally suited exclusively
for lovers of long trips or cross-country trips. If the car will not be used off-road, or will be driven into such terrain extremely rarely, then the need for lifting will disappear in itself.
A high-quality lift for a car is only one of the possible options for performing high-quality tuning with your own hands. See the latest in global auto tuning for SUVs and crossovers here.
Lifting rules
Increasing clearance is a labor-intensive procedure. It requires special skills and tools. Therefore, lifting is usually performed at a service station. However, if you have the skills, you can install the elevator kit yourself. In this case, it is necessary to pay attention to the following points:
- Lifting requires an integrated approach. Simultaneously with the increase in ground clearance, it is necessary to change the shock absorbers and thrust rods. Otherwise, the suspension lift will make the car unusable.
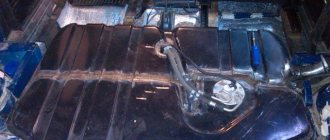
- On the right side of the rear of the body there is a gas tank with ventilation pipes. This must be taken into account if, in addition to lifting, you decide to enlarge the wheel arches.
- If there is a significant change in ground clearance, you should install an extended brake hose and adjust the bump stops. You will also have to reconfigure the pressure regulator in the rear brake circuit.
For tuning at home, it is better to use ready-made factory-made lift kits.
How to increase the cross-country ability of a Chevrolet Niva - ground clearance decides
A short note for those who have already climbed through the mud in a Shevik and realized that this is a good SUV, but its cross-country ability needs to be increased. In fact, there is a lot missing here, but the most important thing that the Shevik lacks is ground clearance. And it definitely needs to be increased, and after it come less significant improvements.
Clearance is just sadness and trouble. Putting a Shevik on bridges in the mud is a piece of cake. I planted it myself 3 times over the last year - two in the summer and one in the spring, planted on compacted snow. When you drive through mud and there is a rut there, at least from an UAZ, then on a Shevik you have to drive with one wheel along the rut, and the other in liquid mud between the ruts, or, if possible, let one rut between the wheels.
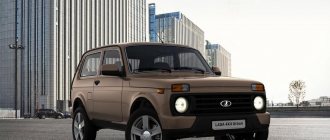
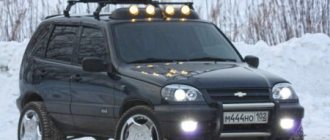
(In the photo - a prepared Chevrolet Niva on I-569 “Bear” tires, size 235/75R15, lift for the tires, engine protection, standard plastic bumper replaced with a power one)
The clearance can be increased by installing mud tires of a larger diameter, optimally for Shevik - 235/75/R15, compared to the maximum wheels for stock 215/75/R15, the increase in clearance will be only 1.5 cm. So little - you say? Not at all, one and a half centimeters sometimes decide whether you sit on bridges or drive, rubbing your belly on the ground. However, installing tires with a larger diameter creates a load on all suspension components, so the car needs to be modified - cutting the arches so that the wheels do not catch when turning and also behave normally on overhangs.
You can read more about preparing a car for 235 wheels here.
So, the wheels were installed, the car became taller. It will become even worse to pull, so in order to make the engine work easier, you need to reduce the total weight of the wheel. There are two ways to do this. The first is to use light tires. For example, Contyre Expedition in size 235/75/15 weighs 10 percent lighter than a Cordiant Offroad cylinder. Well, secondly, we change the disks. Stamping, of course, is good - cheap and cheerful. However, it weighs a ton, and you can install forged wheels (they will be 30-40 percent lighter than stamping). So it turns out that a large diameter wheel with light tires on forged wheels will weigh the same as a smaller diameter wheel with heavy rubber on stamped wheels.
So if you see a Chevrolet Niva with toothy tires on forged wheels (most often these are VSMPO), then know that the owner of the car is fumbling around and reducing the load on the car’s transmission by reducing the weight of the wheel.
If you see a Shevik on the road without its original plastic bumper, it means the original one was in the way and he removed it, since the large wheels cling to the bumper as much as possible when turning the steering wheel to the side. Therefore, the option is to remove it and replace it with a power one, which has a cut-off triangle shape just for installing large wheels so that they do not cling when turning the steering wheel. Well, of course, the purpose of the security officer is to ram small trees when cutting off roads.
Let's continue)) The passable Chevrolet Niva always has toothy wheels. The teeth are needed so that they dig through liquid mud and reach solid ground so that the car can move out. You should also pay attention that the tires have side lugs - it will be easier to get out of a rut, and this is a priority task for Shevik; a Chevy must be able to get out of a rut, since in most cases it is simply unrealistic to drive on someone else’s rut. And if you get into such a rut, you will immediately sit on the bridges, because the ground clearance here is sad. Among the toothed wheels are Cordian Offroad (they are heavier), Contyre Expedition (lighter), as well as imported ones - Goodrich, Kumho and Hankuk.
I won’t talk about changing the main pairs, so it’s clear that large wheels reduce dynamics and it becomes uncomfortable to drive on the highway.
So, we increased the clearance and installed toothy tires. What else? There is an interaxle lock and it often helps out. However, there are times when it is not enough. Very often, in ambushes, only 2 wheels spin - one on the front axle, the second on the rear axle (this is when the lock is on). One more thing would spin and the car would drive out. In order for the third wheel to spin, you need an inter-wheel lock or a so-called self-block. We put it in the rear axle and the cross-country ability increases even more. Read more about blocking and self-blocking.
And most importantly, the Chevrolet Niva’s cross-country ability directly depends on the driver’s skill. Therefore, go for a ride more often, try different options for positioning the car off-road, so that there are gullies and strong slopes. Over time, you will learn to find the optimal routes for driving a car off-road, deftly turn the wheels only along the only correct path, learn to determine which “ambushes” to go through tightly and which ones “slipper to the floor.” It’s not for nothing that the Niva and Chevrolet Niva are considered excellent SUVs; with skillful use and experience, you can drive even further than the UAZ.
Let's summarize. To increase the cross-country ability of your Shevik, first of all you need to increase the ground clearance - this is done by installing large-diameter tires (optimal 235/75/15), however, to install such tires, you will have to either cut the arches or make a lift of at least 5 cm. For new machines - a lift, for old ones - cutting. Or you can do both together. If you travel to places where the rules are dictated by the Urals, then Chevy is not your choice, because even with all the modifications, the maximum you can install are 29″ wheels. And the investment will be decent. But on the UAZ you can push it to 31-33 or even 35″ (there are already total improvements) and the clearance will be an order of magnitude higher. Think, decide))
Lifting methods
There are several ways to increase ground clearance:
Installation of wheels with a large outer radius. In this case, the craftsmen are faced with a limitation - tires that are too large do not fit into the wheel arches. You have to widen them or move the wheel outside the car, installing extended hubs.
Installation of spacers. This method allows you to slightly raise the body and does not require much labor.
Installation of larger springs. This method is more expensive, but allows you to achieve a greater lifting height of the body.
Installation of wheel reducers on the rear axle. These parts allow the hubs to be lowered and increase the distance from the axle to the ground.
Downward displacement of the front beam. To do this, you will have to weld special fasteners onto the side members and install extended arms.
Installation of extended springs and spacers under ball joints. A simple and inexpensive way to greatly increase ground clearance.
Pros and cons of the regular Niva compared to the Chevy Niva
Let us highlight the characteristic features relating to both the 21st Niva and subsequent models VAZ-21213 and VAZ-21214. We will not consider the Long Niva (VAZ-2131), pickup truck (VAZ-2329) and other modifications. So, let's start with the undeniable advantages of the regular Niva compared to the Shevik:
- Patency . Due to the short wheelbase, the 21st model has better geometric cross-country ability.
- Price . In the same condition, a regular Niva will be 1.5-2 times cheaper than a Shevik.
- Availability and low cost of spare parts. Especially for body parts.
- "Psychological passability" . An ordinary Niva is not so scary to be scratched or slightly dented, unlike a Chevrolet.
- The best predisposition for off-road tuning .
Now let's list the disadvantages of the 21st Niva compared to the Chevrolet Niva:
- Low level of comfort . Noise, vibration, lack of power steering (on old Nivas), uncomfortable driving position.
- Outdated design . Although this is a controversial point, because the design of an ordinary Niva is recognizable all over the world, which cannot be said about the Shniva.
- Poor aerodynamics.
- Poor handling on the highway.
- Cramped interior. This includes an uncomfortable seating position in the back row and a small trunk.
Everything is clear with the advantages and disadvantages of the regular Niva compared to the Shevik. Let's move on to the Chevrolet Niva.
How to increase the ground clearance of a Chevrolet Niva with your own hands?
Let's consider one of the lifting methods.
Before starting work, you need to prepare a set of tools:
- jack (2 pieces);
- set of wrenches;
- device for tightening springs;
- ball joint remover;
- pliers;
- mount.
To install the rear shock absorber bracket you will need a welding machine, and to rearrange the rear suspension cups you will need a grinder.
Upgrading the machine requires a ready-made lifting kit or independent selection of parts:
- Extended length shock absorbers.
- Steel cups and rubber spacers.
- Mounting for rear shock absorbers.
- A set of springs (sometimes old ones are used).
- Spacers for ball joints 30 mm thick.
- Washers for cups.
- Long bolts.
- Spacers for rear shock absorbers.
The procedure for lifting the rear and front suspension is different. Therefore, we will consider the operations separately.
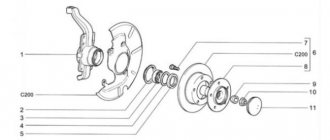
Front suspension lift
To increase ground clearance, you need to do the following:
- Jack up the car.
- Remove the front wheel.
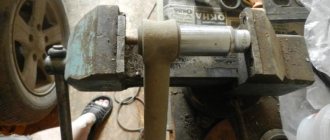
- Place a second jack under the ball joint and lift it so as to load the spring.
- Install the tie rod.
Tip: tighten the part with twists of steel wire. However, this method is dangerous. The tie may unwind or burst, causing the spring to suddenly straighten out and cause injury or damage to the wing.
- Loosen the shock absorber bracket.
- Unscrew the stabilizer and ball joint mounts, then remove the parts.
- Remove the spring.
- Lower the jack under the lever.
- Move the hub to the side.
- Remove the cup.
- Install spacer washers.
- Secure the cup and spring.
- Jack up the lever.
- Secure the hub, stabilizer and ball joints.
- Screw on the shock absorber.
- Install the wheel.
- Repeat the steps on the other side of the front suspension.
This completes the first part of the procedure.
Rear suspension lift
To increase ground clearance at the rear of the Niva, you will have to use welding. First you need to jack up the car, remove the wheels, shock absorbers and springs. After this you will have to perform the following operations:
- Weld a new shock absorber bracket.
- Cut off the bottom cups.
- Shift them by 3 cm and weld.
- Extend the brake system rocker arm.
- Weld the pins under the shock absorbers.
- Replace jet rods.
- Install shock absorbers and springs.
All that remains is to put the wheels on and lower the car to the ground. If there is a strong lift, you need to install an extended rear brake hose and bleed the brakes.
How to increase the cross-country ability of a Chevrolet Niva
The car can be raised in a variety of ways, increasing the ground clearance by 9-10 cm. At the lower point of the RZM, the clearance can be 25 cm, and along the threshold line - 44.5 cm. Most often, lifting is ordered at a service station, but the procedure can be done with your own hands. There are special lift kits that allow you to do the work yourself, but this will require some effort. Sawing the wings, forming new arches in the front, cutting the inside of the rear arch requires some experience. In addition, it should be remembered that the ventilation pipes and gas tank are located in the right rear part, so special care should be taken.
When increasing ground clearance, it is necessary to follow all the rules of the lifting procedure and make changes to other Chevrolet Niva systems. In the absence of an integrated approach, you can end up with a tall car that is unusable. Failure to comply with technical regulations leads to a decrease in reliability and loss of directional stability of the machine. First of all, shock absorbers, wheel bearings and front CV joints fail, which leads to frequent chassis repairs.
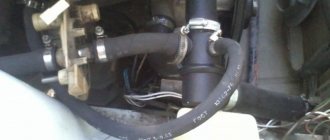
You can use different shock absorbers for the elevator, including those from Mitsubishi Pajero, Monroe, GAZelle or their analogues, the main thing is that they are no worse than the original ones. The Chevrolet Niva must be protected from water entering the gearboxes through the breathers. This problem is solved by placing the gearbox housing ventilation tube at a height that is relatively inaccessible to water. To do this, remove the cap from the breather, insert a hose of suitable diameter, tighten the connection with a clamp and lift the hose under the hood.