How to make a Power bumper for a field?
If you decide to install the bumper on the Niva yourself, we hope that our advice will be useful to you. Several decades ago, the structure to enhance impact resistance was made from an ordinary channel, but now it is a complex structure with arches, fasteners for a winch, a place for a sign and additional lighting, as well as other useful additions, the quantity and quality of which you can control.
Many owners of such cars want to install a power bumper on their car
Making a reinforced bumper
To start:
- remove from the front of the car all elements that interfere with measurement and operation;
- take measurements, think over and model a drawing that does not violate the rules for passing maintenance and traffic rules (yourself, in special graphic editors, download from specialized sites or pay designers);
- Based on the drawing, purchase consumables (round and square pipes, sheet iron, channel, corners);
- purchase or rent tools if you don’t have them (welding machine, grinder, drills);
- stock up on fasteners (bolts, nuts, washers);
- If you plan to bring in elements from round pipes, then you will need a pipe bender; if you don’t have one, you will have to heat the metal with a torch.
Let's get started:
- in order to strengthen the structure along the entire length (spars), it is necessary to make inserts that repeat their shapes. A channel can be used for this purpose;
- to prevent deformation of the side members when tightening, it is necessary to cut out the metal and secure the linings from the outside;
- to tighten the amplifiers in the side members and linings, make holes of the appropriate diameter;
- weld a cross member from a rectangular pipe for subsequent welding to the linings;
Making a power bumper of a simple shape at home is not so problematic
To avoid receiving a fine of 500 rubles, you need to know that:
- if your car has no more than 8 passenger seats or is used to transport cargo with a permissible weight of no more than 3.5 tons, then the installation of structures protruding beyond the bumper line is prohibited;
- regarding metal grilles weighing less than half a kilogram, used to protect headlights and license plates, the ban is lifted;
- the reinforcement structure cannot be made of steel or materials with the same strength;
- if the design is factory-made or has a standard certificate, its use is not prohibited;
- if, after installing a homemade front bumper design, you did not receive a certificate for it and did not pass a technical inspection with it, you cannot avoid a fine;
- Legislation prohibits the installation of power bumpers with guards on off-road vehicles;
- You can drive with decorative elements that are not included in the car’s factory equipment and whose weight does not exceed 500 grams.
Making a reinforced bumper with your own hands
“Niva Chevrolet” is a practical domestic SUV for lovers of “forays” into nature. But those who like to drive through swampy areas and difficult places often complain that the Chevy's front bumper cannot withstand all the loads. After this, it must be repaired or replaced. That’s why lovers of such recreation try to install a power bumper, which can be purchased and installed in the cabin or made with your own hands. To do this we will need free time, skillful hands and a lot of patience.
Power bumper for car
When installing a power bumper, it is advisable to provide fastenings for additional equipment that will not be superfluous:
- winches;
- hi-jack;
- lighting.
You can buy a new body kit for Sheva Niva or make it yourself.
Why do you need a power kit?
A power bumper is one of the options for protecting a car from various damages, chips and various types of impacts to the front of the car. Therefore, to make this type of protection you have to resort to various tricks. Today there are not so many manufacturers of power bumpers for the Chevrolet Niva. Many people make them themselves, at home. For this you will need the following tools and materials:
- metal for making body kit;
- hammer, tape measure;
- grinder (impeller) and cutting wheels;
- welding machine and electrodes;
- fasteners: bolts, washers, nuts.
Do-it-yourself power kit on a car
When doing this work with your own hands, you need the skills of a specialist, since nothing will come of it without good welding. You also need to draw a sketch of the power body kit with all the dimensions you expect. Such sketches should be made in three planes, with the metal cutting areas and bending points marked. After this, you can begin preparatory work.
When doing all the work with your own hands, the main thing is to follow safety rules, because you will be working with open fire.
When manufacturing a power bumper, we recommend using special graphic editors in which you can easily calculate the dimensions of your new body kit, bevel angles, mark fastening points, and also determine the amount of material required.
Options for solving the problem in bumper manufacturing
To manufacture a power body kit for a Chevrolet Niva, it is necessary to provide for the following points that will most likely arise during the manufacture of the bumper:
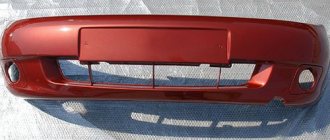
- Drawing. The new power bumper on the Chevrolet Niva can be of any shape and type, but the main thing is not to violate the maintenance and traffic rules;
The drawing shows a sketch of a power bumper for a Chevrolet Niva car
- Material. You need to decide what shape and what metal your new, reinforced bumper will be made of. It is recommended to use metal with a thickness of 3-4 mm. For this, we will use a square pipe, a channel, as well as a 40-mm angle and pipes with a thickness of 2 mm or more;
- Weight of the new design. Since the new bumper will be made of stronger metal, it is recommended to approximately calculate its weight so that the front springs and shock absorbers do not have to be changed;
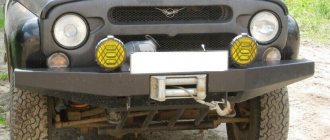
- Optics. It is necessary to provide places for attaching additional lighting, which will never be superfluous;
Additional light can be installed on the power bumper.
- Hi-jack and winch on UAZ and Chevy. A reinforced bumper involves the installation and further use of these two devices, so we recommend that you foresee their installation locations and fasteners in advance.
Comparison of prices of a purchased bumper and a homemade one
If we compare a homemade front bumper for a Niva 2121 car and one purchased in a store, then both have pros and cons:
- a purchased power bumper has a certificate of conformity, but a home-made one needs to be obtained (needless to say, it makes no sense to buy a power bumper without a certificate);
- when making a power body kit yourself, you control the quality of the materials used and the work performed, but in a purchased product you have to rely on the manufacturer’s quality control system;
- An important aspect is the price of such a product; in the purchased product, in addition to the price for the material and labor, you pay for the brand and the work of the store. In fact, the overpayment is at least 2 times - a homemade power bumper for a Niva 2121 will cost you from 2,500 rubles. purchased - from 6,000 rubles.
When purchasing a power bumper in a store, pay attention to the following:
- Take it in your hands and evaluate the weight of the structure; metal cannot be light.
- Plastic in power bumpers is unacceptable.
- Test the chrome coating; it should not peel off when touched with a fingernail; it should be shiny with a light gray, bluish or milky tint.
- Find out the country of origin (China - not right away).
- Consider whether the mounting system shown on the product is suitable for you;
- Buy a power bumper in the middle price category, discard those that are too expensive or cheap.
- Choose a store with a wide range of products.
- Before purchasing, analyze the market and price offers using Internet resources.
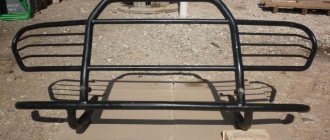
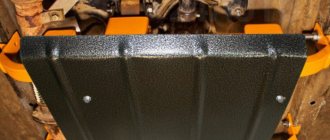
The fully finished structure can be mounted on factory mounts
Our recommendations
After assessing your lifestyle and the feasibility of installing a power bumper, consider the following points:
- mastery of tools (if you or your friends who are ready to help do not have experience with the above tools, leave this to the professionals from the salon or service station);
- when choosing materials to create a structure, sheet metal can be replaced with a square pipe; it can be sawed lengthwise and bent;
- the design significantly makes the car heavier, which without balancing can lead to problems off-road and also become an extra load on the shock absorbers;
- provide places for attaching possible additional elements (light source, volumetric protection of the main headlights, removable headlight protective grilles, removable brackets for cable winding, license plate protective frame, etc.).
If you still decide to add an element of brutality to your vehicle, want to show a masculine character, and simply cannot live without driving over rough terrain, then installing a power bumper is the logical completion of the image of your car.
Before making a power bumper for the Chevrolet Niva, it is recommended to prepare diagrams of the future design. On the sketches we mark the dimensions of the product. This will help in further work.
Recommendations from specialists for installing a bumper on a Chevrolet
In advance, experts recommend:
- Calculate the weight of the bumper on a Chevrolet Niva car. If the value of this indicator is high, then new shock absorbers will need to be installed.
- Provide space for installing additional lighting devices and a winch.
The installation of a power bumper is carried out taking into account the current legislation of the Russian Federation. In this case, the owner of the Niva Chevrolet car must have an installation permit and a certificate for the reinforced structure.
The finished front bumper "RIF" is equipped with an integrated platform for a winch. Due to the presence of stiffening ribs, the driver can use the Hi-Jack. If necessary, you can make an aluminum rear bumper for the Chevrolet Niva.
To make a reinforced bumper for a Niva with your own hands, you will need metal, tape measure, welding, and bolts. When manufacturing the structure, it is recommended to follow safety precautions. To independently calculate the dimensions of the body kit for the Chevrolet Niva, we use graphic editors. The structure is made of metal 3-4 mm thick. To do this, use a piece of metal pipe or channel and a 40 angle.
Niva 2121 bumper size
After reading an article about strengthening a standard bumper, I decided in my free time to figure it out using calculations - what is going on with the pipes and does it make sense to drive pieces of wood inside?
So, the initial data were as follows: pipe length 360 mm; outer diameter 45 mm; wall thickness 2 mm; support on the body at a distance of 200 mm from the point of attachment of the pipe to the body. The modulus of elasticity of steel is taken to be 210,000 MPa. The modulus of elasticity of wood is taken to be 10,000 MPa.
Four options were considered: 1. A pipe without an internal wooden insert loaded with half the weight of the car (assumed equal to 1350 kg) - this corresponds to lifting the car by the bumper, when Jack or any other lifting mechanism with its beak is placed directly under one of the pipes and rises to a height when both wheels leave the ground. 2. A pipe without an internal wooden insert loaded with a quarter of the weight of the car - this corresponds to lifting the car by the bumper, when Jack or any other lifting mechanism with its beak is placed under the bumper exactly in the middle between two pipes and rises to a height when both wheels leave the ground. 3. Same as the first point, only with a wooden insert inside the pipe. 4. Same as the second point, only with a wooden insert inside the pipe.
General view of the calculation scheme:
Calculation results for the first option (half the weight of the car, no tree)
The maximum stress in the contact area of the pipe with the body is 630 MPa, the maximum displacement of the pipe attachment point to the bumper is 1.76 mm. Voltages:
Calculation results for the second option (a quarter of the weight of the car, no tree)
The maximum stress in the contact area of the pipe with the body is 315 MPa, the maximum displacement of the pipe attachment point to the bumper is 0.88 mm
Calculation results for the third option (half the weight of the car, there is a tree)
The maximum stress in the contact area of the pipe with the body is 529 MPa, the maximum displacement of the pipe attachment point to the bumper is 1.52 mm.
Calculation results for the fourth option (a quarter of the car’s weight, there is a tree)
The maximum stress in the contact area of the pipe with the body is 264 MPa, the maximum displacement of the pipe attachment point to the bumper is 0.76 mm.
From the analysis of the results, the following conclusions can be drawn:
1. The presence of a wooden insert inside the pipe reduces stress in the metal by 16%.
2. The displacement of the pipe end is reduced by 14%, i.e. the bending rigidity of the pipe has increased by 14%. Whether it’s a lot or a little, I don’t dare to judge, but I think it’s advisable to get extra rigidity with such small means.
3. Considering that the yield strength for ordinary steels ranges from 190 to 250 MPa, we can conclude that it is not worth placing the jack directly under the pipe - it may not break (although it may break), but it will definitely bend. True, all sorts of abstruse calculations already come into force here, taking into account the plastic deformation of the material, which I am too lazy to carry out, but I can confidently say that nothing good will happen with iron.
4. And the most interesting thing is that it turns out that for pipes it is best when Jack stands exactly in the middle of the bumper, between the pipes. But at the same time, this is the worst thing for the bumper itself (how bad I can say only when I take the dimensions of the bumper itself and calculate it)…
In general, calculations confirm that reinforcing pipes with wood is useful to a certain extent.
Modification of the VAZ 2121 car
To make a Niva 2121 bumper with your own hands, it is recommended:
We first determine the dimensions of the body kit. To make it, you will need to buy round pipes and channels, a sheet of metal (2 mm thick). Tuning begins with disassembling the front part of the Niva 2121 car. It is recommended to remove the factory bumper and linings located at the installation site of the future structure.
The next stage is creating a model of the future “kenguryatnik”. If possible, we use a special computer program or cardboard with tape. The resulting model is checked for symmetry. Then strengthen the VAZ 2121 side members with metal plates (to prevent deformation). We pre-treat this consumable with a special anti-corrosion agent.
To cut into the amplifier elements, you will need a drill, metal scissors or a gas torch. To give the body kit a finished appearance, welding is used. If the frame was assembled from rectangular profiles, then cuts are made inside the frame. The product is bent taking into account the parameters of the cardboard layout. We first connect the elements of the main part, and then weld the side parts. We install a metal frame on the plates.
If the frame is made of a metal pipe, then a torch is used to bend it. The frame is assembled, welded and installed on the Niva 2121. The mounted “kenguryatnik” must be painted. The structure for the VAZ 2121 is first cleaned of welding traces. You can use powder dye to color it.
If you have no experience working with a welding machine, you can install a factory reinforced bumper on a VAZ 2121.
The choice of manufacturer is made taking into account personal preferences and driver reviews.
Many people choose to install a power bumper to provide a secure platform for a winch, additional space for a cable, or as a way to protect against wild animals during off-road travel. Everyone has their own thoughts about the need to install a power bumper on the Niva-2121 or the lack thereof.
The article is intended for the owner of the Niva, who has already decided to install a power bumper. An important question for many car owners is how to make a power bumper for a Niva yourself, so that the design reliably increases resistance to possible impacts. Below we will describe the steps on how to make a power bumper for a Niva yourself.
Preparatory stage
The power bumper "Chevrolet Niva" and "Niva" can be bought almost everywhere, but you can also make it yourself. Personal production has its advantage - independent choice of material for the buffer, as well as the absence of overpayment for the manufacturer's brand when purchasing.
Before actually making a car buffer, be sure to answer the question of why exactly you need this design. This will allow you to think through all the necessary details of future work.
You can make a power bumper for Niva yourself
A do-it-yourself power bumper should contain:
- mounting location for the winch;
- "wind cutters";
- place for mounting license plates and headlights.
It is very important to pay attention to the fact that a homemade bumper for a Niva will add 15-25 additional kilograms to the vehicle.
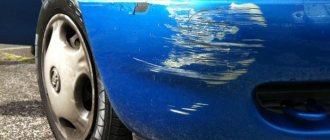
Repairing complex dents
It happens that deeper dents appear on the bumper than those left after contact with snowdrifts. The reasons for their occurrence can be different, ranging from children playing with a ball to road accidents. To level out such a dent, it is not at all necessary to contact specialists. All work can be done with your own hands.
There is an effective and simple method. To straighten a dent, you will need a powerful hair dryer, which heats the area around the damage for a couple of minutes. Next, the heated dent is sprayed with a can of compressed air until traces of frost from the liquefied air appear. Afterwards, you should wait for the frost to disappear and observe the surface straightening on its own. All that remains is to wipe the dent until a natural shine is formed.
So, you can always fix a dent that appears on the bumper with your own hands, which will save significant money.
Also interesting: Chevrolet Niva color code
hello to everyone who stopped by) I somehow like the fact that my rear bumper is a little dented less and less.
Price tag: 0 ₽ Mileage: 59000 km
Selection of power bumper material
At the first stage, before making power bumpers for the Niva, the car owner should decide on the choice of material for the bumper. Car owners make a buffer from various materials depending on the desired weight of the future structure, its reliability and cost. A do-it-yourself fiberglass bumper is more suitable for a Chevrolet Niva. The material is inexpensive and, if properly processed, can be stronger than aluminum. The advantage of fiberglass is its low weight compared to steel construction.
The steel structures of the front power bumper on the Niva are suitable for a powerful SUV. The components must strengthen the structure of the car, which means stainless steel or rolled pipes are perfect in this situation. A high-quality alloy will withstand strong collisions, but will weigh many times more than a fiberglass structure.
Tuning Chevrolet Niva. Installation of power bumpers.
One of the last full-fledged projects.
Given: standard Niva-Chevrolet 2012 with air conditioning.
Necessary:
- install a power kit;
- install a lock in the rear axle;
- install 29-inch off-road wheels;
- change disks;
- install snorkel;
- install an expeditionary trunk;
- install gates for additional equipment on the rear bumper;
- produce maximum suspension lift;
- install four sports buckets instead of standard seats;
- install a winch;
- replace the steering wheel with a sports one;
- install a chandelier;
- and little things...
I'll start by telling you about the stages of construction.
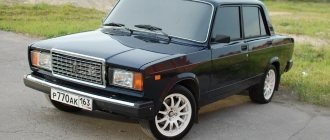
Actually the machine itself.
I decided to put the security forces - OJ. They look quite nice. In terms of appearance, I like them better than RIF ones.
Well, let's begin. From removing the original plastic body kit. I want to warn you right away that, based on my experience of fiddling with various brands of cars, both domestic and bourgeois, I will sometimes insert my opinion on this or that point, design, etc. I ask the reader to understand me correctly. My opinion is not the ultimate truth. At this point in time, I just think so. Perhaps tomorrow aliens will attack us and change my worldview... So, nothing personal. Just my grumbling with or without reason.
So we remove the front bumper. I would like to note right away that when unscrewing the front bumper, I had the good fortune to see just a huge number of Torx screws. Probably the innovations that the prime minister and the president constantly tell me about have reached the automobile industry.
True, there is a nuance. The entire, absolutely entire, front bumper in this car is on torxes))) Somehow I remembered a song... But in order to remove the front bumper and eyelashes, you need to unscrew the front fender liners. But there it’s just the death of a perfectionist - several Torx screws, several ten-point bolts and several self-tapping screws for a Phillips screwdriver. Also, the eyelashes are attached with double-sided tape...
Well, damn it, if you use just a crazy amount of “torx” in the bumper, then why are there bolts and screws on the fender liner? I can't understand. So that it wouldn’t be boring to unscrew, or what? I do not understand…
Okay, after unscrewing a couple of kilograms of screws, bolts and self-tapping screws, unfastening the two foglight connectors, we finally remove the front bumper shnivy. Next, unscrew and remove the front beam.
Next, the Russian master’s favorite thing is grinding with peeling. To install the front power bumper mount on the pulley, it is necessary to do some work with the front side members. Because the bumper will be hung on them.
Here I also want to get a little clever. Shniva is not a frame car. The spars are its stiffening ribs. In theory, all world manufacturers are trying to invent a bumper design for such cars, which will allow, in the event of a front impact, to absorb the force of the impact by deforming numerous elements of the bumper and its beams. So, whatever God forbid, it doesn’t reach the side members... But, we are ahead of the rest