Front hub design on Niva Chevrolet
The hub on a car is the element that connects the wheel and the drive shaft. It has two bearings, which reduce the friction force when rotating on the shaft.
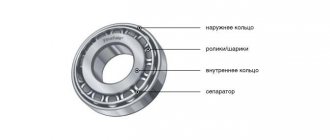
Diagram of hub assembly.
A special feature of the hub is that the play gap can be adjusted.
This gap may increase over time and due to wear and tear of parts. In this case, the wheels begin to vibrate on the axles, which is the cause of premature tire wear . To correct the situation, the wheel bearings should be changed in a timely manner.
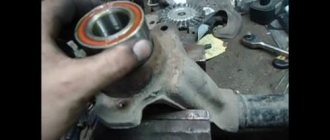
Hub assembly on steering knuckle
When is it necessary to change a wheel bearing?
With such lifting, the load on the wheel bearings will be increased.
There are two reasons that may indicate that the bearings need to be changed . This:
- Increased wheel play and knocking in the hub area.
- Grinding or humming noise in the hub area.
To more accurately determine the breakdown, you should disassemble the mechanism and inspect it.
How to diagnose a broken hub
Surely every driver has at least once encountered a situation when, while driving, a so-called crackling noise is heard. The sound can appear at speeds of 40 km/h and above. Using a car with such a sign is fraught not only with danger to the life of the driver and passengers, but also with serious consequences for the car itself. Most likely, you will notice a hum in a loaded car when turning.
Finding out which wheel bearing is worn out is quite simple: if there is noise from the wheel when turning to the right, the left bearing should be replaced. Similarly, if a hum occurs when turning left, pay attention to the right bearing.
There are several stages of wheel bearing wear:
- hum when turning;
- hum during normal driving with a loaded car;
- hum when driving an empty car;
- constant hum that increases during turns;
- a strong hum, accompanied by crunching, grinding and unregulated movements of the car from side to side.
The period of time between the first and fifth stages with moderate driving can be up to 5 years. It is recommended to replace the part as soon as possible so as not to put the car and the driver’s life at risk.
What could have caused the Niva Chevrolet bearing to fail:
- in 70% of cases, breakdown occurs due to unsuitable lubricant: its quality, excess or shortage may well damage the part;
- it happens that various contaminants and moisture penetrate deep into the bearing;
- this is the cause of failure in 18% of cases;
- There is also a possibility of incorrect assembly of parts, which entails excessive load and overheating.
What are the risks of driving a car with a damaged wheel bearing? There is a considerable possibility of the wheel jamming, which can end in disaster when driving at high speed. It is quite possible to lose control of the car due to the wheel “moving to the side”. Spreading brake pads is also a possible consequence.
Symptoms of a problem
Bearing wear manifests itself as the following symptoms:
- Vibration of the front wheels, which can be reflected in the steering wheel or felt in the cabin.
- Knocking or crackling sounds in the front of the car when driving;
- Heating of the front wheels in the axle area.
If such manifestations occur, you need to check the condition of the wheel bearings. To do this, jack up the car and rock the wheel in different directions. Play and knocking in the bearing area indicates the need for replacement and adjustment. The malfunction may also manifest itself in the form of noise when the wheel rotates.
1. The hubs get hot. It is important to understand that when braking, the kinetic energy of the car is converted into thermal energy. As a result, the brake discs and the hubs on which they are attached become very hot. Heating of the part during movement, and not during braking, indicates wear of the bearing or its incorrect adjustment.
The second option is typical for adjustable hubs. The adjusting nut must be tightened with a force of 2 kgf*m. If you tighten it further, the tapered bearings will be too tight.
Their rotation will be difficult. Prolonged operation of the machine in this condition leads to bearing failure and wheel jamming.
This is interesting: Intake manifold VAZ 2114: characteristics, replacing the gasket yourself
2. The adjusting nut is unscrewed while moving. Sometimes this happens literally after 20-50 kilometers. The phenomenon is observed in three cases: the master forgot to tighten the nut, there was a misalignment between the bearing races, or play appeared in the coupling of the CV joint with the hub.
Is it possible to replace the front wheel bearing of a Niva Chevrolet with your own hands?
It is recommended to entrust installation to professionals. However, if you have a set of tools and free time, it is quite possible to perform the replacement yourself. Before starting repairs, you need to visit a car wash and wash the front suspension especially thoroughly. The second important step is the correct dismantling of the part. To do this, you need to block the wheel and remove the bolts that secure the wheels. Further:
- first, use a jack to suspend and secure the front part of the car;
- then remove the wheel along with the brake pads;
- unscrew the piston pin of the swing arm;
- we take out the bolts that secure the ball joints;
- screw the hub together with the hinges.
The fact that the wheels on a Chevrolet Niva rotate smoothly is determined by the presence of bearings in the hubs. They can stand on both the front and rear wheels. Bearings are designed to reduce friction.
If such bearings fail, the wheel warps and the rubber begins to wear unevenly and quickly. If the bearing is damaged while the car is moving, the wheel will simply lock and stop rotating. For this reason, it is important to pay timely attention to bearings, especially on the Chevrolet Niva, since the car is an SUV and therefore experiences heavy loads on the chassis.
Adjusting the front wheel bearing of Niva Chevrolet
Good afternoon, dear car enthusiasts, stay in touch https://period-vaz.ru/. Today we want to tell you about how to properly adjust the wheel bearing of a Chevrolet Niva.
As a rule, during long-term operation of a particular car, sooner or later some components of the car require adjustment, and adjustment of the Chevrolet Niva wheel bearing is no exception.
To adjust the Neva Chevrolet front wheel bearing we need:
- jack;
- hammer;
- socket wrench “27” or socket + amplifier;
- screwdriver.
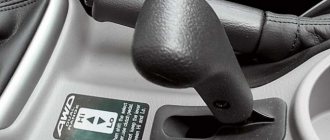
If all the necessary tools have been collected, we proceed to adjusting the bearing. To do this, we need to raise the front part of the car using a jack so that the wheel on which we will adjust the bearing does not touch the ground and can rotate freely. After the car is raised to the height required for adjustment, remove the chrome safety cap from the wheel hub (position 1)
After the safety cap on the hub is removed, you should unlock the nut that compresses the wheel bearing (position 2).
Once the nut is loosened, it should be replaced with a new one if possible. After the nut has been replaced and tightened to the original position of its predecessor, we proceed to tighten it so that the wheel rotates freely and there is no play. When you achieve these parameters, the nut should be loosened slightly by turning it back 25°. Checking the degree of heating of the hub will help you make sure that the front wheel bearing is adjusted correctly after you have driven the car for a little more than 1 km. without using the brakes.
(2 votes, average: 5.00 out of 5)
period-vaz.ru
Is there an alternative to permanent repairs?
It must be admitted, but the wheel-bearing unit of the Niva 4x4, being one of the most loaded in the car, has never learned to be reliable. Whether the culprit is bad components or design errors is not easy to figure out. However, the experience of the owners suggests using alternative options, for example, replacing the “stock” with double-row bearings (IVECO, Moskvich, etc.).
- The unit does not require adjustment or lubrication - all settings are made from the factory.
- There is no possibility of rotation;
- Wear of seats is minimal;
- Has an extended service life.
The difficulty of implementation lies in the need to bore the hub for a double-row bearing, as well as the relatively high cost of the components. But there will most likely be no short-term attempts to change the wheel bearing again.
Replacing and adjusting the front wheel bearing Niva
Symptoms and consequences The sound of a failed front wheel bearing 2121 is often practically indistinguishable from road noise, especially in winter when driving in studded tires on asphalt. However, as the unit wears out, it begins to intensify and accompanies the driver continuously. An additional benefit is the heating of the wheel away from the center without the characteristic smell of brake pads.
At the first suspicion of a specific malfunction, you need to start looking for it, and then change the part, otherwise, not only acoustic comfort is disturbed, but also there is a possibility of complete destruction of the bearing, the appearance of wear on the hub with its subsequent replacement, and in the most advanced situation - misalignment and wheel wedge, which will allow you to easily “make ears” using a short wheelbase and the unique suspension settings of the Niva 21213 and 21214.
Diagnostics
In the absence of a special stand, it is possible to identify the problem. To do this, with precautions, hang up the supposedly faulty wheel. And then grab the extreme points in the horizontal and vertical planes and make swinging movements. A serviceable bearing has no play or it is insignificant, requiring replacement, on the contrary. In addition, when turning, you can hear rolling or cracking sounds. What then? It is necessary to change the wheel bearing yourself, because there is no talk of adjustment.
Replacement
To replace the front wheel bearing in the field, it is necessary to remove the front axle brake calipers. Why you should:
- Hang up and unscrew the wheel;
- Using a chisel, knock the cap off the hub;
• Using pliers, remove the cotter pin located on the lower axis of the clamping lever;
• Carefully remove the axis of the clamping lever using a metalworker's drift and then remove it using pliers;
Read with this: Replacing silent blocks
• Using a flat-head screwdriver, having previously removed the clamping lever and springs, remove the brake caliper from its seat and place it behind the steering knuckle in such a way as not to interfere with the further process (hang).
Removing the hub
To do this, dismantle the conical bushing.
Unlocking the nuts is done by gently tapping them through a chisel.
After which, using a size 19 wrench, the rear and front clamps of the lever to the knuckle are unscrewed sequentially,
not forgetting to get rid of the locking plate.
Then, using the keys “17” and “10”, as well as a flat screwdriver, the brake circuit hoses are removed from the steering knuckle.
Having placed the stop under the lever from below, use two “13” keys to unscrew the nut located on the bolt that secures the ball mount to the upper lever. Unscrew 2 more nuts in the same way. And take the knot to the side.
The lower ball joint is also dismantled.
When the part is freed from the fastenings, holding the steering knuckle with both hands together with the hub, brake disc, upper and lower ball joints, it is removed.
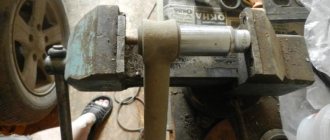
When separating parts, it may be necessary to clamp the steering knuckle in a vice, after which the hub is knocked out without extra effort.
Next, the bolts securing the steering knuckle to the lever are removed.
The brake disc is knocked out by screwing the nuts onto the stud, followed by concentrated blows to the resulting structure.
The result of the work at this stage: the brake system disc and hub are separated from each other.
They hook up the ring that protects against dirt, after which, using a “10” key, remove the casing that protects the steering knuckle.
Replacing the wheel bearing
The steering knuckle is placed in a vice, then the seal (oil seal) is removed with a straight-slotted screwdriver.
Next, the ring with the separator as part of the inner ring is pulled out sequentially. The bearing components are removed from the inside in a similar manner.
Pay attention to the side of the outer bearing and remove the outer ring from there with a punch. The same manipulations are typical for the opposite outer ring.
With this, read the Niva suspension lift yourself drawing
Disassembly is complete. Parts are defective and then, if necessary, replaced with new ones, components are cleaned of old lubricant, and filled with a new compound. It is recommended to use Castrol LMX universal grease for bearing joints and spline units. Assembly - in the reverse order using suitable pipe sections for pressing in bearings, oil seals, etc.
Adjustment
Having restored the structure until the calipers with pads are returned to their place, a dial indicator clamp is placed on the steering knuckle. The indicator is positioned so that its leg rests against the adjusting nut.
Having built a lever on studs, the mechanism smoothly rotates around its axis.
If the permissible gap exceeds 0.15 mm, the adjusting nut is replaced with a new one. By successively changing the degree of twisting, the clearance in the bearings is measured. At the end of the work, the nut is locked.
Is there an alternative to permanent repairs?
It must be admitted, but the wheel-bearing unit of the Niva 4x4, being one of the most loaded in the car, has never learned to be reliable. Whether the culprit is bad components or design errors is not easy to figure out. However, the experience of the owners suggests using alternative options, for example, replacing the “stock” with double-row bearings (IVECO, Moskvich, etc.).
Unlike the standard:
- The unit does not require adjustment or lubrication - all settings are made from the factory.
- There is no possibility of rotation;
- Wear of seats is minimal;
- Has an extended service life.
The difficulty of implementation lies in the need to bore the hub for a double-row bearing, as well as the relatively high cost of the components. But there will most likely be no short-term attempts to change the wheel bearing again.
Video instruction
nivaexpert.ru