Chevrolet Niva
To check the belt tension, press your finger on the belt in the middle between the generator and coolant pump pulleys.
To check the belt tension, press your finger on the belt in the middle between the generator and coolant pump pulleys.
With a pressing force of about 8.0 kgf, the belt deflection should be 12 ± 1 mm.
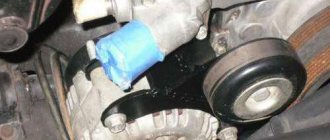
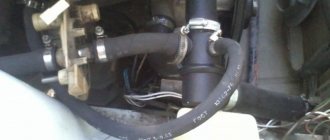
To adjust the belt tension, remove the rubber hoses for supplying air to the throttle assembly.
Belt replacement process
Replacing the alternator drive belt on a Chevrolet Niva with your own hands is generally a simple procedure.
To remove a worn belt, you must first loosen it. To do this, you need to loosen (not completely, but until the moment that makes it possible to remove the belt from the tension roller) the adjusting bolt of the tension roller (number 1 in the photo) and loosen 3 nuts (one for 13 - number 3 in the photo and 2 for 10 - number 2 and 4) tension bar.
After this, the tension bar can be moved and the belt tension can be released. Remove the belt from all rollers.
Installing the belt occurs in the reverse order. The belt drawing diagram is visible in the picture.
Chevrolet Niva drive belt installation diagram
. crankshaft pulley. pump pulley. tension roller . tension bar. bolt . generator pulley. belt . support roller. power steering pulley.
After installation, the belt must be tensioned correctly.
Check the belt tension by deflecting it between the generator pulley and the water pump pulley. With normal belt tension, the deflection “h” under the influence of a load of 7.6 kgf should be equal to (12±1) mm.
The belt tension is adjusted by moving the tension roller 3, rotating the tensioner bolt 5 while the nuts 8 securing the tensioner bracket 4 are loosened. After adjustment, turn the crankshaft two turns and check the belt tension again.
How to check the correct belt tension? I know that many people don’t bother and judge the correct tension purely by how their fingers feel. But I went a different way. For this I needed an electronic steelyard and a regular ruler. For convenience, the air pipe was unscrewed and removed.
The meaning of the actions is clear from the photo. I rest a block against the belt, with an electronic steelyard attached to the other end. I place a ruler on the block, aligning the zero division with the edge of the air socket. I pull the steelyard with my hand until the reading is 7.6 kg, the block presses on the belt, bends it, the ruler goes down along with the block. We look at the amount of deflection along the edge of the air socket. If more than 12 mm, then the belt needs to be tightened, otherwise loosen. We achieve a deflection of 12 mm, rotate the pulley and again check and adjust the tension. Tighten the adjusting bar nuts.
If your Chevrolet Niva has an air conditioner, then in order to get to the alternator belt you will have to remove the air conditioning compressor drive belt. To do this, we drive the car into a pit or overpass and remove the engine protection. You will also have to remove the front mudguard by unscrewing the screws.
To remove the air conditioning belt on a Chevrolet Niva, loosen the two bolts securing the tension roller bracket and loosen the belt tension by rotating the adjusting bolt counterclockwise. Look at the picture below.
After replacing the alternator belt, install the air conditioning belt in the reverse order and tension it. To check the belt tension, press your finger on the belt in the middle between the compressor and crankshaft pulleys. With a pressing force of about 10 kgf, the belt deflection should be about 8.0 mm.
To carry out the procedure, the car must be installed on a device that allows access to engine components: an inspection ditch, a lift or an overpass.
Loading …
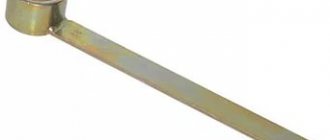
Tools
During replacement you will need the following tools:
- a set of keys;
- screwdrivers;
- jack;
- mount.
You need to prepare a new rubber product in advance. You should purchase an original belt measuring 1888 mm, this will reduce the risk of purchasing a low-quality product.
New consumables
Replacing the alternator belt on a Chevrolet Niva consists of the following steps:
- To avoid accidental short circuits, you need to turn off the power to the car. To do this, you need to remove the negative terminal on the battery.
- Then disconnect the connector from the crankshaft position sensor, unscrew the mounting bolt and dismantle the device.
- Remove the power steering pump drive belt.
- Then you need to loosen the fastening nut on the plate holding the unit and move the generator towards the engine.
- After this, the belt will loosen and can be removed. To do this, lift the car with a jack and put the lever in the last gear.
- Then you need to slightly pull the branch from the water pump pulley and, rotating the front wheel, move the guy onto the generator and crankshaft pulley. Remove the branch from the water pump pulley
- All that remains is to turn the pump and the belt will be removed from all pulleys.
- The new product is first put on the crankshaft pulley, then on the generator pulley and partially on the water pump pulley.
- Then you need to rotate the wheel until the belt is in place.
- Next, you should return the generator to its previous position.
- Then check the belt tension and tighten the fastening nut.
- Lastly, replace the crankshaft sensor and connect the connector. Installed new consumables
The above describes the replacement procedure on a machine without air conditioning. On cars with air conditioning, a compressor pulley is added to the device, onto which the belt drive is also tensioned.
Adjustment is carried out by moving the generator relative to the engine. The closer to the engine, the tension is weaker, further away it is stronger. After installing and tensioning the belt, you need to start the engine and check the operation of the belt.
Chevrolet Niva
Location of the accessory drive belt and tension roller bracket mounting nuts (for clarity, shown with the engine cooling system radiator removed).
Location of the accessory drive belt and tension roller bracket mounting nuts (for clarity, shown with the engine cooling system radiator removed).
Installation of new parts
When replacing the timing belt on a Chevrolet Niva, follow these steps.
- Remove the air conditioning and cooling radiators completely. Before this, of course, you will have to drain the liquid from the cooling system and bleed off the freon. There is no need to remove the fans from them.
- Remove the air purification filter housing.
- Remove the A/C compressor and alternator drive belts. Be sure to remove the tension mechanisms as well.
- Remove the upper part of the timing housing.
- Place marks on the shaft gears. They must definitely match. There is a notch on the engine crankcase that should match the mark on the pulley.
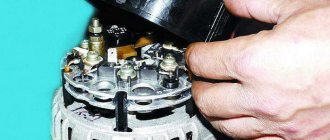
The first step is to prepare the generator for the repair and replacement process. To do this, old parts are removed. To do this, you will need wrenches of diameter 10 and 17.
1. First of all, you need to loosen the belt and remove it, otherwise you will not have access to the bearings themselves. To do this, you need to loosen the roller, which is held by a platform with nuts. There are three nuts, they require a 10mm wrench. Once they are all unscrewed, you need to unscrew the adjusting screw so that it moves up from the platform.
- Place the car in first gear to prevent the crankshaft from turning;
- Unscrew the nut that secures the part
- Remove the spring washer and remove the part.
Also interesting: What oil is better to fill in the Niva Chevrolet engine?
The process of removing generator rollers on a Niva Chevrolet is identical to any other car.
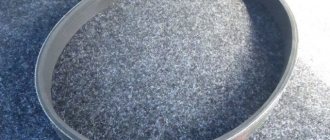
5. The new ring is installed in its place;6. A new roller is installed in place of the old bearing. Before doing this, you should check the diameters of both parts to avoid the mechanism not working;7. Next, the bearing is fixed using a washer with a spring mechanism and a nut;
8. After this, the belt is put on the new roller.
1. You can put the car in 4th gear, put the belt on the roller and push in the direction of rotation of the crankshaft. When it starts to turn, you need to pull the belt onto the generator pulley, and it will fall into place on its own.
2. In the same way, you can not push the car, but lift the wheel and spin it, or spin the generator itself.
This makes it easy and quick to replace the Chevrolet Niva generator belt rollers. You should regularly diagnose the moving parts of the car in order to prevent possible breakdowns in time and replace faulty parts.
We recommend replacing the bearings and belt every 40 thousand kilometers.
Chevrolet Niva
Using a 13mm wrench or socket, rotate the adjusting bolt clockwise, tensioning the belt.
Using a 13mm wrench or socket, rotate the adjusting bolt clockwise, tensioning the belt.
Tighten the nuts securing the tension roller bracket. We start the engine, stop it and check the belt tension again.
Attention! Do not overtighten the belt! Excessive belt tension leads to premature failure of the alternator belt and bearings, coolant pump and power steering pump.
We replace the drive belt for auxiliary units when cracks, ruptures and detachments of rubber from the fabric base are detected on it. On a car with air conditioning, remove the air conditioning compressor drive belt.
Loosen the nuts securing the tension roller bracket (see above) and rotate the adjusting bolt counterclockwise, loosening the belt tension.
Installed a new Chinese generator on Shevik
As it turned out, the generator jammed and because of it the belt broke. Why did this happen? Most likely (my version) - when replacing the pump, the service center tightened the belt too much, because we couldn’t tighten the same one at all. As a result, during the hellish “tightening”, the old gene grunted; the bearings could not withstand such abuse. Therefore, it is better to do everything yourself or in a trusted service. Well, tighten it correctly, you could press the samples with your finger by 1 cm.
How did they even manage to tighten the 1885 belt? I can't imagine))
First I'll tell you about the generator
I took the old one, they completely disassembled it, looked at it and said that it had come to an end. The bearings were torn, and the rotor was worn out to such an extent that repairs would cost 2,500 rubles. And a new one costs 3100. It’s Chinese, but the warranty is 3 months, we checked it at the stand - everything works.
Therefore, it is better to take a native gene with the same width of the roller and with the correct number of rivulets (grooves). That’s why the belt is called a ripple belt, because the grooves must match, it turns out something like rails.
I wanted to buy a 100 Amp Pramo, but I couldn’t find it anywhere in the city; the original genes cost 4,000 rubles. So I decided to try Chinese))
How to remove a generator from a Chevrolet Niva
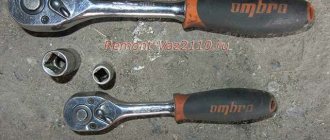
First you need to loosen the belt, which if tense, cannot be easily reset. So, our task is to loosen the tension roller; it is held in place by a platform with three nuts. You will need a 10mm wrench, it is very advisable to have a ratchet with the same head, preferably an elongated one, because the third nut is located directly under the belt and it is better to approach it from the side.
The first 2 nuts are easy to get out with a regular open-end wrench. But the third one is much easier with a ratchet.
We've loosened it - now we turn the adjusting screw (key 10) so that it moves as far up the platform as possible, so the entire platform with the roller will move freely up and down.
We need to go up to throw off the belt.
We remove the generator itself (in my case, I already put it back)