Good visibility on the road is a significant safety factor when driving a car, especially after sunset. The light is set low so that it covers the roadway in front of the car and the shoulder on its side. In oncoming traffic, your headlights will not blind you due to the small size of the illuminated area. If the element shines weakly or is burnt out, it must be urgently replaced.
The following methods will help you find the cause of the failure:
- swap the lamps;
- for xeons, swap the ignition blocks;
- test the halogens and LEDs with a tester;
- inspect carefully (effective for halogens - you can see the broken filament).
We recommend replacing all low beam lamps in your vehicle. Otherwise, differences in brightness and other light characteristics may disturb the driver and other road users.
What to do if the lamps in your car headlights malfunction.
From time to time, every car enthusiast is faced with a situation when the time comes to change defective lighting sources. It is especially important to replace faulty lamps in car headlights. Remember that if a bulb in your car is burned out, you should replace it as soon as possible. Otherwise, you increase the risk of being in an accident. Especially if this concerns burnt-out taillights and brake lights. At the same time, it is also equally important to promptly change faulty light sources in the front optics. Unfortunately, the process of replacing lamps in not all cars is simple and cheap.
Subtleties of work
Changing a low beam lamp in a car with your own hands will not be difficult. You just need to take into account certain subtleties and recommendations of specialists, which will allow you to complete all the work quickly, efficiently and subsequently eliminate any difficulties with the functioning of lighting devices.
You may also be interested in: Computer diagnostics of cars using a scanner
Replacement of the low beam lamp is carried out only with the battery disconnected. The battery can only be de-energized with the engine turned off. Otherwise, there is a risk of electric shock or a short circuit in the network, which can burn wiring and other important components with electronic units in the car.
You can often hear recommendations from experienced car owners to use ordinary wire instead of fuses. Indeed, on the road, if the insulators are burned out, in the absence of the latter, you can install metal clips in the mounting socket, which will temporarily solve the existing problems. However, you should not constantly operate the machine with such protective fuses. In this case, there is a high risk of short circuits, damage to the vehicle's control units and, in particular, to the expensive xenon module or the light bulbs themselves.
The car owner should regularly inspect the headlights to detect clouding of the glass and lens. Their darkening is a signal to change the low beam bulb, which will eliminate various kinds of troubles already on the road, when it is simply impossible to promptly purchase failed devices. The presence of condensation inside lighting equipment is a serious problem, which indicates a loss of sealing and the need for appropriate repairs. In rare cases, such headlights have to be replaced with new ones, which leads to significant expenses for the car owner.
It is necessary to choose the right type of light bulb, its power and type of base. This will ensure the quality of road lighting, the maximum possible durability of the lamp, and the absence of any problems when using it. If you are tuning a car and replacing lights, then such work should be performed exclusively by professionals using high-quality ignition units and original components.
Sometimes, to replace the lamps in the headlights, you need to contact a car service center.
Unfortunately, not in all cars, car enthusiasts can change the headlight bulbs themselves. For example, to replace the low beam lamps in the fourth generation Volkswagen Golf, you must first remove the radiator grille and bumper. Only after you disassemble everything at the front will you gain access to the headlight, which must be removed from the car to replace the light source.
But, say, in more recent generations of Golf (for example, the 5th and 6th generations), you do not need to remove the bumper and radiator grille to replace the bulbs in the front optics. In these machines you can change the light sources yourself. And you don't even need a tool. So before changing the headlight bulb, carefully read the car manual.
How to change a low beam lamp correctly?
Place the car on a flat surface and secure it with the handbrake. Support the wheels with blocks to prevent rolling. Disconnect the wire from the “-” terminal of the battery. If you are replacing the right low beam lamp, remove the washer reservoir.
The replacement procedure is simple - preparation is more difficult. To carry out this process you will need:
- new elements;
- cotton gloves;
- pliers;
- screwdrivers;
- keys;
- alcohol;
- clean rags.
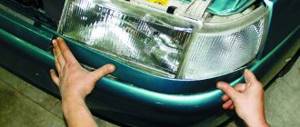
Dismantling . Open the hood and secure the door with a stand. Unscrew the headlight bolts using a wrench. Remove the headlight and twist the cover to open it. Disconnect the holder and terminals. Unscrew the old lamp. Proceed carefully and remember the original position of the elements. Use the camera on your phone to be sure that you are installing the element correctly after replacing the used one.
Installation . Check your contacts first. When replacing, handle the special holder with gloves. Installation is the reverse of dismantling. Be careful and connect the terminals correctly. Tighten the bolts and nuts well to secure the headlight securely.
Light beam correction . Place the car against the wall and turn on the headlights. If the beam is even and forms a “tick”, you will not blind oncoming traffic. In case of intermittent highlights, correction is required. The process is simple: slowly turn the gears on the headlight housing until the broken lines of light line up.
Replacing a car's low beam lamp yourself is a simple process if you follow certain rules:
- Before the procedure, disconnect the battery, first turning off the engine;
- do not test circuits for sparks when checking electrical equipment (electrical equipment fails);
- use only fuses provided by the design;
- When replacing fuses, do not use a screwdriver (possible short circuit);
- do not touch the light bulbs, especially halogen ones (if greasy marks still appear on the glass, wipe them with a lint-free cloth and alcohol);
- Do not wait for the light to turn off completely; replace it when it weakens.
Not every manufacturer indicates in the manual how to change the lamp and what tools to use
If you don't find instructions for replacing headlight bulbs in your car's manual, don't be surprised. This is a completely normal situation. Indeed, some automakers, for some reason, may not indicate in the manual the process of replacing light sources.
This is most often explained by the fact that, due to the design of the machine, replacing headlight bulbs involves a labor-intensive process of dismantling various components of the machine. For example, to change the headlight bulbs on a Ford Fiesta, you also need to dismantle the radiator grille and remove the optics from the car using a special tool.
Replacing the light bulb in the headlight
- Open the hood of the car; on the back of the headlights there is a rubber boot cover with a connector connected to the light bulb.
Reverse side of the headlight - Disconnect the plug connector from the light bulb (as a rule, it is difficult to remove, in this case a little rocking helps).
Disconnect the plug from the light bulb contactsLight bulb power plug
- Remove the rubber cover.
Rubber headlight coverLight bulb contacts
- The light bulb in the headlight is secured with metal tendrils, so to remove the light bulb, unclench them.
Light bulb mounting antennae - Take the light bulb by the base and remove it from the headlight.
Remove the light bulb from the headlightAttention! Due to the fact that the light bulbs heat up to a high temperature, it is not recommended to touch their glass with exposed skin. They must be sterilely clean, otherwise the bulbs will quickly burn out.
- Insert the new light bulb into the headlight, making sure to install the guides on the base into the designated grooves.
Headlight bulbInsert the new bulb into the headlight
- Secure the light bulb using the fasteners.
- Cover the light bulb with the rubber cap.
Replace the rubber cover - Connect the power connector.
Connect power to the light bulb - The first bulb has been replaced, move on to replacing the second.
- Finally, you should check how the new light bulbs in the headlights work.
To do this, turn on the low and high beams alternately. Check the operation of new light bulbs - At this point, replacing the bulbs in the headlights can be considered complete.
Do headlights need to be adjusted after replacing bulbs?
Since the filament in car lamps, as a rule, is not always located in the same place (even in expensive H7 halogen lamps, which are more precisely manufactured), your car may need to adjust its headlights after replacing them. You understand that tuning or adjustment of car headlights should be carried out in a specialized technical class=”aligncenter” width=”680″ height=”680″[/img]e using special instruments or a special stand, where the technician will first check whether the optics require after replacing defective control lamps.
Here's Why You Should Be Careful With Xenon Bulbs
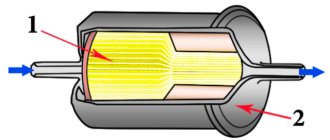
Instead of the filaments used in halogen lamps, gas discharge lamps use xenon gas, which, under high voltage (several thousand volts), begins to ignite, producing a very bright glow. Due to the danger posed by high voltage, we do not recommend that car owners independently replace faulty xenon lamps.
But you may not have to deal with burnt-out xenon lamps, since their service life can be even longer than the service life of the car. The LEDs in the headlights and rear lights are also durable. But, unfortunately, in most LED headlights you do not have the opportunity to replace a failed LED. Even a technical center is unlikely to replace a burnt-out LED.
The thing is that, as a rule, LED car headlights do not have access to the inside. That is, many LED headlights are simply sealed. In this case, you will have to buy a new headlight or contact craftsmen who will somehow be able to open the headlight housing and repair the LED board. But remember that this type of repair is unreliable and is unlikely to be justified.