The camshaft sensor Kalina 8 valves becomes unusable from time to time. This can happen for various reasons, but the result is the same - the part needs to be replaced. The situation is similar with the crankshaft position sensor. You will learn in the article how to dismantle old and install new elements of a car of this type.
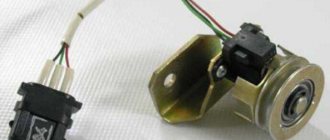
Phase sensor (camshaft position)
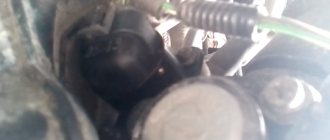
You will find this part on the cylinder head on the left side. The operating principle is quite simple. There is a special pin on the camshaft itself. When it passes by the sensor, but sends a signal to it. This moment corresponds to compression of the piston of the first cylinder.
The controller determines the camshaft angle. This is important information for machine systems and sensor failure has certain consequences. The information is sent to the vehicle's ECU, which uses it to control the ignition and fuel supply to each cylinder.
In what situations is replacement required?
If this part fails, you will see a “Check” indicator on the vehicle’s instrument panel. This is how the ECU signals the driver that the engine needs to be checked. At the same time, the fuel supply pattern changes - it goes to all cylinders simultaneously and, as a result, consumption increases.
The cause of the breakdown may be mechanical damage, as well as other things. There is no point in trying to repair the old unit itself - it costs little and you will waste more nerves and time.
In the video below you will find instructions for replacing this part (the author of the video is Alexandr V).
Replacement instructions
To replace the camshaft sensor, you only need a "10" key . It is better to use a socket with a collar or a ratchet. It will be inconvenient to work with a regular key, although it is still quite possible.
The dismantling and installation procedure is as follows:
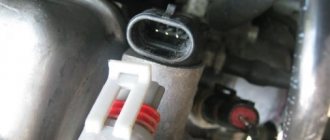
- First, disconnect the block with wires by pressing the latch and slightly pulling it up;
- now, using the key, unscrew the part itself;
- it can be pulled out by slightly pulling towards the windshield;
- installation is carried out in the reverse order of steps.
There are no difficulties in this process, but be careful not to damage both the block with wires and the connector for the controller itself on the cylinder block.
Replacing the crankshaft sensor
Where is the crankshaft sensor located? On all LADA cars, the DPKV is attached to the engine crankcase (to its lower part) using one bolt. On the diagram it is number 2.
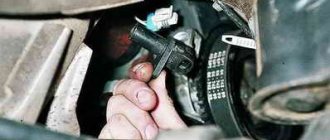
To change the crankshaft sensor, disconnect the block with wires from it and unscrew the mounting bolt (10mm wrench). On Renault-Nissan engines (for example, H4M), you will first have to remove (move aside) the protective casing.
Installation of the DPKV is carried out in the reverse order. Using a set of feeler gauges, we check the gap between the end of the sensor and the teeth of the crankshaft pulley. The gap should be 1±0.41 mm; it is specified by the design of the sensor and is not adjustable.
Crankshaft position sensor
Although this controller rarely fails, its failure can lead to the most unpleasant consequences. You may simply end up in the middle of the road with no way to continue driving.
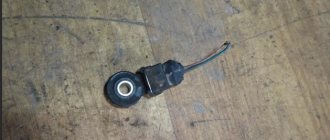
This element is installed on the oil pump cover. The DPKV transmits information to the ECU so that it can synchronize the fuel supply. Inductive type sensor. As mentioned above, it rarely fails, but this becomes a big problem.
In what situations is replacement required?
If this DPKV is completely out of order, you will not be able to start the engine at all.
But even if it just works intermittently, this can be recognized by a number of signs:
- poor engine starting;
- unstable work;
- power reduction;
- detonation with increasing load.
If you notice such signs and there are no other reasons for them, change the sensor. You can check it by testing the resistance of the windings. If the ohmmeter readings differ from 550-570, then the part is faulty. Fortunately, it costs little and replacement can be done very quickly.
Replacement instructions
To replace this part, you will again need a "10" key and nothing else.
- Turn off the ignition. Then disconnect the wire block by pressing the latch.
- Now, using a wrench, unscrew the fastening bolt.
- All that remains is to remove the old DPKV and install the new one in the reverse order.
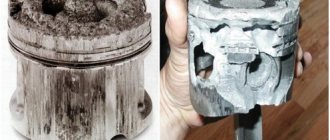
What happens when the camshaft position sensor wears out.
This can happen at any time without warning. Imagine, dear motorists, the following: you are driving along a highway and driving a car at high speed, and then, unexpectedly for you, the car’s engine simply turns off.(?) After you experience unpleasant moments in this situation, which will be associated with turning off the power steering control and deterioration in the effectiveness of the braking system, you will immediately park your car on the side of the road, and then you will wonder what happened. A common cause of this unexpected engine shutdown while driving on the road is a faulty camshaft sensor (camshaft position sensor).
Sometimes this camshaft sensor (CMP) can fail without warning, causing the engine to stall. In certain and some cases, the driver may not even be aware of problems with the sensor; this will happen until the car engine simply starts.
In this article, dear readers, we will look at the main symptoms of a malfunction of the camshaft position sensor, and also tell you what needs to be done to eliminate this malfunction. But first, friends, let's find out together what this sensor does in a car.
What is a Camshaft Position (CMP) Sensor?
The camshaft controls the opening and closing of the intake and exhaust valves.
In the cylinder head of a car engine there are one or two camshafts, which are equipped with special lobes that are designed to operate the intake and exhaust valves. The crankshaft is located in the cylinder block itself, which, when receiving torque from the movement of the pistons in the block, transmits it (torque) using gears, a timing chain (or timing belt) to the camshaft.
Camshaft
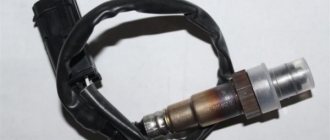
To determine which engine cylinder is on stroke, your vehicle's computer monitors the rotation position of the camshaft relative to the crankshaft position using the camshaft sensor (CMS). The information received from the CMR sensor is necessary to adjust the timing of the spark supply to the combustion chamber and for the operation of the fuel injectors. Thus, the camshaft sensor directly affects the fuel consumption of the car and the amount of emissions in the exhaust.
The most common camshaft sensors are: -magnetic, based on the Hall effect. Both types of sensors transmit a voltage signal to the electronic engine control unit or to the vehicle's on-board computer.
The magnetic type of camshaft sensor produces its own alternating current (sine wave). Typically this sensor has two wires. A Hall effect sensor uses an external power supply to generate a digital signal and typically has three wires.
Camshaft position sensor.
Depending on the make and type of your vehicle, your engine may have one or more camshaft sensors. There are also two types of CMP sensors that may be used in your vehicle.
Checking the crankshaft position sensor Lada Kalina
Lada Kalina Sedan SPORTS Everyday Logbook Bumper Kalina Sport-1 Part.5 Installation
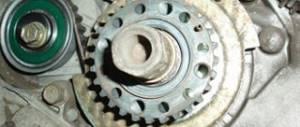
The crankshaft position sensor is designed to generate signals by which the ECU synchronizes its operation with the engine operating cycles. Therefore, this sensor is often called a synchronization sensor. The operation of the sensor is based on the principle of induction - when the teeth of the crankshaft pulley pass past the sensor core, AC voltage pulses appear in the sensor circuit. The frequency of occurrence of pulses corresponds to the speed of rotation of the crankshaft.
The teeth are located around the circumference of the pulley (every 6°). Two of them are separated from each other at an angular distance of 18°. This was done to form reference signals in the sensor circuit - unique reference points relative to which the ECU determines the position of the crankshaft - top dead centers in the first - fourth and second - third cylinders. It is impossible to operate an engine with a faulty crankshaft position sensor. The crankshaft position sensor cannot be repaired; in the event of a malfunction, it is replaced as an assembly.
Removing and installing the crankshaft position sensor
| rice. 1 |
1. Use a screwdriver or finger to press out the plastic latch securing the wiring harness block and disconnect the block from the sensor.
| 2. Unscrew the sensor mounting bolt with a 10mm wrench | 3. Remove the sensor from the cover boss hole. |
| 4. Check the sensor resistance. For a working sensor it should be 0.55 - 0.75 kOhm. 5. Install the crankshaft position sensor in the reverse order of removal. Using a set of feeler gauges, we check the gap between the end of the sensor and the teeth of the crankshaft pulley. The gap should be 1 ± 0.41 mm; it is specified by the design of the sensor and is not adjustable. | With the ignition off, disconnect the engine management system wiring harness block from the crankshaft position sensor. We connect the tester probes to terminal “B” of the wiring harness block and engine ground. With the ignition on and the crankshaft stationary, the tester should record a voltage of about 2.5 V. A similar voltage should be between terminal “A” of the wiring harness block and engine ground. If the voltage values do not correspond to the norm, check the serviceability of the circuits (open and short to ground) between terminal “B” of the wiring harness block and terminal “34” of the controller, as well as between terminal “A” of the block and terminal “15” of the controller. If the voltage values do not match and the circuits are working, the controller is faulty. |
You can also check this way:
1. Connect a multimeter to the sensor terminals (in voltmeter mode with a measurement limit of up to 200 mV).
| rice. 6 |
2. We quickly move the screwdriver blade close to the end of the sensor, while we observe voltage surges on the voltmeter.
The sensor can be checked more accurately by taking readings from it while it is installed on the engine and the crankshaft pulley is rotating. For a working sensor, the voltage at the terminals reaches 0.3 V; we replace the faulty sensor.
Symptoms of a faulty camshaft sensor.
Just like any part or component of your car, this CMP sensor will eventually simply stop working due to wear and tear. This happens in any case as soon as its maximum service life has expired. This usually occurs due to wear on the internal wire wrap or associated component.
Typically, in this case, the engine begins to run erratically, and the symptoms of the malfunction may vary depending on the type of wear on the sensor. For example, the same connector in the sensor may wear out, the same internal circuit of the sensor may fail, or a component associated with the sensor may fail.
–
On some types of cars, if the camshaft position sensor is faulty, the transmission may be blocked in one of the gears, and will be blocked until you turn off the engine and start it back.
This can be repeated with a certain cyclicity. – If the camshaft sensor begins to work incorrectly while the car is moving , then you can immediately feel that your car has begun to move jerkily and lose speed.
– If the camshaft sensor is faulty, you may experience a noticeable loss of power from the engine itself. For example, your car will not be able to simply accelerate over 60 km/h.
– The engine may stall intermittently, and all this is due to a malfunction of the CMR sensor.
– If the sensor fails, you will notice poor engine performance, it will have a loss of dynamism, misfires when turning on the ignition, jolts during acceleration, popping noises in the exhaust system, etc. irregularities in work.
– On some car models, if the camshaft sensor is faulty, the ignition spark may completely disappear, which will ultimately lead to failure and the engine being unable to start.
Once your car's computer detects a faulty camshaft position sensor, which will (usually) cause the Check Engine light to appear (light up) on the dashboard. After detecting such poor performance of the CMR sensor, the computer will automatically record the sensor’s “error code” in its memory. In order to accurately determine the cause of the malfunction of this camshaft sensor, it is necessary to conduct computer diagnostics of the car, i.e. by connecting special equipment to the diagnostic connector of the machine. Then, using a special computer program, you can read the “error code”. Below, dear motorists, we present to you a table of diagnostic “error codes” that are directly related to wear on the camshaft sensor.
Location of the camshaft sensor in the car.
As you can probably guess, the exact location of the camshaft position sensor varies depending on the make and model of the vehicle. In most cars, this sensor can be found somewhere around the cylinder head itself. Look for the sensor around the top of the timing belt location or in protected parts of the electrical wiring at the front of the engine.
The sensor can also be located in the rear of the cylinder head.
Some car models may have a special compartment under the hood for this purpose, in which the camshaft sensor is installed (for example, in certain car models produced by).
In addition, in some cars (car models), the camshaft sensor may be located directly inside the cylinder head.
If necessary, you can look at the owner's manual for your vehicle to find out more precisely where the CMP sensor is located. If you do not have a manual for the repair and maintenance of your car, then you can find it on the Internet or purchase it at a car store, which has a large selection of such auto literature.
Phase sensor diagnostics
If the car suddenly loses power and throttle response, fuel consumption increases, or the check engine light comes on, it is necessary to conduct a comprehensive engine check. The method of such checking is described in the article (Injector diagnostics).
To diagnose the phase sensor, do the following:
Remove the connector from the sensor and inspect the contacts. This can be done conveniently using a dental mirror and a flashlight. If they are oxidized, clean them, insert the connector into the sensor and start the engine, this may correct the problem.
If you have an injector diagnostic scanner, connect it to the engine. If the scanner shows a malfunction with code 0340 - 0343, the problem is in the phase sensor or its wiring.
Troubleshooting the camshaft sensor (CMP).
If your car’s computer has detected a sensor error and turned on the “Check Engine” icon on the dashboard, then you can easily find out the “error code” yourself, which led to the appearance of the light indication on the dashboard. To do this, we advise each driver to purchase an inexpensive set of diagnostic equipment specifically for computer diagnostics. If you cannot afford to purchase this diagnostic scanner for your car, then contact any inexpensive car service center to diagnose your car, where they will read the “error code” from your car’s computer.
Once you know from the "error code" that your car has a faulty camshaft sensor or related components, you should do a few simple tests. Please remember, friends, that a fault “code” indicating a potential failure of the camshaft position sensor will not necessarily mean that the CMP sensor itself has failed on the car. After all, it is possible that the cause of the malfunction is not in the sensor itself, but in the sensor connector, or there is damage to the wires connected to it, or perhaps the components directly connected to it have failed.
The truth is, friends, you need to remember that in order to more accurately establish whether the camshaft sensor is functioning normally, for this you will need to carry out (maybe) quite a lot of diagnostics. It is especially necessary to take into account the following: in order to check the effectiveness of the SMR sensor signal, in some cases special equipment may be needed, without which it will be difficult to determine the cause of the malfunction.
However, you can do a few simple tests yourself using a digital multimeter (DMM):
–
First, check the electrical connector at the camshaft sensor and the condition of the wires. Disconnect the connector and check for signs of rust or dirt.
For example, the same fuel. All this can interfere with good contact for the transmission of electricity. Next, check for damage to the wires, namely, whether there are any broken wires or signs of melting of these wires from nearby hot surfaces.
Above all, please make sure that the camshaft sensor wires do not touch the spark plugs or ignition coils, which could cause interference and prevent the sensor from transmitting the correct signal.
– After the above checks, use a digital multimeter that can test alternating current (AC) voltage or direct current (DC) - depending on the specific type of camshaft sensor used in your vehicle..
Also, before testing, you need to set the correct electrical parameters on the multimeter for a specific type of CPM sensor. Typically, such information is indicated in the vehicle repair and maintenance manual.
– Some camshaft sensors allow you to create a splitter for the electrical circuit of the CMR sensor; this is done in order to read the signal directly from the sensor itself while it is operating in the car.
If the type of sensor you have does not allow you to connect multimeter wires to it, then you can simply disconnect the connector from the sensor and attach copper wire to it by inserting it into each connector of the sensor.
You can then connect the connector back to the sensor, being careful not to short the wires themselves during testing. If you use (apply) this method, do not forget to insulate the wires with electrical tape.
Testing a two-wire camshaft sensor.
– If the camshaft sensor in your car has two wires, then this means that the automaker installed a magnetic type of CMP sensor on the car. In this case, you need to set the multimeter to “variable voltage”.
– Have an assistant turn the ignition key without starting the engine.
– Now we need to check the presence of electricity, which should flow through the sensor circuit. Take one terminal of the multimeter and place it against the “ground” (any metal part on the engine). You should place the other contact of the multimeter against each wire that you have already connected to the camshaft sensor connector. If there is no electrical current on any of the wires, then the camshaft sensor is completely faulty.
– Ask your assistant to start the engine.
– Place one contact of the multimeter against one wire of the camshaft sensor, connect the other contact of the measuring equipment to the second wire of the sensor. Look at the multimeter display. Check the indicator with the specification specified in the car repair manual. In most cases you will see a fluctuating signal between 0.3 and 1 volt.
– If there is no signal on the display, the camshaft position sensor is faulty.
Three wire camshaft sensor testing.
– After you have checked the camshaft sensor wires and the condition of its connector, etc., you have determined that your car has a three-wire CPM sensor, so it’s time to check its functionality with a multimeter. To do this, set the multimeter to “constant current” mode.
– Ask an assistant to turn the key in the ignition, but without starting the engine.
– Place one of the multimeter wires against the “ground” (against a metal bracket, a bolt or a metal part of the engine). Connect the other wire of the multimeter to the power wire of the sensor. Compare the multimeter readings with the specifications specified in the machine's repair manual.
Phase sensor for VAZ on Lada Kalina
Cars of the VAZ family are equipped with four-cylinder petrol injection engines with a capacity of 80 to 120 horsepower. Engines differ in volume and power, type of cylinder head (8 and 16 valves) and electronic control units (ECU).
Why is a phase sensor needed?
The first injection engines were not equipped with a phase sensor. The ECU received all the necessary signals from the crankshaft position sensor (CPS). When the crankshaft was in the position of injecting fuel into one of the cylinders, the ECU received a signal and opened the injectors. The fuel was injected into the common intake manifold, where it mixed with air and turned into an air-fuel mixture. After which the valves of the corresponding cylinder opened and it drew in the finished mixture. Cars with such a power system turned out to be more economical and more powerful than carburetor ones, due to more accurate dosing of the air-fuel mixture. The introduction of the Euro-0 standard required automakers to radically change the system for preparing and supplying the air-fuel mixture. This was done using split fuel injection.
In order to switch to such an injection, it was necessary not only to monitor the DPKV readings, but also to determine the start of operation of the first cylinder. After all, during four cycles of engine operation, the crankshaft makes two revolutions, so it is impossible to determine which cylinder is currently running without additional sensors. Therefore, a sensor was installed on the camshaft, which is responsible for valve timing and the order of operation of the cylinders, which sent a signal about the start of operation of the first cylinder.
Where is the phase sensor installed?
On 8-valve engines, the phase sensor is located on top of the engine, at the end of the cylinder head (cylinder head) on the side of the oil filler hole. On 16-valve engines, the sensor is installed in the upper part of the cylinder head, on the reverse side of the timing belt.
Phase sensor diagnostics
If the car suddenly loses power and throttle response, fuel consumption increases, or the check engine light comes on, it is necessary to conduct a comprehensive engine check. The method of such checking is described in the article (Injector diagnostics).
To diagnose the phase sensor, do the following:
Remove the connector from the sensor and inspect the contacts. This can be done conveniently using a dental mirror and a flashlight. If they are oxidized, clean them, insert the connector into the sensor and start the engine, this may correct the problem.
If you have an injector diagnostic scanner, connect it to the engine. If the scanner shows a malfunction with code 0340 - 0343, the problem is in the phase sensor or its wiring.
Replacing the Kalina phase sensor + Video
On 8-valve engines, replacing the sensor is not difficult. To do this, you will need a small ratchet wrench with a 10mm socket. Remove the battery terminal (if this is not done, the engine fault light will not go off), then pull out the connector and unscrew the 2 mounting bolts. Remove the sensor, insert a new one, screw in the bolts and connect the connector. After 10 minutes, connect the battery.
On a 16-valve engine, replacing the sensor is associated with a number of difficulties. The sensor is located in a very inconvenient place, so you can unscrew the fastening bolts either with an open-end wrench set to “10” or with a small ratchet with a short extension and a corresponding attachment. When unscrewing the bolts, you must carefully ensure that the washer or sensor does not fall into the generator. Install the sensor in reverse order.
Selecting a phase sensor for Kalina
The phase sensor for an 8-valve engine is different from that intended for a 16-valve engine. Some auto electricians install sensors for an 8-valve engine on a 16-valve engine and the engine runs. The difference between these sensors is the size and shape of the connector.
There are also phase sensors for 8-valve engines that do not have a slot for the signal disc. Such sensors cannot be installed on a 16-valve engine because they do not work with a signal disc, but with a pin mounted on the end of the camshaft.
To avoid unnecessary adjustments, purchase the sensor that matches the type of motor. Despite the fact that manufacturers assign different markings to sensors, the number written in the catalog of original VAZ Kalina spare parts remains unchanged. The 8-valve engine corresponds to catalog number 21110370604000, and the 16-valve engine corresponds to 21120370604000. The same sensors are used on VAZ models 2108 - 2115, Largus, Granta, Priora, 4x4. If you are offered a phase sensor for a Priora or 2110, make sure that it is suitable for the engine type (8 or 16 valves) and feel free to install it on the car.
vipwash.ru