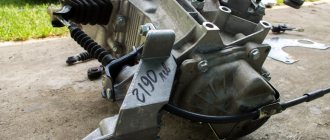
MALFUNCTIONS OF THE ELECTROMECHANICAL CORRECTOR
An electric drive system is much more reliable than a hydraulic corrector, but it is not without its drawbacks.
Possible malfunctions:
- breaking off, chafing of wires, formation of oxides in connectors;
- wear of electric motor elements;
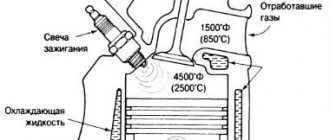
- burnout of circuit elements (for example, due to overvoltage in the machine’s on-board network or moisture entering the control unit housing). Faulty resistors can cause the corrector to operate incorrectly or only within a limited adjustment range. Often the problem is wear of the resistive tracks, which causes contact chatter. The ECU will constantly try to equalize the voltage, as a result of which the microcircuit elements fail due to overheating.
We will consider the process of diagnosing the electromechanical forced-action headlight range control. Diagnosing complex faults in automated systems that use ride height sensors requires much more specialized technical training.
CIRCUIT DIAGRAM
Before starting diagnostics, you should study the electrical diagram for connecting the gearmotors on your car.
Most often, 2 typical connection schemes are used:
- with 5-wire gearmotor connector. This connection method can be found not only in standard systems, but also in kits for installing an electrical corrector with your own hands (for example, EMKF 11);
- with a 3-wire connector for gearmotors (most often found on modern cars). Accordingly, one of the contacts will be “ground”, the second will be a constant “+”, and the third will be a signal wire.
Despite the different pinouts, the electric headlight corrector works on most cars according to a similar principle. The operating principle is based on a constant comparison of the voltage across two variable resistors. One of the resistors is connected to the headlight range control switch on the dashboard, and the other to the actual position sensor of the electric corrector rod. Comparing voltages with a differential amplifier allows you to realize voltage equalization in the event of a mismatch error. Thus, turning the switch on the dashboard causes the headlight range control motor to extend by a fixed distance.
What does a hydraulic corrector consist of and how does it work?
The hydraulic device, thanks to which you can adjust the angle of the light beam from the interior, consists of the following main parts:
- master cylinder located under the dashboard;
- working cylinders, one on each headlamp;
- tubes connecting the above devices.
Hydrocorrector of Lada Granta headlights
In addition, there is a mode switch on the instrument panel, with which the driver changes the pressure in the master cylinder.
The hydraulic corrector system is closed and at the same time sealed (normal). The changed pressure is transmitted through the tubes to the working cylinders. This leads to a change in the position of the pistons and the rods connected to them. They use a special lever mechanism to influence the angle of rotation of the reflector. This is the operating principle of the hydraulic headlight adjuster for the Lada Granta.
Switch for adjusting the headlight beam angle
The electric corrector differs in that the desired position of the lampshades is ensured by mechanisms powered by on-board electricity. Their operation is not affected by changes in ambient temperature, so they are much more reliable than hydraulic devices. Their only “minus” is the cost, which is several times higher.
Electric headlight corrector for Lada Granta
Hydraulic corrector malfunction
In terms of its design, the corrector is a fairly simple device, consisting of a main cylinder, as well as two additional ones - one for each headlight. These cylinders are connected to each other through special tubes. On the center console of the Lada Granta there is a corrector control, which is used to adjust the optics. When the driver presses the corrector handle, the pressure level in the main cylinder changes - it is subsequently transmitted to the working cylinders. Due to the forces acting on the reflector piston, the angle of the optics changes.
If we are talking about an electric corrector, then in this case the option of transmitting force is carried out thanks to special motors. These devices are powered from the vehicle's electrical network. In practice, such devices have proven to be more resistant to temperature changes, in contrast to hydraulic correctors. Accordingly, the cost of the former is also higher.
Replacing the hydraulic corrector with a similar device
If the corrector does not work, then it will be necessary to either replace or repair the device, and the second option, as practice shows, is less appropriate. The reason for the repair usually lies in the jamming of the cylinder or a violation of the tightness of the system, in particular, we are talking about rupture of the sealing components or damage to the pipes.
How to replace the hydraulic corrector with a similar device:
- First, you need to unscrew the nut from the inside, and also remove the handle of the device itself to free the main cylinder of the system.
- The cylinder itself is removed after release.
- Next, other cylinders are dismantled, as well as the pipes through which pressure is transmitted.
- When these steps are completed, the entire structure is removed from the technological hole in the cabin.
- The procedure for installing a new corrector is performed in the reverse order (the author of the video is Romanych).
Replacing a hydraulic corrector with an electric one
As for replacing a hydraulic device with an electric one, in this case the replacement procedure looks similar. The device is dismantled and removed, and instead of the cylinders, electrical analogues of the devices are mounted. After completing these steps, the positive wire of the system must be connected to terminal number 20, and the negative wire must be connected to ground, that is, the car body. All connecting pipes should be replaced with wiring, and at the final stage, power from the device should be connected to the battery. After this, you should carefully check everything to see if the system is working correctly.
Is it possible to repair the Lada Granta hydraulic corrector?
If one or both headlights stop responding to turns of the adjustment knob, you need to think that the hydraulic device has failed. There may be several reasons:
- jamming of the working cylinder (one lamp does not turn);
- depressurization of the system due to failure of sealing elements;
- depressurization due to damage to connecting pipes.
Recommended literature on repair and maintenance of Lada Granta:
LADA GRANTA / 2190 from 2011 onwards, / 2191 from 2014 onwards, petrol, repair manual More details LADA GRANTA / 2190 sedanan / 2191 liftback, petrol, from 2011 onwards, repair manual More details LADA GRANTA / 2190 petrol from 2011 onwards, maintenance manual More detailsLADA GRANTA / 2190 petrol from 2011 onwards, repair manual, operating instructions More details
In the last two cases, both reflectors do not rotate. In most cases, they “fall”, that is, they occupy the lowest position.
Adjusting the hydraulic corrector rod
Manufacturers of headlight correctors for the VAZ 2114 are very similar to the headlight correctors for the Lada Grant; they also did not provide for the possibility of repairing the closed hydraulic system itself, as well as its individual elements. In this case, you can only replace the device. Attempts to repair the hydraulic corrector still take place. However, these are rather temporary measures (screwing in self-tapping screws instead of a working rod, for example). They make it possible to install the lampshades in one working position. We are not talking about adjustments from the cabin here.
So, if the owner of a Lada Granta wants to have a working headlight adjustment system in his car, he will have to start replacing the hydraulic corrector. Whether to install a hydraulic device again or prefer an electric corrector is a matter for the owner. Both options are possible, so let's consider each.
The domestic Lada Granta is equipped with a hydraulic headlight corrector, which fails quite often, which is why many owners of this car are interested in how to carry out repairs with their own hands if the corrector does not work.
Hydrocorrector headlights appeared on such models in Russia as the VAZ 2105 and 2107. The innovation was immediately appreciated and accepted. Subsequently, it began to be installed on new cars of the automaker, including the Lada Granta.
Checking and adjusting Lada Granta headlights
Adjusting headlights, both left and right, is necessary both on a new car and after repair.
Left headlight of Lada Granta
The methods used for checking and adjusting the light are identical for different car models. The Lada Granta has two headlights with halogen lamps. The function of adjusting the light of the lamps from the interior of the Lada Granta is performed by a hydraulic corrector; there is a delay function for turning off the low beam after turning off the ignition after 45 seconds.
To carry out the adjustment, you need to prepare the following materials and tools:
- a set of keys;
- Phillips screwdriver;
- spare wheel;
- full tank of gasoline.
The last two points are needed to give the machine a full load. To check, the car must be installed horizontally (video author - Autonakat).
Further actions consist of the following steps:
- First you need to start the engine and let it idle. To fix the position, you need to put the car on the handbrake.
- Next, you should check the tire pressure and bring it back to normal.
- In front of the car, at a distance of about 3 meters, you need to install a special wall 1.8-2 m high and apply markings on it.
- You need to place a weight of up to 70 kg on the driver's seat to align the low beam line with the bulbs.
- To remove vibrations from the shock absorbers and body, the car should be slightly rocked.
- The light correction control must be set to the “one person” position, which corresponds to the load on the driver’s seat.
- Next, you need to turn on the low beam and adjust the left and right headlights separately. Both the left and right headlights need to be adjusted using a corrector. The rays of light from the light bulbs should shine according to the markings.
Low beam adjustment circuit
You also need to set up the light-off hold function. If desired, you can turn off the function within 45 seconds.
Headlight adjustment (adjustment dials)
Using the thumbwheel, you adjust the low beam horizontally, and using the hex bolt, you adjust the light in the vertical plane. You can raise or lower the beams from the headlights if, for example, the rear of the car is loaded. Ideally, the light beams should exactly match the markings on the wall.
After adjusting the low beam, you need to perform a test drive in order to check the correctness of the adjustment after repair. The light from the headlights should not blind drivers on oncoming vehicles.
Recommendations for quality improvement
To properly adjust the low beam, you need to check the body. There should not be any deformations on it, as they can affect the quality of light; the rays from the lamps will shine scatteredly. If the body has flaws, it needs to be repaired. In addition, in order for the bulbs to shine brightly, you need to check the cleanliness of the glass on the headlights. Dust that has accumulated on them can be removed with a vacuum cleaner.
During use, scratches may appear on the glass. In this case, it is not necessary to change the headlight; you can polish the glass surface. If problems are identified with the reflector, it cannot be repaired and should be replaced with a new one. To make the adjustment correctly, the machine must have lamps of the same power and size.
Halogen lamp for car
You can distinguish a car from the crowd using tuning:
- install eyelashes;
- dim the headlights;
- install lensed headlights;
- make lighting from LEDs.
The simplest tuning option is to purchase ready-made eyelashes and stick them on the top of the Lada Granta headlights. You can give the eyelashes the desired shape using a stationery knife. Tuning can be done with eyelashes made yourself. The materials used to make eyelashes can be different; film materials are suitable.
How does headlight hydrocorrector work on Grant?
By extending a special actuator directly built into the rod mechanism, the so-called headlight range control changes the angle of the lighting.
The mechanism is driven directly by an electric drive or a certain level of pressure from the hydraulic fluid filled. As it turned out experimentally, a short time after purchasing a new Lada Granta, a device such as the headlight hydrocorrector fails, and many people have a logical question: how to carry out the repair yourself? However, we will talk about this below. Experts have identified several obvious signs that indicate a malfunction of the mechanism we have identified:
- The connecting tubes on the device are damaged in some way (possibly cracks have formed).
- The tightness of the regulation system is broken.
- One of the existing cylinders is jammed.
If the tubes are damaged, then there will be no adjustment at all, and the light illuminates the road around the car. Such lighting does not correspond to the safety of driving directly at night. Consequently, many owners of the domestic Lada Granta are beginning to look for all sorts of ways to fix this problem.
Finding the cause of the problem is quite quick, since every experienced driver can understand that it is the headlight range control unit that is to blame for this problem. Many car owners are concerned with the question: is it possible to do it yourself in this case? If your car is still under warranty, the issue will be resolved automatically, since you will receive a free replacement under warranty. However, in most cases, the problem occurs when the car is no longer under warranty. What to do in this case? Also, not everyone can urgently go to the automobile center; driving a personal vehicle is necessary, but it is not safe. Therefore, you will have to carry out the repairs yourself. There is nothing super complicated about this.
Repairing the device, as mentioned above, is not difficult and does not require you to have special devices or any improvised tools. It is enough to take with you a sharp awl, the most ordinary pliers, some antifreeze, and a self-tapping screw, the sharp end of which must first be cut off.
Diagnostics and adjustment of headlights on a Lada Granta car
Lada Granta is one of the popular cars on the domestic market due to its technical equipment, including high-quality optics. In order for the light to meet the requirements, you need to adjust the headlights on the Lada Granta. The article describes the procedure for checking and adjusting headlights, and provides recommendations for tuning and replacing the hydraulic corrector or electric corrector.
Do-it-yourself repair of headlight hydrocorrector on Lada Granta
As mentioned above, when the headlight adjustment device does not work, there are only a few reasons for this. The main reason is the formation of cracks.
It is necessary to visually inspect the hydraulic corrector. If you have identified cracks in the connecting pipelines, which often form due to strong temperature changes in the engine compartment, then the repair work will consist of directly eliminating these same cracks. If the crack is located close to the actuator or the corrector itself, then you should bite off the tube.
You will need to install a new, whole tube, and then bleed the system with antifreeze. Using pliers for this, you need to carefully remove the corrector plug so that you can fill the system with antifreeze. You may need the help of someone, or use a special device that is designed to extend the rod from the corrector system directly into the actuator. It is important to do everything consistently and correctly, the assistant carefully pulls out the rod, using pliers prepared in advance for this purpose, and at this very time you slowly pour antifreeze into the system. The main thing is to make extremely smooth movements with the rod, since there is a high probability of air getting into the corrector system.
After the LADA Granta headlight hydrocorrector system is filled with liquid, instead of the existing plug, install a self-tapping screw of a suitable diameter, the sharp part of which is first cut off. Next, be sure to check the operation of the system; if the two rods are working properly, they should extend simultaneously.
Do-it-yourself adjustment of Lada Granta headlights
Let's look at what you need to quickly and step-by-step adjust the head light on a VAZ 2190:
- a room with a flat wall at a distance of at least five meters from the car;
- a Phillips screwdriver or a six-point hexagon;
- tape measure or long ruler;
- weight equal to yours to place on the driver’s seat (a person of your build or 2-3 bags of plaster - cement - the neighbor’s).
Step-by-step adjustment of low beam headlights on Grant
First , we park the car opposite a flat wall at a distance of 5 meters from the headlights to the wall. Only on a flat surface .
Second , we measure the height from the low beam bulbs to the ground. We mark it on the wall opposite each headlight - this is the upper limit of the light beam.
Third , we retreat down 35mm. and make another mark. For what - shown in the figure.
The headlight light on Grant falls in this shape. The upper edge of the beam has a kink: its upper edge should be equal to the height of your headlights to the ground. The lower edge of the fracture is at the same height minus 35 millimeters
Fourth , we close one headlight so that the light does not overlap the adjacent beam. We turn on the near one.
Fifth , use the light adjustment knob to adjust the height of the light. The goal is for the top edge to match our marks on the wall. An example in the picture above.
Access to adjusting the headlights on the Grant is not difficult. This connector only corrects the height of the light
Sixth – close the other headlight and adjust the second one.
Seventh - if you need to adjust the light from right to left, use long valves located on the headlights themselves.
Rotate these knobs to adjust the light horizontally - right/left