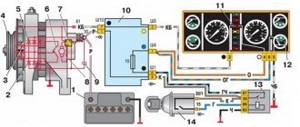
What it is
The battery plays an important role in the operation of the car, being one of the main elements of electrical equipment. The battery acts as a current source when the engine is not running. The battery's job is to perform several functions, including:
- supplying current to the starter when starting the car;
- power supply to all electrical devices when the engine is not running;
- power supply of all electrical appliances along with the generator when the engine is running.
On a note! The joint operation of the battery with the generator allows for transient processes that require a large amount of current. In addition, when working together in the vehicle’s electrical network, the current ripple is smoothed out.
The principle of operation of the battery is quite simple. Charged particles in the battery begin to move after being connected to a load. This leads to the formation of current. While charging the battery from a charger or generator, the particles begin to move in the opposite direction. This is due to the fact that the charge voltage exceeds the battery voltage, that is, its nominal value.
Signs of a bad battery
Some signs may indicate that your battery is dead or broken, including:
- The engine started to start very sluggishly (the starter turns poorly). As a rule, this indicates a low battery charge, which is not enough to ignite the fuel mixture, since the spark is quite weak;
- The battery charge does not last for a long time. Most often, motorists encounter this problem in winter, when a fully charged battery is only enough for a few engine starts. A rapid decrease in battery charge is often indicated by insufficient electrolyte levels.
The car does not start well - a sign of a faulty battery
These signs cannot be ignored, since the battery can fail at the most inopportune time, for example, somewhere far outside the city. Therefore, at the first signs of malfunctioning battery operation, diagnostics must be carried out immediately.
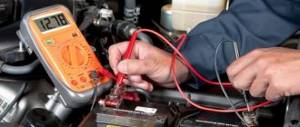
Using a Multimeter to Test
This device is in demand not only among motorists. It is used in any area related to electrical measurements, including using it to check the performance of the battery. The versatility of such a tool is explained by the fact that it combines a voltmeter, an ohmmeter, and an ammeter. The compact device does not take up much space in the car and is always ready to take the necessary measurements. The battery reserve lasts for a long time, if you remember to turn it off during a break in work.
When choosing an assistant to repair car electrical wiring at home, you need to take into account the following characteristics:
- DC voltage is measured in the range from 0 to 200 mV, 2 V, 20 V, 200 V, 1 thousand V, and alternating voltage is measured from 0 to 200 V, 750 V.
- Resistance testing parameters range from 0 to 200 ohms.
- The DC current run-up in most models is 2, 20, 200 mA.
We recommend: Cleaning the battery with a desulfator according to scheme 555
These basic parameters can be supplemented with different values and functions depending on the device model.
Battery voltage measurement
This is the most important parameter of the battery’s suitability for operation.
Many drivers test this indicator first. This is done with the engine running. If the device scale displays values from 13.5 to 14 V, then everything is in order with this characteristic. Increased numbers will indicate a low charge level and more energy being supplied from the generator to maintain operating mode. This case often occurs in winter, when a faulty battery runs out of power. There is no need to worry about short-term exceeding the standard data. In a technically sound car, the level stabilizes within 10 minutes. If during the specified period the indicators have not been restored, you need to pay attention to the serviceability of the voltage regulator or the condition of its contacts. If they become oxidized, they need to be cleaned. If there is a decrease in potential below 13 volts, you should think about replacing the battery, as this is an indicator of a faulty element.
If you take measurements with the car not running, you should pay attention to the following nuances:
- A voltage lower than 12 volts will not allow the engine to start, especially in cold weather with thickened oil. The crankshaft will not turn due to insufficient force in such a situation. A normal level is considered to be no weaker than 13 V.
- All measurements should be taken before the start of the movement, and not immediately after its completion.
- A larger charge will keep the battery operating for a longer period. At a lower level, it will sit down faster. Therefore, a new battery or one in close to this condition remains operational longer.
Battery charge and capacity
To check a car battery using this method, you need to analyze the data from a multimeter. Measurements should be taken 5 hours after recharging or disconnecting the battery from the machine. The data in this case will be more accurate. They do not depend on the ambient temperature.
Considering such measurements, the following patterns should be noted:
- A potential difference of 12.8 V indicates a fully charged battery. A large excess hints at serious malfunctions.
- The 75% balance is indicated by the figure 12.6 V.
- The marking 12.2 is taken as half.
- 12 volts will indicate a quarter of the resource.
- Anything less than the last value indicates a minimum reserve.
Information about capacity is no less important than charge. You can test it in the following way:
- The battery must be fully ready for use.
- Apply load to the battery. You can connect several lighting fixtures in series.
- A weak glow at a voltage of 12.4 volts guarantees problems with starting the engine in winter.
- Reducing the data below 12 V requires replacing the battery.
Such a check of the car battery provides an opportunity to avoid problems during start and movement, as well as prolong the operation of the product.
In addition, you can test the capacity by checking the control charge:
- The battery must be completely full.
- Turn it on at deep load according to the passport.
- Connect the device to the circuit.
- Measure the time it takes for the current to decrease by half.
- If it matches what the manufacturer stated, then the battery is working.
We recommend: Titanium battery for a car and a car battery device
Leakage current measurement
For any car, even a completely new one, this is an inevitable phenomenon. This is explained by the minimal electricity consumption of some consumers even when the engine is turned off. In reference books you can find numbers from 10 to 80 mA depending on the device. If this data is greater, then we can talk about a malfunction of the machine. The ideal value is 60 mA. The lack of daily recharging due to interruptions in operation has a more negative impact on the condition of the equipment.
Before you begin obtaining information, you need to prepare the vehicle for testing:
- Disconnect the interior lighting, radio and other consumers.
- Remove the keys from the ignition.
- Check the information received. Exceeding values of more than 60 mA gives rise to a search for the circuit that receives the maximum power consumption. This can be done by elimination, removing fuse blocks one by one.
This preliminary procedure will provide more accurate information about both the condition of the battery and the power supply circuits.
The procedure for checking leaks is as follows:
- Set the measuring range to 10 A or 20 A.
- Disconnect the minus battery.
- Connect the probe of the device to this place.
- Connect the second one to the removed wire.
- The result will be shown by an indicator board or arrow.
Common Causes
There can be many reasons for a battery to malfunction. Let's look at the most common of them:
- driver inattention. Drivers often leave their car with electrical devices turned on (radio, indicators, light bulbs), which causes the battery to quickly discharge;
- poor device maintenance. If you do not periodically clean the battery terminals, the risk of breakdown increases. This may also reduce the service life;
- long-term use. All car parts have a service life. This also applies to the battery. After the warranty period for the battery expires, various processes may occur in it (sulfation, oxidation, etc.);
- low quality electrical wiring. If poor-quality wiring was installed on the car, then over time it can rot and wear out, which causes a short circuit or discharge of the battery;
- errors when connecting electrical appliances. This may degrade battery performance and shorten battery life;
- poor generator performance. If the generator is faulty, then while the engine is running it will not charge the battery normally. To troubleshoot the problem, it is necessary to carry out diagnostics.
Causes of battery failure
In most cases, battery failures can be prevented. To do this, you need to carry out timely maintenance and repair your car only in high-quality workshops.
Methods for checking the battery
You can check the condition of the battery using various methods, including diagnostics using a load plug, multimeter, and charger. Also during the verification process, an external inspection of the battery and electrolyte testing is carried out. Now let's look at each method separately.
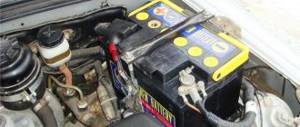
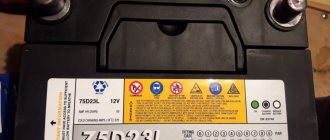
Visual inspection
An external inspection is the first thing to do when checking a car battery. At this stage, you can identify mechanical damage to the case, oxidation of the terminals or contamination of the battery surface. Experts recommend carrying out such a check regularly, since the cleanliness of the battery can also affect its functioning. The inspection procedure will not take much of your time, so it can be done every time you lift the hood.
Car Battery Inspection
On a note! During inspection, special attention must be paid to the battery terminals. Poor connections in these areas can cause active oxidation. Also inspect the battery case for mechanical damage, such as cracks.
If you find dust, dirt or oil on the surface of the battery, remove it with a rag. Without regular cleaning, the device will gradually lose its charge due to the formation of conductive deposits. This will lead to deterioration in battery performance. It would not be superfluous to check the reliability of the fastening elements.
Replacing the brake light bulb
You can find detailed information about the replacement here. You may also be interested in our article about installing DRLs.
Checking with a load fork
Step 1: Remove the cover from the positive terminal of the battery. This can be done by hand, without using any tools.
Remove the terminal cover
Step 2: Connect the positive wire of the load plug to the positive terminal of the battery (the one you exposed). As a rule, the positive wire on the device is colored red.
Connect the positives of the plug and the battery
What is a load fork
Let's start getting acquainted with the device with its description and purpose.
What is it for?
A load fork is a measuring device that can be used to fairly accurately determine the state of charge of a battery. Suitable for both 12-volt and 24-volt batteries. Quite easy to use.
Design
Load fork design may vary depending on model. But the only difference between the options will be additional elements that expand the list of device capabilities. The main components are the same everywhere:
- voltmeter (shows voltage, which is used to determine the battery charge level using tables);
- resistor (spiral made of sheet steel);
- two probes (with their help the device is connected to the battery);
- protective casing (covers the spiral).
What is a load fork and what is it used for?
Periodic checking of a car battery with a modern load fork is relevant for passenger cars with an on-board twelve-volt system. This measuring device serves as a reliable assistant for most motorists. You can buy it at almost any large auto store.
The diagnostic apparatus includes the following elements:
- powerful load resistor;
- digital or pointer voltmeter;
- two probes.
We hold the device from the outside by one handle. It protrudes from the metal casing. There is a voltmeter on the top. Many models use spirals (one or more) as resistors.
The principle of operation of the device is quite simple. We connect an insulated large-section wire to the positive contact of the battery via an alligator clip. We connect the output contact from the plug to the negative terminal on the battery, which has an additional protective casing on most modern batteries.
There is a clamp on the back of the meter to help connect the meter. Inside the housing, nuts can be screwed onto the threads, which are needed to connect resistance in the form of spirals.
Features of the device
The operating principle of the measuring device is quite simple, so every car owner can easily master it. But in order to obtain correct data on the battery charge level, it is necessary to take into account some measurement features:
- The load fork shows accurate data only if measurements are taken at an ambient temperature of 20 to 25 °C;
- the pole of the plug is connected to the plus of the battery, the minus to the minus;
- the contact probe of the device tends to heat up during operation, so you need to work very carefully so as not to get burned;
- measurements should not last more than 6–8 seconds, and there should be a 5-minute pause between each measurement;
- if it is found that the battery is discharged, then fully charge it and repeat the measurements;
- If the battery is serviceable, then when taking measurements it is necessary to unscrew the plugs.
How to check battery performance “quickly and on the go”
It often happens that there is simply not enough time to disconnect the battery from the car and tinker with light bulbs and headlights. There are car enthusiasts who very quickly test their battery literally “on the go,” and this method can also be used from time to time.
This is done like this:
- With the car not running, the multimeter is connected to the battery - as always, plus to plus, minus to minus . It should be borne in mind that in this case there may be some errors in the device’s performance. 12.7 V is a normal indicator, there may be minor deviations, the car is still at rest.
- Now let's start the car . The voltage at the moment the engine starts running can rise to 14.6-14.7 V. The ideal option is a little over 14, but it’s best to check it under load.
- As a load, we use some of the current consumers on board the car - usually these are low-beam headlights, rear wall heating and a heater turned on in medium mode. The optimal and best voltage indicator is 14.6 V.
Such indicators are the norm, and you should always start from them when the question arises of how to check the battery with a multimeter. It is not at all difficult to learn this. It is important to remember the necessary numbers that you will have to rely on when taking measurements, and learn how to use a multimeter correctly. To guarantee accurate and high-quality measurements, it is better to purchase the device itself not on the market or from hand, but in specialized stores.
Why check the battery with a fork?
Checking the condition of the battery is very important, especially if you get a used vehicle rather than a new one.
This method of determining battery charge is the most accurate of all existing ones. Simple measurements with a tester will not display a complete picture of the condition of the battery.
For example, when checking the voltage with a tester, the device showed that the battery was charged, but the car did not start or started poorly. In order to understand the cause of the battery malfunction, measurements must be carried out with a load. It is extremely difficult to simulate the necessary conditions that reflect the operation of a car in a garage.
The starter reduces the time for measurements to a minimum, as it produces a high current. Starting the engine at intervals several times in a row can have a bad effect on the condition of the battery. Therefore, it is the load fork that will help most accurately determine the condition of the battery.
Other devices
Tester/Analyzer
Testers are produced not only for cars, but also for phones, laptops and other devices. It can be made in the form of a charger with extended functionality, an application for a gadget, or an internal code (for a laptop - an address) for the device.
There are also USB testers that, when connected to a device, display all information about the battery status. Any of the options allows you to check the condition of the device’s battery, and in cases where the values are not normal, you can find out about it in time in order to take action as soon as possible.
The bottom line can be summed up as follows: checking the battery for performance with a tester is the easiest and fastest way to find out everything about the condition of the battery. Thanks to testers, the life of car enthusiasts is significantly easier, because there is no need to study the decoding of values taken by other equipment - everything is displayed in real time on the device’s display, and allows you to determine the condition of any battery and its performance in a minimum time.
How to check correctly
There are 2 ways to check the condition of the battery using a load plug. Below we will describe each of them in detail.
Without load
The essence of this method is to measure capacity without connecting an additional load. Measurements can only be taken when at least 7 hours have passed since the engine was turned off. During this time, the battery should not work either. The longer the period of time, the better.
Let's start measuring:
- Before you begin testing the battery, it must be completely disconnected from the vehicle.
- The plug must be connected to the battery terminals (plus to plus, minus to minus).
- We look at the voltmeter and remember the readings.
To understand how much the voltmeter should show if the battery is working properly, you need to look at the table below.
Under load
This testing method is rarely used, as it can harm the battery, and is used only when the maximum charge data was obtained in the first case.
Measurements are carried out as follows:
- Connect an additional load to the plug that corresponds to the parameters specified in the instructions.
- Disconnect the battery from the car's electrical system.
- Apply the probes of the plug to the battery terminals of the corresponding polarity. Use the button to apply additional load.
- At the 5th second of measurement, remember the voltmeter readings and immediately turn off the device.
You can compare the obtained data with the battery capacity using the table.
Video: checking the battery with a load fork When working with a load, it is necessary to take into account the following nuances:
- when contacts with a minus sign come into contact, sparks may appear (no need to be alarmed, this is a normal phenomenon);
- repeated measurements can be carried out only after 5 minutes;
- Do not apply a load for longer than 5 seconds;
- If, even after recharging the battery, the voltage on it drops under load, then the battery is considered unsuitable for use.
How to test a battery with a load fork? We know!
Everyone without exception knows what a battery is, as well as its importance in any device or vehicle. A non-working battery or one that dies at the wrong time can cause a lot of trouble and also ruin all plans...
That is why you should always monitor the condition of the battery, and also know how to properly check it. There are many ways to check the battery; today I will talk about how to test the battery with a load fork. What is a load fork and how it works you will now find out...
What is load fork video:
A load fork is a device for testing car batteries. The uniqueness of the device is that it allows you to accurately determine the battery charge level. The fork is easy to use and provides accurate readings.
Topical: Why does the battery boil and how to deal with it?
Its design is simple and reliable. An ordinary voltmeter acts as a voltage meter. The device also contains a high-power load resistor (spiral, one or more), a housing, a pin and several screws. That's actually the whole structure. Everything works as follows: a conductor with a cross-section of 4 square meters is connected to the “plus” of the battery. mm, and connect a metal pin to the “minus”, it is located on the back of the device body.
On the other side of the device there is a clamping device designed to connect the device and the car battery. In some instances, additional connectors are possible to increase the load. Most often, there is only one load spiral, but if it is necessary to test a high-capacity battery, one spiral may not be enough, in which case you will need to connect an additional spiral.
Important note! Before you start using the device, you should read the operating instructions. Follow safety rules and be careful, any carelessness can lead to injury. Pay special attention to the metal pin; it can become very hot during load.
In addition, the air temperature, as well as the battery itself, plays an important role. The air temperature should not be lower than + 20°C. The battery itself should also not be cold. If the temperature regime is not observed, a deep discharge is possible.
Recommend: How to choose a charger for a car battery
How to check the battery with a load fork?
The check is performed in two steps. The first step is to test the battery without load. The second is to check the battery with a load fork with a resistance.
Now in more detail about each of them...
Checking the battery using a load fork without a load is necessary to record the initial indicators of the battery charge level.
- The first step is to disconnect the battery. At least 7 hours must pass after disconnection; it is very important to observe this point and not use the battery in any way during this time.
- Further. We connect the device (without additional spirals) and connect it to the battery, connecting the “plus” plug to the “plus” of the battery.
- Then we take a metal pin (this will be the “minus” of the load plug) and touch it to the “negative” terminal of the battery. Well, of course, we look at the instrument readings. The device allows you to understand how charged the battery is. If the plug shows a full charge, then move on to the next stage.
- You can understand how charged the battery is by the following numbers.
- From 12.6 to 12.9 V - the battery has a 100% charge;
- From 12.3 to 12.6 V - charge 75%;
- From 12.1 to 12.3 V - battery charge 50%;
- From 11.8 to 12.1 V - the battery is 25% charged.
- From 11.5 to 11.8 V - the battery is completely discharged.
Testing the battery with a load fork under load is carried out only if the battery has demonstrated a full charge at the previous stage.
How to check the battery with a load fork “under load”
- We connect the additional load (resistance) according to the instructions that came with the device.
- Then we perform all the above steps.
Attention! The operating time of the device with a connected resistance should not exceed 5 seconds, and the charge level itself is taken after this time. I would also like to draw your attention to the fact that during contact between the negative pin and the negative terminal of the battery, sparking may occur; this is considered acceptable.
3. We look at the device readings and draw conclusions. If the voltage is above 9 V, the battery is working and fully charged. If the power source shows a voltage below this value, you will need to recharge the battery and repeat the measurement cycle. If, based on repeated tests, the battery does not maintain voltage under load, it will most likely have to be disposed of.
This is important to know!
- Testing the battery with a load fork under load can negatively affect the condition of the battery. This is explained by the fact that the battery experiences a high additional load that is unusual during normal operation.
- Also be careful with the pin; it can become very hot during measurement under load. Take 5-10 minute breaks between measurements to allow the pin to cool.
For those who are uncomfortable reading or just too lazy, I advise you to watch this video:
vaz-remont.ru
Popular models for checking car batteries
Models of the most commonly used load forks for battery testing.
| Model | Operating voltage | Load current, A | Battery capacity, A*h | Operating temperature range, °C |
| VN-1 | 0–15 | 100 | 15–190 | +1. +35 |
| NV-01 | 0–15 | 100/200 | 15–190 | –30. +60 |
| NV-02 | 0–15 | 100/200 | 15–240 | –20. +60 |
| NV-03 | 0–16 | 100/200 | 15–240 | –30. +60 |
| NV-04 | 0–32 | at 12 V - 50, at 24 and 3 V - 100 | 15–240 | –20. +60 |
| NV-B | 3–0–3 | 100 | up to 500 | no data |
Scheme for manufacturing
The standard load fork diagram looks like this:
- V - voltmeter;
- R—resistor (resistance, load);
- S - key;
- arrows - contact legs.
A resistor is connected in parallel to the voltmeter with a switch connected to it in series. When the key is open, the voltmeter shows the voltage on the battery without load. When the circuit is closed with the key, a load is applied to the battery, and data under load is taken from the voltmeter.
Fork
It is a device with a simple, but at the same time reliable and trouble-free design. It consists of a voltmeter, which acts as a meter, and a load resistor, which allows you to test the battery under load.
The housing consists of a pin, a housing and a clamping device used to connect to the battery.
Find out the charging time of your battery
Some load forks have additional connectors. They serve to increase the load if necessary. There is one spiral, but when it becomes necessary to measure a large-capacity battery, the number of spirals can be increased.
Operation and external factors
To correctly test a car battery with a load fork, you need to connect the terminal of the device to the “plus” of the battery, and the measuring pin of the device is connected to the “minus”.
Despite all the ease, it is necessary to study the rules for operating the device, which comes with the equipment.
When using, you must remember that the plug has a minimum temperature of +20 o C, and the battery should not be cold. Failure to comply with the requirements may result in a “deep discharge” of the battery. Taking into account the above criteria, you need to remember that checking a car battery with a plug without removing it from the car (but this is highly not recommended, and it is better to remove the battery) is possible only in a warm climate. If the temperature does not match, it is better not to try to take the readings without removing the battery from the battery.
Important: you must follow all precautions and safety precautions when operating the device - failure to comply can lead to injury! It must be remembered that the pin may heat up when applying a load!
Design features, types of devices
Electrical load forks are designed to check the condition of batteries, and also test the electric generator and other components of on-board electrical networks.
The standard device has a simple design, in particular, a high-power load resistor, which contains a voltmeter and two probes. One of the probes is housed in an all-metal housing. The steel pin is connected to the voltmeter at the negative output, which is located on the back side. A thick wire comes out from the plus of the device, and the clamp is also on the back surface. It is used to connect the load fork to the terminals and two nuts to which the load resistance is connected.
These are one of the simplest devices that can quickly check the technical condition of a car battery.
The load fork allows a number of measurements to be taken:
- voltage at the battery terminals under operating loads and without them;
- output voltage of the electric generator;
- charge holding capacity;
- technical condition of the battery, presence of short circuits, sulfation of plates;
- working resource time.
It is considered an effective testing device that allows you to quickly assess the condition of the battery and make a decision on its repair, further operation or complete replacement. It rightfully occupies a leading position among tools and automotive assistant devices for car owners, systematically diagnosing all systems and functions of their four-wheeled friend. Regular checking gives you confidence in the future, thanks to the fact that the battery will not fail on the road.
Currently, there are several types of devices for testing batteries, allowing you to perform an independent analysis of individual components of vehicle electrical circuits. Common models include VN-1, NV-01, designed for batteries with a capacity of 190 A/h and a voltage of 12 V. The second model is considered more advanced, allows measurements with an accuracy of 2.5%, and has a voltage measurement range of 0-15 V , wide temperature range and other characteristics.
This is interesting: Why the generator does not charge the battery - the main reasons
Models NV-02 and NV-03 are very popular. A significant advantage of the NV-03 is such important characteristics as accurate measurements reaching 0.5%, a voltage measurement range of 0-16 V, equipment with a digital liquid crystal panel and the presence of push-button operating mode switches.
Examination
Load fork measurements are carried out in two stages:
Without load
Allows you to check the battery with a load fork at rest: measure the charge and other indicators of the battery.
It is carried out in several steps:
- Removing the battery from the car. The battery cannot be used for at least 7 hours. Only after this can measurements begin.
- The load plug is connected with the positive terminals to the battery. The cons don't connect.
- By touching the (minus) pin to the negative terminal, battery charge readings are taken. The device screen should display a charge indication indicating:
- 6-13 V – full charge;
- 3-12.5 – 75-80% charge;
- 1-12.2 – 45-55%;
- 7-12V – 20-30%;
- Less than 11.7 V – battery is discharged.
Attention: if the battery is not fully charged, then measurements cannot be taken with a load! Further measurements are carried out only at 100% charge!
Load
The check is carried out with special attention. To avoid mistakes, you need to study the operating instructions.
device and battery terminals
Measurements are taken in the following order:
- An additional load is connected to the device (how this is done is indicated in the instructions for the device).
- The positive terminals of the device and the battery are connected.
- Contact between the pin and the negative terminal (no more than 5 seconds).
- Taking readings from the fork display. The voltage value has certain limits:
- A value greater than 9V means the battery is fully charged, serviceable, and ready for use.
- Less than 9V – the battery needs to be recharged, after which it is necessary to re-take measurements with the load. If the voltage remains less than nine volts, it is necessary to replace the battery (the battery has become unusable).
Power plug for battery
Caution: Taking readings using a plug may negatively affect the condition of the battery due to the additional load it creates.
It is also worth remembering that when the pin comes into contact with the negative terminal, sparking is possible - this is considered an acceptable phenomenon.
How to measure a battery with a load fork can be seen in the video.
Load Fork Testing
You can also find out the state of charge of the battery using a load plug - a device that is a combination of a voltmeter with an electrical load (usually a spiral with a high resistance or just a resistor of a certain value).
The check is carried out according to the following algorithm:
- the external temperature should be within 15–25° C;
- the plug wires are connected to the battery terminals observing polarity (red wire to the positive terminal, black wire to the negative terminal);
- at the moment of connection, measure the voltmeter readings;
- wait 5–6 seconds, record the readings of the device and disconnect the load plug.
The purpose of the measurements is to simulate a switched-on starter, consuming from 100 to 200 A for a short period of time. If the battery was fully charged, after such a test, a drop in the voltage level to 10.2 V indicates its normal condition. If the indicator is lower, the battery is in unsatisfactory condition, having lost part of its rated charge. Thus, a value of about 8.4 V indicates a drop in the state of charge of the battery by 75% of the nominal value.
other methods
Checking the battery
There are methods to check the battery without a load plug: a multimeter or using a charge indicator, which is installed on most modern batteries.
But measurement with a multimeter is not the most accurate, and therefore, when taking readings, an error is possible, which can lead to operational errors.
Indicators are a more accurate indicator than measuring with a multimeter, but their disadvantage is that it is impossible to determine the exact charge of the battery. The indicators are color-coded - therefore, with their help, it is possible to determine only several stages of charging a car battery, and not the exact value.
The result suggests a conclusion: despite the existence of other ways to measure battery charge, a load fork is one of the best tools. It is possible to take measurements without a fork, but it is difficult to guarantee the accuracy of the calculations and the veracity of the indicators. This means that the car owner may make a mistake and fail to take timely measures to correct problems with the battery, which will lead to problems with the operation of the entire car.