Search principle
To find a fault in any vehicle on-board network system, you should use the method of sequential elimination of elements. The point is to consistently check electrical appliances and sections of the circuit, excluding elements from the list of reasons that could cause a breakdown. To do this, you need to clearly understand the design and operating principle of the system. When troubleshooting, you need to move from the components that require the least effort to check, to the most difficult to diagnose elements.
Electrical diagram
We immediately emphasize that the pinout of connectors and color markings of wires may differ not only between different models of the same automaker, but also among one model of different years of manufacture. Before you start searching for the cause of the breakdown, you need to find an electrical diagram specifically for your car model.
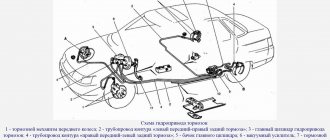
We will consider the principle of operation of brake lights and the troubleshooting algorithm using the example of the VAZ 2101-2102 circuit. The photo shows the general diagram of the vehicle's lighting and light signaling. We need to isolate the components involved in the operation of brake lights.
- 6 – mounting fuse block;
- 13 – brake light switch. It is a non-locking button (returns to its original position after removing the force). Located directly next to the brake pedal. When the brake pedal is released, the contacts of the limit switch are open, no current passes through it. Accordingly, when pressed, the contacts close, allowing flow through the lamps;
- 19 – lamps that light up when you press the brake pedal.
We do not have a diagram of the mounting block, but we know in advance that the brake lights only work when the ignition is on. There is a wire from the mounting block to the brake light limit switch, on which there is a constant + after the ignition is turned on. As soon as the limit switch contacts close, + goes to the brake light bulbs, which are connected in parallel. The “ground” of the rear lights is common and consists of a wire screwed to the car body.
In the diagram we presented, the elements are depicted as close as possible to how they look in reality. Don’t be alarmed if you only find a schematic diagram for your car with symbolic images of the elements. Schematic diagram of external lighting for VAZ 2114, 2115:
- 3 – mounting block;
- 8 – lamps for side lights and brake lights;
- 11 – brake light limit switch;
- K4 – relay for monitoring the serviceability of brake light lamps and side lights.
Description of the circuit operation.
The electrical circuit diagram of all such cars is identical and differs only in design. The KamAZ brake light circuit includes sensors, an intermediate relay, a buzzer and a parking brake warning lamp, and of course warning lamps in the rear lights of the tractor and trailer.
The sensors are installed on the brake system circuits in the area of the brake valve and are triggered when the pressure in the circuit changes. On the latest models, a push-button switch installed under the pedal is used as a brake light sensor, as on most cars. When you press the pedal, the pressure in any of the circuits changes, which leads to the closure of the sensor contacts. If there is a push-button switch, the contacts close mechanically due to the action on the button. In this case, the intermediate relay winding is connected to the vehicle ground. In this case, the current from the fuse passes through the relay winding, the contacts of one of the sensors or the switch under the pedal. The relay contacts close and supply power to the warning lamps in the rear lights.
Fault localization
Understanding the operating principle allows you to determine exactly why the brake lights may not light up:
The fuse has blown. In the diagram, the fuses are marked with the letter F (from English - Fuse) and the serial number of the seat in the fuse block, for example, F3;- poor contact at connectors;
- the light bulbs have burned out, but since the lights are connected in parallel, the likelihood that 2 lamps will burn out at once is extremely low;
- poor contact on the negative terminal of the lights. In this case, problems may begin not only with the feet, but also with the lighting of the remaining lamps in the lanterns;
- Damage to the negative track in the lamp board. From the total mass directly to the brake light lamp, the minus goes along a special path on the board. The path may collapse from water or mechanical impact;
- malfunction of the brake light switch, the so-called frog;
- broken wiring, oxidation of contacts.
Troubleshooting algorithm
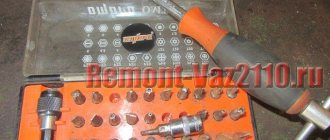
To detect a fault in the electrical network, you will need a multimeter or a tester, which you can make yourself. Previously, we told you how to use a multimeter, so we won’t focus on that.
The sequence of searching for the cause of the breakdown:
- Check the fuse for the brake light circuit. The location diagram of the fuse links can be found in the repair and operating manual for your car; often the symbol of the protected circuits is located on the back of the cover covering the fuse mounting block. If the installed fuse of the required rating immediately blows, there is a short circuit (short circuit) in the circuit. Please note that the fuse can protect not only the feet, but also other circuits. Installing a fuse with an increased rating is fraught with the risk of a car fire;
- If oxidation is detected on the terminals, clean the contacts mechanically or use an aerosol contact cleaner.
- Having turned on the ignition first and holding the brake pedal depressed, check whether there is power on the positive wire that goes from the limit switch to the rear light connector. If there is power, there is a malfunction in the lights themselves;
- check whether the positive signal is coming from the mounting block to the limit switch. If + comes, but when you press the brake pedal it does not appear on the second terminal of the limit switch, then the problem is in the “frog”;
- If there is no + at the limit switch terminal, examine the circuit up to the mounting block. If the wire is intact and securely fastened in the connectors, then the problem is in the mounting block.
Electrical circuit malfunctions.
During operation, some malfunctions are possible. The most common, for all cars, is when the brake warning lights do not light up. In this case, you need to check whether the lamps are lit when the parking brake is applied or not.
If the lamps are on, then the sensor is faulty or the wire from it to the relay is broken. To check, you need to disconnect the wire from the sensor and connect it to the vehicle ground. If the warning lights come on, the sensor is faulty. Otherwise, there is a break in the wire. If the lamps do not light up when the parking brake is applied, it is necessary to check the serviceability of the fuse, warning lamps and relays. Defective elements must be replaced.
The cause of the malfunction may also be a break in the wire connecting the relay to the warning lamps. If the warning lights come on when you press the brake pedal, but do not light up when you apply the parking brake, then you need to check the serviceability of the sensor, connecting wire and diode. It’s better to start by checking the diode, which is located on the board of the instrument panel warning lights, near the parking brake control paw. If, when applying the parking brake, a minus appears on the diode, then the sensor and connecting wire are in good condition. Otherwise, you need to disconnect the wire from the sensor and connect it to the vehicle ground. If a minus sign does not appear on the diode, then it is necessary to eliminate the break in the wire; if it appears, replace the sensor.
Another malfunction is when the warning lights are constantly on. Unlike those described earlier, this is typical only for the KamAZ stop signal. There may be several reasons. The first is the shorting of the positive wire to the signal lamp wire; in practice, it occurs if the wiring was melted in the process of shorting the positive wire to the ground of the car. The second reason is sticking of the signal lamp relay contacts.
To check, just remove and put this relay back into the socket. If the relay is working properly, a characteristic click will be heard. A faulty relay must be replaced.
The third reason may be the lack of power to the parking brake warning lamp and its breaker relay. In this case, the plus goes to minus through the winding of the signal lamp relay, the parking brake warning lamp, the power wire of the warning lamp and through one of the consumers receiving power from the same wire. This closes the circuit and the warning lamp relay is activated. To check, simply disconnect the power wire from the control lamp breaker. The relay should open and the warning lights should go out.
Possible causes could be a faulty fuse or a break in the wire. The last reason is the connection of any wire from the sensors to the ground of the car.
As with all vehicles with a KamAZ brake light, it is also possible for the warning light fuse to blow out. Troubleshooting depends on the moment when the fuse blows. To search, you need to release the car from the parking brake and release the brake pedal. If the fuse burns out immediately upon installation, then the short circuit must be looked for under the instrument panel from the fuse to the warning light relay. If the fuse blows when you press the brake pedal, there is a short in the wire from the relay to the tail lights or in the trailer socket.
The principle of operation of the brake light
The brake lights are located at the rear of the car. Red lanterns. They light up automatically if the driver brakes. When the driver takes his foot off the brake pedal, they are also automatically turned off. The presence of stops is mandatory for vehicles.
The lights should be located symmetrically and burn brighter than the side lights. Brake lights are installed on the sides, on the rear window, in the center above the line of the side stops.
Primary and secondary brake lights can be a single bulb, a neon tube, or a set of LED bulbs. The car enthusiast is additionally equipped with a brake light repeater. The rear brake light can also serve as a fog light. You can install a formula 1 brake light (the author of the video is Mikhail Ermolaev).
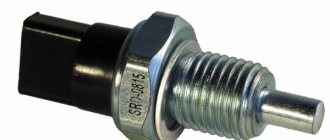
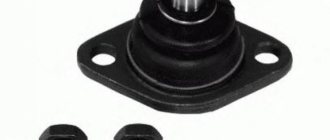
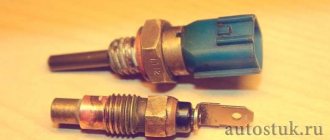
The simplest brake light includes a breaker (switch) and a flashlight. The brake light switch is often called the frog switch. The plastic body of the breaker contains two terminals, a rod and a spring. This device is installed on the brake pedal.
When the driver presses the pedal, the rod enters the breaker body, the contact closes and the light comes on. As soon as the driver removes his foot from the brake pedal, the spring pushes out the rod, the contacts open and the light goes out.
Possible malfunctions: signs and causes
If the feet do not burn, the reason may be the following:
- bad contacts;
- damage to the wiring located in the corrugation between the door and the body;
- burnt out lighting elements.
There is a situation when the brake lights are constantly on if the side lights are on. In this case, the headlights may not light up. If they are turned off, additional lighting fixtures operate normally.
In this situation it is possible:
- the contacts of the parking lights and stop lights have been short-circuited;
- there is no weight on the dimensions;
- the two-pin lamp is faulty;
- the circuit closed, but did not open.
If the parking lights and brake lights are on and the ignition is turned off, then you need to check whether the lampshades are shorted to the housing. The reason may be poor contact of the negative wire with ground.
Methods for troubleshooting
Troubleshooting is not a complicated process and even novice car enthusiasts can do it (the author of the video is Avtoelektika VC).
First of all, you should check the integrity and condition of the wiring.
Using a multimeter, you need to test the wiring. Damaged or torn sections should be replaced intact or soldered. If there are traces of oxidation processes on the contacts, they need to be cleaned.
If the LEDs burn out, they need to be replaced in pairs. If the breaker fails, it must be replaced with a new one, as it cannot be repaired. Before replacing, turn off the vehicle's power by removing the negative terminal from the battery. Then disconnect the power wires from the breaker. Next, you need to loosen the lock nut and unscrew the main nut securing the switch to the bracket.
Replacing the brake light switch
Before installation, the new frog should be checked for functionality. This can be done using an ohmmeter. We connect the device to the device and measure the resistance. When the contact is closed, the resistance should be zero. If you press the rod, the contacts should open; the resistance in this case tends to infinity.
Replacement
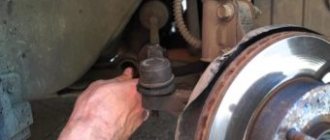
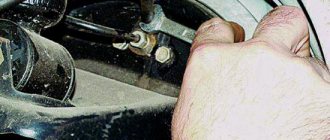
At the bottom of the driver's seat, under the instrument panel, unscrew the 5 Phillips screws
Use a screwdriver to unscrew this plastic holder from under the panel.
Turn the plastic Phillips screw 90 degrees counterclockwise and remove the vent cover
When the panel goes down, use something to depress the brake pedal.
Disconnect both brake light switch connectors
Press the latch, turn the switch 90 degrees clockwise and pull it out
After installing the new brake light switch, release the brake pedal and, if necessary, adjust the gap between the pedal and the switch. This can be done using a gap gauge, small change, or the tip of a flathead screwdriver.
Replacing a stop repeater with your own hands
If repairing the repeater is not practical, it should be replaced.
The replacement process consists of the following steps:
- Using a wrench, unscrew the fastenings of the rear part of the stop and remove it.
- Then we connect the positive wire of the lighting fixture to the terminal where the brake light frog is located. To do this, you need to run the wire into the luggage compartment, unscrew the trim on the right side, and connect it to the desired terminal. The disadvantage may be a bolt in the luggage compartment.
- Heat shrink should be applied to the wiring. To prevent the wires from dangling, they need to be secured with insulating tape.
- The final step is to check the device for functionality.
Photo gallery
If a repeater with incandescent lamps is installed on the car, then when connecting a device with LEDs according to the above diagram, the lamp control will not work correctly due to different loads. In this case, you should insert the positive wire into the light bulb control unit and connect it to terminal 54H.
As a brake light, a strip with LEDs can be glued to the upper part along the entire length of the rear window. It needs to be connected to a standard device, and it will work in the same way. It is important to maintain polarity. To make the tape less conspicuous, it can be painted black. Attach the tape using double-sided tape. We check for functionality.