I installed an on-board computer for you and needed error codes for a Chevrolet Niva. I couldn't find any codes in the book. You can watch from your phone.
Self-diagnosis of errors
If there is no on-board computer, you can read the error codes using self-diagnosis. To do this, press the odometer button and turn on the ignition. The speedometer needle will begin to rise to the top; by pressing again, information about the firmware will appear on the screen, and by pressing again, all existing errors will appear.
Controller BOSCH M7.9.7 (euro-2, euro-3)
Table (list) of error codes:
0102 - Low signal level of the mass air flow sensor (MAF). 0103 - High signal level of the mass air flow sensor (MAF). 0112 - low signal level of the intake manifold temperature sensor (ITM). 0113 - High signal level of the intake manifold temperature sensor (ITM). 0116 — The signal from the coolant temperature sensor (DTOZH) is out of the permissible range. 0117 - Low signal level of the coolant temperature sensor (DTOZH). 0118 — High signal level of the coolant temperature sensor (DTOZH). 0122 - Low signal level of the throttle position sensor (TPS). 0123 - High signal level of the throttle position sensor (TPS). 0130 — Incorrect signal from oxygen sensor No. 1 to the converter. 0131 — Low level signal from oxygen sensor No. 1 to the converter. 0132 - High level signal from oxygen sensor No. 1 to the converter. 0133 - Slow response to enrichment or depletion of oxygen sensor No. 1 to the converter. 0134 - Lack of signal (open circuit) of oxygen sensor No. 1 to the converter. 0135 - Malfunction of the oxygen sensor heater circuit No. 1 to the converter. 0136 - Short circuit to ground in the oxygen sensor circuit No. 2. 0137 - Low level signal from the oxygen sensor No. 2 after the converter. 0138 — High level signal of oxygen sensor No. 2 after the converter. 0140 — No signal (open circuit) of oxygen sensor No. 2 after the converter. 0141 - Malfunction of the heater circuit of the oxygen sensor No. 2 after the converter. 0171 - The fuel supply system (air-fuel mixture) is too lean. 0172 - Fuel system (air/fuel mixture) too rich. 0201 — Open circuit for controlling the injector of the 1st cylinder. 0202 — Open circuit for controlling the injector of the 2nd cylinder. 0203 — Open circuit for controlling the injector of the 3rd cylinder. 0204 — Open circuit for controlling the injector of the 4th cylinder. 0261 - Short circuit to ground in the 1st cylinder injector control circuit. 0262 - Short circuit to the source of the on-board network of the injector control circuit of the 1st cylinder. 0264 - Short circuit to ground in the 2nd cylinder injector control circuit. 0265 - Short circuit to the source of the on-board network of the injector control circuit of the 2nd cylinder. 0267 - Short circuit to ground in the 3rd cylinder injector control circuit. 0268 - Short circuit to the source of the on-board network of the injector control circuit of the 3rd cylinder. 0270 - Short circuit to ground in the 4th cylinder injector control circuit. 0271 - Short circuit to the on-board power source of the 4th cylinder injector control circuit. 0300 - Random/multiple misfires detected. 0301 - Misfire detected in cylinder No. 1. 0302 - Misfire detected in cylinder No. 2. 0303 - Misfire detected in cylinder No. 3. 0304 - Misfire detected in cylinder No. 4. 0327 - Low signal level of the knock sensor (DS) . 0328 - High signal level of the knock sensor (DD). 0335 - There is no signal from the crankshaft position sensor (CPS). 0336 - The signal from the crankshaft position sensor (CPS) is outside the permissible limits. 0337 - Short circuit to ground in the crankshaft position sensor (CPS) circuit. 0338 — Open circuit of the crankshaft position sensor (DPKV). 0340 - Malfunction of the camshaft position sensor circuit (DPRV). 0342 - Low signal level of the camshaft position sensor (DPRV). 0343 - High signal level of the camshaft position sensor (DPRV). 0422 - The efficiency of the neutralizer is below the permissible threshold. 0441 — Incorrect air flow through the valve. 0443 — The canister purge valve control circuit is faulty. 0480 - Cooling fan no. 1 relay control circuit malfunction. 0481 - Malfunction of the cooling fan relay control circuit No. 2. 0500 — Incorrect vehicle speed sensor signal. 0503 — Intermittent signal from the vehicle speed sensor. 0506 - Low idle speed (idle speed control blocked). 0507 - High idle speed (idle speed control blocked). 0560 — The on-board network voltage is below the system operability threshold. 0562 — Reduced voltage of the on-board network. 0563 — Increased voltage of the on-board network. 0601 - Controller ROM checksum error. 0603 — Error writing/reading external RAM of the controller. 0604 — Error writing/reading the internal RAM of the controller. 0615 — Open circuit in the starter relay control circuit. 0616 - Short circuit to ground in the starter relay control circuit. 0617 - Short circuit to the on-board power source of the starter relay control circuit. 1135 - Malfunction of the heater circuit of the oxygen sensor No. 1 to the converter. 1140 — Incorrect signal from the mass air flow sensor (MAF), the measured load parameter differs from the calculated one. 1141 - Malfunction of the heater circuit of the oxygen sensor No. 2 after the converter. 1386 - The test pulse or controller knock channel integrator is outside acceptable limits. 1410 - Short circuit to the on-board power source of the canister purge valve control circuit. 1425 - Short circuit to ground in the canister purge valve control circuit. 1426 — Open circuit for controlling the canister purge valve. 1501 - Short circuit to ground in the control circuit of the electric fuel pump relay. 1502 - Short circuit to the on-board power source of the electric fuel pump relay control circuit. 1509 - Overload of the idle air control control circuit (IAC). 1513 - Short circuit to ground in the idle air control control circuit (IAC). 1514 - Short circuit to the on-board power source (or open circuit) of the idle air regulator (IAC) control circuit. 1541 — Open circuit in the control circuit of the electric fuel pump relay. 1570 - No response from the car anti-theft system (ATS) or open circuit. 1602 — Loss of on-board power supply voltage in the controller. 1606 - Invalid rough road sensor signal. 1616 - Low level of rough road sensor signal. 1617 - High signal level of the rough road sensor. 1640 — Error writing/reading the internal flash RAM (EEPROM) of the controller. 1689 — Incorrect code values in the controller fault memory.
Car diagnostics
Diagnostics of the engine and other systems and units in Chevrolet Niva, Cobalt, Lacetti, Lanos, Captiva, Cruze, Aveo 2004, 2005, 2010, 2012 and other model years allows you to timely identify the fault.
Thanks to this, the car owner can prevent more serious damage. The errors themselves when diagnosing with a laptop or on a VDO display or other factory dashboard will be different. During self-diagnosis on the on-board computer State on the instrument panel of a VAZ 2123 or Chevrolet Tahoe, Orlando, Blazer, Lanos, Niva, Lacetti, Cruz, Captiva, Epica, Aveo in the T250 and T300 body, faults are displayed in two-digit form. Instead of combinations, messages may appear on the display to warn motorists.
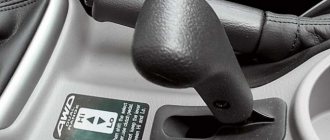
Pressing the odometer button on the dashboard
There are two ways to check for errors in a Chevrolet: self-diagnosis or using additional equipment or a computer. In order for the on-board computer to test for faults, you need to hold down the button on the odometer to reset the daily mileage and turn the key in the ignition.
What codes may appear on a Chevrolet Niva after self-diagnosis:
- 1 - the microprocessor is not working correctly;
- 2 — a break was detected in the electrical circuit of the fuel level controller in the tank;
- 4 - increased voltage level in the vehicle’s on-board network, amounting to more than 16 volts, diagnostics of the battery and generator unit is required;
- 8 - the voltage in the Chevrolet electrical network is low, the same checking steps are performed;
- 12 - the control indicator is not functioning correctly;
- 13 - the control unit does not receive a signal from the lambda probe;
- 14 - the ECU received a signal about overheating of the coolant, this can lead to boiling of the engine;
- 15 - the operating temperature of the antifreeze in the cooling system is too low;
- 19 - the ECU received a signal indicating that the crankshaft is not operating correctly; we recommend testing the controller;
- 21-22 - the throttle valve is in the wrong position;
- 23-25 - the intake air temperature does not correspond to the norm;
- 24 - the dashboard does not receive an impulse about the speed of the vehicle;
- 27-28 - the control unit reports violations in the level of exhaust gases;
- 33-34 - The ECU receives incorrect data on air flow;
- 35 - the power unit does not operate correctly at idle;
- 41 - an incorrect signal is received from the phase controller or camshaft sensor;
- 42 - The computer reports problems with the ignition;
- 43 - incorrect impulse from the knock sensor;
- 44-45 - incorrect composition of the combustible mixture;
- 49 - The ECU detects a loss of vacuum;
- 51 - ROM malfunction;
- 52 - The ECU has detected a RAM error;
- 53 - the control module does not receive an impulse from the exhaust gas regulator;
- 54 - the octane corrector controller does not respond;
- 55 - the load on the power unit is too high;
- 61 - the oxygen controller gives incorrect readings.
Chevrolet Niva error diagnosis
The most reliable way to identify what is wrong with a car is to diagnose electrical appliances and equipment. The procedure allows you to accurately identify breakdowns and quickly repair your car.
There are two ways to detect a problem in a car.
Self-diagnosis VAZ 2123
The simplest procedure allows the motorist to independently identify the damaged area and repair the damage. Thanks to the successful firmware of the on-board computer, some errors are displayed on the standard display. In this case, nothing happens on its own - you will need to perform several steps manually:
- turn off the engine and turn off the ignition;
- find the daily mileage reset button on the dashboard and press it;
- at the same time turn the key in the starting cylinder;
- if everything is done correctly, all the indicators on the dashboard will light up, and the instrument arrows will make a full circle and return to their place;
- at the same time, the firmware version of the on-board computer will be reflected on the built-in display;
- The next press of the key will display a network error.
How is self-diagnosis performed?
Most car enthusiasts prefer to regularly go for computer diagnostics of their vehicles. If you do not have the opportunity to visit a service center or do not have a scanner to check the car, then you can do it differently - run the on-board computer diagnostic program. To do this you need to do the following:
- Press the daily mileage reset button on the odometer and at the same time turn the key in the ignition.
- If you did everything correctly, the speedometer and gauge needles will begin to move along the scales.
- Click the reset button again. The display will show the current firmware version of the on-board computer. After this, you need to repeat the action with the reset button so that the bookmaker displays whether there are errors in the system. If they are present, their numbers will be shown on the display.
This diagnostic will not take much of your time; you can quickly check the Chevrolet Niva system. If the number 8 appears on the display, then do not be upset - this error with number 8 is not terrible in most cases, you just need to check individual components of the car.
Few people know that the Chevrolet Niva has a self-diagnosis function that produces basic error codes that can be used to quickly find and fix vehicle problems. It is not difficult to carry out this procedure yourself; just press the odometer button firmly and turn on the ignition at the same time. The arrows on the speedometer will creep up, after pressing again, an information message about the firmware version will be displayed, and the next time, all error codes will appear on the monitor, naturally, if there are malfunctions in the car.
Self-diagnosis
Without going into details of the operation of all electronics, we note that the functioning of all vehicle systems is “monitored” by an electronic control unit (ECU).
It receives information from numerous sensors. Like any computer, the ECU requires software called firmware. This firmware is capable of analyzing indicators received from sensors, comparing them with normal parameters, identifying errors and storing these errors in memory.
Carrying out self-diagnosis
In the Chevrolet Niva, as in some other cars of the VAZ family, some parameters can be displayed on the VDO dashboard. It is often called an integrated on-board computer.
Testing is started by first pressing the daily mileage reset button and simultaneously turning the ignition key.
All instrument needles begin to move, which indicates the beginning of the testing process. Pressing the same button once will cause the firmware version to appear on the display, and pressing it again will give us a reading called an error code.
Panel codes should not be confused with ECU codes, which are diagnosed by external devices.
The operation of the on-board computer cannot be called flawless, since many errors arise as a result of software failure. You have to reset the errors by holding down the daily mileage reset button in testing mode. This diagnostic method is not entirely convenient for the reason that the error code can be the result of the sum of two codes at the same time (10=8+2).
Decoding codes
Now we suggest that you familiarize yourself with the decoding of the combinations. Why errors may occur and how to eliminate them can only be found out as a result of diagnostics.
The elm327 channel published a video showing the diagnostic procedure for a Chevrolet Niva using a special adapter and an Android-based mobile phone.
Common mistakes
First, let's look at deciphering frequently occurring problems that occur in the Chevrolet Aveo in the back of the T250, T300, Niva and other models.
| Error | Decoding |
| p1396 | Code p1396 is an error in the operation of the ABS system. If this code appears in an Orlando, Niva, Lacetti or other Chevrolet model, the car owner needs to test the performance of the unit itself, as well as the rough road controller. Often the cause of 1396 is a failed sensor, damage, oxidation or contamination of its contacts. You can try to solve the problem by dismantling and cleaning the connector |
| p0661 | The car owner is informed about problems with the solenoid or damage to the electrical circuit. A detailed check needs to be done |
| p0404 | The on-board computer received a message about violations in the functioning of the exhaust gas recirculation system. Often the reason is related to a breakdown of the controller, so it is necessary to diagnose and replace the sensor |
| p1628 | Error code 1628 indicates a problem with the locking device. It is necessary to test the operation of the immobilizer. If you do not pay attention to diagnosing and checking this error, then over time the immobilizer may block the engine and, as a result, it will be impossible to start it. You can try to disable and activate the immobilizer or reprogram its chip |
| p1661 | The Check Engine light does not work. You need to check the functionality of the indicator light in the dashboard. Often the problem can be solved if the light bulb is working by resetting the error |
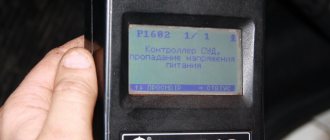
| p1602 | Error 1602 literally means a loss of voltage in the on-board network. The reasons may be different. If the car starts and the engine runs normally, the malfunction may be damage or poor contact of one of the plugs of the control unit, or poor soldering of its components. Perhaps this is a firmware glitch or some relay is not working. A qualified electrician can find the cause. |
| 136 | The meaning of this code may vary for different Chevrolet models. In Orlando cars, this error means a malfunction of the second lambda probe or damage to the wiring. In Cruze models, the code indicates the need to diagnose the parking radar. Perhaps the parking sensors are simply clogged |
Engine
Let's consider the malfunctions encountered in the operation of power units.
| Error | Decoding |
| p0013 | There is a break in the circuit between the crankshaft and camshaft devices. Shaft adjustment required |
| p0171, p0172 | The control unit received a signal about the incorrect functioning of the fuel supply control system. The volume of the air-fuel mixture in the power unit is reduced or increased. We need to identify the cause |
| p0201, p0262 | Malfunctions related to the operation of the injector of cylinder 1 |
| p0202, p0265 | Problems related to the functioning of the injector of cylinder 2 |
| p0203, p0268 | Cylinder 4 injector needs diagnostics |
| p0204, p0271 | Cylinder 4 injector check required |
Computer diagnostics
The most complete diagnosis is possible with a computer or laptop. In order to use this method, you must purchase an adapter. This adapter performs two functions at once. It is an adapter from a K-line port to a USB port or to a COM port. It also acts as a decoder, which allows you to transmit signals from the ECU to the PC. You will also need to install the appropriate software on your laptop. There are a lot of free versions on the Internet. There are universal programs, as well as programs written for a specific car. After connecting to the computer, you will need to turn on the ignition and launch the program. The connection will happen automatically.
The interface of the computer program is very convenient and allows even an inexperienced user to navigate intuitively. All functionality can be divided into several sections. These are parameters, errors and settings. If the first two sections are informational, then using the third section you can control the vehicle systems.
The Check Engine light is constantly on. I checked it for error No. 8. — if 8 appears, then there is a low supply voltage in the on-board network (below 8 V); I reset it by removing the battery for a long time, but it appears after some time. The voltage in the network is 13.5 - 14V. The battery is 2 years old. What to do, how to resolve the error?
What does error 8 mean?
In the table for decoding error codes of the on-board computer, error number 8 means that there is low voltage in the electrical network of your Chevrolet. To eliminate it you need to do the following:
- check the battery charge status;
- diagnose and, if necessary, repair the generator.
If you think that the error message was not generated by the on-board computer due to a problem, then you can check its readings. To do this, remove the negative terminal from the battery for 10 minutes, and then plug it back into the power supply. If there are no problems, then the error on the dashboard will disappear.
Table: reasons for the check engine light to come on and suggested actions
| When and in what cases does the “check” light come on? | Possible reasons | Suggested Actions |
| When driving, when accelerating | Harsh acceleration, faulty air filter | Replace filter, accelerate smoother |
| When the indicator flashes, the engine starts | The fuel in one of the cylinders does not burn completely; the gasoline either burns out in the exhaust pipe or immediately enters the catalyst | Replace spark plugs, check coil and armored wires, check timing marks |
| After refueling | Low fuel quality | Change gas station |
| When the ignition is turned on | Normal car reaction | Nothing should be done |
| After washing the car, engine, after rain | Water got into the Check engine wiring | Treat with WD40, dry, clean contacts |
| Cold | Knock sensor faulty | Replace |
| On a hot engine | Camshaft sensor faulty | Replace |
| At high speeds | Missing ignition coils or faulty crankshaft sensor | Replace coil or sensor |
| At idle | Throttle sensor malfunction | Replace |
| After replacing spark plugs | “Poor” combustible mixture | Change the octane number of gasoline to a higher one |
| After replacing the air filter | More air began to flow, the composition of the exhaust changed, the lambda probe reacted | Turn off the engine and start again |
| After replacing the timing belt | A terminal has come off from some sensor, most likely the air hose | Check terminals |
| After installing gas equipment | Fuel injector emulation is done incorrectly | Tune |
| After installing the alarm | Only one power line is connected to the turbo timer, the second one contains a temperature sensor, brake pedal and mass air flow sensor | Reset Check engine, connect both lines |
| After replacing the fuel filter | Low pressure filter installed | Replace filter |
| With a simultaneous increase in fuel consumption | Driving too long, oxygen heating up or poor quality fuel | Refuel with high-quality fuel and give the car a rest |
| On long climbs | Worn timing belt, faulty sensors | Check and replace |
| After replacing the ignition module | Module connection problems | Remove and reconnect the positive terminal from the battery |
| At sub-zero temperatures | Malfunction of the throttle position sensor or disconnection of its chip | Replace the device or replace the chip |
| When you press the accelerator pedal | Air filter clogged | Clean or replace the filter |
Also interesting: Chevrolet Niva gearbox diagram video
Diagnostics and fault codes of the Chevrolet Niva Niva ECM with controller ME17.9.71
The presence of a malfunction is indicated by the on-board diagnostic system by turning on the warning light.
The on-board diagnostic system must then use special equipment to obtain diagnostic information stored in the controller's memory.
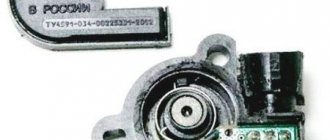
For this purpose, a serial information transmission channel is organized in the engine control system, which includes an ECM controller, a standardized block for connecting a diagnostic device (Fig. 1) and a wire connecting them (K-line). In addition to the block, the information transfer protocol and the format of transmitted messages are also standardized.
The main component of the on-board diagnostic system is the ECM. In addition to its main task (controlling the combustion processes of the fuel mixture), it performs self-diagnosis.
When performing this function, the controller monitors signals from various sensors and actuators of the ECM. These signals are compared with reference values stored in the controller's memory. If any signal goes outside the control values, the controller evaluates this condition as a malfunction (for example, the voltage at the sensor output has become zero - short circuit to ground), generates and records the corresponding diagnostic information in the error memory, and turns on the warning lamp (alarm) indicates malfunctions, and also switches to emergency operating modes of the ECM.
1) Diagnostics of sensors. The controller, by monitoring the value of the sensor output signal, determines the presence or absence of a malfunction.
2) Diagnostics of ECM actuators (driver diagnostics). The controller checks the control circuits for opens, shorts to ground, or shorts to the power supply.
3) Diagnostics of ECM subsystems (functional diagnostics).
In the engine control system, several subsystems can be distinguished - ignition, fuel supply, idle speed maintenance, exhaust gas neutralization, gasoline vapor recovery, etc.
Functional diagnostics gives an opinion about the quality of their work. In this case, the system no longer monitors individual sensors or actuators, but the parameters that characterize the operation of the entire subsystem as a whole.
For example, the quality of operation of the ignition subsystem can be judged by the presence of misfires in the combustion chambers of the engine. Fuel adaptation parameters provide information about the state of the fuel supply subsystem. Each subsystem has its own requirements regarding the maximum permissible deviations of its parameters from the average values.
The fault indicator on Chevrolet Niva cars is located in the instrument cluster.
When the warning light comes on, it means that the on-board diagnostic system has detected a malfunction of the ECM and the vehicle continues to move in emergency mode.
A flashing warning light indicates a malfunction that can lead to serious damage to the ECM (for example, misfires can damage the catalytic converter).
When the ignition is turned on, the indicator should light up - this way the ECM checks the serviceability of the indicator and its control circuit. After starting the engine, the indicator should go out if the controller memory does not contain the conditions for turning it on.
To protect against random, short-term errors that may be caused by loss of contact in electrical connectors or unstable engine operation, the warning light turns on after a certain period of time after detecting a malfunction in the ECM. During this period, the on-board diagnostic system checks for a malfunction.
After eliminating the causes of the malfunction, the alarm will turn off after a certain delay time, during which the malfunction does not appear, and provided that there are no other fault codes in the controller’s memory that require turning on the alarm.
Chevrolet Niva error codes: decoding and description of meanings
The popular Russian-made model is very widespread in the CIS countries due to its optimal cost and increased cross-country ability, which is critically important in the conditions of domestic operation. Motorists buy cars for off-road travel and small towns, where the quality of roads leaves much to be desired.
The disadvantages of the car include weak wiring - when the load increases to the design limit, on-board electronic systems often fail, which causes software failures. Chevy Niva error codes appear on the dashboard display or are detected using special equipment, but the common thing is that they all indicate a malfunction of a specific component.
What problems may be hidden in the Chevrolet Niva generator
If you are sure that the battery is in good condition and produces sufficient voltage, then you need to diagnose the generator. It is one of the weak points of the Chevrolet Niva. During its diagnostic process, malfunctions may be detected:
- pulley wear or damage;
- wear of current collecting brushes;
- rectifier failure;
- failure of the voltage regulator;
- destruction or wear of the bearing;
- wires are damaged;
- collector wear.
Before dismantling, you can check the generator by paying attention to the headlights and other signs. The malfunction is present in the following situations:
- headlights burn dimmer than usual;
- while the engine is running, the battery discharge lamp lights up or flashes on the dashboard;
- as engine speed increases, the brightness of the headlights changes;
- spontaneous shutdown of the radio;
- rapid battery drain.
If you have these problems, you need to replace the generator or its parts. We will give examples of how to install new brushes on this unit or replace it entirely.
Video “Resetting Airbag Error”
If malfunctions are found in the operation of certain systems, then the first thing to do is to correct them. If after repair the codes remain in memory and do not disappear, then you can eliminate them yourself.
There are several options for resetting errors:
- Clear codes by disconnecting the battery terminals. Open the hood and loosen the bolts on the clamps, then disconnect the alligator clips. Wait about one minute, then connect the crocodile clips into place.
- Using the on-board computer. The device has a special function for this. To delete the code, go to the “errors” section in the main menu, then press the middle key on the panel. You will hear a beep and dashes will appear on the computer display. If they exist, then the errors have been successfully removed from memory.
- Resetting can be done using the odometer button. You need to hold it down for five seconds. About 15 seconds will pass, after which the numbers will appear on the display. We wrote about errors during self-diagnosis at the beginning of the article, but if the number 0 appears on the display, then there are no problems with the operation of the sensors, engine and other systems in the car.
If the Chevrolet car was diagnosed using the Chevrolet Explorer program, then information about faults can be deleted through the utility.
In addition, there are other options for resetting codes:
- Disconnect the battery from the power supply. To do this, you need to open the engine compartment and use a wrench to loosen the nuts on the terminal clamps. Then they are disconnected. The connection is completed in one minute.
- Resetting error information is possible through the vehicle’s on-board computer. This device has an appropriate option to perform this task. You need to go to the errors section in the main menu of the computer, and then click on the middle button on the panel. In confirmation, the device will emit a sound signal, and dashes will appear on the screen, indicating that the fault information is deleted from the memory.
- Resetting the codes can be done using the button on the odometer, it is pressed for five seconds and then released. After 15 seconds, numbers should appear on the display. If 0 lights up, this indicates that no problems were detected in the operation of the systems.
User Alex Moss talked about self-resetting an Airbag fault using the example of a Chevrolet Epica.
Loading …
Replacing brushes or the generator itself
Current collection brushes wear out most often, so here is a description of how to do this job:
- Remove the negative terminal from the battery and disconnect the wires leading from the generator casing.
- Remove the protective cap from the terminals of the positive terminal of the wires. Unscrew the nut that secures the block to the generator block.
- Disconnect the spring clips and remove the black plastic cover.
- Unscrew the voltage regulator mountings with a Phillips screwdriver. Take it out along with the brushes.
- Disconnect the wires from it. Remove the assembly together with the fastening bar, take off the belt.
- Release the generator from the bracket by unscrewing all the mounting bolts.
The further plan of action depends on what you will change. If the brushes are very worn, they need to be replaced. If the current collectors are visually intact, then the reason may be in other parts of the generator. In most cases, car enthusiasts simply change it entirely.