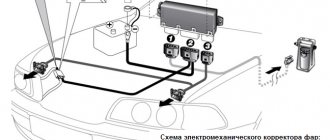
Xenon PTF, when connecting xenon is not against the law
It should be remembered that bi-xenon lamps, as well as corresponding lenses, can be installed in “fog lights” at the factory. These are the so-called fog lights. class D, the light of which is absolutely legal and inspectors cannot “find fault” with it.
In order to install xenon in the fog and/or regular headlights of a VAZ 2110, it is necessary that the entire kit, which uses bi-xenon lamps, be absolutely legal. The letter D must be present on the glass itself, which indicates that bi-xenon lamps must be connected to this headlight. In this case, xenon is legal and will not cause any complaints.
If there is a letter H on the headlight glass, then halogens are used, and problems with the traffic police are quite possible.
How to Install Xenon in VAZ 2110 Fog Lights
The owner of this popular Russian model wants to install xenon on a VAZ 2110. Unfortunately, not many people decide to do this, fearing that something will go wrong. Let's find out together how to correctly install xenon in the PTF of a car, and what result it will bring us.
Installing xenon fog lights is well deserved due to several main factors. Overall, xenon lamps produce a very attractive light with a true bluish color. Using xenon on a VAZ 2110, the driver decides for a long period of time that there is no road surface at night and in bad weather conditions. Secondly, these lamps have a long service life. In this case, even after the end of its life, the flashlight does not lose its glow intensity. Thirdly, xenon lamps are very common for self-assembly. Installing xenon on a VAZ 2110 will take less than 2 hours if you have good standard wiring.
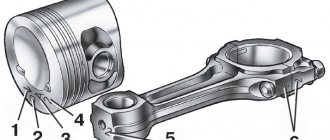
Drivers will likely say that setting up xenon lights is even easier and safer than installing LED car headlights. Typically, stabilizers and resistors must be used to install diodes. When installing such fixtures, a beginner must work with a lot of exposed wires. The situation is somewhat different with xenon lamps. When installing them, the driver practically does not have to deal with exposed wires, which guarantees safe operation. The mechanism of operation of xenon lamps is very simple. The plasma near the cathode is responsible for the main flow of light. The light part of the lamp resembles the shape of a cone. The light intensity is not the same along the entire length of the xenon lamp. It becomes lower in areas away from the cathode and higher in the center of the emitter.
Xenon in fogs! Trip to Ryazan by Metro! | AUTOGLOG
Before you start installing xenon yourself, you need to carefully prepare for the work. In addition to the lamps themselves, you will need to collect tools. To install “10 matches” in fogs we must:
- Flat head Phillips and screwdrivers;
- Super glue;
- insulating tape;
- spanners;
- how;
- narrow drill;
When preparing the equipment, disconnect the negative terminal from the battery. Then turn off the headlights. Use a wrench to remove the top two headlight mounting bolts. Then, using a screwdriver, unscrew the fasteners and remove the radiator grille of the VAZ 2110. Remove the lower mounting bolt of the headlight. Using a screwdriver, carefully remove the trim and place it in the center. We completely remove the cover and use a #10 socket to unscrew the bolt holding the headlight to the bracket. Remove the headlight and proceed to step two. Using a screwdriver, carefully slide the hydraulic adjuster clamp and remove it from the headlight. We then remove the turn signals by unscrewing the two fasteners. Then delete the PTF “10 matches”,
READ Error Code 14 on Niva Chevrolet
Next, clean the inside of the car headlights from dust and polish the walls of the plastic housing. Then we will move on to connecting the xenon wires and standard fog lights. We take a knife and cut off the brown and yellow wire of a standard car cone. Brown wire. minus, but yellow. plus. Using pliers and a knife, thoroughly clean the ends of the wiring harness. Take a pair of thin pliers or a collar and wrap them around the connector. “have” two thin brown and one wide dark wire. Secure the entire range with electrical tape. Then wrap the yellowish wires and one narrow dark wire around the second "have" connector. Isolate the connection again. We apply xenon lamp to the car headlights to ensure the dimensions are correct. If you find that the xenon is out of focus, you need to cut the lamp a little with a rattle. Then clean the radiator walls.
Then, using a drill with a narrow drill bit, make a small hole in the headlight housing of an unfamiliar PTF. The wiring was extended into the hole. Insert the xenon lamp itself into the base of the fog lights and secure it with glue. Then connect the two “have” connectors, We connect the standard ignition unit according to the “10 matches” electrical diagram, Below we insert the headlight and screw it on. We connect the negative terminal to the car battery and check the operation of the optics. In those cases when you have completed the work strictly in the specified manner, you will immediately notice how the road lighting changes. The optics will shine even brighter, now you will have nothing to worry about.
No matter how reliable a radiator is, it can fail from time to time. There is no need to change the lamp right away, since some models of high-quality xenon soybean emitters cost from 1,500 rubles. and not only. You can fix them yourself. Let's see how to do this using the example of frequent lamp breakdowns. The most common problem with xenon face optics owners is oxidation of the wiring. In this version, the xenon begins to flash, which makes it very difficult to drive the car at night.
READ Temperature Sensor VAZ 2107 Injector Where It Is Located
If you see the same failure, you need to disconnect the negative terminal of the machine and disconnect the wires connected to the connector. "have", Then remove the electrical tape and carefully clean off any oxidation. As a result, they must be removed and connected. An additional permanent fault is the misalignment of the brown and yellow wires. This occurs after the parameters of the adhesive part of the electrical tape have been lost. When bare wires touch each other, the xenons either flash or are rare. It is necessary to disconnect the negative terminal and replace the electrical tape. You can then reconnect the wires and continue driving.
Why put xenon in fog?
An additional problem is the formation of sparks in a xenon field. Then such a malfunction is due to the fact that the wires, as a result of oxidation, moved away from the base of the lamp. You need to disassemble the headlight, remove the xenon and solder the wiring again. To avoid such damage in the near future, apply insulating tape to the solder joint.
From time to time, owners of a VAZ 2110 with xenon PTF complain about a loss of light intensity. This does not mean that the issuer will soon fail. It is possible that the connection between the dark narrow and thick wires with the connector has been broken. To do this, you need to disassemble the electrical tapes and check the contacts. If there is a passage, if the cause of the problem is not the solution, make sure that one of the wires is not blocked by the headlight. When selling, the headlight must be carefully moved and the wires carefully removed from below.
Not many Russian automakers produce xenon, although they are high-quality products that deserve the attention of buyers. We invite you to take with you the most reliable lamps with a long service life and attractive shine. Leader of the global xenon economy. Philips products. The range of these lamps is sold in the price range from 600 to 2300 rubles. for one issuer. These devices are characterized by a long service life. about 9-12 months. Most branded Philips flashlights come with built-in mini-connectors, which greatly simplifies the process of installing them in automatic optics.
READ Replacing Fog Light Bulbs Mazda 6
Another popular company that produces high-quality lamps is Bosch. The price of emitters from this manufacturer is a little overpriced. about 4 thousand rubles. per piece, but this does not prevent the company from becoming one of the leaders in xenon sales. Bosch lights are quite reliable and easy to install. Even today they are almost impossible to short circuit due to modern surge protection.
The third most popular company among buyers is Ella. This company is developing only on the Russian market, but it is already in demand in Europe and America. Cost per Ella lamp Depends on modifications. The price for issuers starts from 300 and ends at 3.5 thousand rubles. The products of this company are distinguished by their originality and effectiveness. The company was the first to use special cathodes that emit unusual reddish and yellowish colors.
If you are interested in this, it means that you have the enthusiasm to do something yourself in the car and really save since you already know this:
- 100 huge money for regular computer diagnostics
- You need to consult a specialist to find out the error
- Regular keys work in services, but you can’t find a good specialist
And of course you are tired of spending money and don't need to drive 100 all the time, then you need a regular AUTOScanner ROADGID S6 Pro that connects to any car and you can always find the problem with a regular phone, BUY and save
We tested the myth scanner on different machines. and it showed accurate results, we now recommend it to everyone! To prevent you from falling into Chinese fakes, we publish a link to the auto scanner here.
Source
Advantages and disadvantages of xenon
The main advantage of xenon lamps is their high power. A similar halogen lamp produces light with significantly lower intensity than a xenon lamp. High intensity of luminous flux can provide significant advantages to the owner of xenon headlights in speed capabilities, maneuvering and safety in conditions of poor visibility. In addition, the color spectrum of xenon lamps is as close as possible to daylight, which reduces eye fatigue for the motorist.
Another important advantage of xenon lamps is the absence of filament in their design. Xenon lamps can last up to three thousand hours, while halogen lamps provide a maximum of one thousand hours of operation. Also, do not discount the more economical energy consumption of xenon lamps, which is 35 W versus 55 W for halogen lamps.
This significantly saves battery power and reduces the load on the generator. In addition to everything else, xenon optics are more protected from melting, since their heating during operation is no more than 60 percent of the temperature of halogen optics.
When installing xenon optics yourself, its main disadvantage is that it blinds oncoming drivers for quite a long time, which can lead to an emergency situation. But, if xenon lamps are installed and configured correctly, such problems, as a rule, do not arise. Dazzling drivers of oncoming cars is only possible if the xenon optics are not adjusted at all or are adjusted incorrectly at home.
Other problems are also possible. Adjusting the lamps can be significantly difficult due to the fact that the diffuser is unsuitable for such variations in luminous flux. In addition, self-diagnosis systems of new cars in some cases do not perceive xenon optics as an efficient circuit component. Thus, the on-board computer detects the lamp burnout as a result of its lower power consumption. In other words, the lack of standard power consumption by the lamp is diagnosed by the computer as burnt out.
The inability of xenon optics to the electrical circuit, which is designed for halogen lamps, can also cause such a negative phenomenon as flickering light. In this mode, the lamps last much less than expected, and the constant flickering quickly tires the motorist’s eyes. The problem with computer diagnostics of lamps can be corrected by installing a special unit that simulates a xenon lamp as a “halogen” lamp for diagnostic systems. In some cases, the problem is solved by simply replacing the xenon lamp transformer.
Pro Tip: A focusing lens will help you avoid blinding oncoming drivers.
To avoid dazzling oncoming drivers, it is necessary to install a focusing lens, which provides a stream of light of high brightness and high clarity, as well as excellent quality of the light beam as a result of the special lens glass that is included in the kit. In addition, focusing lenses are capable of uniformly dispersing headlight light, thereby creating a clear boundary between illuminated and darkened areas. Therefore, when using such lenses, it is impossible to blind pedestrians or oncoming motorists.
Benefits and Potential Problems
Bi-xenon does an excellent job of illuminating the roadway and adjacent areas. This applies to both headlights and fog lights. A characteristic feature of xenon is that it emits bright white light with a blue tint.
Xenon in headlights and PTF
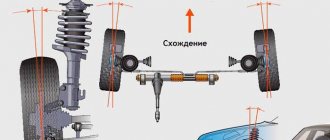
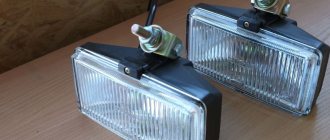
Fog lights from Bosch, which are installed on the VAZ 2110, do not have lenses. Instead, reflectors are provided here. This makes the beam of light not low enough.
Therefore, when installing xenon, it is very important to install focusing lenses so that the bi-xenon behaves appropriately. That is, it illuminated the road efficiently and did not blind oncoming cars.
Set
Of course, without dismantling the old headlights it will be impossible to install xenon devices. Dismantling is performed as follows.
- The vehicle is deprived of power by removing the negative terminal from the battery.
- The connectors going to the headlights are disconnected. All without exception.
- The fasteners are removed from the top mount. The bolts are located there.
- The radiator grille is dismantled.
- The bolt that holds the headlight unit in its lower part is removed. He's there alone.
- Next, pry up the cover using a flat-head screwdriver and remove it.
- Now take a 10 mm wrench and use it to remove the fixing nut to the bracket.
- All that remains is to remove the headlight unit.
- Do not forget to pry the hydraulic correction cylinder retainer using the same flat-head screwdriver to remove the unit.
- The direction indicators are removed. To do this, simply unscrew a couple of bolts.
How to remove a VAZ headlight block (step by step instructions)
- We de-energize the car by removing the negative terminal from the battery.
- Next, disconnect all connectors from the headlights.
- Then unscrew all the bolts from the top mount.
- After this, remove the grille from the radiator.
- We unscrew one bolt that secures the headlight block from below.
- Using a screwdriver, pry up the cover and remove it.
- Next, take a ten key and unscrew the nut securing it to the bracket.
- Then remove the headlight unit.
- Now we pry it with a screwdriver and turn the hydraulic corrector cylinder lock, and then remove it.
- Remove the turn signal. To do this, unscrew several bolts.
Installing xenon on a VAZ 2110
If you are the owner of Kirzhach headlights, then installing xenon on a VAZ 2110 will not be difficult, but owners of BOSH (Automotive Lighting) headlights will have to put a little effort and file it down. Let's analyze the headlight step by step:
1. Disconnect the negative cable from the battery; 2. Next, you need to disconnect the 2 electrical connectors of the headlight; 3. Using a wrench, unscrew the 2 bolts of the upper headlight mounting; 4. Remove the radiator grille; 5. Unscrew the lower fastening bolt; 6. From the turn signal side, pry out the decorative trim using a screwdriver; 7. You need to slide the trim towards the center of your car and then remove it; 8. Now unscrew the nut securing the headlamp to the bracket using a 10mm wrench; 9. Remove the headlight; 10. Using a screwdriver, pry the hydraulic corrector cylinder retainer. Turn it and remove it from the headlight housing; 11. Unscrew the 2 screws securing the turn signal and then remove it. Now let's install a xenon lamp using the BOSH example, for which we need to remove the halogen. You will need 4 mothers: two with regular fastening and two for thick wire.
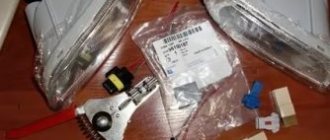
1. First, remove the halogen lamp; 2. In the photo you will see the cut points on the brown wires, indicated by arrows (Yellow = “+”, Brown = “-”). After cutting off the desired places on the wires, expose them with a knife;
3. Now take 2 brown wires, as well as the female for the thick wire, clamp with thin pliers and insulate; We carry out similar actions with the yellow wire, but we use the mother with a conventional mount. Insulation is necessary to prevent short circuit between positive and ground. 4. Insert the xenon lamp. To do this, take a file and make a hole (the place for expansion is indicated in the photo with black arrows); 5. Next, drill a hole with a diameter of 23 mm in the protective cover and pull the lamp wires into it;
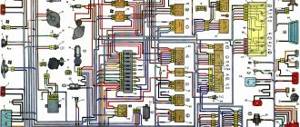
6. Insert a xenon lamp into the hole, secure it, connect the females and close the lid. Be careful not to confuse “+” and “-”. The final stage is checking the correct connection. According to the diagram indicated in the instructions for the xenon, connect the ignition unit. Connect the headlight, connect the negative wire to the battery and secure it with a “10” key. When you turn on the low beam, intense, bright xenon light will appear. Do not ignore the instructions, as a short circuit may occur if the connection is incorrect! Finally, the negative wire can be disconnected from the battery and the wire from the headlight. Replace the headlight. Glue the ignition blocks using 2-sided tape in a place convenient for you.
After installing xenon, do not forget to adjust the headlights. Good luck on the roads!
- Author: Soulless Robot
Rate this article: Share with friends!
Related posts:
Removing and installing headlights VAZ 2110
Do-it-yourself installation of xenon on a VAZ Priora
Installing lenses and xenon in headlights on Volga Gaz 3110
Legal modules for legal installation
To carry out a legal installation, it is advisable to buy a good legal module. For example, headlights from Hella work great, but they must be of the second generation, since they have fairly wide lenses. The designation of these headlights is Lens G2. They are installed standard on the BMW E60, i.e. the quality is excellent.
But there are minor differences with those installed on the VAZ 2110, as a result of which they should be slightly modified.
You will need two pieces:
- Bi-xenon lamps.
- Ignition block.
- Ignitor.
- Hella lenses.
Xenon, installation in Kirzhach block, step-by-step instructions
- Getting the wires ready. Traditionally, brown is a minus, yellow is a plus. We crimp two pluses, as well as two minuses, in turn and carefully isolate them.
- We file the holes for the lamps, trying on the light bulbs. Just don't overdo it.
- We install bi-xenon lamps.
- We pull the wiring from the lamp into the protective cover. However, for this you need to drill a corresponding hole.
- We mount and secure the headlight in the base. Do not reverse the polarity.
- We connect the ignition unit according to the diagram that comes with the lamp.
- We mount the lights back.
- We connect the battery.
Installation of xenon.
Before you begin the main work, you will need to purchase four “mothers”: two of them must have a regular fastening, and the remaining two must have fasteners for a thick cord. Only after everything has been purchased can you begin the step-by-step installation.
- At the first stage, two wires are cut with a knife - yellow and brown. The brown wire is “minus”, and the yellow wire is “plus”. Once everything is done, clean them up.
- Using pliers or a clamp, crimp two brown wires onto the pre-purchased female wire, and then insulate them with electrical tape for safety reasons.
- Carry out exactly the same actions with the yellow wires, only here you need to use the “female” for a thin cord. And you shouldn’t skimp on electrical tape, because if a short circuit occurs, serious problems will arise, and do you need them?!
- The xenon lamps themselves should be installed in the headlight without any problems or complications - freely, however, only if they are not from the manufacturer BOSH - you will have to tinker with them a little: manually, using a round file, you will need to enlarge the hole for the lamp entrance. The main thing is not to overdo it, otherwise you will have to rewind or build everything back up.
- Using a drill, drill a 23mm hole in the protective cover, then pull the wiring from the lamp into it.
- Insert the lamp into the base through the inlet hole and secure it.
- At the next stage - connecting the “mother” - you need to be extremely careful. When making a connection, do not confuse the “minus” with the “plus”! This error can damage either the xenon lamp itself or its ignition unit.
- We connect the ignition unit. During this procedure, it is better to follow the diagram that comes with the xenon. The diagram is drawn in an accessible manner, so it is almost impossible to make a mistake here.
- The final stage is connecting the headlight and connecting the minus.
Once both headlights are assembled, test yourself by turning on the low beam. If the glow is bright blue, then the installation of xenon on the VAZ 2110 was carried out correctly, and the new optics are ready for use.
Video on installing xenon on a VAZ 2110