Lampinfo
Popular
Advantages, popular manufacturers and features of connecting 12 V automotive LEDs
Home › Car light
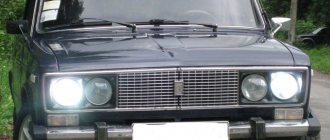
Car owners still use vehicles from the domestic automobile industry, but not all of their elements are durable. An example is the lamp in the low-beam headlights on the VAZ 2106 model. Let's consider which light bulbs are best suited for repairing them, what are the steps in the instructions for replacing them, and what common problems are encountered.
Which lamps are suitable
Low beam headlights are the most frequently used optical element of any passenger car model. Many people use them not only at dusk, but also as daytime running lights. This is why they quickly fail. The VAZ 2106 series model is equipped with a 12-volt H4 lamp with a power consumption of 55 W. The characteristic features of such a lamp are the presence of two filaments - which determines its operation in two modes - far and near.
There are several types of lamps for low beam headlights:
- The incandescent light bulb is an outdated model, burns out quickly, is characterized by low energy efficiency, and is practically not used by modern manufacturers.
- Halogen. The most popular. They have a good service life and sufficient brightness and other lighting parameters for road conditions.
- Xenon. They are distinguished by a good bright white glow that is 3 times stronger than that of their halogen counterparts. Disadvantages - they require additional installation of an ignition unit, and can also blind oncoming road users.
- LEDs. They have the best characteristics - durability up to 100 thousand hours, high brightness, low energy consumption, no overheating. However, they are expensive and require a special reflector design for full operation.
Advice! When replacing standard installed lamps in low beam headlights on a VAZ 2106, it is better to choose trusted manufacturers. For example, it could be the proven Russian brand Mayak.
Optical elements (headlights) Wesem for cars of brands
Optical elements Wesem for VAZ, FIAT
•metal optical element •glass •spring element for fastening the main lamp
Suitable for lamp types:
H4 12V 60/55W or H4 24V 75/70W
Catalog page
Modification options:
| vendor code | Description | Price | Basket |
| RE.02807 | WESEM RE.02807 High beam optical element for VAZ 2106, 2103 | 765 rub. | |
| RE.38307 | WESEM RE.38307 Low beam optical element with clearance for VAZ 2106, 2103 | 830 rub. | |
| RE.02707 | Low beam optical element Wesem RE.02707 | 825 rub. |
ADDITIONAL INFORMATION
The optics of the Polish brand Wesem are distinguished by excellent quality, power and durability, because the headlights of this company are manufactured under license from the world-famous manufacturer of standard and additional optics Hella. At the same time, Wesem headlights are an order of magnitude cheaper than Hella optics, although they are in no way inferior to them in reliability.
Meanwhile, the headlights of the VAZ 2106 Wesem have one significant drawback over Hell's optics - not such a wide variety of designs. After all, Hella headlights have more than a hundred models, differing in design, size and shape, and are also compatible with cars of the most prestigious brands, such as BMW, Audi, Range Rover, Ford, etc.
On the other hand, Vesem optics in our country has a wide range of consumers, because the number of owners of VAZ, GAZ and Niva cars with which they are compatible significantly exceeds the number of owners of expensive luxury foreign cars.
Our online store is able to satisfy the needs and requests of domestic car owners, offering high-quality Wesem optics at affordable prices!
Considering that the production technology of Wesem optics is absolutely identical to Hella’s, many consumers have a very reasonable question: “Why overpay for Hella headlights or fog lights if you can buy the same optics produced by Wesem?”
In fact, the Polish company Wesem carefully monitors the quality of raw materials allowed for the production of branded auto parts, and conducts a lot of tests that prove the high performance of optics in any climate and weather conditions.
Vesem's optics testing proves that these headlights can operate in a temperature range of -50 to +70 degrees Celsius, while the Hella headlights can withstand almost the same loads (their operating temperatures range from -50 to +80 degrees).
In addition, the tightness of Wesem optics reaches 5 atmospheres - Hella optics can boast the same indicator.
All Vesem headlights undergo mandatory certification for compliance with international standards.
Using categorical arguments, we assert that high-quality Wesem headlights are no worse than the optics of the most famous brands and are worthy of your attention! And our company will make sure that you purchase this optics at a low price with delivery to anywhere in Russia.
The design of the presented transport lighting devices is intended for lamps of type H4 12V or 24V.
Also, do not forget that good optics for cars is your safety!
An important stage in replacing standard optics with Optical elements from WESEM VAZ, FIAT is adjusting the headlights. More details about adjustment in our section "Useful information"
Recommended Use:
- Fiat 125p
- Fiat 1500
- Fiat FSO 125p
- Lada 2103
- VAZ 2106
- Polonez MR
- Star
- Jelcz
- Autosan
- Alfa Romeo
Step-by-step instruction
To replace a burnt-out lamp in the low-beam optics on a VAZ model 2106, you will need screwdrivers (flat-head and cross-head) and pliers. The repair procedure itself consists of the following steps:
- Disconnect the vehicle's on-board power supply and, if possible, disconnect the wiring from the battery terminals.
- Use a flat-head screwdriver to remove the trim panel on the outside of the headlights.
- Use a Phillips screwdriver to unscrew the bolts (not completely) securing the rims of the glass cups.
- The headlight is grabbed by hand and turned until the fastening screws fit into the grooves and it can be removed.
- The optics unit is removed from its seat.
- The block with conductors is disconnected from the back.
- Next, the headlight is installed with glass on a flat surface, and a pair of spring-clamps are bent to remove the lamp.
- The burnt-out light source can then be removed from the unit by pulling it up.
- Replace with a new copy.
- Reassemble in reverse order.
- Connect the car's power supply and check that the installed low beam lamp is working properly.
How to Improve the Headlight Light on a VAZ 2106
Adjusting headlights on VAZ 2103, VAZ 2106
Welcome! Sometimes the lights are on the road, and the eyes are very dazzled by the passing car, but those who drive this car are unlikely to think about whether other drivers will perceive its inverted headlights, so it was not like they always say from the very start and then move on to other people. So we ended up with "Oh yeah, the headlights are on" and that's why not every owner knows how to adjust the headlights on their car, so most of the time people have to drive with low headlights, which is why the road is very difficult to see or is located on high headlight heights, so you can change the direction of the headlights in the future, then read this article for detailed information, which details the entire installation process.
The note! To adjust the headlights, you need to take a screwdriver and a dark cloth to cover one headlight while adjusting the other, because all the headlights are installed one after the other, not all of them!
As for adjustments, you will need to stock up on: regular chalk to mark the building, but this is not necessary as the headlights can also be adjusted by eye!
Result:
How to adjust headlights on a VAZ 2103, VAZ 2106?
The note! Before starting tuning, be sure to wait until it is dark or, if this is not possible, adjust the headlights in any dark room, say, in a garage, but the car should be neat, not driver-friendly. seat, a person weighing about 75 should sit. kg, and when adjusting the pressure on the wheels, you also need to fix it!
READ How to Remove the Rear Drum on a Polo Sedan
Adjustment: 1) To adjust the headlights, first consider whether you are adjusting the headlights on the inside (bottom up) or outside (bottom down).
2) Say the light sources you found, and then draw on a certain structure with regular chalk here: This is the diagram for adjusting the external headlights:
Or here to configure the interior lights:
The note! The coordinates of these diagrams are: Figure 1 shows a horizontal line corresponding to the center of the headlight. 2, 3. Line passing through the centers of light spots. A and B, C and E are also vertical lines corresponding to the centers of the headlights. And the letter O. This is the center line!
Change of light. Medium long-range on VAZ 2106
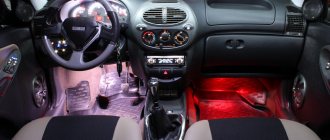
Installation and connection of internal headlights
in close-up mode
World
. Advantages. 1. No one went blind. 2. Great.
Improvement of the center of attention on the VAZ 2103-06 (double center)
In this video my friend Bone talks about how to give your neighbor a shine
in Zhiguli, for each
headlight
.
3) Then get into the car and place it on a flat surface, staying 5 meters away from this circle on the car.
READ Which Low Beam Bulb For Toyota Corolla
The note! Keep in mind that the mill next to the structure must be level, and therefore the machine must be strictly perpendicular to this wall!
4) Now remove the cover that covers the headlights from your car. (For information on how to remove the trim, see "Replacing Front Lights", step 3).
5) After removing the cover, cover the side lights with a thick, dark cloth that you do not plan to adjust.
6) Then turn on the low beam on your car and see how the right outside light shines, if necessary, then adjust it. (Continued from step 7)
7) To adjust this headlight, take a screwdriver and turn the screws that adjust the headlight to adjust the direction of the headlight.
The note! When adjusting, always try to first adjust the headlights in one plane, and only then adjust the headlights in another plane, for example, first adjust the headlights horizontally relative to the contour, and then vertically, by adjusting the headlights, you can adjust faster or more accurately. regulate!
If the exterior headlights are adjusted correctly, look at the diagram again and pay special attention to line 2, which must coincide with the upper limit of the exterior headlight bright spots! (Always remember that the settings are correct, adjust the outer headlights immediately, not the outer ones, then the inner ones, etc. Always adjust the headlights together)
READ Which Audi Is In Carrier 3
And again we draw your attention to the diagram, namely, let’s take a closer look at the intersections of the points of light with lines A and B!
The adjustment screws for indoor and outdoor lighting are shown in the photo below:
The note! Using screw 1. the headlight is adjusted in the horizontal direction, and screw 2. in the vertical direction. And if we are talking about an external headlamp, then there is an adjustment screw 3 for vertical adjustment, and a 4 screw for horizontal!
 Now move on to adjusting the interior headlights and adjust them as well.
9) Next, take a rag and cover the outer headlight if necessary, then turn on the high beams and check the inner headlight adjustment settings you just adjusted.
The note! If necessary, use a screwdriver to adjust the direction of the light beam, starting from one plane and then gradually changing the other!
When setting up interior lighting correctly, the light spots, namely their central part, should be on intersecting line 3, and this line should intersect with lines C and E!
10) Finally, turn off the headlights and then replace the headlights.
Additional Video: If you are interested, watch the video below where the lights are mounted on a special stand:
Common problems
Other, more common problems that may cause low beam headlight bulbs to not light even after replacement include the following:
- Damaged fuses - contacts are oxidized or the protective element is melted. In the VAZ 2106 they are located under the dashboard.
- The low beam relay has failed. A continuity check of the electrical circuit with a multimeter is required.
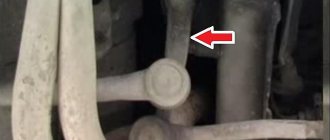
- Poor ground contact on the path from the fuse block to the optics module. It is necessary to clean the oxidized joint.
Recommendation! To double the degree of illumination from the low beam in the VAZ 2106, you can connect the third contact in the high beam module - since a lamp with two filaments is also installed there.
Lighting repair
Possible causes of malfunction
So, if the low beam on a VAZ 2106 in one of the headlights has disappeared, then, as mentioned above, most likely the light bulb has burned out.
If replacing the lamp does not produce results, then the following malfunctions may occur:
- The contacts in the block are oxidized or burnt;
- The fuse has blown;
- The relay has failed;
- The switch is faulty;
- There is a break in the circuit.
Below we will take a closer look at how to diagnose and fix the problem.
Replacing a light bulb
First of all, it should be said that the low beam lamp on the VAZ 2106 complies with the H4 standard, i.e. it has two threads, which allows the headlight to operate in two modes. Currently, such light bulbs are produced by different companies, both well-known brands and little-known companies.
It should be noted that domestic light bulbs are very popular among car owners. Their price is significantly lower than their imported counterparts, but at the same time they are not inferior in quality.
Advice! It is advisable to change the bulbs in two headlights at the same time, since their service life is approximately the same. In addition, different lamp models may differ in glow.
Instructions for doing this work look like this:
- First of all, you need to use a flat-head screwdriver to dismantle the plastic panel that frames the headlights.
- Then use a Phillips screwdriver to loosen the clamps that hold the headlight.
- Next, you need to slightly turn the metal hoop and dismantle it.
- Now you can pull out the headlight with your own hands and disconnect it from the block. At this stage, you need to pay attention to the connector contacts. If necessary, they need to be cleaned.
- Then you need to unfasten the clamp and remove the light bulb.
- Next, the work is performed in the reverse order - a new lamp is installed, which is pressed with a clamp, and the block is connected to the contacts. The headlight assembly must be installed in place and secured with a hoop. To complete the work, a plastic panel is inserted, on which you need to press lightly until you hear a characteristic click.
Note! When replacing a lamp, do not touch its glass bulb with your fingers, otherwise it may quickly burn out. If you do touch glass, you should wipe the surface with a cotton swab soaked in alcohol.
This completes the process of replacing the light bulb.
Replacing fuses
If after replacing the light bulb the low beam headlight on 2106 still does not light, you should check the fuses. They are located under the instrument panel.
In this case, you need to pay attention to two fuses:
- No. 5 – protects the left headlight from short circuit;
- No. 6 – protects the right headlight.
It must be said that the low beam on the VAZ 2106 often does not work due to the fuse contacts being bent or oxidized. In this case, they need to be bent and cleaned. If the protective element has melted, it must be replaced.
Note! The contacts in the fuse box cannot be closed directly, since the protective element could burn out due to the failure of the electrical equipment; accordingly, this could lead to more serious damage or even a fire in the VAZ wiring.
Troubleshooting other problems
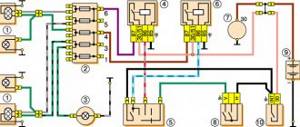
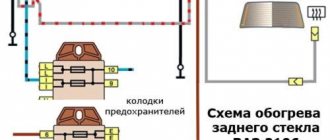
If the low beam on a VAZ 2106 does not light up, then to detect a malfunction you will need a multimeter to test the wiring, or at least a test light. The circuit and equipment should be checked according to the diagram below.
It must be said that the high and low beam relays on the VAZ 2106, which are indicated in the diagram as numbers 6 and 4, often fail.
Therefore, you can start checking with them.
Note! The relay for turning on the low beam headlights for the VAZ 2106 is interchangeable with the high beam relay, since these devices are of the same type.
- If there is no voltage supplied to the relays and fuses, you should check the wiring section from switch No. 5 to terminal No. 86 on the relay, as well as the section from the switch to the external lighting switch No. 8. If the machine's wiring is normal, then the switch has failed.
- If voltage is supplied to the fuses, then an open circuit must be looked for in the area from the block to the headlights. Often the breakdown is due to poor ground contact. In this case, you just need to clean the contact.
These, in fact, are all the reasons why external lighting may not work on the “six”.
Advice! Many car owners are interested in how to improve the low beam on a VAZ 2106, which few people are happy with? The problem can be solved quite simply - connect low beam lighting in the second headlight. The fact is that this device also has a double-filament lamp, however, the third contact is not connected to the circuit.
Main conclusions
To replace a burnt-out low beam lamp on a VAZ 2106, it is better to choose standard-installed halogen lamps with H4 characteristics of 12 V and 55 W. Other problems that lead to failure in this optics module include:
- A burnt-out element or oxidized contact in the fuse box.
- Relay failure.
- The ground connection wire is rusty.
When replacing light bulbs, you must strictly follow the instructions provided.
If you want to share your experience on how to choose and replace a low beam lamp on a VAZ 2106, be sure to write about it in the comments.
Previous
Car light How to choose and replace the dashboard light bulb of a VAZ 2114
Next
Car lightAll about low beam lamps for Gazelle
Troubleshooting other problems
If the low beam on a VAZ 2106 does not light up, then to detect a malfunction you will need a multimeter to test the wiring, or at least a test light. The circuit and equipment should be checked according to the diagram below.
Headlight switching diagram
It must be said that the high and low beam relays on the VAZ 2106, which are indicated in the diagram as numbers 6 and 4, often fail.
Therefore, you can start checking with them.
Low beam relay for VAZ 2106 (no. 3)
Note! The relay for turning on the low beam headlights for the VAZ 2106 is interchangeable with the high beam relay, since these devices are of the same type.
- If there is no voltage supplied to the relays and fuses, you should check the wiring section from switch No. 5 to terminal No. 86 on the relay, as well as the section from the switch to the external lighting switch No. 8. If the machine's wiring is normal, then the switch has failed.
- If voltage is supplied to the fuses, then an open circuit must be looked for in the area from the block to the headlights. Often the breakdown is due to poor ground contact. In this case, you just need to clean the contact.
These, in fact, are all the reasons why external lighting may not work on the “six”.
Advice! Many car owners are interested in how to improve the low beam on a VAZ 2106, which few people are happy with? The problem can be solved quite simply - connect low beam lighting in the second headlight. The fact is that this device also has a double-filament lamp, however, the third contact is not connected to the circuit.