What you need to buy
To work, you need a specific set, which includes the following products:
- Headlight kit. Fog lights for the Lada Granta are available in two versions: “BOSCH”, produced in Ryazan, and PTF Kirzhach, produced in the city of the same name. The first type has straight glass, the second has convex glass; this is the easiest way to distinguish them.
- Installation kit. It includes all the necessary wiring with connectors for connecting to the headlights, interior wires, a power button and a relay. That is, in one kit you get everything you need to connect with your own hands, and its price is quite affordable.
- Additional materials. This includes corrugation for laying wiring under the hood, crimp terminals, electrical tape and other useful little things. For installation you will also need a drill with drills, a round cutter and preferably a 60 mm ring drill, although you can do without it.
Important! Additionally, stock up on a sharp knife and self-tapping screws for attaching PTF, if they were not available, these little things will greatly simplify the work.
General installation plan
- We place the car on the inspection channel (pit).
- To make work easier, remove the rear bumper.
- We remove the trim in the trunk.
- We fix the trailer hitch to the side members.
- We remove and secure the removable ball.
- We kick the electrical wiring in the outlet.
- We collect structural elements.
Step-by-step algorithm for installing a tow bar on a Lada Granta liftback with your own hands
At the initial stage, use the inspection hole to have access to the bottom of the car. A hydraulic jack is not effective in this case.
Next step: removing the bumper. Here, the opinions of most experts were divided into two versions: with and without removal. In order to prevent damage to the surface of the plastic and paintwork, it is better to temporarily remove the rear bumper. Given the simplicity of the design, this can be done in no time.
To install electrical wiring, remove the floor and side trim in the luggage compartment cavity. Use a flat-tip screwdriver to pry up the plastic clips, remove them, and unfasten the trim.
The original trailer hitch is secured with six bolts, four of which are on the side members, two on the rear bumper mounts. By default, the manufacturer has provided for the possible installation of a trailer hitch by preparing holes for the bolt at “17”. In order to prevent the formation and development of corrosion, the holes are sealed with film.
We remove the removable ball, fix it outward with a bolt at “17”. Cover the surface with a thin layer of graphite lubricant and put on a plastic cap.
Connecting the Lada Granta Liftback tow bar:
The pinning of the “socket” is carried out as follows:
The numbering of pins on the motherboard starts with one. The pin is located at 12 o'clock, then clockwise. We secure the socket box and put on the trailer drawbar. We check the pinout first. We assemble the structure in the reverse order, installing the Granta liftback towbar with our own hands is completed.
Bumper removal algorithm
- Unscrew the front license plate.
To access the mounting bolts, remove the front license plate - There are two mounting bolts under the bumper. Unscrew them with a 10 mm head.
- After opening the hood, remove the six bolts securing the radiator grille.
With the hood open, find and unscrew the bolts securing the radiator grille - Unscrew the 3 bolts that secure the bumper from below.
The next step is to unscrew one of the bolts and a pair of screws securing the bumper, - Unscrew a pair of screws on each side connecting the fender liners to the bumper.
Unscrew a pair of screws on one and the other side of the bumper - After this, remove a pair of screws from the side of the wheel arches.
Unscrew four screws in the wheel arches - a pair on each side - Pull the corners of the bumper forward in the direction of travel and remove it.
LADA KALINA, GRANTA (1119, 2192)
Figure 2-14 shows the main version of the trailer hitch installed on the LADA KALINA (hatchback).
Figure 2-14 – Design and delivery set of trailer hitch LADA KALINA, GRANTA (1119, 2192): 1 – left trailer hitch bracket; 2 – rod; 3 – right trailer hitch bracket; 4 – socket box; 5 – hook
Remove the rear bumper in accordance with the requirements of section 1 TI 3100.25100.20470 for car 1119 and section 2 TI 3100.25100.20568 for car 2192.
On the inside of the cross member 2, see Figure 2-11, the floor of the rear, right 1 and left 3 rear side members, clean the embedded threaded holes 4 from the PShM layer, two on each body element, including on the left side member (flat-head screwdriver) .
Install bracket 1 on the left side member, see Figure 2-14, on the right side side member bracket 3 and secure the brackets with the bolts supplied, without tightening.
Install the rear rod 2 on the floor cross member and secure it with the bolts supplied, without tightening.
Connect the brackets to the rod using the bolts supplied, without tightening.
Tighten the bolts securing the rod to the rear floor cross member, then the brackets to the body side members and to the rod (replaceable head 17, 19, knob).
Install hook 5 and socket 4 on the rod (spanner 19, replaceable head 19, knob).
Install and connect the electrical equipment of the trailer hitch.
Where can I install PTF
In the design of the modern Granta, the installation locations are precisely worked out: under the license plate, on the sides. Some bumpers even have indentations there. In any case, for proper installation, the front bumper of the car will have to be removed.
But before that, you should go shopping and find the necessary parts. Today's market offers both bumpers with recesses and bumpers with headlights already installed. The choice, as always, remains with the owner.
Most Lada Granta cars do not have fog lights, but there are recesses in the bumper for do-it-yourself installation
Criterias of choice
Lada Granta with an installed towbar (towbar)
Before choosing a towbar for a car, you need to know what volumes of cargo it will have to work with. Saving money on a low-capacity towing vehicle won't work in your favor if you're hauling heavy items. Therefore, choose components for your Lada that are appropriate for the weight load.
It is worth considering that not every tow bar is suitable for the Granta, because it is initially designed for a specific make or model of car. On the towing device for the Lada Granta (liftback) its compatibility with car models will be separately indicated.
To install the product on your car, you will need:
- a set of keys of different sizes;
- actually, a towbar (with a socket, as well as wires included) for the Lada Granta.
It can be played by the Leader Plus VAZ - 19A model or any other . When choosing a model, keep in mind that it must be made of thick and reliable metal and have a high-quality paint layer.
Model “Leader Plus VAZ - 19A” – equipment
There are 2 types of sockets on the market:
- plastic. In some cases, the bracket dimensions may not fit;
- duralumin. They are more versatile.
We stock up on everything we need
To install fog lights on a Grant, you will first need to assemble the required equipment:
- fog lights – 2 pcs;
- relay for 4 or 5 contacts with a capacity of 15A;
- switching;
- On-off toggle switch or external lighting control unit.
PTFs that are suitable for this car model are produced by two enterprises - Avtosvet in Kirzhach and Bosch in Ryazan. You can also purchase universal fog lights that will suit your specifications. Once you have purchased all the items from the list above, you can get to work.
Reviews
| from 3200 | ||
| 3. | Bosal (1237-A) | from 2900 |
| 4. | Leader-Plus (T-VAZ-22A) | from 2600 |
| 5. | Bosal (1229-E) | from 2900 |
| 6. | Bosal (1218-A) | from 3900 – 4200 |
| 7. | Bosal (2190.01.С) | from 3500 |
| 8. | Baltex (27.2208.12 – 1) | from 2800 |
| № | Positive |
| 1. | Kirill , 41 years old: before buying a trailer, I purchased a tow bar from Leader-Plus (101030). Despite the budget price of the product, the quality is good, the welds are even, the socket fits tightly to the metal base. My recommendations. |
| 2. | Konstantin , 36 years old: I bought a trailer for trips to the dacha, a necessary thing on the farm. The previous owner installed a towbar on the car. It is in good condition, no corrosion, although the paint is a little cracked. I didn’t change it; Leader-Plus is happy with it. |
| 3. | Vyacheslav , 44 years old: after an accident, the trailer hitch had to be replaced in the rear bumper. I didn’t invent anything, I bought Leader-Plus by analogy. |
| 4. | Gleb , 33 years old: as befits a novice entrepreneur, he bought a trailer. The only thing left is the tow bar. The store recommended several models, I settled on Leader-Plus. I don’t need particularly sophisticated ones; I won’t transport large loads. |
| 5. | Alexander , 40 years old: the previous owner sold Grant together with a towbar and trailer. Condition is good, no corrosion. For objectivity, I took it to a service station to diagnose the bottom, no comments. My garage mates advised installing a more powerful tow bar, but I’m happy with the standard one. |
| 6. | Gennady , 37 years old: I’ve had Granta since 2011, I made cosmetic repairs, tinted it a little, treated it with anti-corrosion agent. Due to frequent transportation of goods, the bottom is heavily damaged by gravel, stone, and rust in some places. At the service center they said that it was still ok, the tow bar was normal and didn’t need to be changed. |
| 7. | Vladimir , 29 years old: bought a trailer for the Granta, all that remains is to buy a trailed one. The store recommended Leader-Plus, Bosal, Baltex. I wanted to take Bosal, but the price was prohibitive, so I settled on Leader-Plus. Despite the cheapness, it turned out to be quite good. No complaints, I'm happy. |
| Negative | |
| 1. | Alexey , 34 years old: I was looking for a trailer hitch in a store, I immediately refused the budget Leader-Plus, I heard a lot of negative things. I didn’t check it, I bought Bosal. 1000 more expensive, but the quality is obvious. |
| 2. | Victor , 39 years old: I bought a trailer for commercial purposes, the only thing left is the tow bar. Various modifications were offered on the car market, I immediately refused the budget version and opted for VFM (844947MS). |
| 3. | Igor , 35 years old: the previous owner of Granta installed a trailer hitch from Leader-Plus. Since I heard negative reviews, I replaced it with a new one from Bosal. The cost is more expensive, but the quality is above average. |
Conclusion As for the choice of towbar for the Lada Granta, it is necessary to proceed from the size of the allocated budget and the weight of the goods being transported. If we are talking about large numbers, it is obvious that there is no need to save. Buy more expensive models, for example, Bosal Baltex. Weight does not exceed 500 - 600 kg in total - a budget solution from Leader - Plus is enough. Subject to moderate use, the service life of each modification is approximately equal. The process of installing a towbar on a Granta liftback is not at all complicated, it is intuitive.
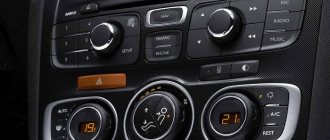
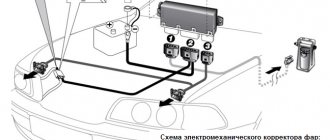
How to put a button
The first method is described in detail in the instructions for the kit. This is what the installation diagram will look like using the button from the installation kit.
The first installation option is to turn on the headlights with a separate button
Here it is worth mentioning the connection rules. The blue wire is connected to the “plus” of the ignition, the white wire is connected to the “plus” of the side lights, and the black wire is connected to the “minus”. There must be a relay in the system. The current strength when the headlights are working reaches 35 A, so without it the button will not last long. Power to the relay is supplied from the fuse box or directly from the battery, as shown in the diagram.
New Lada: Lada X Ray: description, technical characteristics, modifications
Review of Manufacturer Prices
| № | Name / OEM part number | Price, rub.) |
| 1. | Leader-Plus (101030) | from 2500 |
| 2. | VFM (844947MS) |
Lada Granta Liftback / Lada Kalina
*prices are as of September 20, 2018.
The cost of a towing coupling device ranges from 2500 to 4200 rubles.
Obviously, in the first case, this is a budget option, which is purchased by most motorists. The quality and service life are at an average level, not comparable to top-end options made from high-quality steel.
How to wire and connect a headlight
To connect the PTF you will need various tools:
- installation kit for connecting fog lights on Grant. It includes a button, a relay, wiring in the cabin, wiring under the hood;
- corrugation (for example, 9 mm for the interior and 16 mm for the hood);
- insulating tape;
- drill;
- set of drills;
- 10 mm head;
- 13 mm wrench.
An installation kit for connecting fog lights on a Grant will make the car owner’s work much easier
The fog light connection plan looks like this:
- Take out the battery.
- Unscrew the screws securing the platform underneath.
For wiring under the hood, remove the platform under the battery - Moving the panel to the side, loosen the bracket nut, removing the fuel pipes.
- The wire begins to be laid from the right headlight through the mudguard, then under the compressor, generator and cooling system fan.
Start routing the wire from the right mudguard along the front of the hood - The wire from the second headlight is routed through the left mudguard.
- Both wires are connected in the engine compartment.
Then they are placed in corrugation. Connector for the second headlight (black wire on the right side of the picture) - Pass the corrugation under the ABS block next to the headlight hydraulic corrector tubes, inserting it into the cabin through the rubber bands of these tubes.
You can enter the cabin through a separate hole (to do this you need to cut a hole) or through an elastic band near the hydraulic corrector tubes
The wiring under the hood is complete.
Now you can install the battery in its original place and attach the bumper. The diagrams below indicate where the ground terminals can be secured on the right side.
- Right headlight: one of the ends, as is customary in electrics, is attached to ground
- The terminals are attached in the same way on the left side.
- The left headlight is attached to ground in a similar way.
What tool do you need?
In addition to headlights, to equip a car with PTF you must have:
- self-tapping screws (6 pieces for attaching headlights);
- drill;
- set of drills;
- countersink or sandpaper;
- stationery knife;
- sealant.
Experts recommend installing headlights in accordance with the following plan:
- A hole with a diameter of up to 10 mm is drilled in the center of the oval for the headlight.
Make a 10mm hole in the center of the notch to start cutting - Starting from this hole, cut a circle along the inner diameter with a stationery knife.
Starting from the center of the hole, carefully cut out a circle of the required size. - Use sandpaper or a countersink to process the hole, the contour of which should be equal to the outer diameter of the headlight.
After cutting the hole for the headlight, sand it down so that it does not extend beyond the outer diameter - Using self-tapping screws, install the headlight in the bumper.
Secure the headlight using self-tapping screws - The cracks remaining after work are filled with sealant.
After installing the headlight, coat all joints with sealant.
The last paragraph of the instructions is optional. However, experts recommend not to neglect it, otherwise dirt, snow or water may get into the cracks.
The steps described above are repeated in the same sequence to install the second headlight.
Installation of PTF (photo instructions)
As you may have already noticed, the Lada Granta bumper is a single molded plastic form, in the body of which there are places for fog lights, hidden by plugs. The next step is to cut out these plugs.
- It's best to mark the location for the cutout first.
- This work should be carried out with extreme care and precision.
In order to cut holes, you can use either a regular stationery knife or more professional equipment - a drill. We cut out the hole as carefully as possible. - In any case, accuracy and complete avoidance of haste are the key to perfect completion of the task.
However, no matter what you use to cut these holes, they will in any case require treatment to remove burrs, irregularities and burrs. It is also not important to carry out these works with just one thing, be it a file, sandpaper or a grinding attachment of a drill, the main thing is that the result is an evenly cut hole with clean and smooth edges. We clean all edges from irregularities. - After carrying out these operations, you can proceed directly to the installation of fog lights.
We fasten the fog lights with bolts.
New Lada: About stamped wheels on Lada Granta cars
Preparatory stage (selection of PTF for Lada Granta)
In order to install the PTF in the Lada Granta, special installation locations will be required. Fortunately, the standard bumper already has such standard places from the factory. Their dimensions are completely similar and identical to the PTF from Kalina and have two different types.
The first is sold under the Bosch brand in Ryazan and has a flat glass headlight block, and headlights with convex glass are produced under production in Kirzhach. These two types of headlights have the same mounts, so choose for yourself which headlights to buy for yourself.
On the left side there is a PTF from “Bosch” (LUCH), on the right side there is “Kirzhach”.
Connecting the Lada Granta tow bar (electrical)
As you know, most towbars have a special connector for connecting electrical wiring. In order to be able to connect electrical appliances to it (for example, for a trailer with headlights, brake lights, etc.), it is necessary to stretch the wires and connect them correctly. It is best to lay the wires through a special technical hole located behind the rear bumper of the Granta on the left side. Pass the wires through the rubber seal.
Next, the procedure is as follows:
- On the left side, remove the trim, as well as the plastic trunk lining.
- Next, you need to connect the towbar socket connector to the power supply circuit for the rear lights. To make the correct connection, please read the instructions included with your product.
Click to enlarge - After connecting the outlet, return the trunk trim to its original condition.
- We install the trailer hitch ball and secure the fastenings for the sub-cutter.
This completes the installation of the product.
“Take note! When the towbar is installed on the Lada Granta, apply a layer of lubricant to the coupling ball. Thus, you will reduce its friction and premature wear during operation. In addition, we recommend that you treat the connecting contacts of the socket with a special liquid insulation agent. This way you will avoid oxidation of electrical connectors.”
Step-by-step preparation process
- First of all, remove the minus terminal from the battery.
- To make the PTF installation much easier, you need to remove the bumper.
- To do this, we unscrew 4 screws on the wheel arches, 2 self-tapping screws on the mount at the bottom of the bumper, as well as all the nuts that secure the engine crankcase protection or boot, which come from the manufacturer's factory.
After this, unscrew the radiator grille.Hooray! Removed!
- And only after completing all this work will it be possible to easily dismantle the front bumper. And this must be done very carefully so as not to damage the mounting points and the body itself: first of all, we pull off each of the corners, and then, prying the bumper from below, we take it out of the fixing points.
Installation work
To install the device on the Lada Grant, you do not need to drill many holes. It will be enough to use standard ones located on the body. They are covered with tape and coated with an anti-corrosion agent . You will need to attach a tow bar to the body and secure it with 6 bolts, the threads of which must match the body holes.
Installation work on installing a trailer hitch on a Lada Granta
You can use an extension to secure one of the bolts behind the spare tire.
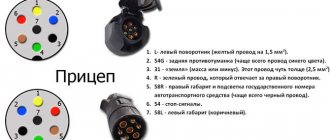
After this, you will need to lay wires from the luggage compartment of the Lada to the socket of the product. The included wires make it easy to connect to the trailer and ensure the operation of its headlights for road safety. First take care of reliable insulation of the wires to prevent moisture from entering during operation and to avoid short circuits. The process is carried out through a standard hole, which you can find at the bottom of the Grants bumper on the left. If you connect the conductors according to the wrong diagram, you will have to spend more than one hour correcting it . To save time, experts recommend testing the circuit on a tester. The algorithm for installing wires is as follows:
- strip the wire braid. Leave the cable uncut. Insulate the wires with regular electrical tape so that you can put heat shrink on them;
- Insert the cables into the clamps on the socket and solder them with a soldering iron. The work is carried out in this way: the blue wire is soldered to the rear right headlight, as this corresponds to the right turn signal. The brown wire is connected to the side lights. The complete connection diagram is in the figure;
- check the correct connection using a tester to avoid short circuit;
Installation of the Lada Granta trailer hitch socket
- install the socket to the product fastener;
- lay all the wires at the bottom of the luggage compartment;
- carry out a check of the socket block, testing all the light signals and pre-connecting the connector. If the test shows the lighting is working correctly, you can use it.
source
Checking the operation of fog lights and final assembly
https://www.youtube.com/watch?v=GRS59jqT9Ms
Before you begin assembling all the assembled elements, you need to check everything for functionality.
First of all, we check all fastening points for secure fixation - this applies to both the wires and the headlight unit itself. Then connect the terminal to the battery and see how the light elements work. If everything worked out and works, we assemble everything in the reverse order of removal and enjoy the work done.
Scheme using mus
This option is more complicated, but it allows you to display an indication of the operation of the fog lights on the dashboard. In addition to the installation kit, you will need to purchase Lyra type terminals (large and small).
Lyra terminals. Small (top), large (bottom)
In addition, you will need an ICC block from Granta Lux. There are two types of this module on sale, the differences between which are the presence of one more switch position and additional contacts. The price of MUSs also differs by almost a third.
IUS: front view (4 positions on the left, three on the right)
In addition, the following must be available:
- two power relays with blocks;
- two 15 A fuses;
- wires with a cross section of 1.5 kV and 2.5 kV.
IUS: rear view (4 positions on the left, three on the right)
Required tool:
- soldering iron;
- insulating tape;
- flat screwdriver;
- Phillips screwdriver;
- 22 mm wrench with long handle.
The installation procedure looks like this:
- The fuse box cover is secured with clips, so to remove it, just pull it towards you.
- Unscrew the three screws holding the instrument cluster panel: a pair at the top, one under the fuse panel.
- The combination itself is held on by four screws. Unscrew them, then, moving it to the side, remove the connection connector. It is held in place by a special switch, which is turned to the side.
- Then remove the steering column trim.
- We got to the ICC.
Unscrew one screw above it and remove it from the block. There will be two latches on the sides that can be pressed with a screwdriver. By unscrewing one screw (in the foreground) and removing the latches, pull the MUS out of the panel - Remove the handle from the headlight hydraulic corrector by pulling it towards you, then loosen the nut holding it to the panel, push it deeper, and move it down slightly.
After removing the handle from the headlight hydraulic corrector, unscrew the fixing nut and press it into the dashboard - Now unscrew the screw securing the fuse box.
The screw securing the block must be unscrewed - By removing the screw and moving the block to the left, release it from its fastenings.
Then you need to turn it over, after first removing several relays on the left side. The fuse box must be reversed to provide power for future headlights. - Connect the pink wire from the ignition and the blue wire from the mounting block, so the “plus” will be supplied to the circuit.
Solder the joint, then insulate it. Pink and blue wires - “plus” for powering the headlights - Next, look for empty spaces on the fuse block for sockets F16, F17 indicated in the diagram below.
Even if there are no headlights, there are places for their fuses - Now large Lyres are put on the ends of the wires coming from the fog lights and inserted into the fuse block. The left headlight is switched on to fuse 17, the right one - to 16. The two remaining fuses must be connected to the power relay, as indicated in the diagram.
The corresponding wires must be brought out and connected to external contactsThen an additional wire is connected to the instrument cluster to indicate that the headlights are on, connecting to pin 15.
- The entire structure is assembled in reverse order. From now on, the inclusion of fog lights will be ensured through the ICC, like the rest of the head lighting.
New Lada: Technical characteristics of VAZ Granta 1.6 AT, liftback, 106 hp. (2015-2020 release)
PTF connection diagram according to the second option
Installing a towbar on a Granta (trailer hitch) — Lada Granta, 1.6 l., 2013 on DRIVE2
Hello, dear subscribers! I decided to install a tow bar (tow hitch) on my magma. The trailer has already been purchased. I'll tell you about him a little later, in the next blog. I need all this for work, but I’ll tell you about the household too, very useful things. The cargo, which is planned to be transported from time to time, is light in weight. It is light, but dimensional. So a trailer is an ideal solution for such problems. Now I’ll tell you directly about choosing a manufacturer. The selection at our local market is small. I found only a tow bar in stock. In principle, the company, according to reviews on the internet, makes good and reliable towbars. But there was a regular welded one-piece towbar available, but I wanted a model with a removable ball. In the end, I still found this model on the market, BUT at an expensive price! In our “Cossack” market they are very good at making money on people who are intently looking for something. In 10 minutes. searches, the entire market already knows what you are looking for. And accordingly, the price rises at every counter. Anyone who knows about similar market schemes (the so-called runners) will understand what I mean... Well, okay, in general, I found what I was looking for.
This is what it looks like:
Towbar for Grants
Now a little about installing it on a car. On our Grant, oddly enough, the factory provides standard mounts for the tow bar, located in the rear side members. This is very pleasing, because you don’t have to drill anything. The same is provided for Kalina, in a sedan body. Well, those who have a Kalina hatchback are a little less fortunate. There, the towbar has a completely different shape and design, and for it it is necessary to make two holes in the spare wheel niche. The towbar itself is attached at 6 points with M10 bolts.
Layout of threaded holes in the side members:
Towbar attachment points.
When I first looked under the bottom, I was terribly upset. The fact is that I found only two threaded holes. They were behind the rear bumper. But there were none on the side spars. I was already prepared for the fact that I would have to drill, somehow grab the nuts, etc.))) But then, in the hope of a miracle))), I decided to carefully examine the bottom again. I took a closer look and discovered that in the supposed places where the tow bar would be attached, under the factory layer of anti-gravel, some square gaps were visible. It turned out that these were exactly the same threaded holes, they were simply sealed with square pieces of film and masked on top with anti-gravel. Underneath the film was a pristine carving. It’s nice that AvtoVAZ cares about such little things.))) I figured out the tow bar in place and tightened the 6 bolts included in the kit. All the holes in the towbar matched the threaded holes in the body.
Two bolts on the left side member.
Two bolts on the right side member.
Towbar mount located behind the rear bumper. (one of two bolts)
It is very difficult to tighten the bolt that is screwed in behind the rear bumper on the right side of the car. It is very difficult to get to it; the spare wheel niche is in the way. I managed to tighten it with a ratchet with two extensions and two cardan shafts. After the tow bar was screwed to the body, I started laying the wiring for the connector.
I passed the wires through the standard rubber seal located on the left side under the bumper. Moreover, I decided not to make holes in this rubber band, but rather to insert the wires along with the standard ones. I had to get pretty fucked up! In the end, this is what happened:
I won’t specifically describe the connection to the standard wiring. The towbar comes with a detailed diagram with pinout of the connector. Well, in standard wiring, everything is simply checked with a multimeter. Photos after connection:
I connected the wires to the connector like this:
To ensure that less water gets into the connector itself and to prevent the wires from rubbing against the metal, the following coupling was purchased from electrical goods:
After connecting the wiring harness and tightening the coupling:
To check the functionality of the electrics and the correct connection, I temporarily asked a neighbor for an old trailer.
Well, that’s all) If you have any questions about electrics, write in the comments!
Page 2
Hello, dear subscribers! I decided to install a tow bar (tow hitch) on my magma. The trailer has already been purchased. I'll tell you about him a little later, in the next blog. I need all this for work, but I’ll tell you about the household too, very useful things. The cargo, which is planned to be transported from time to time, is light in weight. It is light, but dimensional. So a trailer is an ideal solution for such problems. Now I’ll tell you directly about choosing a manufacturer. The selection at our local market is small. I found only a tow bar in stock. In principle, the company, according to reviews on the internet, makes good and reliable towbars. But there was a regular welded one-piece towbar available, but I wanted a model with a removable ball. In the end, I still found this model on the market, BUT at an expensive price! In our “Cossack” market they are very good at making money on people who are intently looking for something. In 10 minutes. searches, the entire market already knows what you are looking for. And accordingly, the price rises at every counter. Anyone who knows about similar market schemes (the so-called runners) will understand what I mean... Well, okay, in general, I found what I was looking for.
This is what it looks like:
Towbar for Grants
Now a little about installing it on a car. On our Grant, oddly enough, the factory provides standard mounts for the tow bar, located in the rear side members. This is very pleasing, because you don’t have to drill anything. The same is provided for Kalina, in a sedan body. Well, those who have a Kalina hatchback are a little less fortunate. There, the towbar has a completely different shape and design, and for it it is necessary to make two holes in the spare wheel niche. The towbar itself is attached at 6 points with M10 bolts.
Layout of threaded holes in the side members:
Towbar attachment points.
When I first looked under the bottom, I was terribly upset. The fact is that I found only two threaded holes. They were behind the rear bumper. But there were none on the side spars. I was already prepared for the fact that I would have to drill, somehow grab the nuts, etc.))) But then, in the hope of a miracle))), I decided to carefully examine the bottom again. I took a closer look and discovered that in the supposed places where the tow bar would be attached, under the factory layer of anti-gravel, some square gaps were visible. It turned out that these were exactly the same threaded holes, they were simply sealed with square pieces of film and masked on top with anti-gravel. Underneath the film was a pristine carving. It’s nice that AvtoVAZ cares about such little things.))) I figured out the tow bar in place and tightened the 6 bolts included in the kit. All the holes in the towbar matched the threaded holes in the body.
Two bolts on the left side member.
Two bolts on the right side member.
Towbar mount located behind the rear bumper. (one of two bolts)
It is very difficult to tighten the bolt that is screwed in behind the rear bumper on the right side of the car. It is very difficult to get to it; the spare wheel niche is in the way. I managed to tighten it with a ratchet with two extensions and two cardan shafts. After the tow bar was screwed to the body, I started laying the wiring for the connector.
I passed the wires through the standard rubber seal located on the left side under the bumper. Moreover, I decided not to make holes in this rubber band, but rather to insert the wires along with the standard ones. I had to get pretty fucked up! In the end, this is what happened:
I won’t specifically describe the connection to the standard wiring. The towbar comes with a detailed diagram with pinout of the connector. Well, in standard wiring, everything is simply checked with a multimeter. Photos after connection:
I connected the wires to the connector like this:
To ensure that less water gets into the connector itself and to prevent the wires from rubbing against the metal, the following coupling was purchased from electrical goods:
After connecting the wiring harness and tightening the coupling:
To check the functionality of the electrics and the correct connection, I temporarily asked a neighbor for an old trailer.
Well, that’s all) If you have any questions about electrics, write in the comments!
www.drive2.ru
Installation of PTF via a separate button
- You just need to take a special kit for connecting the PTF for Lada cars of the Kalina/Priora/Grant family.
- This kit includes all the necessary materials, as well as detailed installation instructions.
- Still, as a rule, the main drawback of this wiring is the short wires for the PTF power button, but they can be extended without problems by cutting in the required length of wires.
Everything you need is already included in this set.
The installation should be carried out strictly according to the instructions, leading the wires from the PTF directly to the mounting block, along the bumper and side member, laying the wiring to the button itself. It is important to secure all wires with plastic clamps and place the wires in a corrugated tube where they are subject to maximum wear.
Types of towbars for Grant
There are several types of products on the market that differ in their design features.
- with a small carrying capacity (up to 1500 kilograms);
- with increased force (usually from 3000 to 3500 kg).
By type of structure:
- with removable ball;
- with a non-separable, one-piece construction;
- differing in the types of fastenings and the shape of the hook with the ball;
- quick-detachable structures.
Preparatory work
To install the product on a car, you need to know whether your vehicle has technical holes for mounting bolts. The owners of the Lada Granta and Kalina (sedan version) were much luckier in this regard than other representatives of the VAZ model range. The automaker has pre-provided standard mounts, which are located on the rear side members (4 pieces) and directly behind the rear bumper (2 pieces).