VAZ-2114 ignition module and its features
The passenger car ignition module is specially designed to improve the starting of a car engine. Since two high-voltage coils operate as the main components of the module, it is often called the “ignition coil”.
Let's look at the structure of this part:
- coils for generating high voltage;
- two-channel electronic switch;
- durable plastic case;
- low-voltage connector for supplying control pulses;
- terminals for connecting high-voltage wires to spark plugs.
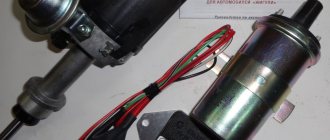
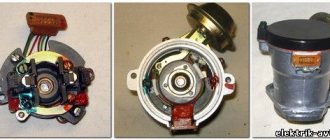
The main operating elements of the ignition module are high-voltage coils that distribute the igniting spark to the spark plugs. This is possible thanks to the following design:
- Wires for high voltage transmission.
- Low voltage terminals.
- The windings on the core are secondary (for igniting the working mixture) and initial.
- Electrical steel core.
The mechanism of operation of the ignition coil is as follows:
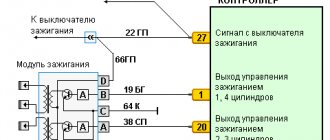
- the electronic engine control unit collects all signals from the sensors located on it;
- The ECU generates a control signal;
- the signal goes directly to the ignition coil;
- that, in turn, forms a high-voltage voltage;
- voltage from the coil is supplied to the engine cylinder spark plug;
- the fuel-air mixture ignites;
- the engine starts.
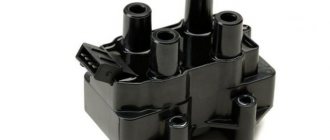
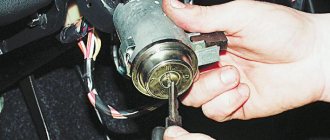
Even an inexperienced car enthusiast can find this part: just trace the path of one of the high-voltage wires - from the spark plug to the plastic case.
This housing houses the ignition module.
Video on repairing KZ VAZ
Often, when the ignition module breaks down, the car owner immediately runs to the store and buys a new one. But, for the VAZ-2112 there is an alternative method - repair. Of course, without proper knowledge in auto electrics, it will be difficult to understand all the circuits and communications. This article will tell you in the most accessible way how to repair the ignition module with your own hands.
VAZ-2114 ignition module: various signs of malfunction
Experts note the main symptom of a faulty ignition coil is the absence of an igniting spark on the spark plugs. But, besides this, there are other signs by which one can judge that the module has failed:
- Lack of dynamics during engine acceleration.
- The appearance of failures in the operation of a car engine at the moment of sharply pressing the gas pedal with your foot so that the vehicle accelerates.
- A noticeable decrease in engine power (as they say, “the engine doesn’t pull”).
- “Swimming” of idle speed.
When the first signs of a malfunction of the described module appear, the owner of the VAZ-2114 should diagnose it. This can be done either independently at home or at the nearest service center for repairing cars of this model.
How to check the ignition coil of a VAZ
If the ignition coil is faulty, the engine will not start. A characteristic sign of a faulty coil is its increased temperature when the ignition is turned off. This is easy to determine by touch.
Signs of a faulty ignition module may include the following:
- hesitant engine starting or failure to start;
- failures during sudden changes in speed;
- high fuel consumption;
- two cylinders do not work, the engine is feverish;
- lack of dynamics;
- a sharp drop in power;
- drop in power and thrust after warming up.
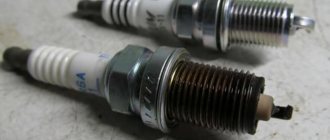
These symptoms may not only be caused by the ignition module. To determine the malfunction, it is enough to spend a few minutes diagnosing spark plugs, high-voltage wires and caps. This will eliminate the remaining elements of the ignition system and make sure that it is the ignition module that is faulty.
Methods for preventing the ignition module on a VAZ-2114
Malfunctions of automobile ignition coils on the VAZ-2114 can be avoided if preventive procedures are regularly carried out. These include:
- Periodic unraveling of high-voltage wires (associated with greatly increased internal resistance, as this can damage the module).
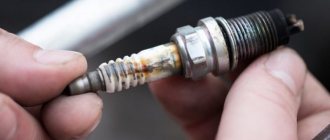
- Checking the spark gap between the electrodes of the spark plugs (if the distance between the electrodes changes, this will affect the efficient operation of the ignition coils).
If faulty spark plugs are identified, they are replaced, after which the car will function properly again.
https://youtu.be/pNyBny-_HoQ
Connecting and replacing VAZ short circuit
The procedure for removing and installing the ignition coil on old VAZ models:
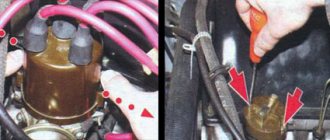
- First, disconnect the central high-voltage wire leading to the distributor (ignition distributor).
- Disconnect all power wires from the coil contacts. Since they are fastened with nuts, you will need an 8 wrench for this.
- If you don’t know which wires to connect to which connector later, it’s better to immediately remember or mark them somehow, so that later during installation you can connect them correctly.
- Unscrew the coil housing. It is attached to a clamp (clamp), which is pressed to the car body with two nuts.
- After the work has been done, you can remove the ignition coil and replace it if necessary.
For new type VAZ cars:
- We remove the “minus terminal” from the battery.
- Remove the top protective cover of the engine. If the engine volume is 1.5 liters, then this part is missing and this step is skipped.
- We remove the high-voltage wires from the coil.
- Now, using a 13mm wrench, unscrew the two fasteners.
- Using a 17mm wrench, loosen one bolt securing the coil.
- We take out the module.
- Use a hexagon to unscrew the coil from the holder.
- Assembly is carried out in reverse order.
Particular attention should be paid to the connection, since high-voltage wires must be located in the strict order provided for by the design. If this is not done, the car will stall or the engine may not start at all.
Replacing the ignition coil on a VAZ is quite simple. Even a novice motorist can do this in his garage, and if everything seems too complicated, contact a car service center. Particular attention should be paid to the choice of product, since this will determine how well the engine and ignition system will work.
Preparation stage
Diagnostics of how the ignition module and each individual coil operates is carried out using a special device called a multimeter or ohmmeter. Its functional task is to show the voltage value supplied by the ignition module. As a result of diagnostics, it is possible to identify the source of current loss in the circuit and, accordingly, the nature of the malfunction. To facilitate painstaking work, it is recommended to dismantle the module outward before starting the process.
Ignition module VAZ-2114 - malfunctions
The malfunction of this system can be judged by the following signs. Firstly, failures in the vehicle when accelerating can indicate coil malfunctions. Secondly, this can manifest itself in a significant loss of machine power, as well as in “floating” engine idle speed. And thirdly, incorrect operation is indicated by non-working cylinders 1-4 or 2-3.
It should be noted that such symptoms very often occur due to a faulty mass air flow sensor or idle air regulator. Therefore, first of all, we look at their performance, and only then we diagnose the ignition module.
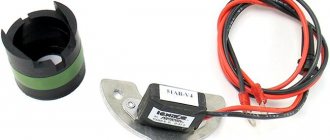
Ignition module repair
If the ignition module does not work, you can try to rehabilitate it:
- Take 10, 13 and 17 end keys, a 5 hex key, a regular screwdriver, a soldering iron, aluminum flux, nail polish, and stranded wires.
- Most often, the connection in the ignition system deteriorates - those same contacts.
- We turn the key in the ignition, start it, move the contacts, and get a comprehensive answer in the absence of their quality connection.
- Now we turn off the engine and remove the ignition module out.
- You need to open it, pry up its body with a screwdriver.
- Inside the board is covered with silicone film - remove it.
- We remove all aluminum from the explosive contacts.
- Now comes the hard part: we need to solder new wires to the plan from where we just removed the old ones.
- First, you need to clean the surface of the collector from plaque, then put the board on the stove and heat it to 200 degrees (approximately by eye, of course), it will start to smell a little when it reaches the desired temperature and soldering on it will become much easier.
- Now, actually, we solder: we connect the ends of the wires to the module.
- We cover all the contacts of the wires with the module and the board with nail polish.
- Now you need to put everything back together, put the ignition device in place and start the engine. Only after this, when you are convinced that everything is working properly, can you take the sealant and seal it tightly.
- Individual elements that have failed. They cannot be repaired, they are only for replacement. Fortunately, the price for them is adequate: a switch is within 200 rubles, a transistor is from 200 to 300 rubles.
A very important point: in common parlance, as here, the ignition coil and the ignition module are synonyms. But in terms of technical design, no. For fourteenths with different engine sizes, different spare parts are installed: for 1.5-liter Samaras of the old generation, it is the ignition module, and for 1.5 and 1.6 liters of the new generation Samaras, it is the ignition coil. The switch of the new type of machines is hidden in the electronic control unit, it turns out that the module was broken, and they began to call it by the name of its main part - the coil. Be careful when choosing a spare. parts from disassembly: do not confuse them, given this fact.
If we talk about service, the price is not worth the cost. It’s easier to figure everything out yourself, even more so. That there are a lot of resources where they can give you advice and help. The main thing is to remember the layout of the high-voltage wires and their good contact. It happens that incorrectly connected wires contribute to improper combustion, a spark hits the relay. And the ignition module completely burns out.
In fact, the ignition coil on the 8-valve VAZ 2114 is not quite the correct name. The fact is that the coil is installed on carburetor cars, and on the “fourteenth” it is the module that is used. Regardless of what you call this element, it refers to the same unit. And it periodically fails, which entails the need for repairs.
- Functions and tasks
- Signs of breakdown
- Error codes
- Module replacement
- Repair
How to check the ignition module on a VAZ 2114
An ignition module is needed in a car to produce high voltage current, which then ignites the spark plugs. On different VAZ vehicles, a separate or block ignition module can be installed. In separate type modules, there is a separate coil for each cylinder. In block modules, one coil is used for two or all cylinders at once. It should be noted that the block ignition module is much easier to remove, check and install back, compared to a separate one.
The VAZ 2114 is now available with a block ignition module; its coil design includes: a core, a winding, high voltage wires and low voltage terminals.
How does a malfunction of the ignition module manifest itself:
Note. Some drivers believe that high-voltage wires and the ignition module are completely different things, and if the wires become faulty, the module will not be affected. This is mistake. If the wires are damaged, the spark may not fire accurately, which can result in the ignition module burning out altogether.
The easiest way to check the ignition module is to install a similar, working ignition module instead of your own. If this is not possible, then you can get by with a multitester or a regular 12-volt light bulb (“control”).
Checking the serviceability of the ignition module using a multitester
Checking the health of the winding
Set the multitester to ohmmeter mode to measure the resistance between the terminals of the secondary winding. Install the probes on the leads to the first and fourth cylinders, then to the second and third (see video below). Usually the tester shows a result close to 5.4 kOhm (plus or minus 0.1 kOhm). The main thing is that the resistance between paired terminals is approximately the same. If the difference exceeds 100 Ohms, then this is evidence of failure of the secondary winding.
Solution to the problem: replacing the ignition module.
Checking the serviceability of high-voltage wires
You need to “ring” the wire block. Set the multitester to voltmeter mode, disconnect the wire block from the ignition module. Place one probe on contact A, the second on engine ground. Have someone start the engine (or turn the starter), and you note the display readings for yourself. Normally, the voltage should be around 12 Volts. Do the same manipulation with the other contact.
If there is no voltage at all, then you need to check the fuse: it may have blown. There are three fuses on the VAZ 2114 electronic control unit. The third one from the top, rated 7.5 A, is the fuse for the ignition module.
There may be no electric current not only due to a blown fuse, but also due to oxidation or broken wires or loose contacts.
Video: How to check the ignition module
Checking the serviceability of the ignition module using a “check”
If you don’t have a multitester at hand, a 12 V test light will help you check the ignition module. Connect one wire of the light bulb to the contact of block A, the other should be shorted to the engine body. Now let someone start the engine (or turn the starter), and you look at the light bulb - it should flicker. Do the same manipulation with the other contact.