Hello, dear motorists! Today's topic is devoted to a small part, which, if it malfunctions, can cause you unpleasant moments and an uneven running car engine.
Let's consider the role played by the camshaft position sensor (camshaft), the causes and signs of its malfunction, and, of course, how to replace the camshaft sensor with your own hands.
While the principle of operation of the camshaft sensor is almost the same, its location depends on the type and model of the engine. Therefore, when checking faults and replacing the sensor yourself, start with the manual in your hands.
What is a camshaft sensor
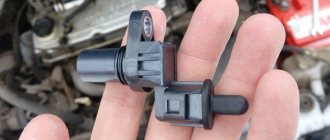
Camshaft position sensor
The camshaft position sensor performs the task of determining the angular position of the timing belt, corresponding to the position of the engine crankshaft. The engine management system, receiving information from the camshaft (camshaft) sensor, performs fuel injection and ignition.
The operation of the camshaft sensor is based on the Hall sensor principle. That is why the camshaft phase sensor is sometimes called a Hall sensor.
The operation of the Hall sensor is based on measuring the direction of movement (voltage change) of charge carriers. The change is recorded at the moment the semiconductor crosses the magnetic field. A permanent magnet placed in the sensor creates this magnetic field.
A metal tooth (reference mark) placed on the camshaft gear (or on the drive disk) closes the magnetic gap. And, when the reference passes by the camshaft sensor, it causes a voltage pulse in the sensor, which is then transmitted to the electronic control unit.
Voltage pulses are supplied at different times. The ECU recognizes the position of the piston of the first cylinder of the engine at TDC (top dead center) of the compression stroke, and ensures the injection and ignition of the fuel mixture.
For engines with a variable valve timing system, the sensors are installed on the camshafts of the intake and exhaust valves.
The camshaft timing sensor on a diesel engine measures the position of the pistons of each cylinder at TDC on the compression stroke.
How to check the camshaft sensor
When the Hall sensor occurs, we receive a signal from the malfunction indicator. It should be noted that the camshaft sensor is functionally connected to the crankshaft sensor. And while driving, if a malfunction of the camshaft sensor occurs, the control system reads information from the crankshaft speed sensor. The engine is even able to restart after stopping.
Checking the camshaft sensor is based on the driver’s knowledge of typical malfunctions and their symptoms. And after identification, the logical action is to replace the camshaft sensor.
What are the typical causes of camshaft sensor failure?
- the toothed disk of the pulse sensor is broken,
- the mounting ears have ruptured, the sensor has moved,
- short circuits in the internal circuit of the sensor,
- increase in engine temperature.
Typical symptoms of a Hall sensor malfunction
- the engine ECU operates in emergency mode,
- fuel consumption increases noticeably,
- The engine control light on the panel lights up,
- a fault code is registered.
Naturally, you will not be able to determine a sensor malfunction by eye. To do this, you will have to contact a car service for testing. Checking the signal reception from the sensor is carried out using an oscilloscope. During the memory test, a complete list of faults will be shown.
Visually, you can only check for external mechanical damage to the sensor, clean the sensor head, check the electrical circuit: for breaks, for correct connection of the connection connectors.
Replacing the camshaft sensor is a completely do-it-yourself task. Before purchasing a new sensor and replacing it, use the car manufacturer's recommendations from the manual, use only those parameters specified by the manufacturer.
Main signs of failure
If the sensor becomes unusable, the shape and magnitude of the output signal is disrupted. The microcontroller polls the device for no more than 5 minutes. If there is no signal from the sensor, the control unit is switched to emergency operation mode. Then only the sensor on the crankshaft is analyzed, fuel injection is supplied to two cylinders simultaneously. on 10%. The main signs of a phase sensor failure:
- Significant increase in gasoline consumption.
- Deterioration of the dynamic characteristics of the car.
- Difficulty starting the engine. In the best case, it will start in 3-5 seconds.
- The Check Engine light comes on on the dashboard.
- Violation of ECU and system diagnostics.
- Errors P0343 or P0340 appear on the on-board computer.
Malfunctions of the phase sensor on the VAZ-2114 (8 valves) lead to exactly this engine behavior. It must be taken into account that malfunction can also occur if the timing belt breaks or the marks are set incorrectly. And also with excessive wear of the gears on the camshaft and crankshaft.
What is a camshaft sensor, the principle of operation of the camshaft sensor
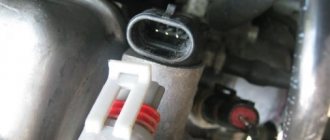
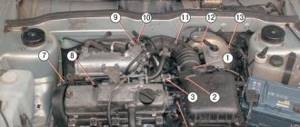
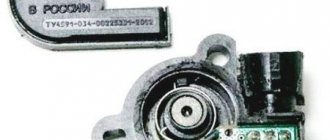
To understand the operation and principle of operation of the device, you need to know where the camshaft sensor is located. The sensor is located on the side of the pump and power steering pulleys. The sensor axis always corresponds to the direction of the camshaft axis.
The camshaft sensor is a device that ensures the normal operation of the car engine. It determines the angular position of the timing mechanism in relation to the position of the crankshaft. After this, information from the sensor goes to the engine management system to control fuel injection.
To answer the question: “What is a camshaft sensor for?” You need to understand the principle of its operation. The sensor itself contains a magnet that creates a special magnetic field. A reference point (pin or metal tooth), which is located on the master disk. It closes the magnetic gap and changes occur in the magnetic field.
The engine control unit, having received a signal from the sensor, receives data on the position of the piston of the first cylinder. After this, the control system sets fuel injection and ignition of the fuel mixture, according to the operating order of the engine cylinders.
Important! If you notice that the camshaft position sensor has failed, you need to replace it as quickly as possible to reduce fuel consumption and normal vehicle operation.
DESCRIPTION
What is ABS in a car and why is ABS needed? How does an anti-lock braking system work?
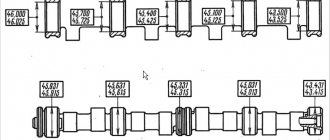
The exhaust camshaft variable valve timing (VVT) sensor (G signal) consists of a magnet and an MRE element. The exhaust camshaft has a toothed disc with 3 teeth on the outer circumference. Exhaust camshaft changes the air gap between the 3 teeth and the sensing coil, which affects the magnet. As a result, the resistance of the MRE element changes. The camshaft position sensor converts exhaust camshaft gear rotation data into pulse signals and uses them to determine the camshaft angle, which is sent to the ECM. The ECM uses this information to determine the duration and timing of fuel injection. The crankshaft position sensor toothed disk has 34 teeth. The pickup coil generates 34 signals for each engine revolution. Based on the G signal and the actual crankshaft angle, the ECM determines the normal crankshaft angle. The ECM also determines the engine speed based on the NE signal.
| DTC No. | DTC Detection Condition | Faulty area |
| P0365 |
|
|
| P0367 | Camshaft position sensor output voltage is less than 0.3V for 5s(1 trip detection logic) |
|
| P0368 | The output voltage of the camshaft position sensor is more than 4.7 V for 5 seconds (1-trip detection logic) |
|
Meter design and location
The operating principle of the DPRV is based on the Hall effect - the sensor reacts to the approach of a metal mass by changing the voltage on the signal wire. The design of the device is similar to another element - the crankshaft position detector. Inside the plastic case there is a coil where the 12 V on-board voltage is constantly supplied.
The meter is installed on the engine cylinder head in close proximity to the camshaft. The latter is equipped with a special plate or gear, whose rotation affects the DPRV. The work algorithm looks like this:
- After turning on the ignition and starting the engine, a 12 V supply voltage is supplied to the sensor. Through the third signal wire, the element supplies the controller with a voltage of 90–95% of the original one.
- When the protrusion on the rotating part of the camshaft passes next to the DPRV housing, the voltage at the signal contact drops to 0.2–0.4 volts, depending on the design of the device and the vehicle model.
- When the voltage drops, the electronic unit clearly “sees” the valve timing, promptly supplies the fuel mixture to the engine cylinders and directs the spark discharge to the desired spark plug.
Note. On cars with 16-valve engines, 2 sensors are installed - one for each camshaft.
When the meter is faulty, the electronics are unable to control the operation of the gas distribution mechanism. In such cases, the control unit goes into error and is guided by the signals of other meters. Spark generation and fuel supply are adjusted according to the programmed program, which affects the operation of the power unit.
We recommend: How to check the spark on an injection engine
How to check the camshaft position sensor
Crankshaft position sensor, testing methods, symptoms of malfunction, location
When troubleshooting a suspected DPRV fault, you should follow the diagnostic guidelines in the vehicle manufacturer's literature to isolate the faulty component when a DTC is present. There is no other way to know what is causing the problem (spark, bad ignition module, coil, computer, bad wiring or ignition switch).
Magnetic DPRVs can be checked by disconnecting the electrical connector and checking the resistance between the terminals. For example, on a GM 2.3L Quad 4, the sensor should show a voltage between 500 and 900 ohms. When testing DPRV, always take into account the technical specifications of the vehicle manufacturers. Obviously, if you see zero resistance (short circuit) or infinite (open) resistance, this means that the DPRV is not working and needs to be replaced.
Camshaft sensor location
As you might expect, the specific location of the camshaft position sensor varies depending on the make and model of the vehicle.
On most models you can find the sensor somewhere around the cylinder head. Inspect the top of the timing belt/chain cover (at the front of the engine) or the rear end of the cylinder head. Some GM models may have a special compartment for the sensor. Additionally, some Mercury Villager and Nissan Quest models place the sensor inside the distributor housing, as well as some Dodge Ram B1500, B2500, and B3500 series gasoline-powered models.
Testing a two-wire inductive sensor
A spar in a car, what is it, what does it look like, what is it for, what is it like
There are a number of common signs of a faulty DPRV. If you have these problems, you may need to replace it. These same symptoms can be caused by problems with the ignition or fuel injection systems. Thus, before replacing the DPRV, it is worth conducting tests to determine the real source of the malfunction.
If the check light comes on, your ECU is recording a trouble code. You can check for errors using a special diagnostic tool. Codes between P0335 and P0338 correspond to DPR problems.
This is probably the easiest and most accurate way to test and determine the problem of the DPRV. Unfortunately, the DPRV, as a rule, fails much earlier than the corresponding indicator lights up. To be constantly aware of the car's problems, it is worth conducting other types of testing.
RPM is the next method for checking the DPRV, which also requires a diagnostic tool. One of the scanner settings allows you to read the engine speed in revolutions per minute (RPM). Set up the scan tool to read engine speed and start it. The scan tool should read between 100 and 500 rpm. A low value indicates that the DPRV is not working properly. “0” means that the DPRV is completely out of order.
Multimeter testing
Of course, not everyone has access to a scanner (although they can sometimes be rented from parts stores). A multimeter is a more common and very useful tool for diagnosing many of your vehicle's electronic components. The multimeter can measure voltage, current and resistance.
You can remove the DPRV and then check the resistance. Attach one end of the multimeter to each DPRV wire. A resistance of 0 means there is a short circuit. Infinite resistance means there is an open circuit. Any of these readings indicate that the DPRV is not working. For any other value, check the manufacturer's instructions. If the reading does not match the recommended resistance, you must replace the DPRV.
Another way to check the DPRV using a multimeter is to check the output voltage using a motor. To do this, you will need an assistant. Strip the connectors and measure the output voltage in AC millivolts. Typically, this reading is about 200 millivolts, but may vary depending on the brand of car. Check the specifications in the user manual. If there is no output voltage, then obviously your sensor is not working properly.
These tests will help you determine the source of the problem. They will either prevent repairs you don't need or confirm that the repairs you are about to make are the ones you actually need. If testing really confirms that your DPRV is faulty, you will have to replace it.
Instructions for checking and replacing
If the above methods failed to normalize its condition, then this part must be replaced. There is nothing complicated in replacing, as well as in checking, since their camshaft is mounted without adjusting the gap. Thanks to this function, you can avoid mistakes when installing a new device. If the gap is adjusted, certain standards must be observed.
If you are not sure that replacing the camshaft sensor yourself will be successful, take it to a special service center. There the replacement is made using an oscilloscope. When starting the oscilloscope, stability of data reading is observed at different engine speeds.
If you have an oscilloscope and you are confident that you can do such a procedure, do it. Just pay close attention to the changing data that the oscilloscope will show. If it shows straight stripes and there are no gaps, that's good. Because you just have to remove the old one and install a new one.
In principle, if you use this method, you need to take into account many points and features that the tester provides in order for the replacement of this camshaft part to be successful. Since, if the indicator does not work, then, logically, the engine should not work. But technology is a delicate matter, and sometimes it malfunctions. If the sensor and built-in electrical devices do not know the location, they go into an emergency state. And, being in this state for a long time, the sensor fails.
We recommend: Symptoms of a faulty coolant temperature sensor
Signs indicating a faulty camshaft sensor
Now let's talk about how we can accurately recognize the failure of the DF. These are, in particular:
- the “Check” sign lights up on the instrument panel;
- problems and failures that appear in self-diagnosis mode;
- deterioration in dynamics and reduction in power;
- increase in fuel consumption.
It should immediately be noted that these signs may also indicate some other problems. However, one of them is a malfunction of the camshaft sensor. If, after starting the engine, you see the Check sign on the dashboard, while the starter continues to crank for a few more seconds, then the problem is most likely in the DF. The thing is that if it fails, then when the engine starts, the ECU will wait for some time to receive information from the camshaft sensor.
If the electronic control unit does not receive any signal from the DF, it will still give the command to start, based on the ignition system. The on-board computer will also indicate a problem with the camshaft sensor. In this case, error codes will light up on its display - 0343 or 0340. These numbers indicate either an open circuit in the sensor circuit or a failure of the device itself. Accordingly, the diagnostic process is greatly facilitated.
In most cases, damage can be detected by visual inspection. In the VAZ-2114, the camshaft sensor is located in close proximity to the cylinder head, near the air filter. Carefully inspect the DF body - there may be some mechanical damage on it. Their presence is almost a 100% sign of a malfunction. Next, you should check the contacts for possible moisture. They can short-circuit from this; accordingly, the sensor simply cannot transmit information to the electronic control unit.
In addition, check the contacts for oxidation and rust, due to which information is not transmitted to the ECU correctly. The next step is to inspect the chain. If you find broken or damaged wires, replace them and then check the operation of the car. If no problems are found, you should continue your search.
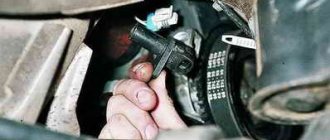
Quite often a breakdown occurs in which it is simply impossible to do without replacing the camshaft sensor. It’s quite possible to do this operation yourself – you don’t have to go to a car service center and pay the specialists for the work. The sensor is attached with just one bolt - to unscrew it, you need to take a 10mm wrench. Then you can remove the device itself. Be sure to immediately close the connector into which the sensor is inserted to prevent dirt or dust from falling into it. In order to confirm your guess, you can install a known working sensor, borrowed, for example, from someone you know. If the car works fine after this manipulation, feel free to go to the store and buy a new one.
It should be noted that on a VAZ-2114 with a 16-valve engine, the DF is located near the camshaft, under the air manifold. Accordingly, getting to it will be more difficult. To make the process of replacing the camshaft sensor here more convenient, it is recommended to first remove the radiator grille. It is secured with 2 bolts - the easiest way to unscrew them is with the help of a head extension. Further, the algorithm of actions is the same as described above. By the way, try to thoroughly wipe the old sensor and return it to its place. It is possible that the device will work normally again. If it doesn’t help, then you’ll have to fork out for a new one.
Operating principle of the sensor
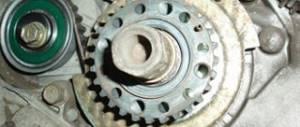
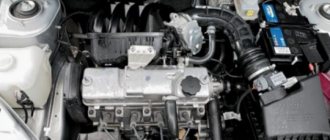
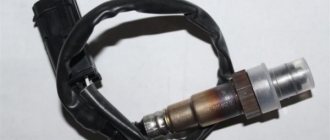
General view of the camshaft sensor
The camshaft sensor or phase sensor is a part of the main power unit of the car, which is responsible for reading information about the location of the camshaft and is also involved in adjusting the ignition angle.
This meter is similar in principle to a Hall sensor .
We recommend: Electrolyte for batteries
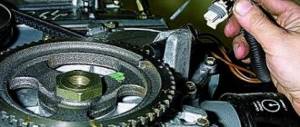
Reading occurs using a special camshaft gear that has no teeth. The missing elements are located in such a way that when this gap hits the sensor, the first piston is at the dead center, at the top or bottom.
Phase sensor operation diagram
A signal is triggered and transmitted to the engine's electronic control unit when the sensor hits the missing teeth. In turn, depending on the received indicator, the ECU adjusts the ignition angle. Thanks to the installation of such a system, Samara-2 engines have become more efficient and popular.
Location of the sensor under the hood of the VAZ-2114
The camshaft sensor on the VAZ-2114 is located near the air filter, at a very close distance from the cylinder head. This meter location is almost always standard for other cars in the injection group.
Camshaft sensor location
The main reasons for sensor failure
Before proceeding directly to the diagnostic process, it is necessary to find out the causes of the malfunction of the VAZ-2114 phase sensor.
So, let's move directly to the most direct and indirect indicators:
Electrical circuit of the sensor
- Check Engine on the dashboard indicates that a malfunction has occurred. In this case, the engine starts without waiting for a response from the camshaft sensor, and the ignition system works based on the latest indicators.
- Increased consumption of the fuel mixture can also serve as an indirect indicator of a malfunction of the air flow control valve.
- The car begins to lose power and dynamics as a whole.
The combination of these reasons can serve as an indirect indicator of a malfunction of the camshaft sensor.
Installing a new phase sensor
Before installing a new device, you need to thoroughly clean the seat under it. You should not use sealants, since they are of little use - there is a joining ring that protects against the penetration of foreign particles. And if you apply sealant, it will be difficult to remove the sensor the next time you disassemble it. And the remaining sealant can get into the lubrication system and cause trouble there.
Therefore, simply install the VAZ-2114 phase sensor (8 valves) in place. The operation of the device must be checked after connecting the negative terminal to the battery
Immediately pay attention to how the engine operates and whether there are any errors on the on-board computer. If errors are present, then perhaps the problem was not in the sensor, but in its connection wires
It is difficult to overestimate the importance of the VAZ-2110 crankshaft sensor for the engine. It is with its help that the engine speed is controlled. Stable operation is only possible if this device and control system are functioning properly. Many sensors send signals to the central unit, which processes the data and, using actuators, regulates the timing of ignition and the supply of mixture to the combustion chambers. But if a breakdown occurs, the engine will stop working normally - the spark will disappear, fuel will not be supplied to the combustion chambers. And it will be impossible to start the engine either hot or cold.
Video - Replacing the camshaft sensor
The design and electromagnetic characteristics of the DPRV, which are used on Russian cars and foreign cars, are similar, so instead of expensive original sensors, you can use Russian ones that are suitable in size. This will not affect the operation of the motor in any way. Don't forget to check if the coil length of the original and Russian sensors is the same. If the Russian one is longer, you can use paronite gaskets of the required thickness. If the Russian sensor is shorter, then when the benchmark passes by it, the voltage change will be less than expected, which may affect the operation of the engine. When installing, the position of the sensor cannot be confused, because the holes for the inductor coil and the mounting bolt are very different in diameter. Clean the sensor seat with a rag, insert the sensor and tighten the mounting bolt. Tightening torque 10 – 15 Newton per meter. Do not overtighten the bolt; this may damage the sensor body or strip the threads or head edges.
Possible causes of malfunction
DPRV is a pulse generator that creates a very weak signal. There is a small chance that the current will gradually weaken the integrity of its winding. However, vibrations caused by magnetism travel through the gear teeth. When the camshaft is turned, the force changes just like the signal generated. These vibrations cause microscopic movements within the DRV, creating weak points in essential parts, especially the winding in the case of inductive type DRV.
With a Hall-type sensor it is a completely different story. This type of DPRV is a solid-state device, that is, its electronic component, such as a diode or transistor. Voltage can damage the sensitive parts of the DPVR. Short circuits and incorrect connections can also damage it. And remember that you need a polarity sensitive power supply.
Crankshaft Position Controller Basics
Now we suggest that you familiarize yourself with the basic information regarding. Where is this device located, how to check the device, what types are there? Find the answers below.
Installation location, purpose and device
The crankshaft sensor or crankshaft sensor is a small device designed to transmit information about the position of the crankshaft. The information is sent to the control module, that is, the block. The regulator is responsible for injection. The correct operation of the engine injectors, which are responsible for supplying fuel, depends on the performance of the DPKV. DPKV also affects the performance of the ignition system as a whole. As for the location, the controller is not difficult to find - it is located in the engine compartment, next to the crankshaft pulley, the sensor is fixed to the oil pump with a bolt.
Principle of operation
It is necessary to take into account that the Fours can use different DPKVs and they differ from each other not only in design features, but also in their operating principle. For example, if we are talking about an inductive type controller, then it is equipped with a steel rod with a magnet that is used to magnetize the sensor. On top of the rod there is a winding of copper wire. In this case, the operating principle is based on delivering an impulse if a metal object is located nearby.
There are also sensors whose operating principle is based on the Hall effect; the Hall controller itself is located inside the structure. If you bring a metal device to the DPKV, the state of the sensor will change. In addition, the “Fours” also use pulse devices, which are designed to generate signals of a certain frequency.
Possible problems and methods for eliminating them
How to check and determine if the regulator is not working? There are many reasons why a DPKV can break, ranging from contamination of the device to failure of the device itself or damage to the wiring.
First, let's look at the main symptoms of a breakdown:
- the car's power unit has become unstable at idle speed - the speed can increase and decrease arbitrarily;
- the power of the car engine may also decrease;
- when the driver presses on the gas, dips may occur in which the car’s power does not increase;
- there are difficulties starting the engine;
- computer diagnostics may show errors 0335 or 0336; with such problems, most likely the cause should be sought in a damaged electrical circuit near the connector.
As for the main breakdowns:
- the device case is damaged, then the only solution is to replace the sensor;
- there is a short circuit of the turns on the winding itself, due to which the control module receives incorrect signals - the device will also need to be replaced;
- natural wear and tear of the sensor - there is no escape from this, the sensor will have to be replaced;
- The teeth on the crankshaft pulley are damaged; in the event of such a malfunction, the pulley itself must be replaced (author - AUTO REPAIR channel).
How to change the DPKV yourself?
The easiest way to check the functionality of the controller is by replacing it with a known working device. If, as a result of replacement, the symptoms of malfunctions become more pronounced, then we can say for sure that the previously installed crankshaft sensor is inoperative.
How to change the device yourself:
- First, turn off the ignition and open the hood of the car.
- Find the location where the controller is mounted, look for it on the oil pump, next to the crankshaft pulley.
- If the sensor seat is dirty, it should be cleaned before dismantling the device. Make sure that the surface around the device is as clean as possible.
- Then disconnect the connector with wires connected to the sensor, unscrew the screw that secures it and remove the controller from the mounting location. Visually check for possible damage to the device body, as well as the toothed pulley.
- Before installing a new DPKV, clean the seat again. Install the new controller, tighten the screw that secures it. When tightening, be careful not to over tighten.
- Using a feeler gauge, you should also check the gap between the pulley and the controller core. Ideally, this gap should be no more than 1 mm; a slight deviation of 0.4 mm upward is allowed.
- When the DPKV is installed, it is necessary to start the power unit and check its operation. If you notice that the engine started quickly and confidently, then the replacement was performed correctly (the author of the video is the IZO channel)))LENTA).
What are the reasons for the malfunction of the DPRV?
If the camshaft position sensor fails, the injector will fire for each crankshaft revolution, that is, twice as often.
Symptoms or signs of a broken sensor:
- Fuel consumption increases significantly.
- The engine operates asynchronously while driving, that is, it jerks while moving, drives jerkily, and loses speed. The engine may stall as if it has run out of gas. Also, sometimes the car cannot reach a high speed, more than 60 km/h. Cars are equipped with speed sensors. Find out what causes problems with their operation and how to check speed sensors.
- On certain brands and models of cars, if the DPRV is faulty, the gearbox may stall. The way out of a locked gearbox is to restart the engine. If this happens constantly, then you have definitely exited the CMP operating mode.
- When diagnosing yourself with a scanner, malfunctions may occur.
- The spark may also disappear and the engine may not start.
- The check light comes on at idle, but goes out at high speeds.
Such reasons for a non-working sensor are shown on the instrument panel with the corresponding icons. When the DPRV (SMR) is not working, the control unit will record the incorrect operating mode and issue a specific error code. To decipher error codes, you can download the application to your phone or tablet and find out what exactly this error code means.
Here are the most frequently encountered errors:
- P0365 means there is no signal in the camshaft position sensor circuit.
- P0344 warns that the signal supplied by the sensor is weak and intermittent.
- P0343 The signal supplied by the CMP sensor is too high.
- P0342 says the DPRV single level is too low.
- P0341 The valve timing does not correspond to the state of proper engine operation.
- P0340 There is no signal from the sensor at all.
- P0300 stands for a violation of ignition cycles in the ignition system (ignition is often skipped).
Factors influencing the occurrence of reasons indicating a non-working condition of the camshaft position sensor:
- Signal wires are not connected to the sensor.
- There is moisture in the sensor connection.
- The signal wire touches ground (some metal object in the car).
- The signal wire is open and torn off.
- The signal wire closes to the on-board network.
- The sensor insulation is broken, the shielding shell or harness is broken.
- The sensor power cord is torn or damaged.
- The power cables are not connected correctly.
- The high-voltage wires of the ignition circuit are faulty.
- The engine control unit is not working correctly.
- The gap between the sensor and the mark is not in accordance with the norm (the gap is too large or too small).
- The camshaft gear “beats”, that is, it has an exceeded standard of end runout.
- There are metal shavings on the DPRV body.
How to remove the device
The sensor is located on the generator drive side, opposite the crankshaft pulley. You can find it by looking at the back of the engine, at the oil pump. Before removing the device, make marks - this will allow you to install the new one in the correct position. Consequently, engine operation will not be affected after repairs.
To dismantle you will need a 10mm wrench. The procedure for carrying out the work is as follows:
- Disconnect the block with the wires that connect the device to the engine control system.
- Having made the marks, unscrew the nut from the sensor body.
- Remove the device for inspection or replacement.
But the sensor may be working fine, so it will need to be checked. Before removing the DPKV, measure the distance from its edge to the pulley - it should be in the range of 0.6-1.5 mm. If it is greater than the maximum value, then adjust and try to start the engine.
Why is it needed and checking the sensor
This electromagnetic sensor is used in the car to carry out most of the operations that are sent. Its readings are very important, since without this data it will be impossible to synchronize the ignition system and injector operation. It is this small device that allows you to distribute the time between supplying the fuel mixture to the engine cylinders. Its location is very simple. It is located on a bracket near the generator drive pulley. Sometimes, problems with this device can be mild. All you need to do is take a few simple steps and you don’t have to worry about replacing the device. Frequent problems with constant use of a car may include:
When using the car, dirt gets onto the sensor. It forms on the belt as a result of oil leakage from the engine cover. The consequences of such an accumulation of dirt can be problematic starting of the car, poor acceleration, low speed (rarely exceeds 3,500 revolutions).
- The vehicle continues to function normally. The ride doesn't stop. The on-board computer may provide information about problems with the camshaft sensor. To solve this problem, you need to slightly move the connection wires. Strong vibration of the car while driving can cause one of the contacts to disconnect. Also, you should clean the terminal from possible rust formation or check all wiring from the sensor to the on-board computer (panel).
- The car stops functioning completely. The engine stalls, and attempts to start it again are unsuccessful. To resolve this problem, you need to check the wiring. Sometimes, the sensor may accidentally come into contact with a hot exhaust manifold. If this situation occurs frequently, the sensor may burn out.
To be more confident in the serviceability of the sensor, it is necessary to carry out a full check of it. A car stops starting for many reasons. The reason will not necessarily be hidden in the breakdown of this mechanism. If you are not sure that the sensor is faulty, it is necessary to check some systems:
- needs to be dismantled.
- Using an ohmmeter (multimeter), the resistance on the winding of the device is measured.
- In the case when the device readings go beyond 550 Ohms to 750 Ohms, we can confidently say that the sensor is broken and requires replacement.
If the sensor breaks down, it must be repaired. To replace the sensor, you must purchase a new device.
Its cost will not be too high and in most cases, its price is insignificant compared to other car parts.
Replacing the camshaft sensor
When the camshaft sensor is certain to be damaged, it is necessary to remove it. To carry out this work, you must use an ohmmeter. Also, it would not hurt to familiarize yourself with the basic safety rules when performing work on the car’s engine control system. After familiarizing yourself with the rules and preparing the necessary instruments and tools, you need to perform the following actions:
- The car is prepared for work to replace equipment: washed, cleaned and installed in a fixed position.
- The decorative trim on the car engine is removed.
- The latch is released.
- The wire terminal that connects the mechanism itself to the machine wiring is disconnected.
- The negative probe of the ohmmeter must be mounted on the car body.
- The car ignition is turned on.
- An ohmmeter takes the necessary measurements. You should bring the free probe of the device to the wire block.
- Using a socket wrench with a stroke of 10 millimeters, unscrew the two connecting bolts of the sensor with the bracket.
- The sensor can be removed from the vehicle without much effort.
To install the camshaft sensor, perform the same operations as those used when dismantling the equipment, but in reverse order. As mentioned above, the cost of a new sensor is negligible. It can be found in any specialty store or at service stations. If there are complications with performing the replacement work yourself, it is best to leave the work to specialists. The corresponding video and photo instructions will be a great help for independent work. This way, you can carry out the entire replacement yourself without errors. The price for this type of service in car services is high, which is for cars with an engine of 8 valves or 16 valves.
Three main reasons for error P0021
The first reason is the oil pressure on the solenoids drops.
camshaft. This reason can cause not only error P0021, but also P0345, as well as other similar ones, which are somehow related to the operation of the mentioned camshaft. Why might this happen? In some engines, the oil channel cover gaskets (where they are present) are made of paper. Accordingly, they have a short service life, after which they simply swell. Therefore, the oil escapes through the lid.
Elimination
—
this can be corrected by replacing the paper gasket
with an iron one. Sometimes difficulties may arise for owners of some cars (for example, Infiniti or Nissan) due to the inaccessibility of the specified gasket. However, if you do not plan to do the work yourself, this should not worry you.
The second reason is the installation of the wrong camshaft sensor, which is not used on your car. This usually happens after repair or failure of the last one.
Therefore, when buying, it is important to check what sellers are offering you
Description of camshaft sensors
Replacing the Nissan camshaft sensor
Elimination
—
find out which sensor is installed
in the engine by reading the documentation for your car. This will save you from potential problems.
The third reason is failure of the camshaft sensors
(DPRV, AVCS) or their wiring. Therefore, if error P0021 occurs, it is recommended that you first check the serviceability of the mentioned sensor. This is best done in a specialized service using appropriate equipment.
Elimination
—
clean or completely replace the sensor
in case of malfunction. Cleaning or replacement is determined depending on the situation. The last option is preferable.
Factors affecting the performance of the camshaft sensor
The performance of the phase sensor directly depends on the temperature regime. Overheating can damage it. The DPRV will also not function due to the failure of the wires through which it receives and transmits the signal, or the breakdown of the reference point. An important role is played by contamination or damage to the sensor itself. In addition, under severe operating conditions (carrying cargo, off-road driving), the sensor may become dislodged or a short circuit may occur. It is very important to systematically diagnose the sensor and change it every 4-5 years to avoid unexpected failure at the most inopportune time.
Checking
Ideally, sensor testing should be done using an oscilloscope. To do this, you will have to check the camshaft and crankshaft sensors. After which, by combining the 2 resulting curves, you can evaluate their performance. But it is not always possible to check the DPRV using an oscilloscope. In this case, you need to check using improvised means. First, turn on the ignition, check the voltage level of the wires supplying power to the sensor. It must match the on-board voltage of your vehicle. If the wires show 0 V, then the problem is not in the sensor, but in its power supply circuit. Check the contacts in the blocks, as well as the wires themselves, for damage. If necessary, change the wires and apply grease to the contacts. They often oxidize over the winter, which interferes with the normal operation of the system. Before further testing, carefully inspect the sensor
You should pay attention to its position relative to the camshaft. There are times when it moves a little and gives an erroneous signal to the engine control unit
As a result, he perceives this as a malfunction of the DPRV and begins to work in emergency mode. If you notice such a shift, then you just need to correct the sensor, and this will be the end of the repair work. Then you need to measure the voltage at terminal “A”. It should be equal to 12 V. No more and no less. You can also check the functionality of the sensor by removing it. To do this, you will need a 12 V battery, wires, a knife and a voltmeter. The removed camshaft sensor is connected to the power supply; its peculiarity is that it is connected using a separate negative wire; do not reverse the polarity. A voltmeter is also connected to the terminals. Now you can proceed to verification. As we remember from the beginning of the article, the sensor does not respond to changes in the magnetic field. Therefore, we take a knife and bring it to the sensor. The voltmeter should show an abrupt change in voltage up to 12 V, this behavior indicates the serviceability of the sensor. If the voltage remains zero or changes slightly, then the sensor is faulty and a new one should be installed.
Replacement. For a complete check, the DPRV should be removed from the engine. It is secured with a bolt; on most modern cars this will require an M10 key. When removing, you may have to struggle with the rubber seal. She usually gets stuck. In this case, you need to carefully pry it off with a slotted screwdriver.
After dismantling, pay attention to the sensor ring located on the pulley. Conclusion
Camshaft position sensor - what is important to know and be able to do
The camshaft position controller is a device used to ensure the correct functioning of the engine. The DPRV or phase sensor is responsible for the spark and is used to determine the position of the shaft at the current time. This device is installed in the engine compartment, directly on the engine, not far from the air filter, next to the cylinder head.
Principle of operation
As for the principle of operation, in this case it is similar to the operation of a Hall controller. During operation, the DPRV reads data from the shaft of the power unit through a gear that is missing two teeth. These teeth are located so that when they hit the sensor, the piston will be located either at top or bottom dead center. The pulse transmitted by the controller is sent to the module, and based on the data received, it controls and changes the ignition timing if necessary. The primary task of the controller is to adjust this parameter while the engine is running, which made the Four engines more efficient.
Possible malfunctions in the sensor
What are the signs that indicate a malfunction of this regulator:
- A Check Engine error appeared on the dashboard, and it came on after the power unit was started. With such a problem, the engine control module will wait for information to arrive from the controller, and if the DPRV still does not work, then it will work based on the operating parameters of the ignition system.
- You can also determine the failure of the camshaft sensor by increased fuel consumption.
- When attempting to perform self-diagnosis, the system may experience malfunctions and malfunctions. A breakdown can be reported by errors numbered 0340 and 0343.
- The power of the power unit has dropped significantly, as well as its dynamics, this can be seen especially clearly as a result of driving uphill.
How to determine a malfunction using visual diagnostics:
- First you need to check the body of the device - there should be no defects or signs of damage. If there are cracks on the body, then most likely it’s time to change the regulator.
- You also need to check the contacts on the device connector and make sure that there is no moisture on them. If water gets on the plug, the contacts may short out, which will prevent the sensor from transmitting the correct information to the control module. It is also necessary to check the contacts for oxidation. If the contacts have oxidized for some reason, which again may be due to humidity, this will lead to loss of signal. Accordingly, the control unit may regard this as a failure of the camshaft sensor.
- It would be a good idea to check the integrity of the connected electrical wiring; a multimeter is used for testing. If the chain is damaged, it must either be replaced or repaired (a video about the replacement was made by user Vitashka Ronin).
Instructions for replacing the device yourself
Let's consider the procedure for replacing the DPRV using the example of a 16-valve power unit:
- As we have already reported, the sensor is located under the air manifold, close to the camshaft. To make the replacement procedure less complicated, it is recommended to remove the engine radiator grille.
- Using a wrench or a socket with an extension, which will be more convenient, you need to unscrew the two screws that secure the device. Disconnect the wires connected to the controller, after which the controller must be dismantled, cleaned and tried to be installed in the seat again. Perhaps these actions will help get rid of the problem if it involves dirty contacts. If the DPRV still does not work, then it must be replaced.
- It is not recommended to use sealant to install a new regulator, since this sensor will in any case work under harsh conditions in an aggressive environment. This is due to temperature changes in the motor. Install the new DPRV and replace the radiator grille.
How does the camshaft sensor work?
Based on the principle of operation, DPRVs are classified into 3 types:
- magnetic dprv;
- optical dprv;
- dprv Hall.
A magnetic or induction camshaft position sensor works because a metal tooth is constantly moving in a magnetic field. This sensor has two outputs.
The operating principle of an optical sensor works by emitting a beam of light from a source, which is tracked and recorded by reception and interruption by a photocell.
A Hall effect sensor monitors changes in the magnetic field around it. Hall-effect DPRVs have three outputs. The Hall effect is also called Hall voltage.
The most rarely used camshaft position sensors are optical ones. Don’t be surprised if the car has more than one or even two DPRV sensors, this is also possible.
What have you heard about the safety of the SRS system? It consists of impact sensors, actuators and an SRS control unit.
The principle of operation of a Hall sensor is that it detects changes in voltage that crosses its magnetic field. The sensor structure contains a piston magnet and a semiconductor element, which records voltage changes. If the magnetic field does not change, then the sensor will not detect any changes. The magnetic field will only change if there is any metallic element in that environment. The notches or teeth on the camshaft are precisely metal elements that change the magnetic field.
As was already mentioned above, the DPRV is also called a phase sensor. This name comes from the fact that the sensor records the cylindrical phases of intake and exhaust.