Design
The operation of the module ensures fuel combustion and, accordingly, engine operation. In very simple terms, the car won’t go anywhere without the module.
For VAZ models, the use of two types of ignition modules is provided:
Block ones differ in that the coils operate one per pair of spark plugs. These are the devices that are installed on the “fourteenth” model of the domestic automaker.
The coil distributes power to two candles at once, and its design includes the following elements:
- High voltage wires;
- Low voltage terminals;
- Secondary and primary winding;
- Core.
Separate modules, where the coils supply a separate circuit to each of the 4 sections, are distinguished by the output of high-voltage wires through a spring contact. Block ones are easier to check, they are easy to remove and return to their place.
It is noteworthy that with a size of 11x11x7 centimeters, this block weighs about 1.5 kilograms.
Signs of breakdown
Disassembled
In fact, the symptoms of a malfunction in the VAZ 2114 ignition module are in many ways similar to the breakdown of other units. For example, you may observe the following phenomena:
- The engine is tripping;
- The car stalls at idle;
- There are problems when trying to start the car, etc.
That is, in fact, it may not be a module at all. Therefore, the only correct solution is to check the ignition module on your VAZ 2114.
Examination
It is a mistake to assume that damage to high-voltage wires does not in any way affect the condition of the module itself. Many people think of simply replacing high-voltage elements, but in reality they will still have to change the module.
In general, the best option for checking the ignition module on a VAZ 2114 is to use an oscilloscope . But, firstly, not every driver has it, and secondly, few people can use them. Therefore, we will carry out the check using improvised means:
- 12-volt light bulb;
- Tester (available for little money at any auto parts store).
Let's start with preliminary manipulations with the accompanying elements of the ignition module.
- Check the wiring harness. It is disconnected and the voltage indicator is checked.
- To do this, fix the tester on contact A, and connect the other terminal to engine ground.
- In normal condition, the voltage reading will be 12V.
- If there is no voltage, most likely the fuse has blown.
- If everything is fine, transfer the terminals of your tester to contacts A and B, start the car. In this case, the starter should turn and the 12-volt light should blink.
- In the absence of these phenomena, we can talk about the presence of a break in circuit A of the contacts.
Next we go to the ignition module itself.
There are several ways to check the condition of your unit. Therefore, let's look at each of them.
- Set the tester to ohmmeter mode. Use it to measure the resistance on the high-voltage lines going to cylinders 1 and 4, and then, by analogy, to the wiring of cylinders 2 and 3. In normal condition, the device will give you readings from 5.2 to 5.5 ohms.
- Give the device a gentle tug. Thus, you will shake the wiring block and the module. Moreover, this must be done in the operating mode of the power unit. If the device works without obstruction when loosened, everything is fine, you are lucky. If not, you will again have to study the condition of the wiring.
Third way
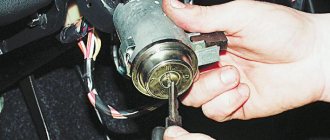
But to replace a module with a module, you will have to first dismantle yours. This is done as follows:
- Remove the negative terminal from the battery, which will allow you to turn off the power to the car;
- Disconnect four high voltages from the ignition module;
- Disconnect the wire block. To do this, you need to release the special clamp that holds the block on the module;
- Next, unscrew the three nuts. With their help, the module is held on the bracket;
- There are three long pins on the bracket, from which the module can simply be pulled off.
IGNITION MODULE CHECKING TECHNOLOGY
In service centers and service stations, the ignition module is checked using a special device - an oscilloscope, but we offer you a simpler technology that gives similar results.
You can check the ignition module using a regular tester (12-volt light bulb) and a multimeter - a device for checking ignition coils, which can be bought at any auto store for 300-500 rubles.
Before proceeding with the device itself, it is necessary to check the fuse and the wiring by which the unit is connected to the spark plugs and the generator.
The fuse is checked as follows:
- Disconnect the power wire block;
- We install one terminal of the multimeter on contact “A”, the second - on engine ground.
If the fuse is working properly, the tester will show a voltage of 12 V. If the voltage is too high or low, the fuse must be replaced.
The easiest way to check the power supply of the unit is with a control unit - we connect its wiring to contacts “A” and “B” and start the fourteenth. When the starter is turned on, the light should light up, otherwise it is necessary to look for problems in the circuit of contacts “A”, there is probably a break in it.
Checking the ignition module with a multimeter requires a device that can perform the functions of an ohmmeter. We put the tester in this operating mode and connect the terminals to the high-voltage wires going to the first and fourth cylinders, then we check the second and third in the same way. If the module is working properly, the tester will show a resistance of 5.2-5.5 ohms.
It is worth noting that only the first VAZ 2114 1.5L is equipped with the module, while modern fourteenth ones are produced with an ignition coil. Essentially, this is the same module, in the body of which there is no switch (it has been moved to the ECU), so checking the VAZ 2114 ignition coil is performed using a similar technology.
Installation
The module is installed strictly in the reverse order of dismantling. It is important to take into account three rules.
- After installing the module, look at the surface of the device. It shows numbers from 1 to 4. These are the designations of cylinder numbers.
- At the ends of the high-voltage bars there are similar numbers - from 1 to 4. They serve as a guide to determine which high-voltage wire is connected to which socket on the module.
- No experiments. Everything is connected strictly in accordance with the marks - 1 to 1, 2 to 2, and so on.
In fact, replacing the ignition module on a VAZ 2114 is quite easy. You don't need to be a professional auto mechanic to do this. Just follow the basic rules for dismantling and installation, and check the device before spending money and replacing it with a new one. It is not a fact that the culprit of problems with your car will be the module you are sinning with.
This table will allow you to check whether the wires from the ignition module to the cylinders are connected correctly.
In a car, each part is assigned certain functions. The ignition module also performs a number of important tasks, for example, when it breaks down, the engine is not able to work properly and it becomes difficult to start the car.
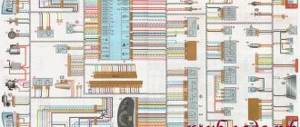
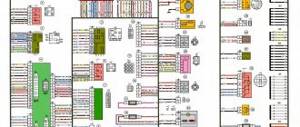
The design of the ignition system on the VAZ-2114
Before proceeding directly to the process of replacing the unit, the motorist needs to know how the system as a whole works. Therefore, let's look at the constituent elements of the ignition system.
Ignition system diagram
Diagram of a non-contact ignition system: 1 – non-contact sensor; 2 – ignition distributor sensor; 3 – spark plugs; 4 – switch; 5 – ignition coil; 6 – mounting block; 7 – ignition relay; 8 – ignition switch
Replacing the ignition coil
Now that the design features of the ignition system are known, you can proceed directly to the process of replacing the bridle. Let's look at the step-by-step instructions:
We dismantle the battery terminal
Removing the upper engine protection strip
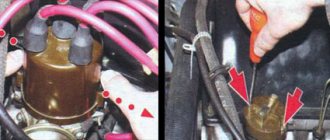
Removing the BB wires from the coil
We dismantle the ignition module
Attention! Particular attention should be paid to the connection, since high-voltage wires must be located in the strict order provided for by the design. If this is not done, the car will stall or the engine may not start at all.
Product selection
Particular attention should be paid to the choice of product, since in the modern automotive spare parts market, low-quality products and fakes are often found. In addition to the original spare part, a number of manufacturers offer analogues that are in no way inferior in quality to the factory part, and in some cases even much better. Let's consider all the options for purchasing an ignition module for a VAZ-2114.
2112-3705010 – original catalog number of the ignition module manufactured by AvtoVAZ. Factory part that is installed on the Lada 2110-2115 family of cars. The cost of a spare part is on average 3,500 rubles.
Possible analogues
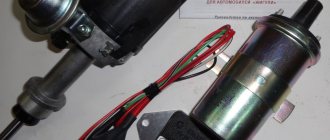
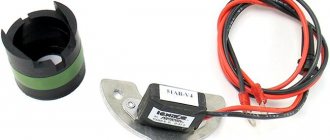
Analogue part produced by Fenox
In addition to the original part, on the spare parts market you can find a number of analogues recommended for installation:
- Pekar 2112-3705010 – St. Petersburg plant of spare parts for domestic cars. It occupies a high market share and is famous for its quality. The average cost of a part is 2,500 rubles.
- Fenox IC16009O7 is a Belarusian manufacturer that offers a spare part for 3,500 rubles.
- Startvolt SC 011 2 – Another one. The cost of the product is 4000 rubles.
- Fenox IC16009 is another option from the Minsk plant, the cost of which is 4,000 rubles.
Possible repairs
Not in all cases of failure of the ignition module, it requires replacement. As automotive practice shows, some motorists are able to repair this unit on their own. So, using a soldering iron and other radio electronics tools, you can carry out repair work.
Read more about ignition coil repair and diagnostics here.
Frequent failure of the ignition module on the VAZ-2114 (possible solution)
If the ignition coil often fails (see “checking the ignition coil”), then you should pay attention to the fact that the factory has not chosen a very good location for it.
Moving the ignition coil to a “better” location
A good option would be to move the ignition coil higher.
Replacing the ignition coil on a VAZ-2114 is quite simple. Even a novice motorist can complete this process in his garage, but if everything seems too complicated, you need to contact a car service. Particular attention should be paid to the choice of product, since this will determine how well the engine and ignition system will work.
Functions of the VAZ-2114 ignition module
The ignition module in the VAZ-2114 solves important problems in the functioning of the car:
- first creates pulses passing through high voltage;
- then transfers them to the spark plugs.
The power supply of the unit involves operation starting from the on-board system of the vehicle, the minus wire is controlled by the body of the car. The subtlety of the module’s operation is that it simultaneously produces 2 sparks, one of which occurs at the moment of maximum compression of the air-fuel mass, and the other depends on the release, which is why it is called idle.
As for the connection method, the spark plugs are connected to the 1st and 4th cylinder, and the idle sparks fit to the 2nd and 3rd cylinder structure.
Operating principle and location
The ignition module is controlled by a controller, which in turn receives information about the state of the vehicle from various sensors (IAC, mass flow sensor and others). The controller also sets the sequence of operation of the ignition coils or, in other words, regulates the supply of current to the spark plugs. The ignition module operates at temperatures from -40° to +130°.
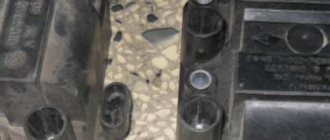
Finding its location is not difficult; high-voltage wires (HV) go from the module to the spark plugs; along them you can find the module.
What does the ignition module consist of?
The ignition module built into the VAZ-2114 consists of 2 high-power transformers and the same 2 electronic-based control units. One side of the product has 4 outputs at once; they are responsible for connecting the candles. To keep the structural components in their original form and protect them, the manufacturer provides a plastic coating. The weight of the entire structure slightly exceeds 1 kg.
The spark plugs suitable for the engine are fixed together with the ignition module by running high-voltage wiring. A device called a “controller” controls the process. First, he takes the performance indicators of the structure, then analyzes them and, finally, decides what should be changed to achieve optimal performance - the crankshaft rotation speed, the temperature reached by the coolant in the VAZ-2114, or the engine load.
Frequent malfunctions of the VAZ-2114 ignition module
The following malfunctions occur in the VAZ-2114 ignition module:
- intermittency is formed at idle;
- power indicators leave much to be desired;
- the engine is not working correctly;
- in the paired operating mechanism, the cylinders are acting up (that is, the functioning of only one pair of cylinders can be heard);
- if the Check Engine light comes on.
If you suspect a faulty factory module in your car, then it's time to check the ignition module. It doesn’t hurt to make sure with your own hands that the wires are connected correctly and firmly; check that the spark plugs remain intact and are not damaged. Before you begin diagnostics and repair work, you need to stock up on protective equipment that will protect you from dangerous situations - the tool must be treated with insulating material, and gloves are required.
How to determine malfunctions in the ignition module at a service station
At a service station, diagnosing a VAZ-2114 factory module looks very simple - professional diagnostic equipment eliminates errors. Service station workers use an error code scanner and an application suitable for a computer diagnostic adapter. What errors are displayed on the display if the VAZ-2114 ignition module requires adjustment and repair?
- P3000-3004 – the car will not start;
- P0351 - indicates damage to the integrity of the windings of a pair of cylinders from 1 to 4;
- P0352 - determines the break in the section in the winding of 2-3 cylinders.
Checking the condition of the ignition module with a multitester
In a VAZ-2114 injector with 8 valves, you can check the operation module using a multitester. All that remains is to arm yourself with a cunning device and determine the serviceability of the winding. During the procedure, follow the step-by-step instructions:
- Determine the operating format of the multitester in ohmmeter mode; it measures the resistance that occurs between the terminals of the secondary winding.
- Mount the probes by connecting the 1st and 4th cylinders to the terminals. Then fix to the 2nd and 3rd cylinders. An adequate result, indicating the absence of a breakdown in the winding, is approximately 5.4 kOhm; fluctuations in values of plus or minus 0.1 kOhm are acceptable. What you should pay attention to? The resistance between the terminals in a pair must correspond in terms of indicators to each other - be the same.
- If the difference is more than 100 Ohms, then we can say with confidence that the fault lies in the secondary winding.
How can I solve this problem? Only by replacing the ignition module.
Checking the ignition module
Before checking the module itself, we need to check the block of wires coming to it.
- To do this, first of all, disconnect the wiring block, take the tester and connect one tester probe to the block at pin A, connect the other probe to engine ground.
- Turn on the ignition and look at the tester readings: the voltage should be around 12V. If there is no voltage, then you need to check the fuse going to the ignition module.
- The next step is to take a 12V test light and connect it to pins A and B.
- We turn on the starter and look: the lamp should blink, if it does not blink, then there is an open circuit on contact A.
- We perform this operation similarly with contact B.
There are several ways to check the ignition module, and we will look at some of them.
The first and easiest way to check a module is to replace the module with a known working one. Everything is simple here: we take the module from the donor’s car and change it. But there are certain disadvantages:
- The donor car may not be available, buying a new module does not suit our task;
- Not every car will have an ignition module: “of course!” - you say, - “from SAMAR this will do.” But not everything is so simple: as a rule, the first Samaras with a 1.5 liter engine are equipped with an ignition module. New Samaras with 1.5 and 1.6 liter engines are often equipped with ignition coils. Let me remind you that the ignition module consists of a switch and an ignition coil. In new Samaras, the switch is located in the ECU, so the module is eliminated as unnecessary, leaving only the coil. Take this fact into account and look for a new donor;
- It is imperative to make sure that the high-voltage wires are in good condition: how to check the high-voltage wires? Otherwise, there is a high probability that the ignition module will burn out.
The next method is the method of moving the module. To do this, we move the block of wires, knock and move the module itself. If, at the moment of our influence on the module, the operation of the engine changes noticeably, then the matter is most likely in poor contact. This malfunction is not catastrophic, so you can try to repair the module yourself: Repairing the ignition module. If the module cannot be repaired, it must be replaced (Replacing the ignition module).
To check we need a tester. Using a tester in ohmmeter mode, we measure the resistance at the paired high-voltage terminals of the ignition module 1 and 4 of the cylinder; and between cylinders 2 and 3. The resistance should be the same but vary around 5.4 kOhm.
How to check input wires for serviceability
Following the recommendations of specialists, to check the condition of the wires at the input, they need to be “ringed”. What does it mean?
- Determine the operating format of the multitester in the voltmeter position, and then disconnect the wiring block from the VAZ-2114 ignition module.
- Focusing on contact A, mount the first dipstick, and fix the second one to the engine ground.
- Ask an assistant to start the car or, alternatively, crank the starter. At this time, your task is to observe the measurements on the display. Normal voltage is 12 volts.
- Carry out exactly the same actions with the remaining contact.
What to do if there is practically no voltage? Then evaluate the serviceability of the fuse - it is likely that it has blown. Find 3 safety mechanisms on the VAZ-2114 electronic control panel. So, the third 7.5 A is a device suitable for the car module.
Even if the fuse is intact and intact, there is a possibility of oxidation and wire breakage, as well as loose contacts.
What to do if there is no multitester available? A control light designed for 12 V will help solve the problem. One wiring of the lighting device is placed to the contact of the block, and the other is closed to the motor housing. After turning on the ignition, the light should flicker.
How to check the VAZ-2114 ignition module with your own hands is shown in the video instructions:
One of the main elements of a car’s ignition system, without which it is not possible to ignite the combustible mixture in the internal combustion engine cylinders, is the ignition module. By generating high voltage pulses, which creates a spark on the spark plugs, the module ensures ignition of the fuel mixture at a certain point in time.
This moment is determined by a preliminary setting corresponding to the factory parameters. Changing these parameters during vehicle operation can lead to problems in engine operation and serious malfunctions (even failure of the internal combustion engine).
Next, we will look at the design and operating principle of the module using the VAZ 2114 as an example, determine the main causes of the malfunction and how to eliminate them, and also describe several diagnostic methods.
Read in this article
How to remove and change the ignition module on a VAZ-2114: photo and video
The ignition module receives a control pulse from the control unit and transmits it to the cylinder plug to ignite the air-fuel mixture. The device itself consists of two coils that produce high voltage and a two-channel switch. The body of the product is made of durable plastic.
Ignition module failure
Malfunctions in the operation of this element may manifest themselves as follows:
- Noticeable decrease in engine power.
- No spark on one of the spark plugs.
- Noticeable "swimming" of the idle speed.
These signs indicate that there is a problem with the ignition module. If they appear, it is worth replacing the ignition module.
Replacing the ignition module on a VAZ-2114
Packaging from the original part
To replace the ignition module, you will need a rag and a key number 13. It is best to do it on some level ground.
Progress
- Open the hood and disconnect the battery terminals;
- Get the high-voltage wires coming from the ignition module to the spark plugs. At the same time, it is necessary to remember their location, because if the location of these wires is changed, the new spare part may immediately fail. You can make notes to be sure of the result.
- Carefully disconnect the connector with cables from the module. Then unscrew the nuts using a 13mm wrench and remove the block from the motor.
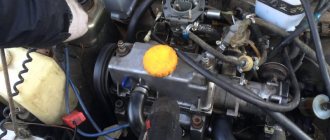
Location of the ignition module under the hood
- After this, you need to install a new module. A rag is needed to wipe the installation area of the module after removing it.
Checking the operation of the ignition module (video)
What should I do if the problem remains after replacing the module?
First of all, you need to check the operation of the new module.
Checking the ignition module
Resistance between contacts: 1 and 4, 2 and 3 - should not be higher than 5.8 kOhm!
If after replacing the ignition module nothing has changed, it means that other elements of the ignition system are faulty.
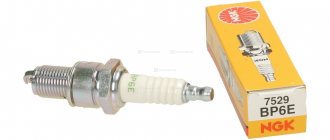
Spark plugs and ignition system
If this does not help, then you need to check the spark plugs and replace them if necessary (see selection of spark plugs for the VAZ-2114).
Inspecting the condition of the spark plugs
Before this, you need to remove the tips of the armor wires. To unscrew the spark plugs, you will have to use a special wrench. Then the candles need to be inspected: they should have a normal brown color and there should be no soot or soot on the surface.
If replacing the module did not correct the situation, and there is carbon deposits on the spark plugs. This means that the rings or pistons are worn out, they need to be replaced, and the spark plugs must be cleaned and put back into the socket. It is also worth checking the gap between the spark plugs and the electrodes - too large a distance has a bad effect on the operation of the devices.
Ignition module: main types
The ignition module is quite small in size, but structurally complex electrical mechanism. The module is powered from the on-board power supply; the negative terminal is attached to the housing.
From the variety of such modules presented on the market today, several modified models for the VAZ of the following type can be distinguished:
- block (modules can have several coils designed to work with all cylinders simultaneously);
- separate (modules have one coil designed to ignite one candle).
Please note that the coils of block modules installed on the VAZ 2114 model can operate one per pair of spark plugs.
Ignition VAZ 2114: main malfunctions
Possessing a high reliability indicator, ignition modules installed on the VAZ 2114 model may still work incorrectly or fail over time. There can be many reasons:
- inappropriate parameters of installed components;
- sufficiently low/high resistance of high-voltage wires (coil failure);
- incorrectly selected spark plugs (breakage of the coil and other elements), etc.
Symptoms of ignition module malfunctions:
- incorrect operation of paired cylinders (first and fourth or second and third);
- floating idle speed of the internal combustion engine;
- when accelerating, the car gains momentum poorly;
- decrease or absence of engine thrust, drop in power, increase in fuel consumption, etc.
Symptoms of a problem
It is extremely rare for two built-in coils to fail at once, so it is more likely to be possible to start the engine with a faulty unit. However, even an inexperienced driver will immediately suspect something is wrong. The malfunction will appear as follows:
- unstable (floating) idle speed;
- the engine has difficulty picking up speed;
- characteristic sound of the engine (triple);
- jerking when accelerating (while moving).
We recommend: Eliminating oil leaks from under the valve cover
Operating a car with such a breakdown is possible (you can drive to a garage or car service station), but it is not advisable unless absolutely necessary.
Similar signs of unstable engine operation are possible with a number of other ignition or fuel supply faults. To differentiate possible breakdowns, the performance of the ignition unit should be determined. It would be useful to check the contacts of the wires coming to the device, as well as their integrity.
VAZ ignition module: checking in different ways
There are several ways to check the ignition module:
- using a tester set to “ohmmeter” mode, the resistance is measured on the high-voltage wires going to the first, fourth and second, as well as third cylinders (the indicators should be the same in both cases and range from 5.2 to 5.5 ohms, more precise figures are indicated in the technical documentation of the vehicle);
- by means of mechanical impact on the device while the engine is running (by tugging on the wire block and the module itself, and lightly knocking on it, the engine should operate without any jerking or knocking);
- installation of a working ignition module with the same parameters from another car.
How to check the VAZ ignition module: testing the wire block
Before checking the ignition module, it is necessary to test the wire block connected directly to the module. To carry out testing yourself, you must have: a test light and a testing device (tester, multimeter). Execution order:
- Having disconnected the block with wires, connect one tester probe to the contact of block “A”, the other to the ground of the internal combustion engine;
- Turning on the ignition, pay attention to the readings of the device (readings should be within 12V).
- check the fuse for the ignition module (if there is no voltage);
- Using a test light and two wires, check the continuity of the circuit for an open circuit, alternately testing contacts “B” and “A” by turning on the starter.
Also, during the diagnostic process, it may be revealed that the VAZ 2114 coil is faulty and needs to be replaced. To replace the ignition module coil, you must perform a number of steps:
- disconnect the negative terminal of the battery (use the ground disconnect button);
- Having removed the caps with tips from the spark plugs, disconnect the low-voltage controlled circuit;
- Having removed the high-voltage wires from the coil, check for damage;
- unscrew the mounting bolts of the module housing;
- remove the module with bracket from the engine;
- Having dismantled the bracket, install the new coil in the reverse order, without mixing up the high-voltage wires.
If the cause has been identified, the ignition system is rechecked with the engine running. If the engine does not operate correctly, it means that after repair the problems in the ignition system have not disappeared.
In this case, you need to make sure that the installed components are in good working order, and also eliminate errors that could have been made during the installation process. Also, the cause of the breakdown itself may be determined incorrectly, etc. In such a situation, a comprehensive diagnostic of the engine ignition system is repeated.
We check module 2114 using available methods
The most effective way to find out that the ignition module is not working is to take a device that is known to work and try to start the engine on it . It is clear that not every module from the second generation eights, nines and Samars may be suitable.
Depending on the type of ignition system, Samara may have a coil installed instead of a module, but we need exactly the module from the 8-valve injection 2114. Everything is simple here - the engine is running, which means the module has become obsolete, we replace it with a new one. However, there is a high probability that the high-voltage wires are broken and this will ruin not only the entire diagnostic picture, but also someone else’s ignition module.
Checking the integrity of high-voltage wires
Therefore, before checking the module itself, you need to make sure that the high-voltage wires are in order, do not break through to ground and allow current to pass through.
The action algorithm for subsequent verification is as follows:
- Checking the ignition module on the high-voltage circuit for an open circuit . To do this, you will need a multimeter that is set to resistance measurement mode. In the module, the ignition coils are connected in parallel - the first and fourth, second and third. To check, take the multimeter probes and install them (with the ignition off) into the connectors for high-voltage wires on the module. First 2 and 3, then 1 and 4 cylinders. The resistance between parallel coils should be 5.1-5.5 ohms. If the resistance is infinite, there is a break in the network and the module must be replaced.