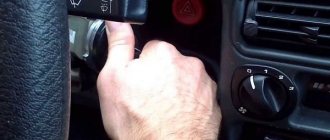
The ignition switch of the VAZ 2107 is the main control element for the electrical equipment of the car. The performance of electrical systems and the vehicle as a whole depends on its serviceability. In different positions of the lock, voltage is supplied to certain circuits and consumers, ensuring the start and operation of the engine, lighting fixtures and other components and assemblies of the “seven”.
Ignition switch device VAZ 2107
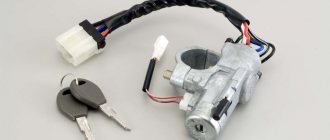
The lock has a cylindrical shape with a side protrusion - a steering wheel lock. In the closed position, the lock serves as an anti-theft system, blocking the rotation of the steering wheel.
At one end of the lock there are terminals for connecting wires, at the other there is a hole for a key. Only a certain key allows you to change the position of the ignition switch, which serves as additional protection against unauthorized use of the car.
The ignition switch consists of two main parts - a contact plate (or “group”) and a switch mechanism. When the key is turned, the mechanism sets part of the contact group in motion, ensuring the closing/opening of the contacts.
Both parts of the lock may have faults, but they are not repairable. Repair of the VAZ 2107 ignition switch consists of replacing the faulty part or assembly.
Malfunctions of the ignition switch VAZ 2107
If the mechanical part of the lock (“secret”) malfunctions, the key begins to turn tightly in the mechanism and may jam. This often ends with the key itself breaking, part of which remains in the lock. You can try to slightly prolong the operation of a stuck lock using WD-40 or brake fluid, but this will not eliminate the need to replace it immediately.
The second problem is that the lock contact group burns out or breaks. Especially often the contact pair responsible for turning on the starter fails. In this case, when you turn the key, the starter does not work or does not turn on on the first try. You can verify that the contacts are not working by checking the voltage at the terminals of the contact group with a voltmeter or “tester”. Faulty contacts are not a reason to completely replace the lock. In this case, you can only replace the contact group, which does not even require completely dismantling the ignition switch. Taking into account the low cost of the contact group, if the mechanical part of the lock malfunctions, it is easier to replace the entire lock assembly, so that you do not have to waste time replacing old contacts.
Replacing the contact group of the ignition switch VAZ 2107
If the ignition switch contacts are burnt and when you turn the key, the electrical circuits do not turn on (usually this is the power supply to the starter traction relay), you can repair the VAZ 2107 ignition switch by replacing the contact group.
The tools you will need are an awl or a thin flat-head screwdriver. The procedure is as follows:
- Disconnect the ground wire from the battery.
- Turn the key vertically (to position “0”).
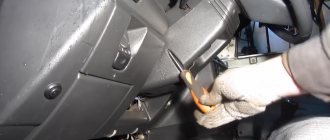
- Unscrew the screws securing the plastic casing covering the steering column.
- Remove the casing.
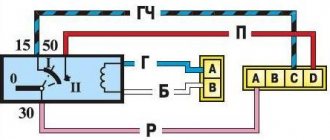
- Disconnect the terminals of the wires going to the ignition switch contact group.
- blue with a black stripe on terminal 15;
- brown to terminal 30/1;
- pink to terminal 30;
- red (magenta) to terminal 50;
- black to the INT terminal.
The wiring diagram is also indicated on the box.
- Using an awl or a screwdriver, pry up and remove the retaining ring that holds the contact group in the ignition switch housing (this operation is inconvenient and sometimes difficult to perform without some experience).
- Pull out the old contact group.
- Insert a new contact group.
- Install the retaining ring into the housing groove.
- Connect the wires to the terminal of the contact group.
- Install the cover on the steering column and tighten the fastening screws.
- Connect the ground wire to the battery.
- Check the functionality of the lock.
At this point, the replacement of the contact group is completed and the machine is ready for operation.
How to change the ignition switch of a VAZ 2110: ignition switch diagram
Having dealt with possible malfunctions of the ignition switch, let’s move on to methods and methods for eliminating them. More precisely, we will consider how to carry out diagnostics, what is the ignition switch connection diagram, how to connect the ignition switch, etc.
Before starting repair work, it is necessary to carry out diagnostics using a tester by removing the ignition switch:
- Having disconnected the negative terminal from the car battery, unscrew the casing around the steering column;
- having disconnected the ignition switch connector, insert the key into the lock and move from position I to II., while measuring the resistance between the contacts using an ohmmeter (the data must correspond to certain values given in a special table);
- The ignition switch and contact group are operational - the resistance value is 0 Ohm.
Removing the ignition switch:
- Having removed the negative terminal from the battery, use a screwdriver to unscrew the fastening bolts and remove the steering casing (the casing is divided into two parts);
- Having removed the front part of the lock and disconnecting the plug with power wires from it, disconnect the specified plug with wires from the relay;
- Having set the key in the ignition switch to position “0”, you can begin to dismantle it;
- unscrew the fastening screws and remove the lock;
- use a tester to diagnose the malfunction;
- Having identified a malfunction, proceed to repair work and reassemble the device in the reverse order.
Repair work may require replacement of the backlight bulb, repair/replacement of the ignition switch contact group, replacement of the microswitch, etc. In this case, it is often the contact group of the ignition switch that is problematic.
We also recommend reading the article on how to install the engine start button yourself. From this article you will learn what an engine start button is, how it works, and how to select and install a start-stop button in a car.
The contact group is located deep in the lock body. Its functionality is checked using a special test lamp. It is recommended to first check for damage to the cables leading to the lock.
Ignition switch and replacement of contact group using the example of a VAZ 2110:
- use a screwdriver to move the fixing latches to the side;
- dismantle the old contact group and replace it with a new one;
- install the latches in place.
The general wiring diagram for the ignition switch on many cars is not complicated. After disconnecting all the wires, some models also have a chip (the wiring going to the lock is collected in a chip placed on the lock contacts). So, this feature greatly facilitates the installation of a new element. In this case, the ignition switch connection diagram is not needed.
However, in some vehicles the wiring may be connected directly to the terminals. For this reason, when installing a new element that has this type of wiring connection, a connection diagram will be required (you need to study the manual or special technical literature for a specific car model).
Replacing the ignition switch of a VAZ 2107
If the ignition switch sticks or does not turn, it is necessary to change the “secret” or the lock assembly. Replacing the ignition switch of a VAZ 2107 is carried out as follows:
- Disconnect the ground from the battery (if this is not done, the probability of a short circuit when removing the lock will be 100 percent).
- Set the lock to position “0”.
- Unscrew the steering column housing screws.
- Remove the steering column cover.
- Unscrew the two ignition switch mounting bolts.
- Through the technological hole in the place where the lock is attached, press the latch holding the lock body and push the lock out of the installation location.
- Disconnect the wires going to the ignition switch contact group.
- If it is necessary to change only the mechanical part of the lock, use a screwdriver to pull out the retaining ring, dismantle the contact group and move it to the new lock.
- Install the new lock into the seat.
- Tighten the ignition switch mounting bolts.
- Connect the wires to the ignition switch contacts in accordance with the connection diagram.
- Install the protective (decorative) cover of the steering column.
- Tighten the bolts securing the protective cover.
- Connect the ground wire to the battery.
- Make sure the ignition switch is working.
The operation to dismantle the ignition switch is quite simple. Therefore, it is recommended to remove it entirely to replace only the contact group. This greatly facilitates the removal and installation of the retaining ring holding the ignition contact group.
How to replace the ignition switch on a VAZ 2101-VAZ 2107?
Replacing the ignition switch:
Removal: 1) At the beginning of the operation, remove the upper and lower casing from the steering column. (For information on how to remove the cover, see the article: “Replacing the instrument panel”)
2) Next, using a marker or something else, mark the wires that are connected to the back of the lock, and only then disconnect all the wires.
3) Next, using a Phillips screwdriver, unscrew the two lower screws that secure the ignition switch.
4) Then insert the key into the lock cylinder and turn it to position “0”, thereby disabling the anti-theft device that locks the steering wheel. At the same time, use a thin awl or screwdriver to press the latch that holds the lock in place... (Continued in point 4)
5) And then pull the key to remove the lock from the bracket.
Note! Installing a new lock occurs in the reverse order!
Checking the ignition switch elements for functionality:
1) To check the correct closure of the contacts at different key positions, do the following:
• First, take the voltage from the “AKB - Rechargeable Battery” and the generator and thereby apply it to the contacts in accordance with the table:
Note! The free “INT” plug, just so you know, is intended only for connecting a radio receiver, and contacts “30/1” and “30” are used to connect wires coming from the battery and generator as mentioned above!
2) Now check how the steering wheel lock works, also known as an anti-theft device, for this:
• Insert the key into the lock and turn it to position “III”, and pay attention to the locking rod (Indicated by the number “1”), which at this moment should extend.
• Then turn the key in the lock to position “0” and again turn your attention to the locking rod, which at this moment should sink.
Note! And also take note that the key must be removed from the lock cylinder only when it is in position “III”!
Replacing the contact part of the lock:
1) First, remove the ignition switch from the car.
Note! In fact, it is possible to remove and install the contact part of the lock even if the ignition switch is installed in its place, but only in this case, replacing the contact part will be much more difficult than with the lock removed!
2) Then pry the retaining ring through the hole in the end of the case under the number “2” (see “photo”), and after prying the ring, carefully remove the contact part from the case.
Note! When reinstalling the contact part, install it so that the wide protrusion under the letter “A” in the photo above fits into the wide groove that is present on the lock body. And after installing the contact part, check that the locking rod “under the number 1” is located next to the plugs “15” and “30” on the contact part!
