How to tighten the handbrake of a VAZ 2107. Adjusting the handbrake
Locking the wheels when parking a car is the task of the parking or hand brake. It is more often used on bumpy road sections.
A well-adjusted handbrake should lock the car in one place when tightened by 4-6 teeth with a surface slope of 25%. If this does not happen, the parking brake needs to be adjusted or repaired.
The breakdown of the handbrake is a common occurrence, since it is enough to just start the car without removing it from the handbrake. In this case, the pads will wear off and will no longer reach the brake drum.
disassembling and assembling the hand brake of a VAZ 2107
We replace the handbrake cables on a VAZ 2107 car if adjustment is impossible due to their stretching or mechanical damage.
Removing the rear hand brake cable from a VAZ 2107 car
1. We install the VAZ 2107 car on an inspection hole or overpass (see “Preparation of the VAZ 2107 car for maintenance and repair”).
2. Use round nose pliers or pliers to disconnect the release spring from the body bracket of the VAZ 2107 car and the tip of the front hand brake cable. 3. Remove the tension spring.
4. Use a 13 mm wrench to unscrew the lock nut, holding the adjusting nut with a wrench of the same size. 5. Holding the tip of the front handbrake cable with pliers, use a 13 mm wrench to unscrew the adjusting nut and remove it together with the spacer sleeve. 6. Remove the rear handbrake cable guide from the front end and disconnect it from the cable. 7. Remove the hand brake cable ends from the drive levers (see “Brake pads for the rear wheels of a VAZ 2107 car - replacement”) without disconnecting the pad support struts. 8. Using a screwdriver, we remove the tip of the handbrake cable sheath from the hole in the bracket of the VAZ 2107 car body. 9. Using a 10 mm wrench, unscrew the two nuts securing the rear handbrake cable bracket to the VAZ 2107 car body and remove the bracket. 10. Using an 8 mm wrench, unscrew the two bolts securing the handbrake cable sheath holder to the brake shield. 11. Pull out the branch of the handbrake cable from the shield. 12. Similarly, disconnect the handbrake cable branch on the opposite side of the VAZ 2107 car and remove the rear parking brake system drive cable.
Attention The right branch of the handbrake cable differs from the left one in the presence of a rubber tube on the casing.
We remove the guide roller of the front handbrake cable if there is mechanical damage or to lubricate the contact surfaces of the roller and spacer sleeve.
Removing the handbrake roller
1. Remove the rear handbrake cable guide from the front end and disconnect it from the cable.
2. Using a 13 mm wrench, unscrew the bolt securing the handbrake cable roller. 3. Remove the handbrake cable roller.
We remove the front handbrake cable from the VAZ 2107 for replacement. Removing the front hand brake cable from a VAZ 2107 car
1. Remove the rear handbrake cable guide from the front end and disconnect it from the cable. 2. Using a short Phillips screwdriver, unscrew the two self-tapping screws securing the handbrake protective cover.
3. Remove the casing from the lever.
4. Remove the rubber seal from the handbrake lever bracket. 5. Using a 10 mm socket wrench with an extension, unscrew the four bolts securing the handbrake lever. 6. Remove the handbrake lever along with the front cable. 7. Unsplint the connection between the handbrake lever and the cable, remove the washer from the axis of the handbrake cable tip. 8. Remove the end of the front handbrake cable. Installing the front handbrake cable on a VAZ 2107 car
1. Install the parking brake system drive parts on the VAZ 2107 car in reverse order, lubricating the roller axis. 2. Adjust the parking brake system (see “Parking brake of the VAZ 2107 - adjustment”).
Logbook VAZ 21074 (2006)
The author of the review, as always, tried, in addition to a detailed presentation of the work carried out, to support them with appropriate photo illustrations. Very interesting. But nevertheless, as always, I will allow myself a small critical comment.
So, let's go! Using a mallet to remove drums is frankly bad manners, not to mention that it is inconvenient and ineffective. If you don’t have a special puller (reverse hammer) at hand, especially since the author has welding and his hands are not strong enough (making a homemade one is a piece of cake!), then you should have used a heavy hammer (at least 2 kg) and a spacer made of soft metal (in extreme cases, something else, for example piece parquet, etc.). Further, the new parking brake cable that was replaced is clearly counterfeit. I remember how many times I changed it on different classic VAZs, I always had to strain a little, pulling it, in order to fit an M8 nut even one turn onto the threaded end of a short cable, but here on you - even with new pads and drums you have to install a spacer sleeve a few cm! The short front cable, of course, should also stretch over the entire period of operation, but not to the same extent! By the way, the counterfeit nature of this cable is also hinted at (judging by the photo) because its springs are too long, in my opinion. The original cable must have authenticity labels and a self-adhesive label with a bar code. Apparently, none of this was observed on this cable. Further, it is very bad that the respected author, when changing the cable, did not think to lubricate it thoroughly with grease under the shirt and always under the protective rubber boots so that it would not turn sour in a year or two. It’s clear that no one will do this in a car service center, but he did it for his loved one! This is simply amazing! No less striking is the fact that Nikolay, during the process of carrying out this work, did not check the performance of the taxiway and the wheel brake cylinders! In addition, if the drums, pads and springs were already removed, then what prevented him from unscrewing only 4 nuts on each side and checking the condition of the axle bearings, especially since he himself stated in the text, I quote, that “they have never been climbed into with since I bought the car 4 years ago.” If the bearings do not yet require replacement, then at least it was necessary to add grease to them. I suspect that he simply lacks experience in repairing and maintaining this car. Next, bend the rear cable bracket mount by unscrewing only one M6 nut, also bad manners. (Well, who does that for their loved one?!). Well, there is a good hair dryer or, in the end, VD-40! Simply amazing! Returning to the RD and rear brake wheel cylinders, if we take into account that the brake fluid was changed before this, it is unknown when, and whether it has been changed at all since the car was produced, then the normal functionality of these components is a big question. From the close-up photo of the pads, we can say with great confidence that the second pad from the left did not work, i.e. the corresponding piston of the cylinder has definitely soured a long time ago, the block on the far left is not far from it, and the respected author noted this fact, I quote: “Yes, and the blocks themselves have some kind of mud coating and it’s clear that they didn’t really work,” but despite I still left the cylinders as is! The effectiveness of the brakes of classic VAZs by modern standards already leaves much to be desired (even if they are in completely good condition), but here there are obvious problems with them, but the author leaves everything as it is! Amazing carelessness! It’s good if these pads were at the rear (and they weren’t much use anyway, but if they were at the front!) In general, the author needs to make it a rule that if he wants to minimize possible problems with the brake system of his car, then it’s definitely necessary to replace the brake fluid carried out at least once every two years. (if you have a compressor, then replacing the fluid is quick and very simple and without an assistant). Well, for good measure, you need to disassemble everything again: change the cable to a normal one, i.e. shorter (be sure to lubricate it), replace the working cylinders (you can, of course, identify soured pistons, but it’s not a fact that this will happen only in one cylinder, and not both at once), for this you need to purchase a special 10 wrench with a clamping bolt, and do not unscrew the pipeline nut, otherwise you will have to change the tube too (since the nut itself sticks tightly to the tube over time), and unscrew the two bolts securing the cylinder to the shield rotate the cylinder itself while holding the tube nut motionless, well, that’s a topic for another discussion), and also adjust the left support rubber band for the spring on the guide bar (you can see in the photo that it’s positioned incorrectly). Something like this.
Replacing the handbrake cable on a VAZ 2107
It is quite possible to replace the handbrake cable on a VAZ 2107 yourself. The serviceability of this device is the key to safety, so it should not be neglected. To replace the cable on the “seven”, you will need to purchase a new part, and then perform the procedure in accordance with the algorithm that will be described in this material.
Why the handbrake does not work on the VAZ 2107
Like any other part or mechanism, the handbrake cable tends to wear out and become unusable. The parking brake on the VAZ 2107 is activated using a lever located in the middle part of the car between the driver and passenger seats.
Periodically, the handbrake cable should be tightened, as it becomes weakened, which leads to a decrease in the efficiency of the device. The reasons why the handbrake on the “seven” may not function are due to the following factors:
- Excessive cable stretch.
- Damage to the cable.
- Malfunction of the brake mechanism in the rear wheel drums.
During prolonged use of the car, when the handbrake is constantly used, owners are faced with the need to periodically restore the cable tension. Over time, the device in question stretches, and there is nowhere to tighten it. The only way out of the situation is to exchange the product for a new one. It is recommended to carry out work on replacing the handbrake cable in an inspection hole, but you can do without it.
Changing the handbrake cable
Replacing the handbrake cable on a VAZ 2107 car begins with the fact that it is first necessary to dismantle the brake drums of the rear wheels. After dismantling the brake drums, you should pay attention to the condition of the rear brake pads and working cylinders. The presence of traces of fluid leakage will indicate that the mechanisms also need repair.
How to independently restore the effectiveness of the handbrake
Driving a car with faulty brake system components is prohibited by traffic regulations. By riding with a non-working parking brake, you not only violate the relevant rule, but also endanger yourself and those around you. Let's not drag our feet and start repairing the handbrake.
The parking brake “does not hold” for the following reasons: — the drive cable has stretched; — breakdown of drive mechanism parts inside the wheel drums; — the cable braid or the cable itself is torn. If everything is in order with the rear brake pads and drums, and breakdowns of these parts occur infrequently, work to return the “grip” to the parking brake comes down to replacing the cable and adjusting its tension.
Parking brake VAZ-2107
What is the principle of parking brake
The handbrake, located on the right hand of the driver, is connected directly by cables (made of metal) to the rear brakes. In turn, when the handbrake is raised, the cables are set in motion, pressing the pads to the drum or brake disc (depending on the type of rear brakes). It is worth noting that when the handbrake lever is raised, a light comes on on the instrument panel, indicating that the handbrake is currently in use.
Attention! If the handbrake is idle and the car is not locked in place by blocking the wheels, this mechanism has a malfunction. The first reason may be torn/stretched cables, the other may be worn out brake pads or handbrake pads.
If the handbrake lever is in the lowered position, but the dashboard still shows a light with an exclamation mark, the brake fluid level is probably at a minimum value.
To replace the cable in a VAZ-2107 car, you will first have to buy new elements, and then start the process according to the instructions, which we will present below.
The parking brake in the “seven” does not function: reasons
Any mechanism or element, and the handbrake cable is no exception, can wear out and fail. The 2107 model's handbrake is activated using a lever located midway between the driver's and passenger's seats.
The handbrake cable must be tightened periodically, as it tends to weaken, which leads to a decrease in the productivity of the device. A non-working handbrake is caused by factors such as:
- cable damage;
- breakdown of the brake device in the wheel drums (rear);
- excessive stretch of the cable.
During prolonged use of the vehicle, when the parking brake is in use, motorists will have to adjust the cable tension at some intervals. Over time, the mechanism in question stretches, and there is nowhere to tighten it. The way out of this situation is to replace the part. Carry out such work related to replacing the hand brake, preferably in an inspection ditch. However, the latter does not play a decisive role in this process.
Parking brake cable: replacement
To change the handbrake cable on a VAZ-2107, you first need to dismantle the brake drums of the rear tires. After completing this procedure, pay attention to how the rear brake pads and working cylinders look. The presence of traces of fluid leakage indicates a probable repair of the mechanisms.
When it’s time to replace the handbrake cable, each owner of the “Seven” decides for himself. The degree of wear of the cable matters here. The process of replacing the handbrake can be divided into 3 stages:
- Dismantling.
- Installation of the mechanism.
- Tension regulation.
Types of maintenance work
Despite the fact that the system is not so complicated structurally, it requires periodic maintenance, including:
- Checking the fluid level in the system;
- Checking the degree of wear of friction clutches, pads, discs, drums;
- Bleeding the system to remove air;
- Checking the condition of the handbrake cables;
- Adjustment of cable tension;
- Adjusting the rear brake adjuster;
Before each trip, you must always check how much brake fluid is in the VAZ-2107 system. An insufficient amount of it can lead to the fact that the efficiency of the system can be significantly reduced due to air getting inside the pipelines. In addition, a decrease in level may indicate damage to pipelines and fluid leakage.
The elements of the mechanism should be checked every few months, this is especially true for the pads, since they wear out quite intensively. If necessary, worn elements are replaced.
If air gets inside the drive of the working system, pumping is performed, as a result of which the air is expelled from the system.
Replacing the handbrake: instructions
- After dismantling the rear wheels and brake drums, you need to head into the pit and find the tension adjustment rod. This rod is equipped with a spring that must be unscrewed with a screwdriver.
- Next, you need to unscrew the 2 nuts and begin dismantling the adjusting bar. Then the cables (rear and front) of the parking brake are dismantled.
- Use a wrench to unscrew both nuts securing the brackets. The latter just prevent the cable from falling. There are screws under the nuts that prevent them from unscrewing unintentionally.
- The next step is to remove the rear drums and then remove the springs that secure the brake pads. The latter are also timely to be replaced if they are worn out excessively.
- Now you need to pull the cable. This way it will be possible to disengage it with the bracket where it rests.
- Next you need to remove the brake pads. There is no need to remove both elements on the wheel. To replace the rear cable, you only need to remove one rear block.
- On the opposite side of the brake shield of both wheels, you need to unscrew 2 mounting bolts, with which the cable tip is secured. After unscrewing both bolts, pull the cable.
- Using a 10mm wrench, you now need to unscrew the front cable fastening brackets. When the bolt is unscrewed, carefully remove the roller. To do this, you will need to roll it forward in the direction of the tip.
- To remove the front part of the mechanism, pull the device to remove it from the intermediate support and bracket structure.
- Then you can get out of the inspection hole and head to the S7’s interior. The handbrake is kept in the down position throughout the entire process. While in the cabin, you need to unscrew the 2 screws that secure the handle trim.
- So, there are 4 bolts under the cladding. They need to be unscrewed, and then proceed to dismantling the handle with the front cable.
- To disconnect the cable fastener from the handle, use pliers to remove the small cotter pin that clamps the device to the parking brake handle.
- Now the device can be removed from the car and a new cable can be installed. The installation procedure for both mechanisms is carried out in the reverse order of removal. After all, you need to fix them and move on to adjusting the tension.
Note. When installing the rear cable, it is important to remember that this part has both a right and a left side. On the right there is a rubber tube that serves as auxiliary insulation of the braid from the hot pipe of the resonator located nearby.
The procedure for adjusting and replacing the parking brake cable is not as complicated as it seems. Any VAZ-2107 car owner can cope with the task.
In conclusion, we note that the process for replacing the handbrake cable is identical for both models of the VAZ family and for most types of cars.
Repair of hand brake VAZ 2107
Operating a vehicle with a faulty brake system is prohibited. This also includes cases when the handbrake does not hold the car well or does not work at all. Therefore, repairing the VAZ 2107 handbrake is a job that should be performed immediately. If lifting the lever 5-6 clicks is not enough to lock the car in place, the handbrake requires attention.
Adjusting the handbrake VAZ 2107
Restoring the handbrake's functionality should begin by checking the cable tension. To tighten the parking brake cable of a VAZ 2107, you will need:
- pliers;
- a pair of keys for 13;
- metal brush;
- WD-40;
- jack.
The adjustment should be made on an inspection pit or a lift. In the latter case, a jack will not be needed.
The procedure is as follows:
- Raise the rear wheels using a jack or lift so that they can be rotated by hand.
- Tighten the handbrake 2-3 clicks (until the locking position).
- Use a wire brush to clean the threads on the adjusting bolt if they are dirty. If corrosion is severe, use WD-40 to remove the nut from the adjusting bolt.
- Using a pair of 13mm wrenches, loosen the locknut;
- Using a 13mm wrench and pliers, adjust the position of the nut so that the wheels are locked.
Note: if even in the extreme position of the nut the VAZ 2107 handbrake is not tightened sufficiently, it is necessary to replace the cable.
- Make sure that the cable is not overtightened and that when the lever is lowered, the wheels are unlocked.
- Tighten the locknut.
- Lubricate the threads of the adjusting bolt with lithol to prevent corrosion.
Adjusting the handbrake yourself
If you promptly ask yourself the question of how to tighten the handbrake on a VAZ-2107, and do all the work correctly, you will be able to avoid a number of unpleasant situations. Securely locked wheels will prevent the car from rolling away while parked. In addition, a properly functioning hand brake system makes it much easier to move the car away if you are on a steep road. Therefore, if the handbrake on a VAZ does not work effectively enough, read the instructions for adjusting it.
Timely tightening of the handbrake on the VAZ-2107 will allow you to avoid unpleasant situations
Before pulling the handbrake on the VAZ-2107, make sure that the brake pads of the rear wheels are in good technical condition. And also check the condition of the cable itself - perhaps it is too stretched or worn out and a regular tightening will not solve the problem. And also check the operation of the handbrake drive. If all parts are in good condition, prepare two “13” wrenches and pliers and begin adjustment, guided by the sequence of actions described below:
- The VAZ-2107 hand brake is adjusted under the bottom of the car, so it must be installed above the inspection hole or the rear of the car must be raised using a jack.
- Set the parking brake lever to the applied position by tightening it 5–6 clicks.
- After this, while under the car, remove all dirt from the adjusting rod and nuts. After cleaning, hold the adjusting nut with one wrench and loosen the lock nut.
- Next, by tightening the adjusting nut, you need to tighten the handbrake cable until the rear wheels lock. During the process, the adjusting rod should be held with pliers so that it does not rotate.
- After the required degree of cable tension has been set, tighten the nut a few more turns - this is necessary to reduce the free play of the lever.
- Now check if the wheels actually brake, and if everything is fine, you can tighten the lock nut.
If the handbrake tension is adjusted correctly, the brake pads will hold the car on a 25% slope.
Upon completion of the work, it would be useful to lubricate the threaded connections, for example, with lithol - this will make the adjustment process easier the next time. So, now you have learned how to tighten the handbrake on a VAZ-2107 car, but you still need to check the system in action. To do this, find a road section with a 25% slope (or a suitable overpass) and after stopping, pull the handbrake lever 2-4 clicks. If the tension is adjusted correctly, the brake pads will hold the car in place.
Replacing the hand brake cable of a VAZ 2107
The operation of replacing the cable is carried out on a lift or inspection pit.
To replace the handbrake cable, it is necessary to remove the brake drums of the rear wheels. When removing them, it is possible to check the condition of the brake pads and parts of the brake mechanism, especially the working cylinders. The latter should not have any traces of brake fluid leakage, and the rubber boots should not have cracks or damage.
Removing brake drums is a rather complicated procedure. The work is made difficult by the wear of the brake drum, which, as a result of wear, may have a “side” that clings to the pads when removed. Another problem is corrosion, which is best combated with WD-40.
When removing the brake drum, you can use a sledgehammer or hammer, but the blows must be applied through a wooden block. Without the use of a block, the hammer may crack the aluminum edges of the drum.
When the drum is removed, the brake mechanism should be inspected and cleaned of dirt. The wheel hub should be lubricated with graphite grease. If the brake pads are on the verge of complete wear, they should be replaced.
To replace the VAZ 2107 parking brake cable, you need to unscrew the two mounting bolts, release the cable and remove it.
After removing the old cable, all that remains is to install a new one and put the brake drums and wheels in place. After which it is necessary to adjust the VAZ 2107 handbrake as described in the previous paragraph.
Now you know how to repair the VAZ 2107 handbrake.
How to replace the handbrake (handbrake) cable on a VAZ 2110 with video
Handbrake failure is a problem that owners of VAZ 2110 cars often have to face. This problem can be solved by replacing the cables on your own, but not every car enthusiast knows this. We will tell you how to replace the handbrake cable with your own hands in this article.
The hand brake has a simple function: to stop the car in an emergency. In addition, this device is used to securely secure the car in a parking lot with the engine turned off and to prevent the car from rolling away during emergency stops on slopes up to 25% inclusive. The handbrake lever is located between the front seats of the car.
Parking brake cable for VAZ 2110
The basis of the parking brake is a cable through which the force applied by the driver is transmitted from the lever to the rear brake system. The load on this structural element cannot be called large, so the cable breaks quite rarely. Most often he just jumps off.
This can happen for the following reasons:
- The rear brake pads are badly worn, causing the cable to sag.
- The brake pads themselves are completely worn out (if the car is equipped with this type of brake).
- The cable ends gradually became chafed by the too-long bolts on the wheels, which ultimately led to them slipping off.
- In addition, the handbrake cable may break due to too sharp braking, or it may jump out simply by catching on some foreign object on the road.
When should you change cables?
This question can be answered after a simple visual inspection:
- If more than 10% of the strands on the cable are broken, it should be replaced immediately.
- If the fastening tips are severely worn out or there are chips and cracks on them.
- And finally, if the cable, even after abundant lubrication, is difficult to move inside the protective jacket, this is also a reason for its immediate replacement.
How to change
Tools and materials required for replacement
- New handbrake cable.
- Open-end wrenches for 10 and 13.
- Socket wrench 13.
- Flat blade screwdriver (large size).
- 2 mounts.
Step-by-step instruction
- The car is placed on an inspection hole, and wheel chocks are placed under the rear and front wheels.
- The handbrake lever is lowered to its lowest position (until the stopper clicks).
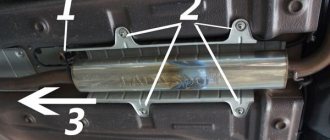
- The muffler and resonator are removed from the car.
After this you can get to the cable equalizer. Handbrake equalizer VAZ 2110 - First unscrew the locknut from the outer end of the cable, then the main nut.
After removing them, the equalizer is removed. Nut and locknut of the brake cable VAZ 2110 - Now you should remove the car's brake pads.
This must be done in order to disconnect the second end of the cable from the lever. Dismantling the brake pads of the VAZ 2110 and disconnecting the second cable tip - Once both ends are free, the cable can be removed from behind the brake guard.
- After you have changed the cable, all the above steps are performed in reverse order.
Important points
- It is best to use two people to disconnect the tip from the brake pads. One person should carefully press the brake rocker with a large screwdriver (or a thin pry bar), the second at this moment will be able to freely loosen the lock nut, after which the cable can be pulled out of the holder without risking injury to your hands.
- As soon as the cable is removed, its attachment points should be thoroughly cleaned of rust and dirt. The best way to do this is with a wire brush. Those places in the brake shield where the cable passes must be wiped with solvent.
- If too much rust has accumulated in the through passages of the cable, you should use concentrated acetic acid, as it corrodes rust well. You only need to work with it wearing gloves to avoid chemical burns.
- Before installing the brake drum, be sure to check the condition of the pads. If the spacers on the pads are very worn (and most likely this will be the case), they need to be replaced with new ones. A set of such strips can be purchased at any auto store.
Video: how to change the handbrake cable mechanism on a ten
Adjustment and checking
- The travel of a properly adjusted handbrake lever should not exceed 8 clicks. The optimal lever stroke is 6-7 clicks (this number varies depending on the car model; details for a specific VAZ model can be found in the operating instructions supplied with the car).
- After installing the new cable, the rear wheels of the car should be jacked up and try to spin them by hand. Rotation must be free.
- Now the brakes should be checked while driving. You need to drive 30-40 meters, then slow down using the parking brake. After braking, you need to get out of the car and touch the rear brake drum. It should not be hot, its temperature should not exceed the ambient temperature. If the drum gets so hot that it burns your hand, this means that the brake cable is too tight and should be loosened.
- To loosen the cable, you should put the car back on the inspection hole, unscrew the lock nut on the outer tip with a 13mm wrench, and then loosen the main fastening nut. After this, the locknut is tightened again.
- If the brake cable is too slack, it needs to be tightened. All steps are listed above, with one exception: the main nut on the tip should be tightened, not unscrewed.
- To independently check the reliability of the parking brake, you should find a slope with a ratio of 1:5 (that is, 1 meter high and 5 meters long), drive the car onto it, turn off the engine, put the car on the parking brake and squeeze the clutch. After these actions, the machine should remain in place and not roll downhill. If the car does roll, you should tighten the brake cable a little more.
As you can see from our article, there is nothing complicated about replacing a brake cable, and even a novice car enthusiast can do this task. The main thing you should pay attention to in this case is compliance with safety regulations. When changing a cable, it is very easy to get injured or get a chemical burn, so it is better not to carry out this operation alone, but to work together with an experienced auto mechanic.
motorltd.ru
Replacing the handbrake and front parking brake cable on a VAZ 2101-VAZ 2107
Welcome! There are two cables in total in the car, namely the rear and front handbrake cables. The front one, coming from the parking brake and having a short length. It goes to the rear, compared to the front cable it is very long. The rear one goes directly to the two rear wheels. Thanks to the cable system, the car is braked.
Note! You will have to remove the handbrake, which means the following tools will be useful: various kinds of wrenches, a screwdriver and pliers.
Part location
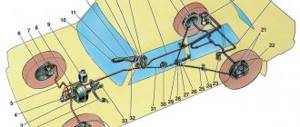
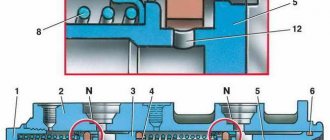
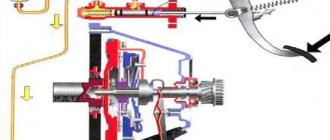
It comes from the handbrake and passes under the bottom of the car, connecting to the rear (main) cable. Below we have attached a photo with a diagram of the handbrake. The front cable is indicated by number 2.
Note! In the diagram above it may seem that cable number two is divided into two parts, but in fact it is not. It is solid, just in the place where it supposedly breaks (in the diagram) there is a roller (indicated by number 8).
When to change the cable and the handbrake itself?
You have to change it when the cable breaks. You will feel this when the handbrake begins to rise very easily and to a very high position, almost to a vertical position. Exactly the same situation will arise if the cable breaks at the back. Therefore, before you go to a car store and buy a new one, inspect the bottom of the car and figure out which cable has become unusable.
Note! The cable tends to stretch over time. It all depends on the quality of the material; a high-quality cable will last longer and stretch to a shorter length. If you see that this cable is sagging and the adjustment does not lead to anything good, then you will have to replace it with a new one!
Now let's talk about when to change the handbrake itself. Firstly, there is a gear sector on the parking brake, thanks to which the handbrake rises up neatly and does not slip between clicks. Secondly, the so-called pawl, which blocks the handbrake after lifting up, its breakdown leads to the handbrake not being held in one position, it will constantly fall. These factors are a reason to replace the part with a new one.
Replacing the handbrake and front cable on a VAZ 2101-VAZ 2107
Removal
Remove the guide from the tip of our cable, for more details see the article: “Replacing the rear cable”, points 3-4.
Take a wrench and remove the bolt securing the roller to the bracket (the bracket is indicated by the blue arrow). Carefully remove the roller by rolling the roller towards the tip of the front cable, as shown in the figure, and remove it from the car.
Note! Be careful: inside the roller there is a bushing (number 3 in the photo below) and a fastening bolt (number 1). Don't let the parts fall and get lost.
We recommend using Litol-24 or LSC-15 lubricant, lubricating the contacting surfaces of the bushing itself (the surface is indicated by the letter B) and the surface of the roller (the letter A). To do this, remove the bushing from the socket.
Now pull the cable to the bottom and remove the cable from the bracket and the intermediate support of the cardan drive (indicated by the blue arrow).
Get out from under the bottom of the car and move into the interior. While inside the car, remove the two screws securing the handbrake trim, remove it and set it aside.
You will see four handbrake mounting bolts. By unscrewing them, you will remove the handbrake from the car along with the attached cable (front).
Note! If necessary, disconnect the cable from the handbrake: using pliers, remove the small cotter pin (looks like a small twisted wire inserted into the hole; a washer is placed under it, holding the parts in place) that goes into the hole indicated by the red arrow. Unfortunately, the hole is hard to see in the photo, but it is present in the so-called finger, where the cable tip is installed. Remove the cotter pin securing the end of the cable and remove the washer with the cable as shown in the figure below.
Installation
New parts are installed in the reverse order of removal. ,After installation, adjust the cable; the process is described in detail in the article: “Adjusting the cable.”
Note! Is the handbrake button stuck? Most likely the spring is to blame. It can be easily removed and replaced with a new one:
- Unscrew the handbrake button completely;
- pull out the hole button together with the spring;
- replace the spring with a new one;
- Reinstall the parts in reverse order.
Sources:
https://car-exotic.com/vaz-cars/vaz-2107-car-brake-17.html https://provaz07.ru/tormoza/zamena-trosa-ruchnika-vaz-2107.html https:// ladaprofi.ru/vaz-2107/kak-sdelat-zamenu-trosa-ruchnika-na-vaz-2107.html https://semerkavaz.ru/tormoznaya-sistema/remont-ruchnogo-tormoza-vaz-2107/ https:/ /vaz-russia.com/remont/zamena-ruchnika-i-perednego-trosa-ruchnika-na-vaz-2101-2107.html
Changing the parking brake cable of a VAZ 2110 with your own hands
Quite often, owners of the domestic VAZ 2110 car are faced with a problem - a breakdown of the parking brake and a lack of reverse traction on the lever. Actually, in this article we will take a detailed look at how this important device is repaired and adjusted, simultaneously focusing on the main reasons why the system does not hold up and does not work.
Main causes of failure
The main reason why such an important device may break and need to be replaced is mechanical wear of the handbrake. As you know, the basis of the system is a small cable that transmits forces from the lever to the mechanism. It actually turns on this node.
The operating conditions of the cable are quite complex - the constant load from the force that the driver transmits through the handbrake lever to the system, sooner or later, can damage the device.
However, the cable breaks extremely rarely - most often, the cables simply jump off. Or the tips fixed in the drum are ground with very long wheel bolts. Needs renovation. Also, the parking brake may not work due to wear on the rear drum brakes (as well as abrasion of the pads, depending on the design).
As a result, the unit ceases to perform the functions assigned to it - the handbrake simply does not hold. The parking brake needs to be replaced and subsequently adjusted. But not everything is so simple - in some cases, the device can be damaged during emergency braking of the car - as a result, it will require repair or replacement.
Often the metal is not completely ground, but the steel fibers are stretched and moving in the shell is very difficult. But it doesn’t matter what the reason for the parking brake failure is, why it doesn’t hold. The purpose of our article is to figure out how to solve the problem.
Repair manual
To quickly carry out repairs, you will need the help of a partner. This will significantly save time that will have to be spent on repairs.
Further point by point:
- Step one - remove the VAZ 2110 from the parking brake (we lower the handbrake all the way to the floor - the system for holding the car in place must be turned off);
- Step two - remove the wheel brake drum;
- Step three. Getting to the equalizer is quite difficult. The technician will need to remove the muffler from the suspension cushion and remove the resonator from the rear cushion. We lower the exhaust pipe downwards;
- Step four. To do this, you will have to crawl under the VAZ 2110 - the adjusting nut and locknut are located here. We unscrew them and remove the equalizer from the rod;
- Step five. Remove the cable end from the control;
- Step six. On the body of the VAZ 2110 there is a bracket where the tip of the cable sheath is installed;
- Step seven. The manufacturer secured the cable with brackets - they need to be bent to the sides;
- Step eight. Remove the rear brake pad and disconnect the end of the handbrake cable;
- Step nine. We move on to the rear axle beam and loosen the nuts with which the manufacturer secured the handbrake. Remove the cable from the device holder.
Remove the muffler from the suspension cushions and the resonator from the rear cushion.
Lower the exhaust system downwards From the bottom of the car, unscrew the lock nut 1 and the adjusting nut 2 of the parking brake and remove the equalizer 4 from the rod 3 Remove the cable tip from the equalizer Remove the tip of the cable sheath from the bracket on the body Bend the two fastening brackets for each cable Having removed the rear brake shoe, disconnect the cable tip from lever Loosen the nut securing the cable holder on the rear axle beam and remove the cable from the holder. Remove the cable from the bracket on the body. Remove the cable from the brake shield. Install the cable in the reverse order of removal. Please note that the cables are installed crosswise in the bracket. After installation, adjust the parking brake. Actually, this stage can be called as half the way passed. Now the car owner must install a new handbrake cable using the steps above (proceed in reverse order).
The main design feature of the VAZ 2110 is that the cables in the bracket are mounted crosswise.
Also, after installing the product in place and assembling the VAZ 2110 in the reverse order, the parking brake system will require adjustment to restore traction - this is important for the further comfortable operation of the car.
Adjustment
Adjustment takes a few simple steps:
- We put the car on a jack so that the rear wheels can be easily rotated by hand;
- We bring the repaired handbrake to the locked position;
- We arm ourselves with two keys at “13” and find the adjusting bolt and nut of the parking brake;
- Tighten the tension adjustment nut. Pull until the wheels are completely blocked;
- Tighten the locknut;
- We check the quality of work of the repaired unit
Modernization
Many modern owners modernize their cars and install so-called hydraulic handbrake here. As a lyrical digression, we note that in this case it is necessary to replace the rear brakes with disc brakes without fail.
Very serious design changes are required - such as installing a hydraulic system in the parking brake. No cables are used here - the parking brake lever is connected to the master cylinder.
After the driver lifts the lever, the brake fluid in the system presses on the cylinders. Most often, hydraulic systems can be found on sports cars - after all, such a brake holds much better.
The main advantages that the hydro system gives:
- Full confidence that the hydraulic handbrake will work;
- There is no need to tighten the cable.
There are some disadvantages:
- It is quite difficult to bleed the brakes when replacing the standard cable system and installing a hydraulic handbrake;
- The hydraulic handbrake holds the car for several hours, after which the pressure in the system drops and the car can start moving.
vazweb.ru