05.10.2020 3,822 Lubrication system
Author: Victor
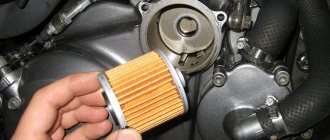
Every car enthusiast who decides to replace the motor fluid on their own is faced with the need to dismantle the oil filter. Difficulties may arise when performing this task, since the device becomes stuck and is difficult to remove. We will tell you below how to unscrew the oil filter and what methods there are.
[Hide]
Remove all filters on a worksheet
Click the Filter button next to the column header and select Remove filter from {amp}lt;column_name{amp}gt;.
For example, the figure below shows an example of removing a filter from the “country” column.
Note: You cannot remove filters from individual columns. Filters can be turned on or off for the entire range. If you don't want anyone to filter a certain column, you can hide it.
On the Data tab, click Clear.
If you want to remove filters completely, go to the Data tab and click the Filter button or use the keyboard shortcut ALT D f f.
When does the filter need to be cleaned?
On all machines, the filter is installed in front of the fill valve directly in the hole where the water supply hose to the machine is screwed. It looks like a round plastic mesh with small holes.
The inlet filter, unlike the drain filter, does not require regular cleaning. Clean it as the water supply to the SMA deteriorates. If you notice that the machine begins to draw water poorly and slowly, then clean it.
Don’t have time to tinker with your washing machine or do you prefer to trust repair work to professionals? Contact our service department. The technician will arrive at your home within 24 hours of the call and clean the inlet filter in 15-20 minutes.
The service falls into the category of simple repairs, so it is inexpensive - from 1000 to 1900 rubles. Detailed prices for cleaning the inlet filter depending on the brand of SM are presented in the table below.
| Washing machine brand | Price* |
| Visit of the master | For free |
| Bosch washing machine | 1200 rub. |
| Washing machine Indesit | 1000 rub. |
| Samsung washing machine | 1200 rub. |
| LG washing machine | 1300 rub. |
| Ariston washing machine | 1000 rub. |
| Washing machine Candy | 1100 rub. |
| Electrolux washing machine | 1300 rub. |
| Washing machine Zanussi | 1200 rub. |
| Miele washing machine | 1900 rub. |
| Whirlpool washing machine | 1400 rub. |
| BEKO washing machine | 1000 rub. |
| Washing machine Siemens | 1400 rub. |
| Washing machine Ardo | 1400 rub. |
| Washing machine AEG | 1300 rub. |
| Brandt washing machine | 1500 rub. |
| Washing machine Atlant | 1000 rub. |
| Washing machine Gorenje | 1300 rub. |
| Hotpoint Ariston washing machine | 1300 rub. |
| Other brand | from 1000 rub. |
*Price is for cleaning. The cost of a new filter, if it needs to be replaced, is included in the bill additionally.
7 (495) 215 – 14 – 41
7 (903) 722 – 17 – 03
or order repairs online.
According to the standard schedule, technicians serve clients on the same day or the next. If a different date is convenient for you, please let us know when you contact us. We will come to your call when it is convenient for you.
Only cartridges made of metal or plastic mesh can be cleaned and washed completely. Polypropylene, ion exchange, compressed carbon liners cannot be cleaned and require replacement. Cartridges made from Aragon material are regenerated autonomously, except for Aragon-Bio type systems. Cleaning or replacement must be done in the following cases:
- When plaque and dirt are clearly visible on the filter walls or on the cartridges and membranes.
- If the water flow slows down and/or the pressure weakens.
- If the water acquires an unnatural color/taste/smell.
Before you begin to wet clean the cartridge from dust, blow it with compressed air from a compressor or household vacuum cleaner. This procedure avoids the formation of dirt when debris comes into contact with water. There are several ways to wash your car's air filter:
- The corrugated paper element is cleaned using auto cosmetics in the form of a spray. The product is sprayed onto all folds and left for the time required to soften (indicated on the package). Then rinse off the contaminated mixture with a warm stream.
- The fibrous structure cartridge is washed in an aqueous solution of dishwashing chemicals or washing powder, immersing the element for 30–40 minutes, then rinsing thoroughly.
- The filter part of a direct-flow zero filter differs in different designs: if the material used is paper or fabric, then the procedures are similar to those described above. The difference is that after cleaning, a special lubricant is applied to the outer surface of the nulevik cartridge with your own hands.
- Synthetic parts of the cabin filter are washed in soapy water, rinsed under running tap and dried well.
When removing moisture from washed elements, it is not recommended to use hair dryers or other heaters: the cartridge may become warped. There are also dry methods for cleaning a car’s cabin filter; they are used for carbon- and paper-based elements that cannot be washed in solutions. This is the air blast method mentioned above.
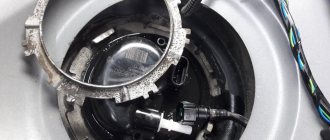
Video “Removing the oil filter using the example of a Mitsubishi Lancer”
Find out how to unscrew a stuck device using a regular leather belt from the instructions published and filmed by the Garage Repair channel.
The recommended mileage after which an oil change is necessary is on average 15 thousand km. It all depends on operating conditions, the degree of engine wear, and driving style. For example, when constantly moving with a trailer, it is recommended to change the lubricant more often. The same can be said about drivers who prefer an aggressive driving style. Each oil change is accompanied by the installation of a new filter.
Inexperienced drivers sometimes do not understand why this element needs to be changed: they say, it is enough to fill in fresh oil. The fact is that any lubricant that is poured contains foreign particles that negatively affect the operation of the engine. Plus, there are always tiny chips inside the motor, and dirt can get inside it.
More on the topic: Do-it-yourself oil change in a Volkswagen Polo manual transmission
There are special keys for this that can be purchased at car dealerships. But it happens that it is impossible to get to the filter with such a tool due to limited space. Or another situation: instead of a standard product, you installed a higher quality element with larger dimensions. In such cases, the question arises: how to unscrew the oil filter without a key? But first it’s worth identifying the reasons why the product cannot be turned away by hand. There are two of them:
- during the previous oil change, the filter was tightened too tightly with a wrench (this is typical for car repair shops);
- the product just got stuck because it hasn’t been changed for a long time.
Below are all the popular ways to replace an old filter with a new one. However, this product must be unscrewed by hand. There is also a trivial situation: maybe you just don’t have enough strength. Then invite a stronger assistant.
Using a screwdriver
The tool must be long: longer than the diameter of the filter. You just need to pierce it, and right through it. The screwdriver here plays the role of a lever, which should be sharp and thick. Don't forget to drain the oil first: however, some of it will still spill out, so take care in advance and place a suitable container down. It is worth noting: all filters turn counterclockwise.
A regular trouser shirt will do. You need to make a loop out of it and throw it over the body. The free end is a kind of lever.
If the belt turns, place a piece of sandpaper under it. If you have an alternator belt from a VAZ or other car at hand, you can use that too. The filter must be unscrewed.
Removal in this way is only acceptable if there is enough space in your car and the tool can easily fit there. The handle of the tool will be the lever. However, fanaticism is not needed! Be careful not to roll anything else along the way.
Everything is clear here: take a tool (it should be sharp), place it on the rim of the filter, closer to the engine (this makes it easier to remove). The blows must be strong and sharp.
When the old filter is unscrewed in one way or another, thoroughly wipe the seat with a rag, removing all particles of dirt. Fill the new filter with oil and screw it in by hand. Try to do this with force, but not excessively! Only after this can the filter replacement procedure be considered complete.
How to clean the mesh filter yourself - instructions
The cleaning procedure is quite simple, does not require special knowledge and experience, and even a woman who is not familiar with the structure of a washing machine can handle it. The main thing is to follow the sequence of steps described below.
- Unplug the washing machine and close the water supply shut-off valve to the machine.
- Unscrew the washing machine inlet hose and disconnect it from the body to gain access to the filter. This is usually easy to do with your hands, but if you are not strong enough, use pliers or pliers. There is always some water left in the hose, so slip a rag when unscrewing the hose if you don’t want any remaining water on the floor.
- Gently clamp the filter with pliers or pliers and pull it towards you; it will come out easily.
- Rinse the mesh under running water. If you want a more thorough cleaning, soak it in a solution of citric acid for 30 - 60 minutes (at the rate of 1 teaspoon per glass of warm water). Please note that the water should not be hot. Boiling water can cause the plastic to deform, in which case you will have to change the fill filter. Warm water is preferable to cold water because citric acid dissolves better in it.
- Insert the screen back into the fill valve hole until it stops using pliers or pliers.
- Screw on the inlet hose, fully open the water supply tap to the machine and check that the connection point of the hose to the washing machine is not leaking.
- Plug in the washing machine, run any program and make sure the machine fills with water.
More on the topic What types of car shock absorbers are there? Types of shock absorbers and device features.
Replacing the water filter cartridge
Greetings to all readers of my blog =)
Today I want to tell you how I changed the water filter cartridge. It was a Geyser 20BB main filter for purifying cold water from mechanical impurities.
In general, there is nothing complicated about replacing a cartridge. Before starting work, you need to close the two ball valves located in front of the inlet and outlet of the filter. Release the pressure using the red button located on top of the filter housing and unscrew the flask with a special plastic key.
I didn't have any problems turning off the taps and releasing pressure. But when I tried to unscrew the filter flask, the plastic key fell into two parts, and the flask did not budge.
To continue the manipulation of replacing the cartridge, two plastic keys were purchased for unscrewing the flask. But even with two keys it was impossible to turn the flask. The keys were bent, and it was scary to make every effort not to break them, just like the first one.
By wrapping two keys together with electrical tape, the tool became stronger, but did not lead to the desired result. Unscrewing the flask by tapping its edge with a hammer through a block, and heating the filter housing with a hairdryer also did not bring any results. No matter how much I tormented him, no matter how much I hugged him, trying to unscrew him with my bare hands =) It was all to no avail. It was not possible to disconnect it from the pipeline. It was possible to remove it, but to do this it was necessary to disassemble part of the pipeline, which I really didn’t want to do!
I suffered with him for three days, being distracted from my main work for an hour and a half a day. The idea came unexpectedly. Using metal mounting tape and electrical tape to plastic keys, I attached a piece of timber as a lever. It turned out to be a very good device, which I used to unscrew the flask with almost no effort. Hooray!
Now I want to write how to avoid such a situation.
Well, firstly, when installing the filter on the pipeline, I would use squeegees, they are also called American ones. By using squeegees, if necessary, you can easily remove and install the filter housing on the pipeline, and you will not need to disassemble a large number of connections. This will be as easy to do as replacing a water meter.
Secondly, every time you replace the filter element (cartridge), the o-ring of the flask must be lubricated with silicone grease for rubber seals.
And thirdly, there is no need to tighten the flask “from the heart”, and even with the help of a key. I twisted this flask by hand with little effort. There wasn't even a hint of a leak.
Good luck replacing your cartridges =)
How do you know if a filter has been applied to your data?
| Description |
| The filter is available and has not yet been used to sort the data in the column. |
| A filter is used to filter or sort the data in a column. |
In the next sheet, a filter is available for the Product column, but it is not yet in use. To sort the data, use a filter in the “country” column.
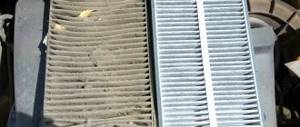
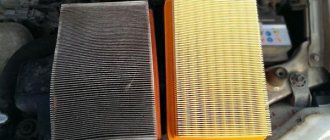
A refurbished old consumable is suitable, for example, for use in winter, when there is no fine dust suspended in the air outside the car, which the old filter may not be able to cope with. With the onset of spring, it is still worth replacing it with a new one.
Cleaning methods and rules
Removing the filter flask using improvised means
Water filter keys are not known for their excellent quality and, despite infrequent use, often break. In this case, you can always purchase a new puller; its cost in specialized stores ranges from 200-300 rubles. However, there is no guarantee that it will not break within a short time. Also worthy of special attention are available tools that can fully replace a removable key.
When replacing a cartridge in a cleaning system, there are several common problems that often occur.
- After tightening it again, water still leaks. To solve the problem, you need to re-disassemble the entire installation and carefully check the condition of the rubber seals; perhaps they still need to be replaced.
- If you can’t unscrew the cylinder and there is no special key, you need to use simple devices. For example, a regular leather belt or clothesline, a screwdriver or an unnecessary drill, a metal rod, a piece of pipe 30-40 cm long, or an old car timing belt are used as a puller. In most cases, these devices solve the problem.
The demand for purification systems for tap water is growing noticeably, since the quality of consumed water plays an important role in human life. Liquid enriched with impurities of salts and metals contributes to the deposition of sand in the kidneys and the formation of tartar, brittle hair and nails, and negatively affects the condition of the skin. To prevent these unpleasant phenomena, you need to monitor the water filter and regularly carry out preventative maintenance.
Why change the oil filter?
Using a screwdriver
Those who cannot unscrew it begin to look for information - in which direction does it unscrew? Maybe I'm just going in the wrong direction? MAYBE!
But the filter element unscrews counterclockwise, that is, like many of all nuts, with a normal (not reverse) thread. So if it doesn’t work, you need to resort to special methods, about them below.
More on the topic Mitsubishi Lancer 10 CVT oil: how to choose, replace
I’ll tell you a few ways that will 100% help you unscrew this element, so here we go:
- Trite with your hands. Often you just don’t have enough strength, just call a “more powerful” person and everything can work out. I will say this in 80% of cases they unscrew it by hand. YES, and you need to tighten it again with your hands, tightly! IT'S ENOUGH!
- Special key. I already wrote about it once, you can read it here, of course it’s not always at hand, but if you have a friend with a car, he can drive to almost any spare parts store and buy it. I personally even saw it in several supermarkets, the cost is a penny, about 200 - 300 rubles. Everything with it is quite easy and simple, we hook it on and unscrew it, of course, the body of the element will get wrinkled, but actually we don’t need it anymore.
- Rope and screwdriver (another lever). Sometimes they also use an old alternator or timing belt. What we do is twist a loop around the filter, tighten it with a screwdriver, tightly. And we try to unscrew it. The main thing is that the rope or belt does not slip.
Next come barbaric but effective methods. The most important thing is that they are dirty, that is, you will get dirty in oil anyway, if you are not afraid, then they are for you.
- A hammer and a long, strong screwdriver. Actually, this method is used to unscrew most intractable filter elements. Since the walls of the element are soft, they are usually aluminum, or tin, and other soft metals. It breaks through very easily (just like a tin can). What we do is drive a long and strong screwdriver all the way through, that is, so that it goes in on one side and comes out on the other. And then we unscrew it like a lever. The most important thing is that everything can be done without a special key, and actually using those tools that are always in the garage. The only downside is that your hands are dirty, because some of the oil is always inside.
- Hammer and chisel. This is generally the method that they say “ATAS”, there is nothing to explain here, we take a chisel and “fuck” it with a hammer, the most important thing is to hit closer to the bottom, to the place of fastening, and counterclockwise. The case, of course, will be all dented, but the most important thing is to unscrew it. The downside here is not only that you can get dirty, but also that you can hit the engine block with a chisel. I personally recommend the method with a screwdriver, it is still less dangerous.
As you can see, there is nothing complicated, you can do without a special key, just pierce the housing with a screwdriver.
More on the topic How often to change the engine air filter. How to understand when it's time to change the air filter
Now we are watching a short video.
And that’s all for me, read our AUTOBLOG.
(16 votes, average: 3.88 out of 5)
Similar news
Hydraulic compensators. What is it and why do they knock
Iridium spark plugs. Reviews, service life, pros and cons –.
Why does a car drive poorly in hot weather? Detailed video version
How and with what can this be done?
Can you twist it by hand?
Which way should I unscrew?
How to use it correctly?
Rope (belt) and screwdriver
Hammer and long screwdriver
Hammer and chisel
What to do if the filter is stuck?
What to do next?
Screw in the new filter without a key
Why does the water supply valve filter become clogged?
Keys for removing filter housings
The filter acts as a kind of sponge. It absorbs dirt and solid particles, toxic substances, and therefore needs special care. Each manufacturer outlines approximate terms of application. As a rule, the service life of the filter does not exceed 8 months.
More on the topic: What is better, automatic, robot or CVT: what is the difference and difference
Before replacement, you need to prepare working equipment. To disassemble the water filter, you need a special key, which is included in the kit. If it has been lost, you can purchase it at any specialized store. The most important part of the preparatory work is the supply of water, which will be needed to clean and wash the unusable filter.
First of all, you need to stop the water supply to the cleaning device. To do this, a special tap is closed. If it has not been installed, the full supply of water to the house or apartment is temporarily stopped.
Water pressure is released using a special button
The next stage is a complete release of pressure in the system. For this purpose, the equipment is equipped with a special button, most often red. If the model does not provide it, it is enough to use any tap on the mixer. To prevent active splashing of liquid, open the tap carefully and slowly.
Using a special key, the container is unscrewed. If parts stick to each other, the whole process becomes more complicated. Operations must be careful, otherwise the housing may crack. The filter is unscrewed clockwise.
After complete removal, the cylinder is removed from the device. If the elastic bands located on both sides are well preserved, they can be reused. Before installation, they are thoroughly washed and dried. The flask is also thoroughly washed.
A new filter for rough cleaning is installed in a clean flask. The cylinder is secured with a wrench. Liquid access to the cleaning system gradually opens. You need to carefully check the pipeline for leaks.
Of course, before you start replacing this part, you need to study its design and structure in advance. A household filter consists of several parts:
- head;
- pressure release button;
- replaceable cylinder;
- flask.
Liquid purification occurs in the cylinder. Thanks to the installed rubberized rings in the lower and upper parts of the cylinder, the entry of dirty liquid is prevented. After filtration, only clean water that can be drunk gets into the flask.
Different materials are used to make the cartridge:
- polypropylene;
- polyethylene;
- cardboard;
- Activated carbon.
There are products where manufacturers include rubber seals in the design.
In principle, the filter plays the role of a kind of sponge. To cleanse the incoming liquid, it actively absorbs toxic substances, various dirt, and harmful microparticles. After purification, the liquid becomes suitable for drinking.
The installed filter requires regular maintenance. His condition must be constantly monitored. In the instruction manual, each manufacturer indicates a specific period of time for operating the device. Then it needs to be replaced. Usually this period does not exceed 8 months. If such a filter is used in large enterprises, it is replaced much more often. Repairs and replacements are carried out every 4 months.
Before you begin, you should carefully study the manual for working with this model. Manufacturers provide detailed recommendations, as well as basic operating requirements.
To remove the filter, the kit includes a special wrench. If it is not available, you can visit any specialized store and purchase it there. To wash the product and clean it of dirt, you must prepare a container of water in advance.
First you need to turn off the water. To do this, close a special tap. Usually it is installed in every apartment. If it is not there, you will have to turn off the water to the entire house.
In the second stage, the system pressure is released by pressing the red button. If it is missing, you can use one of the mixer taps.
The third step is to remove the product. Using a key, the tank is unscrewed. This must be done carefully so as not to damage the flask, since prolonged use leads to sticking of the device.
At the fourth stage, the cylinder is removed. The rubberized seals located on each side can be reused if the material has retained its softness while remaining sufficiently dense. Before installing the rubber bands again, you need to rinse them well and wait until they are completely dry.
More on the topic Car gasoline AI 95 or AI 92 - what to choose and which is better for the car
Experts also recommend thoroughly washing the removed flask. The use of modern cleaning products is not suitable for cleansing, since the remaining chemicals can enter the human body. This can cause serious illness. Filter parts should only be washed in pre-prepared water.
Assembly and installation
The cleaning filter is inserted into a well-washed flask. Use a wrench to tighten the flask tightly. Then the water supply valve slowly opens. There should be no leakage between the head and the bulb. The connection must be completely sealed. If leaks are detected, you need to turn off the tap again and check the tightness of the connection between the filter and the vessel.
Sometimes situations arise when repeated twisting does not give a positive result. Leaks are detected. To solve the problem, you will have to disassemble the product again and check the condition of the rubber bands. They may have become twisted during screwing. The parts must be carefully straightened, then the installation operation must be performed again.
You need to start draining the water. This operation should take approximately 10 minutes. The filter will be cleaned of remaining microparticles of dirt. If you do not drain the water, harmful particles may settle. Once ingested, they will become a source of serious illness.
No matter how clean tap water is, it contains impurities (scale, salts, other insoluble particles) that clog the filter. Installing additional water filters reduces the amount of “garbage”, but does not completely solve the problem. The filter will still have to be cleaned, although less often.
The oil filter does not unscrew: what to do?
If you can’t unscrew the oil filter yourself, you can suggest that someone who has more strength try to do it. In most cases, you can unscrew even a strongly “stuck” oil filter without unnecessary tricks. But when you cannot unscrew the element even with outside help, you can use one of the methods described below:
- Special wrench for oil filters. In automobile accessory stores you can find a special wrench designed to unscrew oil filters of various diameters. It is enough to hook such a key onto the element and then start rotating. Using it to unscrew the oil filter is not difficult, but not all drivers have such a key, and you must first purchase it;
- Creating a lever. In the garage you can always find a lot of unnecessary parts and various tools from which you can build a lever. For example, you can put an old timing belt or generator belt on the key, then tie it around the filter and start rotating. Due to the unique lever and the absence of rubber sliding on the oil filter, unscrewing the element will not be more difficult than using a special wrench;
- Screwdriver and hammer. A simple and effective method that is suitable if you are not afraid of getting dirty in oil. It implies that a screwdriver must be driven through with a hammer into the oil filter. When the filter is broken, you can use a screwdriver as a lever, unscrewing the consumable element. It should be understood that if the oil filter is broken, residual oil will flow out of it;
Please note: Some drivers recommend not punching through the filter with a hammer, but rather driving a screwdriver into the area of the mounting location with a hammer. Doing this is quite dangerous, since the screwdriver may accidentally fall off and pierce the engine components.
( 438 votes, average: 4.58 out of 5)
How to unlock a car radio? Ways to find out the PIN code from the audio system
What kind of fluid is poured into the power steering: colors, characteristics, choice of fluid
Related Posts
Air purifier designs in cars
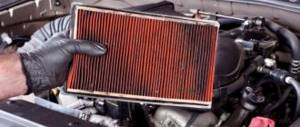
To understand how to clean a car air filter, you need to know its design and the properties of the material from which the replacement element, the cartridge, is made. The dust removal device includes: a housing with openings for the entrance of a dirty jet and the flow of clean air, a membrane and a sealing gasket along the contour of the lid to prevent particles from passing past the filter.
- Paper ones - installed on old models of domestic and foreign production. Folded in the form of an accordion from porous tapes.
- Cotton - replaced the previous ones as more effective cleaners.
- Fiber-type synthetic membranes predominate in use today; they filter well even when dirty.
- Carbon cartridges are increasingly being used because they are capable of enriching the air with oxygen, removing harmful gases.
- Direct-flow low-resistance filters or zero filters - in them the working element is impregnated with a special oil composition, and it must be washed every 5 thousand kilometers.
Chemicals for filter care
The air filter is responsible for the quality and quantity of air entering the engine and vehicle interior. Is it possible to wash its cartridge with ordinary detergents? This question sometimes arises among car enthusiasts. Here are recommendations on the range of chemicals used for cleaning air purifier elements:
- Regular laundry and dishwashing powders and gels are all suitable for removing dust and debris from porous surfaces. They will not cause any harm to the construction material.
- Domestos has an unpleasant odor; its purpose is to clean tiles, bathtubs and toilets. If you use it to wash the cabin filter, you will have to ventilate the treated cartridge for a long time.
- Ipone Air Filter Clean is a special liquid that degreases and cleans filter elements in vehicle engines and car interiors. A 5 liter canister is enough for 30 treatments.
- MOTUL A3 Air Filter Oil, IPONE SPRAY AIR FILTER OIL, Liqui Moly Motorrad Luftfilter Oil are all oils for impregnating the filter parts of the cartridge after washing it.
Procedure for disassembling and replacing the cartridge
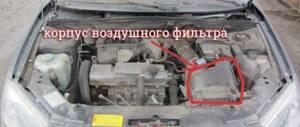
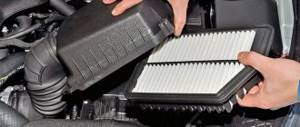
Replacing the air filter is not difficult, and most car enthusiasts do it themselves, without resorting to the services of a car service center. The service life of the working element is set at 15–20 thousand kilometers. Procedure for dismantling and replacement:
- unfasten the top cover: remove the latches or unscrew the screws;
- remove the filter and inspect for contamination, decide whether to clean it or replace it with a new one;
- install a new or remanufactured cartridge;
- lock the housing by returning the lid to its original place.
When determining the feasibility of cleaning the cabin filter, consider the following points. Regeneration of the surface of the elements occurs only from the outside, and the internal pores retain some of the dust. In addition, the new cartridge carries an electrostatic charge, which increases the efficiency of air purification. When washed, it is lost and cannot be restored.
How to unscrew a water filter
Keys for removing filter housings
The filter acts as a kind of sponge. It absorbs dirt and solid particles, toxic substances, and therefore needs special care. Each manufacturer outlines approximate terms of application. As a rule, the service life of the filter does not exceed 8 months.
Before replacement, you need to prepare working equipment. To disassemble the water filter, you need a special key, which is included in the kit. If it has been lost, you can purchase it at any specialized store. The most important part of the preparatory work is the supply of water, which will be needed to clean and wash the unusable filter.
First of all, you need to stop the water supply to the cleaning device. To do this, a special tap is closed. If it has not been installed, the full supply of water to the house or apartment is temporarily stopped.
Water pressure is released using a special button
The next stage is a complete release of pressure in the system. For this purpose, the equipment is equipped with a special button, most often red. If the model does not provide it, it is enough to use any tap on the mixer. To prevent active splashing of liquid, open the tap carefully and slowly.
Using a special key, the container is unscrewed. If parts stick to each other, the whole process becomes more complicated. Operations must be careful, otherwise the housing may crack. The filter is unscrewed clockwise.
After complete removal, the cylinder is removed from the device. If the elastic bands located on both sides are well preserved, they can be reused. Before installation, they are thoroughly washed and dried. The flask is also thoroughly washed.
It is strongly not recommended to use store-bought household chemicals for cleaning.
A new filter for rough cleaning is installed in a clean flask. The cylinder is secured with a wrench. Liquid access to the cleaning system gradually opens. You need to carefully check the pipeline for leaks.