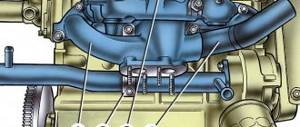
Device
On the VAZ-2109 you can find the ignition of a new, as well as an old model.
Older models have 4 positions, a long key and a relay. The new ones have 3 positions and a short key, but there is no relay at all. The ignition switch in the VAZ-2109, as well as in other cars, is designed to perform two functions: to lock the steering column (mechanical) and to close contacts when turning the key (electrical). The electrical part works depending on the turn of the key:
- car de-energized – 0;
- voltage supplied to the entire electrical network – 1;
- supplying current only to the starter – 2;
- turning on emergency lighting.
Malfunctions
Considering that the ignition switch is designed to perform two functions, all breakdowns are divided into mechanical and electrical. Mechanical malfunctions include jamming of the cylinder in one of the positions when it is impossible to turn the key. Contact group, which is time to change when the car engine does not start when you turn the key or deformation has occurred.
Electrical faults can occur in any position of the key, as they are associated with a violation of the integrity of the electrical network.
In a situation where there is no contact, all components of the system do not function. If there is a contact in the wrong place, a short circuit and overheating will occur, which will lead to the need to install a new lock.
How to determine the malfunction?
The visual method is to check the behavior of the machine at different key positions. First, the key is set to the right position - “ignition”. If the unit is working properly, then all electrical equipment works. If there are any problems with the electrical system, either all or part of the electrical equipment does not work.
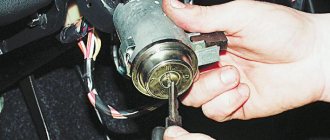
Turning the key in the lock
In the second position of the key, the starter should start. If it does not spin and you cannot hear the click of the retractor relay under the hood, then it is possible that either the starter or the starter is faulty. More specific information can be obtained using diagnostics. This is done with a multimeter set to ohmmeter mode. To carry out diagnostics, you need to remove the steering column cover.
Next you need to do the following:
- Disconnect power from the 3Z.
- Next, find pins 4 and 7 coming from the node. They correspond to pins “30” and “15”, and connect the multimeter terminals to them.
- Then the key in the 3Z turns to the first position. If the unit is working properly, the resistance should be zero.
- Then the operation of the unit is checked when the key is turned to position II. Likewise, the multimeter should show zero resistance if the circuit breaker is working properly.
Once you are convinced that the protection device is faulty, it must be replaced (the author of the video is Region 4253).
Ignition replacement and check
To replace the ignition switch, you need to perform all the steps in a certain sequence:
- Before replacing, you must remove the negative terminal from the battery.
- Remove the steering column cover and the two switches located under the steering wheel.
- After this, you need to insert the key into the ignition switch and set it to the zero position. This is necessary for the anti-theft device to be disabled.
- Next, unscrew the 4 bolts that hold the ignition switch. If bolts with sheared heads are installed, knock them down using a hammer and chisel.
- After unscrewing (knocking down) the bolts, remove them from the holes using pliers.
- On the left side, remove the bracket, and then on the right side, remove the ignition switch.
- Then disconnect the wire block from the electrical connector.
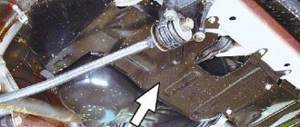
- Get under the dashboard and disconnect the ignition switch connectors from the relay.
Installing a new lock must be done step by step in reverse order.
To check the contacts on the wire block, use an ohmmeter. The device must display zero. If his readings are different, change the contact group.
To change a contact group, you need to do the following:
- Using a screwdriver, unscrew the screw that secures the cover.
- Bend back the plastic latches that hold the cover in place, then remove it.
- Remove the contact group.
The contact group is also installed in the reverse order.
Not in all cases it will be possible to find four bolts on the steering column on a VAZ-2109. On some models it can be secured with two bolts and a hook.
Preparation
At the preparation stage, you will need to collect the necessary tools near you, which will be useful in the process of dismantling and installing a new ignition switch. You will also have to remove the steering cover and steering column shifters. Doing this is quite difficult, but we will tell you step by step about all the nuances of these preparatory activities. So you can easily figure out for yourself how to remove the ignition switch on a VAZ 2114.
Tools you will need:
- Phillips strong screwdriver;
- Open-end wrench 10 millimeters;
- Chisel;
- Hammer;
- Pliers or pliers;
- New ignition switch assembly;
- Lock mounting screws (4 pieces).
Now let's move on to the casing and switches. For more convenient work, many advise removing the steering column switches and the steering wheel itself. Dismantling the casing is performed in the following sequence:
- Disconnect the negative cable from the battery. Nobody has yet canceled the requirements for personal safety and protection against electric shocks;
- Unscrew the three screws securing the two parts of the casing. A screwdriver is useful for this;
- Unscrew the screw that connects the housing to the connector of the steering column switches;
- Remove the two screws that hold the lower housing to the steering column;
- The lever that fixes the column at the corner leads down;
- The steering wheel also goes down;
- The lower casing is then removed;
- The power supply from the emergency lights must be disconnected;
- Now you can remove the top casing;
- To dismantle the steering column switches, you need to act one by one;
- Simultaneously press both latches and thereby remove the elements from their seats;
- Disconnect them from the power supply.
How to remove the ignition switch on a VAZ 2109
The ignition switch has been bothering me lately, or rather at the most inopportune moments. It was stuck (would not turn) in the ignition → starter position. It was especially infuriating when you were standing at a gas station, in a traffic jam, on railway tracks, etc. Yesterday I went after work and again such crap. Each time you disassemble the steering column housing, remove the lock itself and use WD40 to open up the half-jammed steering lock again. The lock was original DAAZ. The base itself and the blocker seemed to be made of duralumin, and there were millimeter-long scuffs on the blockers and it sometimes jammed inside the lock.
Yesterday I decided to finally disassemble the lock and sharpen the blocker itself so that this would not happen again. I guessed that there must be springs and other crap that likes to fly away into nowhere or into the eye. He carefully disassembled it and began to grind down the two planes of the lock, only returning to the second part of the lock without touching it yet, and a spring and a small ball shoot out in an unknown direction.
Ipona mother... Searching for details in a room of 60 m² is tantamount to finding a needle in a haystack. Long story short, I put it back together. Everything seems to be working. I connect it and check if everything is working fine. I think it’s strange, what for then is that spring and ball?! installed everything in reverse order. I went to the store and started the car, everything was OK, but only the dimensions worked, after shaking the key, the heater and the low beam started working. So that's what those little parts did.
It turns out that when the key was returned to position II after starting the engine, position 15/2, which is responsible for ( Low and high beam headlights. Fog light. Headlight cleaners. Rear window cleaner. Rear window heating. Washer. Heater fan, was not fixed (did not turn on). Engine cooling fan
). I tried to turn on autostart, but it also started turning on somehow miraculously. I decided not to experiment with such a lock and buy a new one, because... Winter is coming and autostart is needed, what if the starter sticks with such a lock or something else and repairs will be much more expensive than now forking out for a new lock. In general, thought and done. I bought an original DAAZ lock at a wholesale price; I found out in the store it costs 1000-1250 rubles.
NEW IN PLACE
All the best and good ignition!
Changing the ignition switch is, in principle, not such a difficult task. The price of an ignition switch for a VAZ 2109 is about 700 rubles. We will learn below how to replace the ignition switch on a nine.
From the tool we will need a 10mm socket and a driver, we can use a ratchet.
First of all, you need to disconnect the battery. Now you need to remove the steering column cover. Next, unscrew the fastening bolts that tighten the clamp of the VAZ 2109 ignition switch.
Now we separate the two clamps so that they stop interlocking.
We remove the lock from the steering column, lowering it down.
Disconnect the plugs with wires.
Now you need to disconnect the largest plug by sticking your hand a little under the panel.
As a result, we see the following picture.
We install the ignition switch of a VAZ 2109 car in the reverse order.
Replacing the ignition lock cylinder of a VAZ 2109 with your own hands
Ignition switch for vases with cylinder assembly
The ignition switch cylinder of the VAZ 2109, despite its small size and completely inconspicuous location, together with the lock, plays the main role in the operation of the vehicle systems. Therefore, the failure of such a small unit can completely paralyze the operation of the entire car.
The ignition switch is used to turn on the power to the entire ignition and engine starting system, windshield wipers, reversing lights, turn indicators, and in some modifications even the radio and headlights. In addition, on some cars the ignition switch is additionally equipped with an anti-theft device that blocks the steering wheel from turning.
On a VAZ 2109, replacing the lock cylinder is very simple. It is only important to study the execution sequence and choose a tool.
Power-up modes used
At each of the turns, the connection of certain devices is provided. There are markings in a circle in front of the socket indicating the position to which a certain mode corresponds.
Null
To activate this mode, just insert the key into the “secret”. In this case, devices that are directly connected to the battery remain active.
Additional consumers will be put into operation after the larva is rotated at a certain angle. Voltage is supplied to pins 30/1 and 30.
The first is “ignition”
In the first position, the driver can turn on the front lighting, such as the low and high headlights. The tidy and interior light up responsively. The connection diagram for the VAZ-2109 ignition switch is activated during this turn, releasing current to the 30–INT pair.
When there is a connection between terminals 30/1 and 15/1, the rear lights, reversing lights, turn signals are operational, and the generator excitation winding is energized. The XX solenoid valve also receives power.
In this position, contacts 30/1 and 15/2 are closed, which ensures the operation of, in addition to the head light optics, the functioning of the fog lights, the rear window wiper and its heating. The headlight cleaners, heater fan and engine cooling system propeller are connected to this contact.
The second is the “starter”
By moving the key to the current position, the driver does not block the connection of electrical consumers that were started in the previous “ignition” position. This fully applies to both the closed contacts of the pair 30/1 - 15/1, and to the pair 30 - INT.
The main change that the VAZ-2109 ignition switch connection diagram provides in such a situation is the activation of a pair of contacts 30–50. This allows the starter to start.
Third – “parking”
At this angle of rotation, consumers started in the “ignition” position and closed contacts 30 – INT remain activated. A closed pair 30/1 - P is also added. It is responsible for the parking lighting.
PURPOSE AND DEVICE
The main purpose of the lock was initially to protect the car from theft, however:
- Today, as can be seen from practice, in order to start and steal a car, car thieves do not necessarily need to have a key or a duplicate of it
- To put it more clearly, the protection from the castle used to justify itself, but today it is “so-so”
- Advanced car thieves, equipped with modern technologies and devices, are able to hack the electronic protection of the most modern anti-theft systems in just a few seconds.
- And on the VAZ 2109, the lock cylinder or the VAZ 2109 lock itself, or its domestic analogue can generally be called entertainment for beginners
- In fact, the ignition switch is an ordinary switch that, when you turn the key, opens or closes a certain group of contacts
- The appearance of a malfunction in the ignition switch increases the likelihood of vehicle theft several times, in addition, it creates great trouble for you and, according to the law of meanness, at a completely inappropriate moment for this
- The design of any ignition switch is similar; it consists of a lock and its contact group
- And the contact group consists of two separate plates, fixed and movable
- The movable plate moves when the key is turned in the lock and the contacts are closed in the required sequence
- Already now, switches that have the same design and order of contact closure are successfully used on all domestic cars
Reasons for replacement
As a rule, replacement of VAZ 2109 lock cylinders is carried out in the following cases:
- When they tried to steal a car and the lock cylinder was damaged in the process
- If the owner of the car has lost his keys
- Breakage of the larva during operation
The car engine may not start due to poor contact. It’s not at all difficult to check this; to do this, it’s enough to have an ohmmeter on hand, or a multitester with an ohmmeter function and five minutes of time:
- Disconnect the “-” terminal from the battery
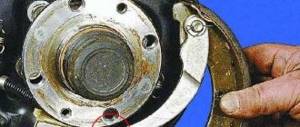
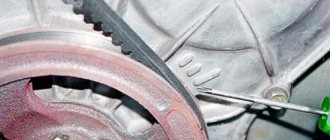
- Remove the lower casing from the steering column
Removed the casing and opened the contacts
- Disconnect the contacts and check the resistance with an ohmmeter
- Serviceable contacts should have minimal (zero) resistance
- Otherwise, you need to replace either the contact group or the entire lock
We measure the contact resistance using an ohmmeter
REPLACING THE LOCK CIRCUIT OR THE CONTACT GROUP
Replacing the VAZ 2109 lock cylinders requires the following tools:
- New cylinder complete with keys
- Thin clock screwdriver
- Phillips screwdriver
- Fine drill
- Chisels
- Hammer
- Pliers
In the event of any breakdown, it is not necessary to replace the entire lock; if the cause of the malfunction lies in replaceable parts, then a partial repair of the lock is performed and replacing the lock cylinders on the VAZ 2109 makes sense when the key stops rotating freely in the keyhole. Another option for partial repair is to replace the contact group; for this, a minimum of tools and a little understanding of the device are enough.
Our instructions will help you understand the device:
- Nothing and no one forbids you to change the entire lock every time, and even go to a service station if you are satisfied with the price
- After removing the casing, access to the switch lock opens
- The lock cylinder can, in principle, be removed at this stage
- Therefore, we pull out the side pin that holds it in the lock
- This can be easily done with a thin screwdriver (clockwise) while tapping it with a small hammer
- If the pin cannot be pulled out in this way, then try to drill out the cylinder carefully using a thin drill
- If it is more convenient for you to remove it first, remove the ignition switch before proceeding to replace the cylinder, to do this you need to unscrew the bolts securing the ignition switch to the steering column
- This must be done using a hammer and chisel, as these bolts have sheared heads.
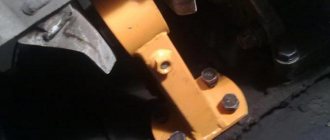
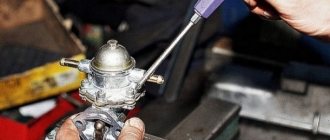
- Use a chisel to loosen them slightly, and then unscrew them with pliers, as in the photo below
Loosen the bolts securing the lock to the steering column
- Now we remove the bracket and the lock itself from the column, be sure to disconnect its electrical connector
- We unscrew the screw securing the ignition relay and remove it from under the panel
- Disconnect the connector
- Disconnect the “mass” wire
- Using a Phillips screwdriver, unscrew the screw
- Then release the latch and remove the cover, then the contact group
- So we pulled the switch
- We remove the cylinder with our own hands and the ignition switch, as already described above
- We are replacing it
- We check the operation of the lock with a new cylinder installed, to do this we turn the ignition key
- After installation, do not forget to check the correct operation of the locking mechanism, our steering shaft
- When the mechanism does not work when turning the steering wheel fully, you need to adjust the location of the lock on the steering column
- Only after completing the adjustment of the location and checking the functionality of our locking mechanism, you can tighten the bolts until the heads come off completely, use a “10” spanner for this purpose
Backlight
In every modern car, the dashboard should be illuminated. The same condition applies to switches and buttons located on the dashboard. Another common feature for foreign cars is the lighting for the lock. The domestic manufacturer has not reached this point, so most drivers prefer to carry out the modifications themselves. It is very convenient to see where to insert the key.
The most convenient option is to use LEDs. It is easy to install and has a fairly long service life. And the important thing is that you don’t have to invent anything.
We troubleshoot the ignition switch of your favorite “Nine”
Ignition switch device VAZ 2109
ZZ is found in old and new designs. The old one has 4 positions, a long key and a relay. The new one does not have a relay, it has 3 positions and a short key.
The ignition switch of the VAZ 21099, like other models, performs two functions:
- mechanical – locks the steering wheel without a key;
- electrical - closes contacts depending on the position of the key.
ZZ car 2109
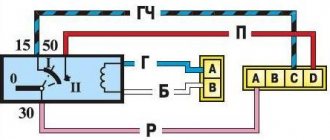
Scheme
The ignition switch diagram represents the position of the key in the lock and can be presented in the form of a table:
| Key position | What's happening |
| «0» | There is no power to the vehicle. |
| "I" | Voltage is supplied to all elements of the electrical network. |
| "II" | Voltage is supplied to the starter. |
| "III" | Handbrake light, parking lights. |
Pinout of the old sample Connection diagram of the new sample
Ignition switch device and its repair
The lock body 2 contains a built-in device that blocks the steering shaft and a cylinder 5. Contact group 3 is the ignition switch itself with a wiring harness. Repair of the contact group is not provided by the manufacturer, but replacing it is not difficult - it is simply put on the body.
Pinout of the new ignition switch block:
You can “ring” the contact group of such a lock using the diagram:
To check, remove the terminal from the battery and disconnect the connector, then, placing the key in different positions, measure the resistance between the corresponding terminals of the block with a multimeter in ohmmeter mode. For example, the resistance between contacts 1, 2, 7 and 5 with the key position “2” should be zero, and between any of them and the others it should be infinite.
However, sometimes malfunctions of the contact group are visible to the naked eye: fallen off wires, melted plastic near the wire connection points, etc.
Pinout and connection diagram of the VAZ 21099 ignition switch with relay:
Repair of the lock is carried out by replacing either the contact group or its cylinder. Failure of the cylinder manifests itself in jamming of the lock mechanism.
But it is best if there is a mechanical breakdown of the lock, that is, jamming of its insert or locking rod, to replace the entire product.
Sometimes discussions about the “capriciousness” of ignition switches are caused by the fact that non-original spare parts were used when repairing or replacing them. Many parts, including locks, are supplied to the assembly line by the Dimitrovgrad Automotive Assembly Plant (DAAZ).
Typical faults
Since the ignition switch on the VAZ 2109 performs two functions, the nature of the faults can be divided into mechanical and electrical, although most often the lock breaks down in starter mode:
- A mechanical malfunction includes jamming of the core in any position: it is physically impossible to turn the key. In this case, you can inject a little silicone lubricant inside. If this does not help, you will have to remove the ignition switch and replace it with a new one.
- Electrical faults can occur at a certain position of the key when the integrity of the electrical network in the switch is broken. If there is no contact, all system components will not work. If there is contact, but the circuit does not occur where it is needed, this is fraught with a short circuit and overheating of the circuit breaker. It may melt and a specific smell will appear (video author - MAQS MAC).
Repair and replacement instructions
Basically, the protection zone can be repaired. Repair usually consists of replacing the core or contact group. If the problem remains after repair, then the ignition switch needs to be replaced.
Core of ZZ VAZ 2109
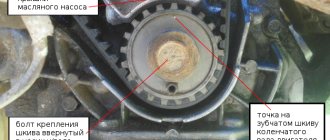
On a VAZ 2109, replacing the core consists of the following steps:
- First, the protective and decorative cover is removed from the steering column, as well as the windshield washer and turn switches.
- The lock is secured with screws and a hook latch. There may be problems with unscrewing the screws, since their heads are cut off. To remove them, you first need to loosen them with chisels and then unscrew them with pliers. You can carefully drill out the screws.
- Next, we disconnect the clamps, disengaging them.
- By pulling out the side pin, you can remove the core. If that doesn’t work, the core can be drilled out using a thin drill. In extreme cases, you will have to dismantle the entire assembly.
- The next step is to disconnect the connector, wire plug, and ground wire.
- By releasing the latch, you can remove the cover and contact group.
- We insert a new core and check the work. When you turn the key, all processes should work.
The steering wheel lock should also be checked. If the steering wheel does not lock when turned fully, you need to adjust the position of the lock on the column.
Contact group ZZ
Replacing the contact group of the VAZ ignition switch comes down to dismantling the ignition switch: the removal diagram is described above.
When performing the procedure, the following recommendations should be followed:
- before disconnecting contacts, it is advisable to assign numbers to them, this will help to avoid errors when connecting;
- If there is a retaining ring in the design of the contact group, you must first remove it using an awl.
Knowing how the ignition switch on a VAZ 2109 works, and having at least a little experience, you can carry out the repair yourself without resorting to the help of specialists. This way you can save on maintenance costs.