After rummaging around on the net I came across ways to clean the lambda probe. because buying a new one costs a lot of money, but the old faulty sensor, in principle, doesn’t care anymore, and as I was convinced myself, the sensor is full of soot deposits, which can interfere with its normal operation, you can try this technique: How to clean a lambda umbrella (oxygen sensor) ? The problem with all passenger cars in Russia is the excessive gas consumption on used cars. The main reason for this is poor quality fuel, which pollutes the car system, and primarily the lambda umbrella, popularly called the oxygen sensor, which is located on the catalytic converter (exhaust gas purification system). If the failure of the lambda probe (LZ) is not caused by irreversible changes in the structure its basis is a layer of zirconium ceramics, then you can try to “revive” the sensor. The fact is that the working surface of the LZ under the protective cap becomes covered with soot and lead deposits of exhaust gases over time. The sensor begins to “lie”. If this plaque is removed, the performance of the LZ is restored. The surface of the sensor does not allow it to be cleaned mechanically (with abrasive sandpaper or a file), since layers of platinum coating are inevitably removed from the ceramic base along with carbon deposits. This sensor is responsible for the quality of the fuel mixture, and accordingly, if it is dirty, the signal to the car’s computer will not correspond to the norm. Thus, the car begins to consume a lot of gasoline, the purchase of a new sensor greatly affects the budget, its price sometimes reaches 30 thousand rubles, depending on the make of the car. And so we revive it! Instructions Difficulty level: Easy Step 1 You can safely clean the LZ by rinsing it in orthophosphoric acid, which for 10 - 20 minutes. corrodes contaminants without affecting platinum electrodes. Before washing, the sensor must be opened. To do this, carefully cut off a protective cap made of stainless steel at the very base using a thin cutter on a lathe. You cannot use a hacksaw for these purposes - it can damage the ceramic body of the sensor. Step 2 The cleaning procedure can be speeded up by using a thin natural bristle brush. Orthophosphoric acid is carefully applied with a brush, evenly washing the LZ ceramic rod on all sides. You should not immerse the entire sensor in acid - only its working part is washed. As it is cleaned, the black-brown surface of the rod acquires a steel tint: this is the shine of platinum, dusted on the ceramic base. After cleaning, the sensor is rinsed well with water and dried, and the protective cap is secured in place using argon welding. If you don’t have the necessary equipment at hand, you don’t have to cut off the cap. Instead, two “windows” 3–4 mm wide are made in it using a file, and the sensor is washed with acid through them using the same brush. Step 3 The restored sensor is screwed into its place in the car, having first checked the condition of the O-ring. The LZ can be washed repeatedly as it becomes dirty. If the “resuscitation” still does not bring the expected results, this means that the oxygen sensor has completely failed and you have no choice but to go to the store for a new “informant”.
Do-it-yourself lambda probe cleaning
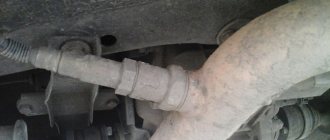
Finding the second lambda
.
You can
help financially and issues will be published more often!
Sberbank: 4276 8060 4388 0409. And so we revive it! Instructions Difficulty level: Easy Step 1 You can safely clean the LZ by rinsing it in orthophosphoric acid, which for 10 - 20 minutes. corrodes contaminants without affecting platinum electrodes. Lambda hesitated! Is it possible to wash it with something? Is it possible to clean the sensor? Before washing, the sensor must be opened. To do this, carefully cut off a protective cap made of stainless steel at the very base on a lathe using a thin cutter. There are two ways to quickly clean the lambda probe. This method is possible or worth it. You cannot use a hacksaw for these purposes - it can damage the ceramic body of the sensor. Step 2 The cleaning procedure can be speeded up by using a thin natural bristle brush. Orthophosphoric acid is carefully applied with a brush, evenly washing the LZ ceramic rod on all sides. How to clean a lambda probe at home - two ways. You should not immerse the entire sensor in acid - only its working part is washed. As it is cleaned, the black-brown surface of the rod acquires a steel tint: this is the shine of platinum, dusted on the ceramic base. After cleaning, the sensor is rinsed well with water and dried, and the protective cap is secured in place using argon welding. Each lambda probe has its own resource, try to clean the probe without is it possible to clean it. If you don’t have the necessary equipment at hand, you don’t have to cut off the cap. Instead, two “windows” 3–4 mm wide are made in it using a file, and the sensor is washed with acid through them using the same brush. Step 3 The restored sensor is screwed into its place in the car, having first checked the condition of the O-ring. The LZ can be washed repeatedly as it becomes dirty. If the “resuscitation” still does not bring the expected results, this means that the oxygen sensor has completely failed and you have no choice but to go to the store for a new “informant”.
Orthophosphoric acid
The essence of the method is that orthophosphoric acid is capable of removing deposits from the ceramic-platinum base of the device in a few minutes (10 - 15), sometimes more, without damaging it.
To complete the work, you will need at least 100 milliliters of this chemical or its analogues (see below).
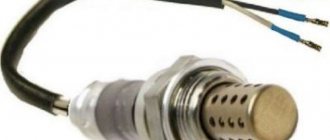
The problem is that you need to carefully remove the protective cap, which is made of stainless steel.
This can be done with a hacksaw, but it can damage the working base itself, so this method is excluded (although you can try it at your own peril and risk).
For these purposes, a lathe is used, with the help of which the cap is carefully cut off at the very base of the device, near the thread, with a cutter, thereby freeing access to the working base of the sensor.
But not everyone has access to a lathe.
This problem can be solved using a file, which is used to carefully saw holes (windows) in the protective cap measuring 4 - 5 mm.
Having gained full or partial access to the working rod of the lambda probe, you can begin cleaning it.
It is impossible to completely immerse the device in phosphoric acid, only the core itself.
Or you can use a natural bristle brush.
The brush should be thin in order to capture as much of the surface of the core as possible. A toothbrush is not a good solution unless the protective cap is removed.
By carefully wetting and washing the surface of the working rod of the device, the following picture will be observed: the impurities will gradually disappear, and the core itself will acquire a steel tint.
Once you have achieved the result, rinse the sensor with clean water, let it dry and repeat the procedure if necessary.
Subsequently, secure the protective cap (if it was removed) using argon welding.
Check the condition of the oxygen sensor gasket and install it in its original place.
If the Check Engine error appeared before, it will have to be reset.
Disadvantages and pitfalls:
- not everyone can find a good turner who will do such work, so a file will help you;
- There is a danger of using orthophosphoric acid, it is necessary to avoid getting it into the eyes and into the body. You can use a rust converter, which includes the mentioned component. Or pay attention to such names as “FLUX OR ACID FOR SOLDERING”, as a rule, all this can be found in construction stores, but these are also dangerous chemicals;
- the protective cap can have two layers (double shell), which complicates sawing the device with a file; here only soaking the core will save you;
- It is impossible to quickly check the result of the work, unless of course a Check Engine error immediately appears. Only after a while, measuring fuel consumption, observing the “behavior” of the car, the picture will be clear - to throw out the lambda probe or not;
- in some cases, 10 minutes will not be enough for complete cleaning (it all depends on the degree of contamination of the device); you will have to wait from 1 to 3 hours to see the result.
POPULAR WITH READERS: What oils should be poured into the engine
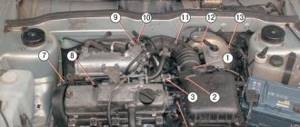
Signs and causes of lambda probe malfunction
Lambda probe malfunctions manifest themselves in the same way as problems with fuel equipment or catalytic converter. Therefore, it is possible to determine exactly which element is broken only through diagnostics at a car service center. There are a number of symptoms that indirectly indicate that the lambda is failing:
- Floating speed when idling the internal combustion engine. If the lambda probe breaks down, they constantly change, dropping to 400-600. This happens due to a lean fuel mixture. It is not enough for stable operation of the engine in idling mode. The lambda probe is responsible for dosing fuel into the mixture.
- Decrease in engine power. A lean mixture reduces the power of the internal combustion engine. Its speed will begin to slowly increase when the accelerator pedal is pressed, the car will drive worse uphill, acceleration will become slower.
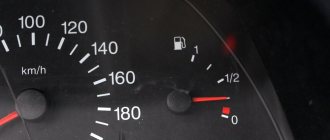
- Increased fuel consumption. Fuel consumption may increase by 25-30%.
- Change in color and odor of exhaust gases. The exhaust will turn black. It will clearly smell of gasoline that does not burn out in the catalyst.
- Candle color. If the mixture is over-enriched, they will develop a black coating.
- Uneven acceleration with jerks. The car will not be able to accelerate quickly and evenly.
- "Check Engine" indicator on the dashboard. If you consider the error as a scanner and decipher it, it will be clearly indicated that the lambda probe is broken. If the error is simply erased, it will constantly appear until the problem is eliminated.
Typical causes of failure are:
- Use of low quality fuel. This is perhaps the most common reason. Excess harmful impurities, when burned, settle on the working surface of the heating element, which leads to its clogging.
- Natural wear and tear over time. The lambda needs to be changed closer to 150 thousand kilometers. The period can be increased if high-quality fuel is used. A non-original or cheap sensor will last less.
- Wiring problems. To connect the lambda to the ECU, ordinary copper wire is used, which will later begin to oxidize or break.
Methods for checking an oxygen sensor
The check is carried out with the engine running. There are several ways to check the oxygen sensor:
- Using a multimeter (tester). You need to measure voltage and resistance. The probes are connected to the contacts in the plug, and measurements are taken in different operating modes of the internal combustion engine. If the lambda is fully operational, at XX speed the voltage will fluctuate between 0.1-0.9 volts. The disadvantage of this method is the inability to measure the rate at which the voltage changes.
- An oscilloscope. The test allows you to see the rate at which the voltage changes. It should not be more than 0.2-0.3 seconds. If at least one of the two described parameters is significantly outside the permissible limits, then the component must be cleaned or replaced.
- Reading errors from the on-board system. If the “Check Engine” icon appears on the dashboard, this may indicate a failure of the lambda probe. To determine exactly what is faulty, you need to conduct computer diagnostics (read the error from the ECU). Certain codes indicate exactly this problem; they are listed in the table.
How to repair a lambda probe?
In most cases it cannot be repaired. But sometimes cleaning the heating element helps, which can hardly be considered a repair. To perform this, you must allow the exhaust manifold to cool completely. Further:
- disconnect the battery;
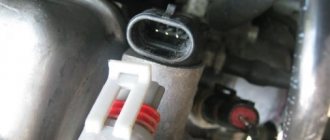
- disconnect the terminal from the sensor and pull it out.
Sometimes this is difficult to do. The part burns badly and can only be removed by damaging it. But you need to try: fill the thread with vinegar or kerosene and leave for several hours.
Do not knock on the sensor when trying to remove it. There is a high risk of damaging it or the threads. Then you definitely won’t be able to remove it yourself without damaging the collector.
For cleaning you will need phosphoric acid. Immerse the part in it for 30-40 minutes, then rinse well several times with warm water. All deposits from the heating element will be washed away. If they are the cause of the malfunction, the functionality of the sensor will be restored.
There is an unusual repair method, but for this you need to have 2 identical sensors. If the reasons for the malfunction of each of them are different, you can try to assemble one of the two. So, for example, one may be faulty due to a broken signal wire, and the second due to a broken heating element. Test each one with a multimeter to identify the one with a break. Carefully cut both. The photo shows that the heating element on one of them is broken. In addition, the ceramic shell is damaged.
Carefully remove the heater:
We cut the next one, where the signal wire is broken. We need to remove the heater very carefully so as not to break it. In the photo, whole and broken:
We wipe the heater with a clean, dry cloth and carefully place it in the housing with the signal wire intact.
Now you need to solder the case using a jewelry torch with copper-phosphorus solder. It can withstand heat up to 700 degrees and does not leak.
We put it on the car and check it.
DIY crafts for car enthusiasts
In this post we will talk about repairing the Luda probe, a sensor that a modern car cannot do without, and how to repair it with your own hands in a garage.
So, preface: I had some adventures with my first lambda. In general, I then changed the first lambda to the Bosch one and the problems disappeared.
But time does not stand still, and just now, while sorting out the trash in the garage, I came across a box, and in it there were already 3 lambdas. 1st - dear. She is completely “ales” 2nd - supposedly the original. I checked it with a multimeter - there is no voltage on the signal wire. (mine is gray) we can assume that there is a break somewhere inside. 3rd - from disassembly. We check with a multimeter - the heater is broken.
Let me remind you that almost all cables have 4 wires, two are the sensor heater and two signal wires.
It was decided: the 1st one will be cut, and then we’ll see, maybe out of the 2 remaining ones with different problems I’ll make one, but a working one.
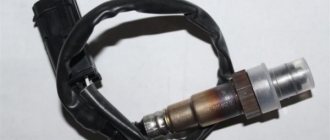
native lambda, or rather what’s left
Preparing the tool
Everything you need
Next comes peeling. First, we cut the 3rd lambda, remove the cap and see our heater breakage
This is how we see a broken heater and a broken ceramic shell
closer
heater fragment
Next we need to remove the remaining heater fragment. We will do this using part of a “musical instrument”
Here is the fragment, just removed
He's without a needle
Now we take the 2nd lambda with a broken signal wire and cut it in exactly the same way as the previous one and remove the working heater from it.
drank the 2nd lambda
CAREFULLY, with surgical precision, without haste, extract the working heater into the light. Here he is
Working heater on top, broken off on bottom
We wipe the working heater from dirt and dust simply with a dry, clean cloth WITHOUT CHEMICALS, because she can do her nasty thing. We wiped it and, with the same care as when we removed it, we pack it into the probe body with a working signal wire.
Assembled LZ before soldering Now you can solder everything, recheck it and install it. Soldering with a jewelry torch using copper-phosphorus solder. Unfortunately, there is no photo of the finished product. We put it on the car. And we check everything with the engine running using a multimeter. We are glad to have a spare sensor for a rainy day.
Author; Ilya Shirokikh Alchevsk, Ukraine
Popular;
- Do-it-yourself lambda decoy
- A simple electric heater for a car with your own hands
- How to balance a wheel in a garage.
- How to make a simple lambda probe or oxygen sensor
- DIY washer tank heater
- Charger for a car from a power supply from an LED strip
- How to make a washer reservoir heating with your own hands
- How to easily make car lamps brighter.