Is the shift rod seal leaking? Questions torment me - How to replace the rocker seal? Is it possible to replace the oil seal yourself? If so, then you have come to the right place. An article on replacing the gear shift rod oil seal on VAZ-2112, VAZ-2115, VAZ 2108 cars will be useful for you. After reading it, you will be able to replace the oil seal with your own hands without any problems and in a short time. At the same time, you can enjoy the work done and save the Nth amount of money))). Let's start with choosing a replacement method. There are only two of them. The first one, which I use and recommend to you, is replacing the rocker seal in the inspection hole by knocking out the bushing along with the seal. The second method does not require a viewing hole or overpass, but will require you to have a certain dexterity of hands, body flexibility and the presence of one (two) long screws. Since screwing these screws into the oil seal, pulling it out and pressing it into place while lying under the car... This is not for everyone! Both dexterity and flexibility will be very useful to you here. But, let's take things in order. From the introduction we move on to the main thing.
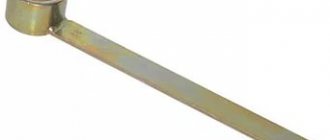
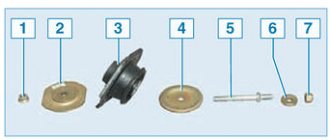
Let's start with the arsenal of the necessary tools for replacing the gear shift rod oil seal on VAZ-2108, VAZ-2109, VAZ-21099, VAZ-2110, VAZ-2114, VAZ-2115: two 13 keys, a 10 key, a wrench or screwdriver for knocking out the oil seal bushing, a small hammer, a 22mm socket, silicone sealant (Abrovsky 999 is perfect). For those who are still going to change the oil seal from the “lying on the ground” position, the list of tools does not change much: two 13 wrenches, a 10 wrench, a small hammer, one or two long self-tapping screws, a piece of pipe of suitable length and diameter for pressing the oil seal. (I can’t tell you the exact dimensions, since I don’t use this method). Spare parts. Everything is simple here. We buy a Balakovo shift rod oil seal and immediately a cardan shaft boot, look at photo number 2. Practice has shown that in most cases this boot is either already torn or will tear during the removal process. So, we don’t rely on chance, and we buy the boot right away, and the costs are small. And you can save your nerves and time. And one more thing... Recently, new gear shift rod seals appeared on the market, codenamed “Reinforced”! Look at comparative photo No. 3, on the left. I won’t praise or recommend them yet, since I’ve only installed one so far. On the problematic rod, which was leaking even with two seals. As they say, time will tell how strong it is))) Now the final part is a description of replacing the gear shift rod oil seal on VAZ-2108, VAZ-2109, VAZ-21099, VAZ-2110, VAZ-2114, VAZ-2115:
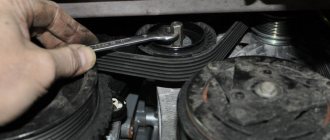
Using two 13mm wrenches, we loosen the clamp of the transmission control rod (the connection between the rod and the driveshaft can be marked in advance so that you don’t have to adjust the gear shift later) and disconnect the rod from the driveshaft (photo 4). Pull the boot back and use a 10mm wrench to unscrew the bolt securing the cardan to the gearshift rod (photo 5). Remove the cardan and boot. Using a screwdriver, resting it against the side, we knock out the bushing from the gearbox (photo 6). Using the same screwdriver, we knock the oil seal out of the bushing and with a 22-inch head, press the oil seal in until it stops (photos 7 and 8). Lubricate the bushing with sealant and press it into the gearbox with gentle hammer blows. For those who will work “from the ground” - perform steps 1 and 2, screw the screws into the oil seal, pull the screws and pull out the oil seal, press a new one with a tube of suitable diameter and length.
All! The main part is finished. All that remains is to assemble everything in reverse order and admire the fruits of your labor.
(photo from the Internet)
Self-diagnosis.
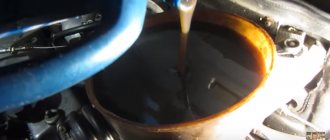
Signs indicating the need to replace the gearbox seal are, in most cases, oil traces that remain on the asphalt after the car has been parked for a long time. Before changing the gearbox seal, you should make sure that this is the problem, since oil leaks are often caused by a poorly tightened oil filter. The danger of untimely identification of the problem associated with the oil seal and oil leakage is fraught with serious problems; if the oil leaves the box, and you do not detect this in time, then instead of changing the box seal, you will have to change the box. To prevent this, you need to frequently check the oil and constantly monitor its level both in the gearbox and in the engine. A faulty oil seal can be identified by a corresponding crunching sound that appears when switching certain speeds.
Causes of manual transmission oil seal malfunction
If there are obvious signs of oil leakage on the gearbox, then the oil seal has stopped performing its functions. Frequent causes of malfunction:
- Natural wear and tear over a long service life. Nowadays, manufacturers care about the durability of parts, but sooner or later even the most durable materials become unusable. If we talk about seals, then under the influence of high temperatures and oil, rubber cracks and dries out;
- Mechanical damage is often associated with road traffic accidents or poor quality repairs;
- Deformation;
- Use of non-original oil seals made from low quality materials.
We recommend: What is climate control in a car - different types of systems
To replace the old seal with a new one, you need to understand the causes of the failure. If the reasons are not found and corrected, there is a high probability that the new part will also quickly break.
Replacing the VAZ 2108-2109 gearbox seal will require you to have the following tools:
- Keys at 10, 13;
- Awl;
- A slotted screwdriver like a crochet hook, as it is also called, something similar to this;
- Plastic stopper.
Replacing the oil seal is done on a lift or inspection pit. If you don’t have either one, use a cheap option like two spare tires laid flat. Take two stronger boards and drive out onto an impromptu hill.
Attention! When you drive into a pit or any other device during repairs, take care of your safety - secure the car using wheel chocks and a handbrake.
Video - How to change the gearbox seal of the VAZ secondary shaft
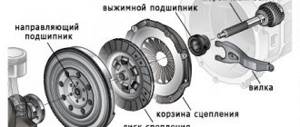
The bearing of the secondary shaft ensures free rotation of its end in the place where the shaft already leaves the gearbox. From the inside, the bearing is filled with a lubricant, which facilitates the rotation of the part.
The gearbox secondary shaft oil seal is installed in the same place. The oil seal is a rubber O-ring that fits onto the shaft and fills the gaps between the shaft and the transmission housing. The oil seal is designed to prevent oil leakage and ensures the tightness of the system.
More on the topic Changing the oil in the Toyota Rav 4 variator
Over time, both the seal and the bearing are subject to natural wear. Parts of the bearing are destroyed and begin to loosen the shaft. Gradually, the friction between the parts increases, and the bearing begins to disrupt the shape of the shaft. The balancing of the shaft becomes unbalanced over time and it begins to vibrate. The very first to suffer is the oil seal, which will lose its shape and will no longer be able to hold oil in the gearbox.
The oil gradually disappears and the lubrication of gearbox parts is disrupted. In addition, the oil seal may fail due to wear, which occurs in any case. The fact is that a rubber product has a certain service life, which is determined by mileage and the oil seal begins to crack and also lose its sealing properties.
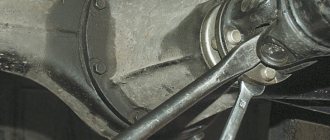
You can diagnose a seal malfunction visually. To do this, it is enough to look from time to time at the junction of the cardan and the secondary shaft. If traces of transmission oil are found there, then we can confidently say that the oil seal has become unusable and needs to be replaced.
Bearing failure is quite difficult to determine. To do this, you need to have good hearing and know your car perfectly. When driving in gears, a hum and vibration may appear from the gearbox; when the clutch is depressed or the gear is disengaged, the hum disappears, but this sound should not be confused with the sound of a faulty clutch release bearing or gearbox input shaft.
- The car must be driven onto a pit or overpass. The most important requirement will be that he must be immobilized for safety reasons. To do this, install wheel chocks under the wheels or block the wheels using the hand brake.
- Prepare the gearbox for removal. Without this operation, replacing the oil seal and bearing is impossible. First, disconnect the ground or negative terminal of the battery. Now find the shift lever inside the car, push it down and use a screwdriver to release the locking sleeve. The lever should come out. After this, release the remote plastic sleeve using two screwdrivers, which need to be used to release the special fastening tabs. Then, go down under the car and remove the exhaust pipe, as it will interfere with further removal of the gearbox.
- In the same place, on the gearbox, disconnect the special block of the two wires that are responsible for turning on the reverse lights. Unscrew the universal joint drive mount, the starter mount, release the clutch release hydraulic cylinder, but do not unscrew the hose from it to avoid subsequent bleeding of the clutch, and remove the flexible speedometer cable.
- Now the most important thing: unscrew the fastenings of the cross member holding the box at the back, and place any support under the gearbox so that it does not collapse when unscrewing the fastenings to the engine. Unscrew the corresponding fasteners and remove the gearbox from the support.
- Disassemble the gearbox, but before doing this, all the oil must be drained from it. Once the transmission is completely disassembled, locate the bearing mounted on the shaft and press it out using a puller. After this, install a new bearing in the same way and change the oil seal.
- Reassemble the gearbox in reverse order and install it on the car.
At this point, the replacement of the oil seal and bearing of the secondary shaft of the VAZ 2107 gearbox is completed. If you are not fluent in tools and do not understand the structure of a car transmission at all, then it is best to entrust this task to professionals from the field of car maintenance.
Depending on the location of the structure, the methods of carrying out repair work within the system also differ. To implement them, the owner will need a lift, a set of keys, various types of screwdrivers, a hammer, and a small knife.
As basic advice, we can give a recommendation on the selection of replacement units. Foreign products are not always superior in quality to Russian products, which are made according to strict state standards. Therefore, you should not focus on cost when purchasing. Also, when working to change these parts, it is necessary to strictly follow the sequence of actions.
For ease of use, you should always use a lift or pit in the garage. This will make it possible to carry out not only operations to replace parts, but also preventive maintenance of other gearbox elements and the general condition of the gearbox. Also, close attention should be paid to the moment of centering and tightening of parts. In the case of increased load, the life of the bearings decreases in proportion to the increased load and, accordingly, the next replacement will be required at shorter mileage.
Welcome! The gearbox is one of the most important parts when assembling almost any car, because as we all know, if there is no gearbox, the wheels will not spin at all, since torque is transmitted only from the gearbox to the wheels of the car. Over time, the box, like any other unit, becomes unusable and there comes a time when it needs to be replaced, but not everyone knows how to perform this operation without damaging themselves (Since the box is very heavy and can fall on your leg, etc.)
e) and the car. Note! To replace the box, you will need to stock up on: A basic set of wrenches, which will include wrenches “10”, as well as “13” and “19”. Instead of wrenches, you can also stock up (if you have one) with heads of the same size, as well as cardan joints and an extension on which all this will be put on!
To replace it, you will also need to take with you: A screwdriver, pliers, if possible, a funnel and an unnecessary 2-liter container, which you can then close with a lid, since the container is needed to drain the used oil, which you can then pour back into the box or throw away the container !
You will also need to stock up on: A long thick block, thanks to which, when removing the box, you can prop it up so that it does not hang and thereby calmly unscrew all the bolts that secure it!
Important points!
From time to time, after changing the gearbox seal, or similar work related to fastening the cardan and gearshift lever, the rocker in the cabin moves a lot, which sometimes makes switching certain speeds impossible. The problem lies in the mounting screw number 13, it connects the cardan and the gearshift lever. Few people understand that such a screw is not only a fastening screw, but also an adjustment screw, so after finishing work, check what position the lever is in and, if necessary, adjust its position. Only then can you safely collect all the tools and go wash your hands.
After assembly, check the oil level, top it up if desired, and you can check the operation later. Do a few laps and make sure nothing is leaking anywhere. Today it remains for our client, I hope you found the article useful. You see, replacing the gearbox seal is essentially no obstacle, so overpaying for 100 is simply pointless.
Two ways to replace the gearbox seal on a VAZ-2110
It is easier to change the oil seal with the gearbox removed.
Replacing an element that has become unusable can be done in two ways.
- The first of them is very labor-intensive , since it will be necessary to remove the gearbox. But replacing the oil seal will be much easier.
- The second method seems less time-consuming and labor-intensive , but in practice it is very difficult to carry out this procedure. Only experienced motorists who have repeatedly had to repair their cars can replace the oil seal directly on the car without removing the gearbox.
We recommend: The design of a manual transmission and how it works
Troubleshooting
Experienced car owners know the visual reasons why they can determine the failure of the rocker seal. Naturally, for such reasons it is impossible to accurately determine the cause of the leak, but this gives a signal to carry out diagnostics, in which the cause of the oil leak can be accurately identified.
The most important sign is oil stains under the car, especially in the gearbox area.
An oily rubber boot indicates a malfunction of the rocker seal.
But these spots do not always indicate oil seal failure. It happens that this is due to the oil filter, which sometimes does not tighten properly. In any case, the driver is obliged to monitor for any oil leaks in the checkpoint area . To do this, you need to monitor the oil level. This is the only way to save the box from damage, which will certainly happen if it operates with a minimum amount of oil.
Another way that indicates the oil seal is worn out is a characteristic crunch that is heard when changing gears . But only an experienced VAZ-2110 owner can diagnose this crunch. In any case, if you hear unusual sounds when shifting into gear, it is better to diagnose the gearbox.
Set of tools required for replacement
A minimum set of tools for replacing the oil seal without removing the gearbox.
In order for the replacement of a part to take place without problems, you need to prepare the place and the necessary set of tools in advance. You will need:
- A set of keys and sockets, and for 13 you need two keys and there must be a key for 10. There must also be a socket head for 22.
- A chisel or screwdriver will be needed to knock out the oil seal.
- The hammer is small so you can get under it.
- Silicone sealant.
- Awl and hook.
Additional accessories
A regular self-tapping screw will allow you to do without a special puller.
For those who decide to replace the gearbox seal without removing it from the car, you will need additional equipment:
- Several long screws.
- A piece of pipe for pressing in a new oil seal.
It should be noted that the replacement process without removing the gearbox is much more complicated. In addition, there is a possibility of damaging the part being replaced during pressing.
Difficulty switching
The reasons for difficult gear shifting may be severe contamination of the lever linkage or jamming of the sliders.
In order to determine the cause of this malfunction, you need to take the shift lever housing and check if there is any jamming when the lever moves. If there is one, you need to establish the cause and eliminate it.
If the lever in the body moves without much effort, then the reason is in the sliders. After removing them from the gearbox housing, you need to carefully inspect them. Usually, in places where the sliders jam, marks remain in the form of abrasions and scratches.
More on the topic Can anyone explain how to install these seals correctly? Are they applicable?
POPULAR WITH READERS: Main faults of a car transmission
Then you need to inspect the seats of the slides for the presence of particles that cause jamming. Alternatively, there may be a slight bend in the slider itself. In this case, the slider is replaced.
Bearing numbers in the VAZ 2107 5-speed gearbox
To simplify the selection of bearing data for the VAZ 2107 5 mortar gearbox, special numbers are provided, which are designated in GOST. In accordance with these numbers, various manufacturers are obliged to produce products in strict accordance with GOST, which includes not only physical dimensions, width, length, but also the composition of the materials used, various temperature conditions, as well as operating tolerances.
More on the topic Electronic ignition system of an injection engine
It is in compliance with GOST standards that the advantage of domestic manufacturers lies, since this standard was developed taking into account the specific operation and loads of the gearbox in domestic conditions. Foreign analogues can use this standard in production, but in many cases they do not do this, supplying the market with low-quality products. For the secondary shaft, the bearing number according to GOST is set as 6-205KU, for the intermediate shaft 6-156704.